In today's blog post, I will share a great way to spice up rusty jingle bells with Mod Podge now! The best part about making these rusty bells with regular Mod Podge is they take moments to complete. The good news? This requires minimal craft supplies and will add a vintage-looking item to your Christmas tree, wreaths, stockings, or garlands. So, let's create some magic for the Christmas season and spice items up to add to our homes.
Keyword: acrylic paint, big bell, bowl of cinnamon, christmas decorating, Christmas decorations, christmas season, Christmas tree, coat of mod podge, craft store, dollar store, dollar tree, halloween costumes, handmade christmas ornaments, hobby lobby, holiday decoration, hot glue gun, jingle bell garland, large bells, local thrift store, matte mod podge, memorial day, merry christmas, metal bells, metal objects, paint brush, pine cones, red jingle bells, rusting solution, rusty appearance, rusty bells, rusty jingle bells, rusty stars, spray paint, thin coat of mod podge, vintage look
Yield: 5rusty jingle bells
Cost: $8
Notes
Spice Up Rusty Jingle Bells with Mod Podge Now!
Craft Supplies:
Regular Mod Podge (Matte is best)
Bowl of cinnamon
Small paint brush
Zinc acrylic paint or black spray paint
Foam Brush or paint brush
Metal bells — different sizes
Craft paper or newspaper
Paper plate, paper bowl, or plastic container
Egg carton — (optional) This is the easiest way to let the bells dry.
Step 1: Add Zinc Paint
The first thing I did, was apply a little bit of zinc craft paint to the metal bells allowing a little bit of metal to show through. This is optional, however, I highly recommend taking time to add the paint. This is a good idea. It adds more dimension for a truly vintage appearance. The best part is that this step took about five minutes to complete and will begin to spice up rusty jingle bells with Mod Podge now!Cindy's Helpful Bell Tips: You can achieve this look with a plastic bell purchased from Dollar Tree, Dollar Store, or any craft store. For a plastic bell, I recommend painting it with acrylic paint or spray paint before adding a thin coat of Mod Podge and the cinnamon. It adds texture and dimension. Let dry. This will take approximately five minutes. Why add acrylic paint? It's a good idea to layer colors and textures for a truly aged look.
Step 2: Sand
Next step use a light grit sanding sponge and sand the metal bells. Doing this step only takes a little bit of time and adds to the vintage look of the rusty bells.
Step 3: Rust Bells with Mod Podge and Cinnamon
Add cinnamon to a plastic container or a paper bowl. Next step, with a foam brush or paint brush, add a thin coat of matte Mod Podge. Dip the metal bells a section at a time into the bowl of cinnamon. Shake excess cinnamon off and set aside to dry. Repeat the process to make the rest of your bells. I did this in sections because when items rust and look vintage, they don't rust the same in all areas.If you would rather your rusty bells be completely rusty feel free to do so. Skip the painting process. To accomplish this look dip half the bell in the bowl of cinnamon or pour cinnamon over the coat of Mod Podge and shake excess cinnamon off.Cindy's Helpful Bell Tip: My favorite method to create a rusty appearance is adding acrylic paint and sanding. The layering givesthebellsa real vintage look.Once the cinnamon is dry, add another thin coat of matte Mod Podge and wait for the magic of your rusty jingle bells to happen. This is an easy way to get a vintage appearance without additional cost. It's so much fun to add rusty bells to your Christmas decor. The next time I did this project, I made smaller rusty jingle bells. I didn't paint these. I added a coat of matte Mod Podge and cinnamon and shake excess cinnamon off.Cindy's Helpful Bell Tip: For a few of my rusty jingle bells, after I added a bit of cinnamon, I immediately added a thin coat of Mod Podge to small areas. This gave my metal bells a more crusty rusty appearance.
Regular Mod Podge (Matte is best)
Bowl of cinnamon
Small paint brush
Zinc acrylic paint or black spray paint
Foam Brush or paint brush
Metal bells — different sizes
Craft paper or newspaper
Paper plate, paper bowl, or plastic container
Egg carton — (optional) This is the easiest way to let the bells dry.
Step 1: Add Zinc Paint
The first thing I did, was apply a little bit of zinc craft paint to the metal bells allowing a little bit of metal to show through. This is optional, however, I highly recommend taking time to add the paint. This is a good idea. It adds more dimension for a truly vintage appearance. The best part is that this step took about five minutes to complete and will begin to spice up rusty jingle bells with Mod Podge now!
Cindy’s Helpful Bell Tips: You can achieve this look with a plastic bell purchased from Dollar Tree, Dollar Store, or any craft store. For a plastic bell, I recommend painting it with acrylic paint or spray paint before adding a thin coat of Mod Podge and the cinnamon. It adds texture and dimension. Let dry. This will take approximately five minutes. Why add acrylic paint? It’s a good idea to layer colors and textures for a truly aged look.
Step 2: Sand
Next step use a light grit sanding sponge and sand the metal bells. Doing this step only takes a little bit of time and adds to the vintage look of the rusty bells.
Step 3: Rust Bells with Mod Podge and Cinnamon
Add cinnamon to a plastic container or a paper bowl. Next step, with a foam brush or paint brush, add a thin coat of matte Mod Podge. Dip the metal bells a section at a time into the bowl of cinnamon. Shake excess cinnamon off and set aside to dry. Repeat the process to make the rest of your bells. I did this in sections because when items rust and look vintage, they don’t rust the same in all areas.
If you would rather your rusty bells be completely rusty feel free to do so. Skip the painting process. To accomplish this look dip half the bell in the bowl of cinnamon or pour cinnamon over the coat of Mod Podge and shake excess cinnamon off.
Cindy’s Helpful Bell Tip: My favorite method to create a rusty appearance is adding acrylic paint and sanding. The layering givesthebellsa real vintage look.
Once the cinnamon is dry, add another thin coat of matte Mod Podge and wait for the magic of your rusty jingle bells to happen. This is an easy way to get a vintage appearance without additional cost. It’s so much fun to add rusty bells to your Christmas decor. The next time I did this project, I made smaller rusty jingle bells. I didn’t paint these. I added a coat of matte Mod Podge and cinnamon and shake excess cinnamon off.
Cindy’s Helpful Bell Tip: For a few of my rusty jingle bells, after I added a bit of cinnamon, I immediately added a thin coat of Mod Podge to small areas. This gave my metal bells a more crusty rusty appearance.
Spice Up Rusty Jingle Bells with Mod Podge Now!
Craft Supplies:
Regular Mod Podge (Matte is best)
Bowl of cinnamon
Small paint brush
Zinc acrylic paint or black spray paint
Foam Brush or paint brush
Metal bells — different sizes
Craft paper or newspaper
Paper plate, paper bowl, or plastic container
Egg carton — (optional) This is the easiest way to let the bells dry.
Step 1: Add Zinc Paint
The first thing I did, was apply a little bit of zinc craft paint to the metal bells allowing a little bit of metal to show through. This is optional, however, I highly recommend taking time to add the paint. This is a good idea. It adds more dimension for a truly vintage appearance. The best part is that this step took about five minutes to complete and will begin to spice up rusty jingle bells with Mod Podge now!
Cindy’s Helpful Bell Tips: You can achieve this look with a plastic bell purchased from Dollar Tree, Dollar Store, or any craft store. For a plastic bell, I recommend painting it with acrylic paint or spray paint before adding a thin coat of Mod Podge and the cinnamon. It adds texture and dimension. Let dry. This will take approximately five minutes. Why add acrylic paint? It’s a good idea to layer colors and textures for a truly aged look.
Step 2: Sand
Next step use a light grit sanding sponge and sand the metal bells. Doing this step only takes a little bit of time and adds to the vintage look of the rusty bells.
Step 3: Rust Bells with Mod Podge and Cinnamon
Add cinnamon to a plastic container or a paper bowl. Next step, with a foam brush or paint brush, add a thin coat of matte Mod Podge. Dip the metal bells a section at a time into the bowl of cinnamon. Shake excess cinnamon off and set aside to dry. Repeat the process to make the rest of your bells. I did this in sections because when items rust and look vintage, they don’t rust the same in all areas.
If you would rather your rusty bells be completely rusty feel free to do so. Skip the painting process. To accomplish this look dip half the bell in the bowl of cinnamon or pour cinnamon over the coat of Mod Podge and shake excess cinnamon off.
Cindy’s Helpful Bell Tip: My favorite method to create a rusty appearance is adding acrylic paint and sanding. The layering givesthebellsa real vintage look.
Once the cinnamon is dry, add another thin coat of matte Mod Podge and wait for the magic of your rusty jingle bells to happen. This is an easy way to get a vintage appearance without additional cost. It’s so much fun to add rusty bells to your Christmas decor. The next time I did this project, I made smaller rusty jingle bells. I didn’t paint these. I added a coat of matte Mod Podge and cinnamon and shake excess cinnamon off.
Cindy’s Helpful Bell Tip: For a few of my rusty jingle bells, after I added a bit of cinnamon, I immediately added a thin coat of Mod Podge to small areas. This gave my metal bells a more crusty rusty appearance.
acrylic paint, big bell, bowl of cinnamon, christmas decorating, Christmas decorations, christmas season, Christmas tree, coat of mod podge, craft store, dollar store, dollar tree, halloween costumes, handmade christmas ornaments, hobby lobby, holiday decoration, hot glue gun, jingle bell garland, large bells, local thrift store, matte mod podge, memorial day, merry christmas, metal bells, metal objects, paint brush, pine cones, red jingle bells, rusting solution, rusty appearance, rusty bells, rusty jingle bells, rusty stars, spray paint, thin coat of mod podge, vintage look
In today's blog post, I will share a great way to spice up rusty jingle bells with Mod Podge now! The best part about making these rusty bells with regular Mod Podge is they take moments to complete. The good news? This requires minimal craft supplies and will add a vintage-looking item to your Christmas tree, wreaths, stockings, or garlands. So, let's create some magic for the Christmas season and spice items up to add to our homes.
Keyword: acrylic paint, big bell, bowl of cinnamon, christmas decorating, Christmas decorations, christmas season, Christmas tree, coat of mod podge, craft store, dollar store, dollar tree, halloween costumes, handmade christmas ornaments, hobby lobby, holiday decoration, hot glue gun, jingle bell garland, large bells, local thrift store, matte mod podge, memorial day, merry christmas, metal bells, metal objects, paint brush, pine cones, red jingle bells, rusting solution, rusty appearance, rusty bells, rusty jingle bells, rusty stars, spray paint, thin coat of mod podge, vintage look
Yield: 5rusty jingle bells
Cost: $8
Notes
Spice Up Rusty Jingle Bells with Mod Podge Now!
Craft Supplies:
Regular Mod Podge (Matte is best)
Bowl of cinnamon
Small paint brush
Zinc acrylic paint or black spray paint
Foam Brush or paint brush
Metal bells — different sizes
Craft paper or newspaper
Paper plate, paper bowl, or plastic container
Egg carton — (optional) This is the easiest way to let the bells dry.
Step 1: Add Zinc Paint
The first thing I did, was apply a little bit of zinc craft paint to the metal bells allowing a little bit of metal to show through. This is optional, however, I highly recommend taking time to add the paint. This is a good idea. It adds more dimension for a truly vintage appearance. The best part is that this step took about five minutes to complete and will begin to spice up rusty jingle bells with Mod Podge now!Cindy's Helpful Bell Tips: You can achieve this look with a plastic bell purchased from Dollar Tree, Dollar Store, or any craft store. For a plastic bell, I recommend painting it with acrylic paint or spray paint before adding a thin coat of Mod Podge and the cinnamon. It adds texture and dimension. Let dry. This will take approximately five minutes. Why add acrylic paint? It's a good idea to layer colors and textures for a truly aged look.
Step 2: Sand
Next step use a light grit sanding sponge and sand the metal bells. Doing this step only takes a little bit of time and adds to the vintage look of the rusty bells.
Step 3: Rust Bells with Mod Podge and Cinnamon
Add cinnamon to a plastic container or a paper bowl. Next step, with a foam brush or paint brush, add a thin coat of matte Mod Podge. Dip the metal bells a section at a time into the bowl of cinnamon. Shake excess cinnamon off and set aside to dry. Repeat the process to make the rest of your bells. I did this in sections because when items rust and look vintage, they don't rust the same in all areas.If you would rather your rusty bells be completely rusty feel free to do so. Skip the painting process. To accomplish this look dip half the bell in the bowl of cinnamon or pour cinnamon over the coat of Mod Podge and shake excess cinnamon off.Cindy's Helpful Bell Tip: My favorite method to create a rusty appearance is adding acrylic paint and sanding. The layering givesthebellsa real vintage look.Once the cinnamon is dry, add another thin coat of matte Mod Podge and wait for the magic of your rusty jingle bells to happen. This is an easy way to get a vintage appearance without additional cost. It's so much fun to add rusty bells to your Christmas decor. The next time I did this project, I made smaller rusty jingle bells. I didn't paint these. I added a coat of matte Mod Podge and cinnamon and shake excess cinnamon off.Cindy's Helpful Bell Tip: For a few of my rusty jingle bells, after I added a bit of cinnamon, I immediately added a thin coat of Mod Podge to small areas. This gave my metal bells a more crusty rusty appearance.
Hi friends, are you a fan of the vintage look of rusty-looking jingle bells or are you team sparkle and shiny bells? In today’s blog post, I will share a great way to spice up rusty jingle bells with Mod Podge now! The best part about making these rusty bells with regular Mod Podge is they take moments to complete. The good news? This requires minimal craft supplies and will add a vintage-looking item to your Christmas tree, wreaths, stockings, or garlands. Just wait to see this added to a wood piece! So, let’s create some magic for the Christmas season and spice items up to add to our homes.
Amazing Creators Blog Hop: Spice Up Rusty Jingle Bells with Mod Podge Now!
Today, I’m joining blogging friends for a Christmas Blog Hop. I’ll be sharing links at the bottom of the page of my blog post. These ladies are talented and will be sharing inspiration to add to your home for Christmas! Take the time to click each link below to visit and get different ideas to add to your home for the season!
This is an easy way to add a vintage look to large bells or metal objects. This is a great way to make DIY ornaments to hang on the Christmas tree or use in your decor for the holiday season.
And there’s other good news, this craft project only takes a little bit of time which makes it perfect especially, during the hustle and bustle of the holiday season.
Craft Supplies:Spice Up Rusty Jingle Bells with Mod Podge Now!
Regular Mod Podge (Matte is best)
Bowl of cinnamon
Small paint brush
Zinc acrylic paint or black spray paint
Foam Brush or paint brush
Metal bells — different sizes
Craft paper or newspaper
Paper plate, paper bowl, or plastic container
Egg carton — (optional) This is the easiest way to let the bells dry.
Step 1: Enhance the Bells: Quick Zinc Paint Trick
The first thing I did, was apply a little bit of zinc craft paint to the metal bells allowing a little bit of metal to show through. This is optional, however, I highly recommend taking time to add the paint. This is a good idea. It adds more dimension for a truly vintage appearance. The best part, this step took about five minutes to complete and will begin to spice up rusty jingle bells with Mod Podge now!
Cindy’s Helpful Bell Tips: You can achieve this look with a plastic bell purchased from Dollar Tree, Dollar Store, or any craft store. For a plastic bell, I recommend painting it with acrylic paint or spray paint before adding a thin coat of Mod Podge and the cinnamon. It adds texture and dimension. Let dry. This will take approximately five minutes. Why add add acrylic paint? It’s a good idea to layer colors and textures for a truly aged look.
Step 2: Quick Sanding Achieve A Vintage Appearance
Next step is to use a light grit sanding sponge and sand the metal bells. Doing this step only takes a little bit of time and adds to the vintage look of the rusty bells.
Step 3: Rust Bells Easy Mod Podge and Cinnamon Technique
Add cinnamon to a plastic container or a paper bowl. Next step, with a foam brush or paint brush, add a thin coat of matte Mod Podge. Dip the metal bells a section at a time into the bowl of cinnamon. Shake excess cinnamon off and set aside to dry. Repeat the process to make the rest of your bells. I did this in sections because when items rust and look vintage, they don’t rust the same in all areas.
If you would rather your rusty bells be completely rusty feel free to do so. Skip the painting process. To accomplish this look dip half the bell in the bowl of cinnamon or pour cinnamon over the coat of Mod Podge and shake excess cinnamon off.
Cindy’s Helpful Bell Tip: My favorite method to create a rusty appearance is adding acrylic paint and sanding. The layering givesthebellsa real vintage look.
Step 4: Mod Podge Magic: Create Vintage-Looking Jingle Bells
Once the cinnamon is dry, add another thin coat of matte Mod Podge and wait for the magic of your rusty jingle bells to happen. This is an easy way to get a vintage appearance without additional cost. It’s so much fun to add rusty bells to your Christmas decor. The next time I did this project, I made smaller rusty jingle bells. I didn’t paint these. I added a coat of matte Mod Podge and cinnamon and made sure to shake excess cinnamon.
Cindy’s Helpful Bell Tip: For a few of my rusty jingle bells, after I added a bit of cinnamon, I immediately added a thin coat of Mod Podge to small areas. This gave my metal bells a more crusty rusty appearance.
As an Amazon Associate, Black Dog Salvage Furniture Paint affiliate, and other Affiliate links I earn from qualifying purchases Use Code: C-L20 when visiting Black Dog Salvage Furniture Paint and RECEIVE 20% OFF!!I earn a small commission from qualifying purchases through affiliate links. The price will be the same whether you use the affiliate links or go directly to the website. All opinions are my own. (Check our full disclosure Policy)
Where To Find Bells for Jingle Bells With Mod Podge
Looking to add a jingle for a holiday decoration? Add these as a unique for the Christmas Season. Visit any craft store:
Hobby Lobby
Michaels
Dollar Tree
The Dollar Store
Thrift store
Garage sale
So visit the Dollar Store, and Hobby Lobby, and look for bells in different sizes to make your holiday decor have that special feeling.
Can I add matte Mod Podge and cinnamon to other metal objects?
When you visit the thrift store look for other metal objects to create a unique decoration. The good news, it’s an easy way to add a rusty appearance to pieces you find thrifting or metal objects already in your home. This technique uses few craft supplies and creates a unique decoration for your home. Family and friends will be wowed at how these transform items for the living room, coffee bar, and home! Items to spice up with Mod Podge:
Safety pins – Large ones for a laundry room (Amazon)
Add these to Halloween costumes. How cute is this court jester hat, collar, and wand? Bookmark this for next year! Or this velvet elf hat for Halloween costumes. Please take a look, the ears on the elf hat smiled at me! The best part? This solution is perfect for adding a unique touch to a variety of metal objects. This will make Halloween costumes and any holiday decoration extra special! I add this technique to this wood sign and washer!
Handmade Christmas Ornaments: Add Rustic Flair With Mod Podge and Cinnamon
Ornaments perfect for the Christmas season. Make handmade Christmas ornaments for the tree. Make rustic rusty scrabble pieces. Hot glue these to ribbon for handmade Christmas ornaments. First thing, add a thin coat of Mod Podge and then a bowl of cinnamon to create the rusting solution. Shake off the excess cinnamon. Use a hot glue gun and glue them to the festive ribbon I found for you for a holiday decoration.
Transform Christmas Decor: Rust Metal Items With Mod Podge for a Charming Look
Imagine all the things you can do with these bells in your Christmas decor and other special occasions. There are so many possibilities:
Holiday Decoration: Here’s a good idea, grab your hot glue gun add hot glue a piece of faux greenery and a small pine cone. Let dry. Add a piece of twine and you have handmade Christmas ornaments. Add these to your tree or Christmas decor in bowls, or baskets with greens, cinnamon sticks, and red berries.
Pine cones: Add the bells to a crate, decorative bowl, or dough bowl. Fill them withpine cones, cinnamon sticks, greenery, and ornaments to add a festive touch. This link to my blog post shares front porch Christmas ideas. See how we say Merry Christmas to our neighbors with Farmhouse porch decor.
Wreaths: When visiting Dollar Tree or Hobby Lobby, grab large bells twine, pipe cleaners, or zip ties. Thread a piece of twine, pipe cleaner, or zip ties through the bells. Twist the pipe cleaners or wire tight. For the piece of twine thread through the bell wrap it around the wreath frame and tie a slip knot (double knot) for a holiday decoration. How beautiful would this look with rusty red jingle bells, or gold jingle bells and a plaid ribbon on your door?
Rustic Charm for Holidays with DIY Jingle Bells
Jingle Bell Garland: Make a jingle bell garland to compliment faux greens on your mantle. For this project think about using red jingle bells. The rusted red and greens will pop on your living room mantle or front door. Add the garland with small cup hooks. Cup hooks won’t add too much additional cost and leave small holes. After the holidays, the holes won’t be visible.
Gift Toppers: Here’s another good idea, add bells as gift toppers. Use a hot glue gun and attach a bell in the center three of pine cones. Hold to set and thread or hot glue a bell in the center. Use these as place settings. This an easy way to make your family members or friends feel special. It says Merry Christmas! Add an extra piece of twine inside so they can hang the bells next time on their Christmas tree and remind them of the prior Christmas season.
Stockings: Add small gold jingle bells with this simple rusting solution to Christmas stockings to hang on the living room mantle. This is an easy way an instant rustic look.
With these ideas, you can create festive decor without any additional cost!
Rusting Metal Items With Mod Podge
Rusty Stars: This simple rusting solution doesn’t have to be limited to bells. Purchase small star-shaped cutouts is different sizes for rusty stars. Use a hot glue gun or Aleene’s craft glue to glue the rusty stars to twine, string, or ribbon. Use it as a garland on a Christmas tree or a mantle in your living room for the holiday season.
Star-Shaped Cutouts: Another great way to use your rusty stars is for cool special events like Memorial Day or July 4th. The good news is there’s little to no additional cost. Wrap the garland with star-shaped cutouts around a wreath or add them to your buffet table as a unique decoration for Memorial Day or any special occasion.
Big Pieces: Add a thin coat of Mod Podge and cinnamon to big pieces, such as bezel frames or a metal cloche from a thrift store or any craft store. Have a metal sign from Dollar Tree that looks too new and fresh. The best part is that this rusting solution with regular Mod Podge and a bowl of cinnamon easily adds a vintage appearance to big pieces.
Place Cards: Imagine your holiday table with rusty gold jingle bells or rustic rusty scrabble pieces as a place card holder. Use Word and print the names of family members on card stock. Cut with scissors, pinking shears, or Fiskar scissors. Add the place cards to the bell or rustic rusty scrabble pieces to a cut piece of wood or by a package of eight for a great price HERE. Use a paintbrush or spray paint to add these for a unique decoration during the Christmas season.
With these ideas, any special occasion will have a charming and rustic touch.
Transform Decor With Rusted Bells: Matte Mod Podge and Cinnamon
Creating rusty jingle bells with regular Mod Podge and cinnamon is a great way and easy craft project. It adds a vintage look to your Christmas decor. Whether you add these bells to your Christmas tree, wreaths, garlands, or stockings, or add a rusty appearance to big pieces. They require a little bit of time and work with any decor style. The good news, it requires minimal craft supplies. This is a great way to add an aged look to bells, star-shaped cutouts, and big pieces and customize the level of rust. I hope you enjoyed this blog post and begin to spice up rusty jingle bells with Mod Podge now and add a rusty appearance to a piece for your home. I look forward to sharing my next easy craft project of home decor ideas with you in my next blog post. Merry Christmas and Happy Holidays!
Egg carton — (optional) This is the easiest way to let the bells dry.
Step 1: Add Zinc Paint
The first thing I did, was apply a little bit of zinc craft paint to the metal bells allowing a little bit of metal to show through. This is optional, however, I highly recommend taking time to add the paint. This is a good idea. It adds more dimension for a truly vintage appearance. The best part is that this step took about five minutes to complete and will begin to spice up rusty jingle bells with Mod Podge now!
Cindy’s Helpful Bell Tips: You can achieve this look with a plastic bell purchased from Dollar Tree, Dollar Store, or any craft store. For a plastic bell, I recommend painting it with acrylic paint or spray paint before adding a thin coat of Mod Podge and the cinnamon. It adds texture and dimension. Let dry. This will take approximately five minutes. Why add acrylic paint? It’s a good idea to layer colors and textures for a truly aged look.
Step 2: Sand
Next step use a light grit sanding sponge and sand the metal bells. Doing this step only takes a little bit of time and adds to the vintage look of the rusty bells.
Step 3: Rust Bells with Mod Podge and Cinnamon
Add cinnamon to a plastic container or a paper bowl. Next step, with a foam brush or paint brush, add a thin coat of matte Mod Podge. Dip the metal bells a section at a time into the bowl of cinnamon. Shake excess cinnamon off and set aside to dry. Repeat the process to make the rest of your bells. I did this in sections because when items rust and look vintage, they don’t rust the same in all areas.
If you would rather your rusty bells be completely rusty feel free to do so. Skip the painting process. To accomplish this look dip half the bell in the bowl of cinnamon or pour cinnamon over the coat of Mod Podge and shake excess cinnamon off.
Cindy’s Helpful Bell Tip: My favorite method to create a rusty appearance is adding acrylic paint and sanding. The layering givesthebellsa real vintage look.
Once the cinnamon is dry, add another thin coat of matte Mod Podge and wait for the magic of your rusty jingle bells to happen. This is an easy way to get a vintage appearance without additional cost. It’s so much fun to add rusty bells to your Christmas decor. The next time I did this project, I made smaller rusty jingle bells. I didn’t paint these. I added a coat of matte Mod Podge and cinnamon and shake excess cinnamon off.
Cindy’s Helpful Bell Tip: For a few of my rusty jingle bells, after I added a bit of cinnamon, I immediately added a thin coat of Mod Podge to small areas. This gave my metal bells a more crusty rusty appearance.
acrylic paint, big bell, bowl of cinnamon, christmas decorating, Christmas decorations, christmas season, Christmas tree, coat of mod podge, craft store, dollar store, dollar tree, halloween costumes, handmade christmas ornaments, hobby lobby, holiday decoration, hot glue gun, jingle bell garland, large bells, local thrift store, matte mod podge, memorial day, merry christmas, metal bells, metal objects, paint brush, pine cones, red jingle bells, rusting solution, rusty appearance, rusty bells, rusty jingle bells, rusty stars, spray paint, thin coat of mod podge, vintage look
Regular Mod Podge (Matte is best)
Bowl of cinnamon
Small paint brush
Zinc acrylic paint or black spray paint
Foam Brush or paint brush
Metal bells — different sizes
Craft paper or newspaper
Paper plate, paper bowl, or plastic container
Egg carton — (optional) This is the easiest way to let the bells dry.
Step 1: Add Zinc Paint
The first thing I did, was apply a little bit of zinc craft paint to the metal bells allowing a little bit of metal to show through. This is optional, however, I highly recommend taking time to add the paint. This is a good idea. It adds more dimension for a truly vintage appearance. The best part is that this step took about five minutes to complete and will begin to spice up rusty jingle bells with Mod Podge now!
Cindy’s Helpful Bell Tips: You can achieve this look with a plastic bell purchased from Dollar Tree, Dollar Store, or any craft store. For a plastic bell, I recommend painting it with acrylic paint or spray paint before adding a thin coat of Mod Podge and the cinnamon. It adds texture and dimension. Let dry. This will take approximately five minutes. Why add acrylic paint? It’s a good idea to layer colors and textures for a truly aged look.
Step 2: Sand
Next step use a light grit sanding sponge and sand the metal bells. Doing this step only takes a little bit of time and adds to the vintage look of the rusty bells.
Step 3: Rust Bells with Mod Podge and Cinnamon
Add cinnamon to a plastic container or a paper bowl. Next step, with a foam brush or paint brush, add a thin coat of matte Mod Podge. Dip the metal bells a section at a time into the bowl of cinnamon. Shake excess cinnamon off and set aside to dry. Repeat the process to make the rest of your bells. I did this in sections because when items rust and look vintage, they don’t rust the same in all areas.
If you would rather your rusty bells be completely rusty feel free to do so. Skip the painting process. To accomplish this look dip half the bell in the bowl of cinnamon or pour cinnamon over the coat of Mod Podge and shake excess cinnamon off.
Cindy’s Helpful Bell Tip: My favorite method to create a rusty appearance is adding acrylic paint and sanding. The layering givesthebellsa real vintage look.
Once the cinnamon is dry, add another thin coat of matte Mod Podge and wait for the magic of your rusty jingle bells to happen. This is an easy way to get a vintage appearance without additional cost. It’s so much fun to add rusty bells to your Christmas decor. The next time I did this project, I made smaller rusty jingle bells. I didn’t paint these. I added a coat of matte Mod Podge and cinnamon and shake excess cinnamon off.
Cindy’s Helpful Bell Tip: For a few of my rusty jingle bells, after I added a bit of cinnamon, I immediately added a thin coat of Mod Podge to small areas. This gave my metal bells a more crusty rusty appearance.
Spice Up Rusty Jingle Bells with Mod Podge Now!
Craft Supplies:
Regular Mod Podge (Matte is best)
Bowl of cinnamon
Small paint brush
Zinc acrylic paint or black spray paint
Foam Brush or paint brush
Metal bells — different sizes
Craft paper or newspaper
Paper plate, paper bowl, or plastic container
Egg carton — (optional) This is the easiest way to let the bells dry.
Step 1: Add Zinc Paint
The first thing I did, was apply a little bit of zinc craft paint to the metal bells allowing a little bit of metal to show through. This is optional, however, I highly recommend taking time to add the paint. This is a good idea. It adds more dimension for a truly vintage appearance. The best part is that this step took about five minutes to complete and will begin to spice up rusty jingle bells with Mod Podge now!
Cindy’s Helpful Bell Tips: You can achieve this look with a plastic bell purchased from Dollar Tree, Dollar Store, or any craft store. For a plastic bell, I recommend painting it with acrylic paint or spray paint before adding a thin coat of Mod Podge and the cinnamon. It adds texture and dimension. Let dry. This will take approximately five minutes. Why add acrylic paint? It’s a good idea to layer colors and textures for a truly aged look.
Step 2: Sand
Next step use a light grit sanding sponge and sand the metal bells. Doing this step only takes a little bit of time and adds to the vintage look of the rusty bells.
Step 3: Rust Bells with Mod Podge and Cinnamon
Add cinnamon to a plastic container or a paper bowl. Next step, with a foam brush or paint brush, add a thin coat of matte Mod Podge. Dip the metal bells a section at a time into the bowl of cinnamon. Shake excess cinnamon off and set aside to dry. Repeat the process to make the rest of your bells. I did this in sections because when items rust and look vintage, they don’t rust the same in all areas.
If you would rather your rusty bells be completely rusty feel free to do so. Skip the painting process. To accomplish this look dip half the bell in the bowl of cinnamon or pour cinnamon over the coat of Mod Podge and shake excess cinnamon off.
Cindy’s Helpful Bell Tip: My favorite method to create a rusty appearance is adding acrylic paint and sanding. The layering givesthebellsa real vintage look.
Once the cinnamon is dry, add another thin coat of matte Mod Podge and wait for the magic of your rusty jingle bells to happen. This is an easy way to get a vintage appearance without additional cost. It’s so much fun to add rusty bells to your Christmas decor. The next time I did this project, I made smaller rusty jingle bells. I didn’t paint these. I added a coat of matte Mod Podge and cinnamon and shake excess cinnamon off.
Cindy’s Helpful Bell Tip: For a few of my rusty jingle bells, after I added a bit of cinnamon, I immediately added a thin coat of Mod Podge to small areas. This gave my metal bells a more crusty rusty appearance.
acrylic paint, big bell, bowl of cinnamon, christmas decorating, Christmas decorations, christmas season, Christmas tree, coat of mod podge, craft store, dollar store, dollar tree, halloween costumes, handmade christmas ornaments, hobby lobby, holiday decoration, hot glue gun, jingle bell garland, large bells, local thrift store, matte mod podge, memorial day, merry christmas, metal bells, metal objects, paint brush, pine cones, red jingle bells, rusting solution, rusty appearance, rusty bells, rusty jingle bells, rusty stars, spray paint, thin coat of mod podge, vintage look
In today's blog post, I will share a great way to spice up rusty jingle bells with Mod Podge now! The best part about making these rusty bells with regular Mod Podge is they take moments to complete. The good news? This requires minimal craft supplies and will add a vintage-looking item to your Christmas tree, wreaths, stockings, or garlands. So, let's create some magic for the Christmas season and spice items up to add to our homes.
Keyword: acrylic paint, big bell, bowl of cinnamon, christmas decorating, Christmas decorations, christmas season, Christmas tree, coat of mod podge, craft store, dollar store, dollar tree, halloween costumes, handmade christmas ornaments, hobby lobby, holiday decoration, hot glue gun, jingle bell garland, large bells, local thrift store, matte mod podge, memorial day, merry christmas, metal bells, metal objects, paint brush, pine cones, red jingle bells, rusting solution, rusty appearance, rusty bells, rusty jingle bells, rusty stars, spray paint, thin coat of mod podge, vintage look
Yield: 5rusty jingle bells
Cost: $8
Notes
Spice Up Rusty Jingle Bells with Mod Podge Now!
Craft Supplies:
Regular Mod Podge (Matte is best)
Bowl of cinnamon
Small paint brush
Zinc acrylic paint or black spray paint
Foam Brush or paint brush
Metal bells — different sizes
Craft paper or newspaper
Paper plate, paper bowl, or plastic container
Egg carton — (optional) This is the easiest way to let the bells dry.
Step 1: Add Zinc Paint
The first thing I did, was apply a little bit of zinc craft paint to the metal bells allowing a little bit of metal to show through. This is optional, however, I highly recommend taking time to add the paint. This is a good idea. It adds more dimension for a truly vintage appearance. The best part is that this step took about five minutes to complete and will begin to spice up rusty jingle bells with Mod Podge now!Cindy's Helpful Bell Tips: You can achieve this look with a plastic bell purchased from Dollar Tree, Dollar Store, or any craft store. For a plastic bell, I recommend painting it with acrylic paint or spray paint before adding a thin coat of Mod Podge and the cinnamon. It adds texture and dimension. Let dry. This will take approximately five minutes. Why add acrylic paint? It's a good idea to layer colors and textures for a truly aged look.
Step 2: Sand
Next step use a light grit sanding sponge and sand the metal bells. Doing this step only takes a little bit of time and adds to the vintage look of the rusty bells.
Step 3: Rust Bells with Mod Podge and Cinnamon
Add cinnamon to a plastic container or a paper bowl. Next step, with a foam brush or paint brush, add a thin coat of matte Mod Podge. Dip the metal bells a section at a time into the bowl of cinnamon. Shake excess cinnamon off and set aside to dry. Repeat the process to make the rest of your bells. I did this in sections because when items rust and look vintage, they don't rust the same in all areas.If you would rather your rusty bells be completely rusty feel free to do so. Skip the painting process. To accomplish this look dip half the bell in the bowl of cinnamon or pour cinnamon over the coat of Mod Podge and shake excess cinnamon off.Cindy's Helpful Bell Tip: My favorite method to create a rusty appearance is adding acrylic paint and sanding. The layering givesthebellsa real vintage look.Once the cinnamon is dry, add another thin coat of matte Mod Podge and wait for the magic of your rusty jingle bells to happen. This is an easy way to get a vintage appearance without additional cost. It's so much fun to add rusty bells to your Christmas decor. The next time I did this project, I made smaller rusty jingle bells. I didn't paint these. I added a coat of matte Mod Podge and cinnamon and shake excess cinnamon off.Cindy's Helpful Bell Tip: For a few of my rusty jingle bells, after I added a bit of cinnamon, I immediately added a thin coat of Mod Podge to small areas. This gave my metal bells a more crusty rusty appearance.
Regular Mod Podge (Matte is best)
Bowl of cinnamon
Small paint brush
Zinc acrylic paint or black spray paint
Foam Brush or paint brush
Metal bells — different sizes
Craft paper or newspaper
Paper plate, paper bowl, or plastic container
Egg carton — (optional) This is the easiest way to let the bells dry.
Step 1: Add Zinc Paint
The first thing I did, was apply a little bit of zinc craft paint to the metal bells allowing a little bit of metal to show through. This is optional, however, I highly recommend taking time to add the paint. This is a good idea. It adds more dimension for a truly vintage appearance. The best part is that this step took about five minutes to complete and will begin to spice up rusty jingle bells with Mod Podge now!
Cindy’s Helpful Bell Tips: You can achieve this look with a plastic bell purchased from Dollar Tree, Dollar Store, or any craft store. For a plastic bell, I recommend painting it with acrylic paint or spray paint before adding a thin coat of Mod Podge and the cinnamon. It adds texture and dimension. Let dry. This will take approximately five minutes. Why add acrylic paint? It’s a good idea to layer colors and textures for a truly aged look.
Step 2: Sand
Next step use a light grit sanding sponge and sand the metal bells. Doing this step only takes a little bit of time and adds to the vintage look of the rusty bells.
Step 3: Rust Bells with Mod Podge and Cinnamon
Add cinnamon to a plastic container or a paper bowl. Next step, with a foam brush or paint brush, add a thin coat of matte Mod Podge. Dip the metal bells a section at a time into the bowl of cinnamon. Shake excess cinnamon off and set aside to dry. Repeat the process to make the rest of your bells. I did this in sections because when items rust and look vintage, they don’t rust the same in all areas.
If you would rather your rusty bells be completely rusty feel free to do so. Skip the painting process. To accomplish this look dip half the bell in the bowl of cinnamon or pour cinnamon over the coat of Mod Podge and shake excess cinnamon off.
Cindy’s Helpful Bell Tip: My favorite method to create a rusty appearance is adding acrylic paint and sanding. The layering givesthebellsa real vintage look.
Once the cinnamon is dry, add another thin coat of matte Mod Podge and wait for the magic of your rusty jingle bells to happen. This is an easy way to get a vintage appearance without additional cost. It’s so much fun to add rusty bells to your Christmas decor. The next time I did this project, I made smaller rusty jingle bells. I didn’t paint these. I added a coat of matte Mod Podge and cinnamon and shake excess cinnamon off.
Cindy’s Helpful Bell Tip: For a few of my rusty jingle bells, after I added a bit of cinnamon, I immediately added a thin coat of Mod Podge to small areas. This gave my metal bells a more crusty rusty appearance.
Spice Up Rusty Jingle Bells with Mod Podge Now!
Craft Supplies:
Regular Mod Podge (Matte is best)
Bowl of cinnamon
Small paint brush
Zinc acrylic paint or black spray paint
Foam Brush or paint brush
Metal bells — different sizes
Craft paper or newspaper
Paper plate, paper bowl, or plastic container
Egg carton — (optional) This is the easiest way to let the bells dry.
Step 1: Add Zinc Paint
The first thing I did, was apply a little bit of zinc craft paint to the metal bells allowing a little bit of metal to show through. This is optional, however, I highly recommend taking time to add the paint. This is a good idea. It adds more dimension for a truly vintage appearance. The best part is that this step took about five minutes to complete and will begin to spice up rusty jingle bells with Mod Podge now!
Cindy’s Helpful Bell Tips: You can achieve this look with a plastic bell purchased from Dollar Tree, Dollar Store, or any craft store. For a plastic bell, I recommend painting it with acrylic paint or spray paint before adding a thin coat of Mod Podge and the cinnamon. It adds texture and dimension. Let dry. This will take approximately five minutes. Why add acrylic paint? It’s a good idea to layer colors and textures for a truly aged look.
Step 2: Sand
Next step use a light grit sanding sponge and sand the metal bells. Doing this step only takes a little bit of time and adds to the vintage look of the rusty bells.
Step 3: Rust Bells with Mod Podge and Cinnamon
Add cinnamon to a plastic container or a paper bowl. Next step, with a foam brush or paint brush, add a thin coat of matte Mod Podge. Dip the metal bells a section at a time into the bowl of cinnamon. Shake excess cinnamon off and set aside to dry. Repeat the process to make the rest of your bells. I did this in sections because when items rust and look vintage, they don’t rust the same in all areas.
If you would rather your rusty bells be completely rusty feel free to do so. Skip the painting process. To accomplish this look dip half the bell in the bowl of cinnamon or pour cinnamon over the coat of Mod Podge and shake excess cinnamon off.
Cindy’s Helpful Bell Tip: My favorite method to create a rusty appearance is adding acrylic paint and sanding. The layering givesthebellsa real vintage look.
Once the cinnamon is dry, add another thin coat of matte Mod Podge and wait for the magic of your rusty jingle bells to happen. This is an easy way to get a vintage appearance without additional cost. It’s so much fun to add rusty bells to your Christmas decor. The next time I did this project, I made smaller rusty jingle bells. I didn’t paint these. I added a coat of matte Mod Podge and cinnamon and shake excess cinnamon off.
Cindy’s Helpful Bell Tip: For a few of my rusty jingle bells, after I added a bit of cinnamon, I immediately added a thin coat of Mod Podge to small areas. This gave my metal bells a more crusty rusty appearance.
acrylic paint, big bell, bowl of cinnamon, christmas decorating, Christmas decorations, christmas season, Christmas tree, coat of mod podge, craft store, dollar store, dollar tree, halloween costumes, handmade christmas ornaments, hobby lobby, holiday decoration, hot glue gun, jingle bell garland, large bells, local thrift store, matte mod podge, memorial day, merry christmas, metal bells, metal objects, paint brush, pine cones, red jingle bells, rusting solution, rusty appearance, rusty bells, rusty jingle bells, rusty stars, spray paint, thin coat of mod podge, vintage look
In today's blog post, I will share a great way to spice up rusty jingle bells with Mod Podge now! The best part about making these rusty bells with regular Mod Podge is they take moments to complete. The good news? This requires minimal craft supplies and will add a vintage-looking item to your Christmas tree, wreaths, stockings, or garlands. So, let's create some magic for the Christmas season and spice items up to add to our homes.
Keyword: acrylic paint, big bell, bowl of cinnamon, christmas decorating, Christmas decorations, christmas season, Christmas tree, coat of mod podge, craft store, dollar store, dollar tree, halloween costumes, handmade christmas ornaments, hobby lobby, holiday decoration, hot glue gun, jingle bell garland, large bells, local thrift store, matte mod podge, memorial day, merry christmas, metal bells, metal objects, paint brush, pine cones, red jingle bells, rusting solution, rusty appearance, rusty bells, rusty jingle bells, rusty stars, spray paint, thin coat of mod podge, vintage look
Yield: 5rusty jingle bells
Cost: $8
Notes
Spice Up Rusty Jingle Bells with Mod Podge Now!
Craft Supplies:
Regular Mod Podge (Matte is best)
Bowl of cinnamon
Small paint brush
Zinc acrylic paint or black spray paint
Foam Brush or paint brush
Metal bells — different sizes
Craft paper or newspaper
Paper plate, paper bowl, or plastic container
Egg carton — (optional) This is the easiest way to let the bells dry.
Step 1: Add Zinc Paint
The first thing I did, was apply a little bit of zinc craft paint to the metal bells allowing a little bit of metal to show through. This is optional, however, I highly recommend taking time to add the paint. This is a good idea. It adds more dimension for a truly vintage appearance. The best part is that this step took about five minutes to complete and will begin to spice up rusty jingle bells with Mod Podge now!Cindy's Helpful Bell Tips: You can achieve this look with a plastic bell purchased from Dollar Tree, Dollar Store, or any craft store. For a plastic bell, I recommend painting it with acrylic paint or spray paint before adding a thin coat of Mod Podge and the cinnamon. It adds texture and dimension. Let dry. This will take approximately five minutes. Why add acrylic paint? It's a good idea to layer colors and textures for a truly aged look.
Step 2: Sand
Next step use a light grit sanding sponge and sand the metal bells. Doing this step only takes a little bit of time and adds to the vintage look of the rusty bells.
Step 3: Rust Bells with Mod Podge and Cinnamon
Add cinnamon to a plastic container or a paper bowl. Next step, with a foam brush or paint brush, add a thin coat of matte Mod Podge. Dip the metal bells a section at a time into the bowl of cinnamon. Shake excess cinnamon off and set aside to dry. Repeat the process to make the rest of your bells. I did this in sections because when items rust and look vintage, they don't rust the same in all areas.If you would rather your rusty bells be completely rusty feel free to do so. Skip the painting process. To accomplish this look dip half the bell in the bowl of cinnamon or pour cinnamon over the coat of Mod Podge and shake excess cinnamon off.Cindy's Helpful Bell Tip: My favorite method to create a rusty appearance is adding acrylic paint and sanding. The layering givesthebellsa real vintage look.Once the cinnamon is dry, add another thin coat of matte Mod Podge and wait for the magic of your rusty jingle bells to happen. This is an easy way to get a vintage appearance without additional cost. It's so much fun to add rusty bells to your Christmas decor. The next time I did this project, I made smaller rusty jingle bells. I didn't paint these. I added a coat of matte Mod Podge and cinnamon and shake excess cinnamon off.Cindy's Helpful Bell Tip: For a few of my rusty jingle bells, after I added a bit of cinnamon, I immediately added a thin coat of Mod Podge to small areas. This gave my metal bells a more crusty rusty appearance.
Hi friends, are you a fan of the vintage look of rusty-looking jingle bells or are you team sparkle and shiny bells? In today’s blog post, I will share a great way to spice up rusty jingle bells with Mod Podge now! The best part about making these rusty bells with regular Mod Podge is they take moments to complete. The good news? This requires minimal craft supplies and will add a vintage-looking item to your Christmas tree, wreaths, stockings, or garlands. Just wait to see this added to a wood piece! So, let’s create some magic for the Christmas season and spice items up to add to our homes.
Amazing Creators Blog Hop: Spice Up Rusty Jingle Bells with Mod Podge Now!
Today, I’m joining blogging friends for a Christmas Blog Hop. I’ll be sharing links at the bottom of the page of my blog post. These ladies are talented and will be sharing inspiration to add to your home for Christmas! Take the time to click each link below to visit and get different ideas to add to your home for the season!
This is an easy way to add a vintage look to large bells or metal objects. This is a great way to make DIY ornaments to hang on the Christmas tree or use in your decor for the holiday season.
And there’s other good news, this craft project only takes a little bit of time which makes it perfect especially, during the hustle and bustle of the holiday season.
Craft Supplies:Spice Up Rusty Jingle Bells with Mod Podge Now!
Regular Mod Podge (Matte is best)
Bowl of cinnamon
Small paint brush
Zinc acrylic paint or black spray paint
Foam Brush or paint brush
Metal bells — different sizes
Craft paper or newspaper
Paper plate, paper bowl, or plastic container
Egg carton — (optional) This is the easiest way to let the bells dry.
Step 1: Enhance the Bells: Quick Zinc Paint Trick
The first thing I did, was apply a little bit of zinc craft paint to the metal bells allowing a little bit of metal to show through. This is optional, however, I highly recommend taking time to add the paint. This is a good idea. It adds more dimension for a truly vintage appearance. The best part, this step took about five minutes to complete and will begin to spice up rusty jingle bells with Mod Podge now!
Cindy’s Helpful Bell Tips: You can achieve this look with a plastic bell purchased from Dollar Tree, Dollar Store, or any craft store. For a plastic bell, I recommend painting it with acrylic paint or spray paint before adding a thin coat of Mod Podge and the cinnamon. It adds texture and dimension. Let dry. This will take approximately five minutes. Why add add acrylic paint? It’s a good idea to layer colors and textures for a truly aged look.
Step 2: Quick Sanding Achieve A Vintage Appearance
Next step is to use a light grit sanding sponge and sand the metal bells. Doing this step only takes a little bit of time and adds to the vintage look of the rusty bells.
Step 3: Rust Bells Easy Mod Podge and Cinnamon Technique
Add cinnamon to a plastic container or a paper bowl. Next step, with a foam brush or paint brush, add a thin coat of matte Mod Podge. Dip the metal bells a section at a time into the bowl of cinnamon. Shake excess cinnamon off and set aside to dry. Repeat the process to make the rest of your bells. I did this in sections because when items rust and look vintage, they don’t rust the same in all areas.
If you would rather your rusty bells be completely rusty feel free to do so. Skip the painting process. To accomplish this look dip half the bell in the bowl of cinnamon or pour cinnamon over the coat of Mod Podge and shake excess cinnamon off.
Cindy’s Helpful Bell Tip: My favorite method to create a rusty appearance is adding acrylic paint and sanding. The layering givesthebellsa real vintage look.
Step 4: Mod Podge Magic: Create Vintage-Looking Jingle Bells
Once the cinnamon is dry, add another thin coat of matte Mod Podge and wait for the magic of your rusty jingle bells to happen. This is an easy way to get a vintage appearance without additional cost. It’s so much fun to add rusty bells to your Christmas decor. The next time I did this project, I made smaller rusty jingle bells. I didn’t paint these. I added a coat of matte Mod Podge and cinnamon and made sure to shake excess cinnamon.
Cindy’s Helpful Bell Tip: For a few of my rusty jingle bells, after I added a bit of cinnamon, I immediately added a thin coat of Mod Podge to small areas. This gave my metal bells a more crusty rusty appearance.
As an Amazon Associate, Black Dog Salvage Furniture Paint affiliate, and other Affiliate links I earn from qualifying purchases Use Code: C-L20 when visiting Black Dog Salvage Furniture Paint and RECEIVE 20% OFF!!I earn a small commission from qualifying purchases through affiliate links. The price will be the same whether you use the affiliate links or go directly to the website. All opinions are my own. (Check our full disclosure Policy)
Where To Find Bells for Jingle Bells With Mod Podge
Looking to add a jingle for a holiday decoration? Add these as a unique for the Christmas Season. Visit any craft store:
Hobby Lobby
Michaels
Dollar Tree
The Dollar Store
Thrift store
Garage sale
So visit the Dollar Store, and Hobby Lobby, and look for bells in different sizes to make your holiday decor have that special feeling.
Can I add matte Mod Podge and cinnamon to other metal objects?
When you visit the thrift store look for other metal objects to create a unique decoration. The good news, it’s an easy way to add a rusty appearance to pieces you find thrifting or metal objects already in your home. This technique uses few craft supplies and creates a unique decoration for your home. Family and friends will be wowed at how these transform items for the living room, coffee bar, and home! Items to spice up with Mod Podge:
Safety pins – Large ones for a laundry room (Amazon)
Add these to Halloween costumes. How cute is this court jester hat, collar, and wand? Bookmark this for next year! Or this velvet elf hat for Halloween costumes. Please take a look, the ears on the elf hat smiled at me! The best part? This solution is perfect for adding a unique touch to a variety of metal objects. This will make Halloween costumes and any holiday decoration extra special! I add this technique to this wood sign and washer!
Handmade Christmas Ornaments: Add Rustic Flair With Mod Podge and Cinnamon
Ornaments perfect for the Christmas season. Make handmade Christmas ornaments for the tree. Make rustic rusty scrabble pieces. Hot glue these to ribbon for handmade Christmas ornaments. First thing, add a thin coat of Mod Podge and then a bowl of cinnamon to create the rusting solution. Shake off the excess cinnamon. Use a hot glue gun and glue them to the festive ribbon I found for you for a holiday decoration.
Transform Christmas Decor: Rust Metal Items With Mod Podge for a Charming Look
Imagine all the things you can do with these bells in your Christmas decor and other special occasions. There are so many possibilities:
Holiday Decoration: Here’s a good idea, grab your hot glue gun add hot glue a piece of faux greenery and a small pine cone. Let dry. Add a piece of twine and you have handmade Christmas ornaments. Add these to your tree or Christmas decor in bowls, or baskets with greens, cinnamon sticks, and red berries.
Pine cones: Add the bells to a crate, decorative bowl, or dough bowl. Fill them withpine cones, cinnamon sticks, greenery, and ornaments to add a festive touch. This link to my blog post shares front porch Christmas ideas. See how we say Merry Christmas to our neighbors with Farmhouse porch decor.
Wreaths: When visiting Dollar Tree or Hobby Lobby, grab large bells twine, pipe cleaners, or zip ties. Thread a piece of twine, pipe cleaner, or zip ties through the bells. Twist the pipe cleaners or wire tight. For the piece of twine thread through the bell wrap it around the wreath frame and tie a slip knot (double knot) for a holiday decoration. How beautiful would this look with rusty red jingle bells, or gold jingle bells and a plaid ribbon on your door?
Rustic Charm for Holidays with DIY Jingle Bells
Jingle Bell Garland: Make a jingle bell garland to compliment faux greens on your mantle. For this project think about using red jingle bells. The rusted red and greens will pop on your living room mantle or front door. Add the garland with small cup hooks. Cup hooks won’t add too much additional cost and leave small holes. After the holidays, the holes won’t be visible.
Gift Toppers: Here’s another good idea, add bells as gift toppers. Use a hot glue gun and attach a bell in the center three of pine cones. Hold to set and thread or hot glue a bell in the center. Use these as place settings. This an easy way to make your family members or friends feel special. It says Merry Christmas! Add an extra piece of twine inside so they can hang the bells next time on their Christmas tree and remind them of the prior Christmas season.
Stockings: Add small gold jingle bells with this simple rusting solution to Christmas stockings to hang on the living room mantle. This is an easy way an instant rustic look.
With these ideas, you can create festive decor without any additional cost!
Rusting Metal Items With Mod Podge
Rusty Stars: This simple rusting solution doesn’t have to be limited to bells. Purchase small star-shaped cutouts is different sizes for rusty stars. Use a hot glue gun or Aleene’s craft glue to glue the rusty stars to twine, string, or ribbon. Use it as a garland on a Christmas tree or a mantle in your living room for the holiday season.
Star-Shaped Cutouts: Another great way to use your rusty stars is for cool special events like Memorial Day or July 4th. The good news is there’s little to no additional cost. Wrap the garland with star-shaped cutouts around a wreath or add them to your buffet table as a unique decoration for Memorial Day or any special occasion.
Big Pieces: Add a thin coat of Mod Podge and cinnamon to big pieces, such as bezel frames or a metal cloche from a thrift store or any craft store. Have a metal sign from Dollar Tree that looks too new and fresh. The best part is that this rusting solution with regular Mod Podge and a bowl of cinnamon easily adds a vintage appearance to big pieces.
Place Cards: Imagine your holiday table with rusty gold jingle bells or rustic rusty scrabble pieces as a place card holder. Use Word and print the names of family members on card stock. Cut with scissors, pinking shears, or Fiskar scissors. Add the place cards to the bell or rustic rusty scrabble pieces to a cut piece of wood or by a package of eight for a great price HERE. Use a paintbrush or spray paint to add these for a unique decoration during the Christmas season.
With these ideas, any special occasion will have a charming and rustic touch.
Transform Decor With Rusted Bells: Matte Mod Podge and Cinnamon
Creating rusty jingle bells with regular Mod Podge and cinnamon is a great way and easy craft project. It adds a vintage look to your Christmas decor. Whether you add these bells to your Christmas tree, wreaths, garlands, or stockings, or add a rusty appearance to big pieces. They require a little bit of time and work with any decor style. The good news, it requires minimal craft supplies. This is a great way to add an aged look to bells, star-shaped cutouts, and big pieces and customize the level of rust. I hope you enjoyed this blog post and begin to spice up rusty jingle bells with Mod Podge now and add a rusty appearance to a piece for your home. I look forward to sharing my next easy craft project of home decor ideas with you in my next blog post. Merry Christmas and Happy Holidays!
Egg carton — (optional) This is the easiest way to let the bells dry.
Step 1: Add Zinc Paint
The first thing I did, was apply a little bit of zinc craft paint to the metal bells allowing a little bit of metal to show through. This is optional, however, I highly recommend taking time to add the paint. This is a good idea. It adds more dimension for a truly vintage appearance. The best part is that this step took about five minutes to complete and will begin to spice up rusty jingle bells with Mod Podge now!
Cindy’s Helpful Bell Tips: You can achieve this look with a plastic bell purchased from Dollar Tree, Dollar Store, or any craft store. For a plastic bell, I recommend painting it with acrylic paint or spray paint before adding a thin coat of Mod Podge and the cinnamon. It adds texture and dimension. Let dry. This will take approximately five minutes. Why add acrylic paint? It’s a good idea to layer colors and textures for a truly aged look.
Step 2: Sand
Next step use a light grit sanding sponge and sand the metal bells. Doing this step only takes a little bit of time and adds to the vintage look of the rusty bells.
Step 3: Rust Bells with Mod Podge and Cinnamon
Add cinnamon to a plastic container or a paper bowl. Next step, with a foam brush or paint brush, add a thin coat of matte Mod Podge. Dip the metal bells a section at a time into the bowl of cinnamon. Shake excess cinnamon off and set aside to dry. Repeat the process to make the rest of your bells. I did this in sections because when items rust and look vintage, they don’t rust the same in all areas.
If you would rather your rusty bells be completely rusty feel free to do so. Skip the painting process. To accomplish this look dip half the bell in the bowl of cinnamon or pour cinnamon over the coat of Mod Podge and shake excess cinnamon off.
Cindy’s Helpful Bell Tip: My favorite method to create a rusty appearance is adding acrylic paint and sanding. The layering givesthebellsa real vintage look.
Once the cinnamon is dry, add another thin coat of matte Mod Podge and wait for the magic of your rusty jingle bells to happen. This is an easy way to get a vintage appearance without additional cost. It’s so much fun to add rusty bells to your Christmas decor. The next time I did this project, I made smaller rusty jingle bells. I didn’t paint these. I added a coat of matte Mod Podge and cinnamon and shake excess cinnamon off.
Cindy’s Helpful Bell Tip: For a few of my rusty jingle bells, after I added a bit of cinnamon, I immediately added a thin coat of Mod Podge to small areas. This gave my metal bells a more crusty rusty appearance.
acrylic paint, big bell, bowl of cinnamon, christmas decorating, Christmas decorations, christmas season, Christmas tree, coat of mod podge, craft store, dollar store, dollar tree, halloween costumes, handmade christmas ornaments, hobby lobby, holiday decoration, hot glue gun, jingle bell garland, large bells, local thrift store, matte mod podge, memorial day, merry christmas, metal bells, metal objects, paint brush, pine cones, red jingle bells, rusting solution, rusty appearance, rusty bells, rusty jingle bells, rusty stars, spray paint, thin coat of mod podge, vintage look
Regular Mod Podge (Matte is best)
Bowl of cinnamon
Small paint brush
Zinc acrylic paint or black spray paint
Foam Brush or paint brush
Metal bells — different sizes
Craft paper or newspaper
Paper plate, paper bowl, or plastic container
Egg carton — (optional) This is the easiest way to let the bells dry.
Step 1: Add Zinc Paint
The first thing I did, was apply a little bit of zinc craft paint to the metal bells allowing a little bit of metal to show through. This is optional, however, I highly recommend taking time to add the paint. This is a good idea. It adds more dimension for a truly vintage appearance. The best part is that this step took about five minutes to complete and will begin to spice up rusty jingle bells with Mod Podge now!
Cindy’s Helpful Bell Tips: You can achieve this look with a plastic bell purchased from Dollar Tree, Dollar Store, or any craft store. For a plastic bell, I recommend painting it with acrylic paint or spray paint before adding a thin coat of Mod Podge and the cinnamon. It adds texture and dimension. Let dry. This will take approximately five minutes. Why add acrylic paint? It’s a good idea to layer colors and textures for a truly aged look.
Step 2: Sand
Next step use a light grit sanding sponge and sand the metal bells. Doing this step only takes a little bit of time and adds to the vintage look of the rusty bells.
Step 3: Rust Bells with Mod Podge and Cinnamon
Add cinnamon to a plastic container or a paper bowl. Next step, with a foam brush or paint brush, add a thin coat of matte Mod Podge. Dip the metal bells a section at a time into the bowl of cinnamon. Shake excess cinnamon off and set aside to dry. Repeat the process to make the rest of your bells. I did this in sections because when items rust and look vintage, they don’t rust the same in all areas.
If you would rather your rusty bells be completely rusty feel free to do so. Skip the painting process. To accomplish this look dip half the bell in the bowl of cinnamon or pour cinnamon over the coat of Mod Podge and shake excess cinnamon off.
Cindy’s Helpful Bell Tip: My favorite method to create a rusty appearance is adding acrylic paint and sanding. The layering givesthebellsa real vintage look.
Once the cinnamon is dry, add another thin coat of matte Mod Podge and wait for the magic of your rusty jingle bells to happen. This is an easy way to get a vintage appearance without additional cost. It’s so much fun to add rusty bells to your Christmas decor. The next time I did this project, I made smaller rusty jingle bells. I didn’t paint these. I added a coat of matte Mod Podge and cinnamon and shake excess cinnamon off.
Cindy’s Helpful Bell Tip: For a few of my rusty jingle bells, after I added a bit of cinnamon, I immediately added a thin coat of Mod Podge to small areas. This gave my metal bells a more crusty rusty appearance.
Spice Up Rusty Jingle Bells with Mod Podge Now!
Craft Supplies:
Regular Mod Podge (Matte is best)
Bowl of cinnamon
Small paint brush
Zinc acrylic paint or black spray paint
Foam Brush or paint brush
Metal bells — different sizes
Craft paper or newspaper
Paper plate, paper bowl, or plastic container
Egg carton — (optional) This is the easiest way to let the bells dry.
Step 1: Add Zinc Paint
The first thing I did, was apply a little bit of zinc craft paint to the metal bells allowing a little bit of metal to show through. This is optional, however, I highly recommend taking time to add the paint. This is a good idea. It adds more dimension for a truly vintage appearance. The best part is that this step took about five minutes to complete and will begin to spice up rusty jingle bells with Mod Podge now!
Cindy’s Helpful Bell Tips: You can achieve this look with a plastic bell purchased from Dollar Tree, Dollar Store, or any craft store. For a plastic bell, I recommend painting it with acrylic paint or spray paint before adding a thin coat of Mod Podge and the cinnamon. It adds texture and dimension. Let dry. This will take approximately five minutes. Why add acrylic paint? It’s a good idea to layer colors and textures for a truly aged look.
Step 2: Sand
Next step use a light grit sanding sponge and sand the metal bells. Doing this step only takes a little bit of time and adds to the vintage look of the rusty bells.
Step 3: Rust Bells with Mod Podge and Cinnamon
Add cinnamon to a plastic container or a paper bowl. Next step, with a foam brush or paint brush, add a thin coat of matte Mod Podge. Dip the metal bells a section at a time into the bowl of cinnamon. Shake excess cinnamon off and set aside to dry. Repeat the process to make the rest of your bells. I did this in sections because when items rust and look vintage, they don’t rust the same in all areas.
If you would rather your rusty bells be completely rusty feel free to do so. Skip the painting process. To accomplish this look dip half the bell in the bowl of cinnamon or pour cinnamon over the coat of Mod Podge and shake excess cinnamon off.
Cindy’s Helpful Bell Tip: My favorite method to create a rusty appearance is adding acrylic paint and sanding. The layering givesthebellsa real vintage look.
Once the cinnamon is dry, add another thin coat of matte Mod Podge and wait for the magic of your rusty jingle bells to happen. This is an easy way to get a vintage appearance without additional cost. It’s so much fun to add rusty bells to your Christmas decor. The next time I did this project, I made smaller rusty jingle bells. I didn’t paint these. I added a coat of matte Mod Podge and cinnamon and shake excess cinnamon off.
Cindy’s Helpful Bell Tip: For a few of my rusty jingle bells, after I added a bit of cinnamon, I immediately added a thin coat of Mod Podge to small areas. This gave my metal bells a more crusty rusty appearance.
acrylic paint, big bell, bowl of cinnamon, christmas decorating, Christmas decorations, christmas season, Christmas tree, coat of mod podge, craft store, dollar store, dollar tree, halloween costumes, handmade christmas ornaments, hobby lobby, holiday decoration, hot glue gun, jingle bell garland, large bells, local thrift store, matte mod podge, memorial day, merry christmas, metal bells, metal objects, paint brush, pine cones, red jingle bells, rusting solution, rusty appearance, rusty bells, rusty jingle bells, rusty stars, spray paint, thin coat of mod podge, vintage look
In today's blog post, I will share a great way to spice up rusty jingle bells with Mod Podge now! The best part about making these rusty bells with regular Mod Podge is they take moments to complete. The good news? This requires minimal craft supplies and will add a vintage-looking item to your Christmas tree, wreaths, stockings, or garlands. So, let's create some magic for the Christmas season and spice items up to add to our homes.
Keyword: acrylic paint, big bell, bowl of cinnamon, christmas decorating, Christmas decorations, christmas season, Christmas tree, coat of mod podge, craft store, dollar store, dollar tree, halloween costumes, handmade christmas ornaments, hobby lobby, holiday decoration, hot glue gun, jingle bell garland, large bells, local thrift store, matte mod podge, memorial day, merry christmas, metal bells, metal objects, paint brush, pine cones, red jingle bells, rusting solution, rusty appearance, rusty bells, rusty jingle bells, rusty stars, spray paint, thin coat of mod podge, vintage look
Yield: 5rusty jingle bells
Cost: $8
Notes
Spice Up Rusty Jingle Bells with Mod Podge Now!
Craft Supplies:
Regular Mod Podge (Matte is best)
Bowl of cinnamon
Small paint brush
Zinc acrylic paint or black spray paint
Foam Brush or paint brush
Metal bells — different sizes
Craft paper or newspaper
Paper plate, paper bowl, or plastic container
Egg carton — (optional) This is the easiest way to let the bells dry.
Step 1: Add Zinc Paint
The first thing I did, was apply a little bit of zinc craft paint to the metal bells allowing a little bit of metal to show through. This is optional, however, I highly recommend taking time to add the paint. This is a good idea. It adds more dimension for a truly vintage appearance. The best part is that this step took about five minutes to complete and will begin to spice up rusty jingle bells with Mod Podge now!Cindy's Helpful Bell Tips: You can achieve this look with a plastic bell purchased from Dollar Tree, Dollar Store, or any craft store. For a plastic bell, I recommend painting it with acrylic paint or spray paint before adding a thin coat of Mod Podge and the cinnamon. It adds texture and dimension. Let dry. This will take approximately five minutes. Why add acrylic paint? It's a good idea to layer colors and textures for a truly aged look.
Step 2: Sand
Next step use a light grit sanding sponge and sand the metal bells. Doing this step only takes a little bit of time and adds to the vintage look of the rusty bells.
Step 3: Rust Bells with Mod Podge and Cinnamon
Add cinnamon to a plastic container or a paper bowl. Next step, with a foam brush or paint brush, add a thin coat of matte Mod Podge. Dip the metal bells a section at a time into the bowl of cinnamon. Shake excess cinnamon off and set aside to dry. Repeat the process to make the rest of your bells. I did this in sections because when items rust and look vintage, they don't rust the same in all areas.If you would rather your rusty bells be completely rusty feel free to do so. Skip the painting process. To accomplish this look dip half the bell in the bowl of cinnamon or pour cinnamon over the coat of Mod Podge and shake excess cinnamon off.Cindy's Helpful Bell Tip: My favorite method to create a rusty appearance is adding acrylic paint and sanding. The layering givesthebellsa real vintage look.Once the cinnamon is dry, add another thin coat of matte Mod Podge and wait for the magic of your rusty jingle bells to happen. This is an easy way to get a vintage appearance without additional cost. It's so much fun to add rusty bells to your Christmas decor. The next time I did this project, I made smaller rusty jingle bells. I didn't paint these. I added a coat of matte Mod Podge and cinnamon and shake excess cinnamon off.Cindy's Helpful Bell Tip: For a few of my rusty jingle bells, after I added a bit of cinnamon, I immediately added a thin coat of Mod Podge to small areas. This gave my metal bells a more crusty rusty appearance.
Regular Mod Podge (Matte is best)
Bowl of cinnamon
Small paint brush
Zinc acrylic paint or black spray paint
Foam Brush or paint brush
Metal bells — different sizes
Craft paper or newspaper
Paper plate, paper bowl, or plastic container
Egg carton — (optional) This is the easiest way to let the bells dry.
Step 1: Add Zinc Paint
The first thing I did, was apply a little bit of zinc craft paint to the metal bells allowing a little bit of metal to show through. This is optional, however, I highly recommend taking time to add the paint. This is a good idea. It adds more dimension for a truly vintage appearance. The best part is that this step took about five minutes to complete and will begin to spice up rusty jingle bells with Mod Podge now!
Cindy’s Helpful Bell Tips: You can achieve this look with a plastic bell purchased from Dollar Tree, Dollar Store, or any craft store. For a plastic bell, I recommend painting it with acrylic paint or spray paint before adding a thin coat of Mod Podge and the cinnamon. It adds texture and dimension. Let dry. This will take approximately five minutes. Why add acrylic paint? It’s a good idea to layer colors and textures for a truly aged look.
Step 2: Sand
Next step use a light grit sanding sponge and sand the metal bells. Doing this step only takes a little bit of time and adds to the vintage look of the rusty bells.
Step 3: Rust Bells with Mod Podge and Cinnamon
Add cinnamon to a plastic container or a paper bowl. Next step, with a foam brush or paint brush, add a thin coat of matte Mod Podge. Dip the metal bells a section at a time into the bowl of cinnamon. Shake excess cinnamon off and set aside to dry. Repeat the process to make the rest of your bells. I did this in sections because when items rust and look vintage, they don’t rust the same in all areas.
If you would rather your rusty bells be completely rusty feel free to do so. Skip the painting process. To accomplish this look dip half the bell in the bowl of cinnamon or pour cinnamon over the coat of Mod Podge and shake excess cinnamon off.
Cindy’s Helpful Bell Tip: My favorite method to create a rusty appearance is adding acrylic paint and sanding. The layering givesthebellsa real vintage look.
Once the cinnamon is dry, add another thin coat of matte Mod Podge and wait for the magic of your rusty jingle bells to happen. This is an easy way to get a vintage appearance without additional cost. It’s so much fun to add rusty bells to your Christmas decor. The next time I did this project, I made smaller rusty jingle bells. I didn’t paint these. I added a coat of matte Mod Podge and cinnamon and shake excess cinnamon off.
Cindy’s Helpful Bell Tip: For a few of my rusty jingle bells, after I added a bit of cinnamon, I immediately added a thin coat of Mod Podge to small areas. This gave my metal bells a more crusty rusty appearance.
Spice Up Rusty Jingle Bells with Mod Podge Now!
Craft Supplies:
Regular Mod Podge (Matte is best)
Bowl of cinnamon
Small paint brush
Zinc acrylic paint or black spray paint
Foam Brush or paint brush
Metal bells — different sizes
Craft paper or newspaper
Paper plate, paper bowl, or plastic container
Egg carton — (optional) This is the easiest way to let the bells dry.
Step 1: Add Zinc Paint
The first thing I did, was apply a little bit of zinc craft paint to the metal bells allowing a little bit of metal to show through. This is optional, however, I highly recommend taking time to add the paint. This is a good idea. It adds more dimension for a truly vintage appearance. The best part is that this step took about five minutes to complete and will begin to spice up rusty jingle bells with Mod Podge now!
Cindy’s Helpful Bell Tips: You can achieve this look with a plastic bell purchased from Dollar Tree, Dollar Store, or any craft store. For a plastic bell, I recommend painting it with acrylic paint or spray paint before adding a thin coat of Mod Podge and the cinnamon. It adds texture and dimension. Let dry. This will take approximately five minutes. Why add acrylic paint? It’s a good idea to layer colors and textures for a truly aged look.
Step 2: Sand
Next step use a light grit sanding sponge and sand the metal bells. Doing this step only takes a little bit of time and adds to the vintage look of the rusty bells.
Step 3: Rust Bells with Mod Podge and Cinnamon
Add cinnamon to a plastic container or a paper bowl. Next step, with a foam brush or paint brush, add a thin coat of matte Mod Podge. Dip the metal bells a section at a time into the bowl of cinnamon. Shake excess cinnamon off and set aside to dry. Repeat the process to make the rest of your bells. I did this in sections because when items rust and look vintage, they don’t rust the same in all areas.
If you would rather your rusty bells be completely rusty feel free to do so. Skip the painting process. To accomplish this look dip half the bell in the bowl of cinnamon or pour cinnamon over the coat of Mod Podge and shake excess cinnamon off.
Cindy’s Helpful Bell Tip: My favorite method to create a rusty appearance is adding acrylic paint and sanding. The layering givesthebellsa real vintage look.
Once the cinnamon is dry, add another thin coat of matte Mod Podge and wait for the magic of your rusty jingle bells to happen. This is an easy way to get a vintage appearance without additional cost. It’s so much fun to add rusty bells to your Christmas decor. The next time I did this project, I made smaller rusty jingle bells. I didn’t paint these. I added a coat of matte Mod Podge and cinnamon and shake excess cinnamon off.
Cindy’s Helpful Bell Tip: For a few of my rusty jingle bells, after I added a bit of cinnamon, I immediately added a thin coat of Mod Podge to small areas. This gave my metal bells a more crusty rusty appearance.
acrylic paint, big bell, bowl of cinnamon, christmas decorating, Christmas decorations, christmas season, Christmas tree, coat of mod podge, craft store, dollar store, dollar tree, halloween costumes, handmade christmas ornaments, hobby lobby, holiday decoration, hot glue gun, jingle bell garland, large bells, local thrift store, matte mod podge, memorial day, merry christmas, metal bells, metal objects, paint brush, pine cones, red jingle bells, rusting solution, rusty appearance, rusty bells, rusty jingle bells, rusty stars, spray paint, thin coat of mod podge, vintage look
In today's blog post, I will share a great way to spice up rusty jingle bells with Mod Podge now! The best part about making these rusty bells with regular Mod Podge is they take moments to complete. The good news? This requires minimal craft supplies and will add a vintage-looking item to your Christmas tree, wreaths, stockings, or garlands. So, let's create some magic for the Christmas season and spice items up to add to our homes.
Keyword: acrylic paint, big bell, bowl of cinnamon, christmas decorating, Christmas decorations, christmas season, Christmas tree, coat of mod podge, craft store, dollar store, dollar tree, halloween costumes, handmade christmas ornaments, hobby lobby, holiday decoration, hot glue gun, jingle bell garland, large bells, local thrift store, matte mod podge, memorial day, merry christmas, metal bells, metal objects, paint brush, pine cones, red jingle bells, rusting solution, rusty appearance, rusty bells, rusty jingle bells, rusty stars, spray paint, thin coat of mod podge, vintage look
Yield: 5rusty jingle bells
Cost: $8
Notes
Spice Up Rusty Jingle Bells with Mod Podge Now!
Craft Supplies:
Regular Mod Podge (Matte is best)
Bowl of cinnamon
Small paint brush
Zinc acrylic paint or black spray paint
Foam Brush or paint brush
Metal bells — different sizes
Craft paper or newspaper
Paper plate, paper bowl, or plastic container
Egg carton — (optional) This is the easiest way to let the bells dry.
Step 1: Add Zinc Paint
The first thing I did, was apply a little bit of zinc craft paint to the metal bells allowing a little bit of metal to show through. This is optional, however, I highly recommend taking time to add the paint. This is a good idea. It adds more dimension for a truly vintage appearance. The best part is that this step took about five minutes to complete and will begin to spice up rusty jingle bells with Mod Podge now!Cindy's Helpful Bell Tips: You can achieve this look with a plastic bell purchased from Dollar Tree, Dollar Store, or any craft store. For a plastic bell, I recommend painting it with acrylic paint or spray paint before adding a thin coat of Mod Podge and the cinnamon. It adds texture and dimension. Let dry. This will take approximately five minutes. Why add acrylic paint? It's a good idea to layer colors and textures for a truly aged look.
Step 2: Sand
Next step use a light grit sanding sponge and sand the metal bells. Doing this step only takes a little bit of time and adds to the vintage look of the rusty bells.
Step 3: Rust Bells with Mod Podge and Cinnamon
Add cinnamon to a plastic container or a paper bowl. Next step, with a foam brush or paint brush, add a thin coat of matte Mod Podge. Dip the metal bells a section at a time into the bowl of cinnamon. Shake excess cinnamon off and set aside to dry. Repeat the process to make the rest of your bells. I did this in sections because when items rust and look vintage, they don't rust the same in all areas.If you would rather your rusty bells be completely rusty feel free to do so. Skip the painting process. To accomplish this look dip half the bell in the bowl of cinnamon or pour cinnamon over the coat of Mod Podge and shake excess cinnamon off.Cindy's Helpful Bell Tip: My favorite method to create a rusty appearance is adding acrylic paint and sanding. The layering givesthebellsa real vintage look.Once the cinnamon is dry, add another thin coat of matte Mod Podge and wait for the magic of your rusty jingle bells to happen. This is an easy way to get a vintage appearance without additional cost. It's so much fun to add rusty bells to your Christmas decor. The next time I did this project, I made smaller rusty jingle bells. I didn't paint these. I added a coat of matte Mod Podge and cinnamon and shake excess cinnamon off.Cindy's Helpful Bell Tip: For a few of my rusty jingle bells, after I added a bit of cinnamon, I immediately added a thin coat of Mod Podge to small areas. This gave my metal bells a more crusty rusty appearance.
Hi friends, are you a fan of the vintage look of rusty-looking jingle bells or are you team sparkle and shiny bells? In today’s blog post, I will share a great way to spice up rusty jingle bells with Mod Podge now! The best part about making these rusty bells with regular Mod Podge is they take moments to complete. The good news? This requires minimal craft supplies and will add a vintage-looking item to your Christmas tree, wreaths, stockings, or garlands. Just wait to see this added to a wood piece! So, let’s create some magic for the Christmas season and spice items up to add to our homes.
Amazing Creators Blog Hop: Spice Up Rusty Jingle Bells with Mod Podge Now!
Today, I’m joining blogging friends for a Christmas Blog Hop. I’ll be sharing links at the bottom of the page of my blog post. These ladies are talented and will be sharing inspiration to add to your home for Christmas! Take the time to click each link below to visit and get different ideas to add to your home for the season!
This is an easy way to add a vintage look to large bells or metal objects. This is a great way to make DIY ornaments to hang on the Christmas tree or use in your decor for the holiday season.
And there’s other good news, this craft project only takes a little bit of time which makes it perfect especially, during the hustle and bustle of the holiday season.
Craft Supplies:Spice Up Rusty Jingle Bells with Mod Podge Now!
Regular Mod Podge (Matte is best)
Bowl of cinnamon
Small paint brush
Zinc acrylic paint or black spray paint
Foam Brush or paint brush
Metal bells — different sizes
Craft paper or newspaper
Paper plate, paper bowl, or plastic container
Egg carton — (optional) This is the easiest way to let the bells dry.
Step 1: Enhance the Bells: Quick Zinc Paint Trick
The first thing I did, was apply a little bit of zinc craft paint to the metal bells allowing a little bit of metal to show through. This is optional, however, I highly recommend taking time to add the paint. This is a good idea. It adds more dimension for a truly vintage appearance. The best part, this step took about five minutes to complete and will begin to spice up rusty jingle bells with Mod Podge now!
Cindy’s Helpful Bell Tips: You can achieve this look with a plastic bell purchased from Dollar Tree, Dollar Store, or any craft store. For a plastic bell, I recommend painting it with acrylic paint or spray paint before adding a thin coat of Mod Podge and the cinnamon. It adds texture and dimension. Let dry. This will take approximately five minutes. Why add add acrylic paint? It’s a good idea to layer colors and textures for a truly aged look.
Step 2: Quick Sanding Achieve A Vintage Appearance
Next step is to use a light grit sanding sponge and sand the metal bells. Doing this step only takes a little bit of time and adds to the vintage look of the rusty bells.
Step 3: Rust Bells Easy Mod Podge and Cinnamon Technique
Add cinnamon to a plastic container or a paper bowl. Next step, with a foam brush or paint brush, add a thin coat of matte Mod Podge. Dip the metal bells a section at a time into the bowl of cinnamon. Shake excess cinnamon off and set aside to dry. Repeat the process to make the rest of your bells. I did this in sections because when items rust and look vintage, they don’t rust the same in all areas.
If you would rather your rusty bells be completely rusty feel free to do so. Skip the painting process. To accomplish this look dip half the bell in the bowl of cinnamon or pour cinnamon over the coat of Mod Podge and shake excess cinnamon off.
Cindy’s Helpful Bell Tip: My favorite method to create a rusty appearance is adding acrylic paint and sanding. The layering givesthebellsa real vintage look.
Step 4: Mod Podge Magic: Create Vintage-Looking Jingle Bells
Once the cinnamon is dry, add another thin coat of matte Mod Podge and wait for the magic of your rusty jingle bells to happen. This is an easy way to get a vintage appearance without additional cost. It’s so much fun to add rusty bells to your Christmas decor. The next time I did this project, I made smaller rusty jingle bells. I didn’t paint these. I added a coat of matte Mod Podge and cinnamon and made sure to shake excess cinnamon.
Cindy’s Helpful Bell Tip: For a few of my rusty jingle bells, after I added a bit of cinnamon, I immediately added a thin coat of Mod Podge to small areas. This gave my metal bells a more crusty rusty appearance.
As an Amazon Associate, Black Dog Salvage Furniture Paint affiliate, and other Affiliate links I earn from qualifying purchases Use Code: C-L20 when visiting Black Dog Salvage Furniture Paint and RECEIVE 20% OFF!!I earn a small commission from qualifying purchases through affiliate links. The price will be the same whether you use the affiliate links or go directly to the website. All opinions are my own. (Check our full disclosure Policy)
Where To Find Bells for Jingle Bells With Mod Podge
Looking to add a jingle for a holiday decoration? Add these as a unique for the Christmas Season. Visit any craft store:
Hobby Lobby
Michaels
Dollar Tree
The Dollar Store
Thrift store
Garage sale
So visit the Dollar Store, and Hobby Lobby, and look for bells in different sizes to make your holiday decor have that special feeling.
Can I add matte Mod Podge and cinnamon to other metal objects?
When you visit the thrift store look for other metal objects to create a unique decoration. The good news, it’s an easy way to add a rusty appearance to pieces you find thrifting or metal objects already in your home. This technique uses few craft supplies and creates a unique decoration for your home. Family and friends will be wowed at how these transform items for the living room, coffee bar, and home! Items to spice up with Mod Podge:
Safety pins – Large ones for a laundry room (Amazon)
Add these to Halloween costumes. How cute is this court jester hat, collar, and wand? Bookmark this for next year! Or this velvet elf hat for Halloween costumes. Please take a look, the ears on the elf hat smiled at me! The best part? This solution is perfect for adding a unique touch to a variety of metal objects. This will make Halloween costumes and any holiday decoration extra special! I add this technique to this wood sign and washer!
Handmade Christmas Ornaments: Add Rustic Flair With Mod Podge and Cinnamon
Ornaments perfect for the Christmas season. Make handmade Christmas ornaments for the tree. Make rustic rusty scrabble pieces. Hot glue these to ribbon for handmade Christmas ornaments. First thing, add a thin coat of Mod Podge and then a bowl of cinnamon to create the rusting solution. Shake off the excess cinnamon. Use a hot glue gun and glue them to the festive ribbon I found for you for a holiday decoration.
Transform Christmas Decor: Rust Metal Items With Mod Podge for a Charming Look
Imagine all the things you can do with these bells in your Christmas decor and other special occasions. There are so many possibilities:
Holiday Decoration: Here’s a good idea, grab your hot glue gun add hot glue a piece of faux greenery and a small pine cone. Let dry. Add a piece of twine and you have handmade Christmas ornaments. Add these to your tree or Christmas decor in bowls, or baskets with greens, cinnamon sticks, and red berries.
Pine cones: Add the bells to a crate, decorative bowl, or dough bowl. Fill them withpine cones, cinnamon sticks, greenery, and ornaments to add a festive touch. This link to my blog post shares front porch Christmas ideas. See how we say Merry Christmas to our neighbors with Farmhouse porch decor.
Wreaths: When visiting Dollar Tree or Hobby Lobby, grab large bells twine, pipe cleaners, or zip ties. Thread a piece of twine, pipe cleaner, or zip ties through the bells. Twist the pipe cleaners or wire tight. For the piece of twine thread through the bell wrap it around the wreath frame and tie a slip knot (double knot) for a holiday decoration. How beautiful would this look with rusty red jingle bells, or gold jingle bells and a plaid ribbon on your door?
Rustic Charm for Holidays with DIY Jingle Bells
Jingle Bell Garland: Make a jingle bell garland to compliment faux greens on your mantle. For this project think about using red jingle bells. The rusted red and greens will pop on your living room mantle or front door. Add the garland with small cup hooks. Cup hooks won’t add too much additional cost and leave small holes. After the holidays, the holes won’t be visible.
Gift Toppers: Here’s another good idea, add bells as gift toppers. Use a hot glue gun and attach a bell in the center three of pine cones. Hold to set and thread or hot glue a bell in the center. Use these as place settings. This an easy way to make your family members or friends feel special. It says Merry Christmas! Add an extra piece of twine inside so they can hang the bells next time on their Christmas tree and remind them of the prior Christmas season.
Stockings: Add small gold jingle bells with this simple rusting solution to Christmas stockings to hang on the living room mantle. This is an easy way an instant rustic look.
With these ideas, you can create festive decor without any additional cost!
Rusting Metal Items With Mod Podge
Rusty Stars: This simple rusting solution doesn’t have to be limited to bells. Purchase small star-shaped cutouts is different sizes for rusty stars. Use a hot glue gun or Aleene’s craft glue to glue the rusty stars to twine, string, or ribbon. Use it as a garland on a Christmas tree or a mantle in your living room for the holiday season.
Star-Shaped Cutouts: Another great way to use your rusty stars is for cool special events like Memorial Day or July 4th. The good news is there’s little to no additional cost. Wrap the garland with star-shaped cutouts around a wreath or add them to your buffet table as a unique decoration for Memorial Day or any special occasion.
Big Pieces: Add a thin coat of Mod Podge and cinnamon to big pieces, such as bezel frames or a metal cloche from a thrift store or any craft store. Have a metal sign from Dollar Tree that looks too new and fresh. The best part is that this rusting solution with regular Mod Podge and a bowl of cinnamon easily adds a vintage appearance to big pieces.
Place Cards: Imagine your holiday table with rusty gold jingle bells or rustic rusty scrabble pieces as a place card holder. Use Word and print the names of family members on card stock. Cut with scissors, pinking shears, or Fiskar scissors. Add the place cards to the bell or rustic rusty scrabble pieces to a cut piece of wood or by a package of eight for a great price HERE. Use a paintbrush or spray paint to add these for a unique decoration during the Christmas season.
With these ideas, any special occasion will have a charming and rustic touch.
Transform Decor With Rusted Bells: Matte Mod Podge and Cinnamon
Creating rusty jingle bells with regular Mod Podge and cinnamon is a great way and easy craft project. It adds a vintage look to your Christmas decor. Whether you add these bells to your Christmas tree, wreaths, garlands, or stockings, or add a rusty appearance to big pieces. They require a little bit of time and work with any decor style. The good news, it requires minimal craft supplies. This is a great way to add an aged look to bells, star-shaped cutouts, and big pieces and customize the level of rust. I hope you enjoyed this blog post and begin to spice up rusty jingle bells with Mod Podge now and add a rusty appearance to a piece for your home. I look forward to sharing my next easy craft project of home decor ideas with you in my next blog post. Merry Christmas and Happy Holidays!
Egg carton — (optional) This is the easiest way to let the bells dry.
Step 1: Add Zinc Paint
The first thing I did, was apply a little bit of zinc craft paint to the metal bells allowing a little bit of metal to show through. This is optional, however, I highly recommend taking time to add the paint. This is a good idea. It adds more dimension for a truly vintage appearance. The best part is that this step took about five minutes to complete and will begin to spice up rusty jingle bells with Mod Podge now!
Cindy’s Helpful Bell Tips: You can achieve this look with a plastic bell purchased from Dollar Tree, Dollar Store, or any craft store. For a plastic bell, I recommend painting it with acrylic paint or spray paint before adding a thin coat of Mod Podge and the cinnamon. It adds texture and dimension. Let dry. This will take approximately five minutes. Why add acrylic paint? It’s a good idea to layer colors and textures for a truly aged look.
Step 2: Sand
Next step use a light grit sanding sponge and sand the metal bells. Doing this step only takes a little bit of time and adds to the vintage look of the rusty bells.
Step 3: Rust Bells with Mod Podge and Cinnamon
Add cinnamon to a plastic container or a paper bowl. Next step, with a foam brush or paint brush, add a thin coat of matte Mod Podge. Dip the metal bells a section at a time into the bowl of cinnamon. Shake excess cinnamon off and set aside to dry. Repeat the process to make the rest of your bells. I did this in sections because when items rust and look vintage, they don’t rust the same in all areas.
If you would rather your rusty bells be completely rusty feel free to do so. Skip the painting process. To accomplish this look dip half the bell in the bowl of cinnamon or pour cinnamon over the coat of Mod Podge and shake excess cinnamon off.
Cindy’s Helpful Bell Tip: My favorite method to create a rusty appearance is adding acrylic paint and sanding. The layering givesthebellsa real vintage look.
Once the cinnamon is dry, add another thin coat of matte Mod Podge and wait for the magic of your rusty jingle bells to happen. This is an easy way to get a vintage appearance without additional cost. It’s so much fun to add rusty bells to your Christmas decor. The next time I did this project, I made smaller rusty jingle bells. I didn’t paint these. I added a coat of matte Mod Podge and cinnamon and shake excess cinnamon off.
Cindy’s Helpful Bell Tip: For a few of my rusty jingle bells, after I added a bit of cinnamon, I immediately added a thin coat of Mod Podge to small areas. This gave my metal bells a more crusty rusty appearance.
acrylic paint, big bell, bowl of cinnamon, christmas decorating, Christmas decorations, christmas season, Christmas tree, coat of mod podge, craft store, dollar store, dollar tree, halloween costumes, handmade christmas ornaments, hobby lobby, holiday decoration, hot glue gun, jingle bell garland, large bells, local thrift store, matte mod podge, memorial day, merry christmas, metal bells, metal objects, paint brush, pine cones, red jingle bells, rusting solution, rusty appearance, rusty bells, rusty jingle bells, rusty stars, spray paint, thin coat of mod podge, vintage look
Regular Mod Podge (Matte is best)
Bowl of cinnamon
Small paint brush
Zinc acrylic paint or black spray paint
Foam Brush or paint brush
Metal bells — different sizes
Craft paper or newspaper
Paper plate, paper bowl, or plastic container
Egg carton — (optional) This is the easiest way to let the bells dry.
Step 1: Add Zinc Paint
The first thing I did, was apply a little bit of zinc craft paint to the metal bells allowing a little bit of metal to show through. This is optional, however, I highly recommend taking time to add the paint. This is a good idea. It adds more dimension for a truly vintage appearance. The best part is that this step took about five minutes to complete and will begin to spice up rusty jingle bells with Mod Podge now!
Cindy’s Helpful Bell Tips: You can achieve this look with a plastic bell purchased from Dollar Tree, Dollar Store, or any craft store. For a plastic bell, I recommend painting it with acrylic paint or spray paint before adding a thin coat of Mod Podge and the cinnamon. It adds texture and dimension. Let dry. This will take approximately five minutes. Why add acrylic paint? It’s a good idea to layer colors and textures for a truly aged look.
Step 2: Sand
Next step use a light grit sanding sponge and sand the metal bells. Doing this step only takes a little bit of time and adds to the vintage look of the rusty bells.
Step 3: Rust Bells with Mod Podge and Cinnamon
Add cinnamon to a plastic container or a paper bowl. Next step, with a foam brush or paint brush, add a thin coat of matte Mod Podge. Dip the metal bells a section at a time into the bowl of cinnamon. Shake excess cinnamon off and set aside to dry. Repeat the process to make the rest of your bells. I did this in sections because when items rust and look vintage, they don’t rust the same in all areas.
If you would rather your rusty bells be completely rusty feel free to do so. Skip the painting process. To accomplish this look dip half the bell in the bowl of cinnamon or pour cinnamon over the coat of Mod Podge and shake excess cinnamon off.
Cindy’s Helpful Bell Tip: My favorite method to create a rusty appearance is adding acrylic paint and sanding. The layering givesthebellsa real vintage look.
Once the cinnamon is dry, add another thin coat of matte Mod Podge and wait for the magic of your rusty jingle bells to happen. This is an easy way to get a vintage appearance without additional cost. It’s so much fun to add rusty bells to your Christmas decor. The next time I did this project, I made smaller rusty jingle bells. I didn’t paint these. I added a coat of matte Mod Podge and cinnamon and shake excess cinnamon off.
Cindy’s Helpful Bell Tip: For a few of my rusty jingle bells, after I added a bit of cinnamon, I immediately added a thin coat of Mod Podge to small areas. This gave my metal bells a more crusty rusty appearance.
Spice Up Rusty Jingle Bells with Mod Podge Now!
Craft Supplies:
Regular Mod Podge (Matte is best)
Bowl of cinnamon
Small paint brush
Zinc acrylic paint or black spray paint
Foam Brush or paint brush
Metal bells — different sizes
Craft paper or newspaper
Paper plate, paper bowl, or plastic container
Egg carton — (optional) This is the easiest way to let the bells dry.
Step 1: Add Zinc Paint
The first thing I did, was apply a little bit of zinc craft paint to the metal bells allowing a little bit of metal to show through. This is optional, however, I highly recommend taking time to add the paint. This is a good idea. It adds more dimension for a truly vintage appearance. The best part is that this step took about five minutes to complete and will begin to spice up rusty jingle bells with Mod Podge now!
Cindy’s Helpful Bell Tips: You can achieve this look with a plastic bell purchased from Dollar Tree, Dollar Store, or any craft store. For a plastic bell, I recommend painting it with acrylic paint or spray paint before adding a thin coat of Mod Podge and the cinnamon. It adds texture and dimension. Let dry. This will take approximately five minutes. Why add acrylic paint? It’s a good idea to layer colors and textures for a truly aged look.
Step 2: Sand
Next step use a light grit sanding sponge and sand the metal bells. Doing this step only takes a little bit of time and adds to the vintage look of the rusty bells.
Step 3: Rust Bells with Mod Podge and Cinnamon
Add cinnamon to a plastic container or a paper bowl. Next step, with a foam brush or paint brush, add a thin coat of matte Mod Podge. Dip the metal bells a section at a time into the bowl of cinnamon. Shake excess cinnamon off and set aside to dry. Repeat the process to make the rest of your bells. I did this in sections because when items rust and look vintage, they don’t rust the same in all areas.
If you would rather your rusty bells be completely rusty feel free to do so. Skip the painting process. To accomplish this look dip half the bell in the bowl of cinnamon or pour cinnamon over the coat of Mod Podge and shake excess cinnamon off.
Cindy’s Helpful Bell Tip: My favorite method to create a rusty appearance is adding acrylic paint and sanding. The layering givesthebellsa real vintage look.
Once the cinnamon is dry, add another thin coat of matte Mod Podge and wait for the magic of your rusty jingle bells to happen. This is an easy way to get a vintage appearance without additional cost. It’s so much fun to add rusty bells to your Christmas decor. The next time I did this project, I made smaller rusty jingle bells. I didn’t paint these. I added a coat of matte Mod Podge and cinnamon and shake excess cinnamon off.
Cindy’s Helpful Bell Tip: For a few of my rusty jingle bells, after I added a bit of cinnamon, I immediately added a thin coat of Mod Podge to small areas. This gave my metal bells a more crusty rusty appearance.
acrylic paint, big bell, bowl of cinnamon, christmas decorating, Christmas decorations, christmas season, Christmas tree, coat of mod podge, craft store, dollar store, dollar tree, halloween costumes, handmade christmas ornaments, hobby lobby, holiday decoration, hot glue gun, jingle bell garland, large bells, local thrift store, matte mod podge, memorial day, merry christmas, metal bells, metal objects, paint brush, pine cones, red jingle bells, rusting solution, rusty appearance, rusty bells, rusty jingle bells, rusty stars, spray paint, thin coat of mod podge, vintage look
In today's blog post, I will share a great way to spice up rusty jingle bells with Mod Podge now! The best part about making these rusty bells with regular Mod Podge is they take moments to complete. The good news? This requires minimal craft supplies and will add a vintage-looking item to your Christmas tree, wreaths, stockings, or garlands. So, let's create some magic for the Christmas season and spice items up to add to our homes.
Keyword: acrylic paint, big bell, bowl of cinnamon, christmas decorating, Christmas decorations, christmas season, Christmas tree, coat of mod podge, craft store, dollar store, dollar tree, halloween costumes, handmade christmas ornaments, hobby lobby, holiday decoration, hot glue gun, jingle bell garland, large bells, local thrift store, matte mod podge, memorial day, merry christmas, metal bells, metal objects, paint brush, pine cones, red jingle bells, rusting solution, rusty appearance, rusty bells, rusty jingle bells, rusty stars, spray paint, thin coat of mod podge, vintage look
Yield: 5rusty jingle bells
Cost: $8
Notes
Spice Up Rusty Jingle Bells with Mod Podge Now!
Craft Supplies:
Regular Mod Podge (Matte is best)
Bowl of cinnamon
Small paint brush
Zinc acrylic paint or black spray paint
Foam Brush or paint brush
Metal bells — different sizes
Craft paper or newspaper
Paper plate, paper bowl, or plastic container
Egg carton — (optional) This is the easiest way to let the bells dry.
Step 1: Add Zinc Paint
The first thing I did, was apply a little bit of zinc craft paint to the metal bells allowing a little bit of metal to show through. This is optional, however, I highly recommend taking time to add the paint. This is a good idea. It adds more dimension for a truly vintage appearance. The best part is that this step took about five minutes to complete and will begin to spice up rusty jingle bells with Mod Podge now!Cindy's Helpful Bell Tips: You can achieve this look with a plastic bell purchased from Dollar Tree, Dollar Store, or any craft store. For a plastic bell, I recommend painting it with acrylic paint or spray paint before adding a thin coat of Mod Podge and the cinnamon. It adds texture and dimension. Let dry. This will take approximately five minutes. Why add acrylic paint? It's a good idea to layer colors and textures for a truly aged look.
Step 2: Sand
Next step use a light grit sanding sponge and sand the metal bells. Doing this step only takes a little bit of time and adds to the vintage look of the rusty bells.
Step 3: Rust Bells with Mod Podge and Cinnamon
Add cinnamon to a plastic container or a paper bowl. Next step, with a foam brush or paint brush, add a thin coat of matte Mod Podge. Dip the metal bells a section at a time into the bowl of cinnamon. Shake excess cinnamon off and set aside to dry. Repeat the process to make the rest of your bells. I did this in sections because when items rust and look vintage, they don't rust the same in all areas.If you would rather your rusty bells be completely rusty feel free to do so. Skip the painting process. To accomplish this look dip half the bell in the bowl of cinnamon or pour cinnamon over the coat of Mod Podge and shake excess cinnamon off.Cindy's Helpful Bell Tip: My favorite method to create a rusty appearance is adding acrylic paint and sanding. The layering givesthebellsa real vintage look.Once the cinnamon is dry, add another thin coat of matte Mod Podge and wait for the magic of your rusty jingle bells to happen. This is an easy way to get a vintage appearance without additional cost. It's so much fun to add rusty bells to your Christmas decor. The next time I did this project, I made smaller rusty jingle bells. I didn't paint these. I added a coat of matte Mod Podge and cinnamon and shake excess cinnamon off.Cindy's Helpful Bell Tip: For a few of my rusty jingle bells, after I added a bit of cinnamon, I immediately added a thin coat of Mod Podge to small areas. This gave my metal bells a more crusty rusty appearance.
Are you planning fall celebrations? How about an easy craft I’m sharing to create a fall napkin ring? The best part? With a little time and skill level, these will be the perfect finishing touch to any autumn table. Today I’m sharing fall napkin rings DIY in minutes for your holiday table. The best part?…
Bring spring cheer to any empty space for early spring with a faux spring flower bulb planter! This DIY Spring planter adds a touch of garden-inspired whimsy while being low maintenance! I will share how to wrap foam balls with brown paper lunch bags or brown parchment paper. Add faux flower stems in different heights and secure them with Mod Podge and Spanish moss with a bit of glue for a natural look of spring bulbs. With just…
How to make easy Daffodil centerpiece is something I love to create for spring. How about you? Do you have a go to spring flower you love to add to your home? If you are visiting from Bushel and a Pickle, her idea for an early spring table is pretty, isn’t it? Links all the…
Unleash Your Creativity with a Dried Citrus Garland Wreath Printable Card! Embrace the beauty of natural elements and infuse your home decor with a touch of elegance using our DIY guide — the Easy Dried Citrus Garland Wreath. Discover the art of transforming a simple grapevine garland into a wreath decorated with citrus slices. This…
Elevate your front door or porch with this beautiful wreath. Let’s begin making an easy eucalyptus flowerpot wreath. The best part is the versatility of this wreath. It easily transitions into the summer season and to a fall wreath with just a few tweaks to the flower pots or the eucalyptus garland. The good news…
See an easy elegant Valentine’s DIY. Have you ever wanted to make an elegant Valentine? Well, this post is for you because I am sharing how to make this easy elegant Valentine’s DIY. If you are stopping by after visiting Renae from Peacock Ridge Farm welcome. She’s creative and her heart wreath is beautiful. What’s…
54 Comments
These look just like vintage sleigh bells, Cindy. I can’t get over it. Just pinned and I can’t wait to try this too. They’re amazing! Hugs, CoCo
Wow, Cindy. What an interesting way to add a rustic look to metal. I would never have thought of cinnamon. Does it make the house smell wonderful too? That would be a bonus to the pretty jingle bells.
Thanks Carol and it’s the best because this technique can be used on so many things. Unfortunately they don’t smell when they are finished because of the second coat of Mod Podge.
I learned something today!!! I had no idea there was such a thing as zinc paint. Thank you for sharing. I love how the cinnamon actually looks like rust in the end! Brilliant. I will be using your cinnamon idea for a bunch of plastic items. Great project Cindy.
I love your “rustic” bells, Cindy! I would’ve never thought to use cinnamon to age something; such an ingenious idea! I bet your home smells heavenly too!
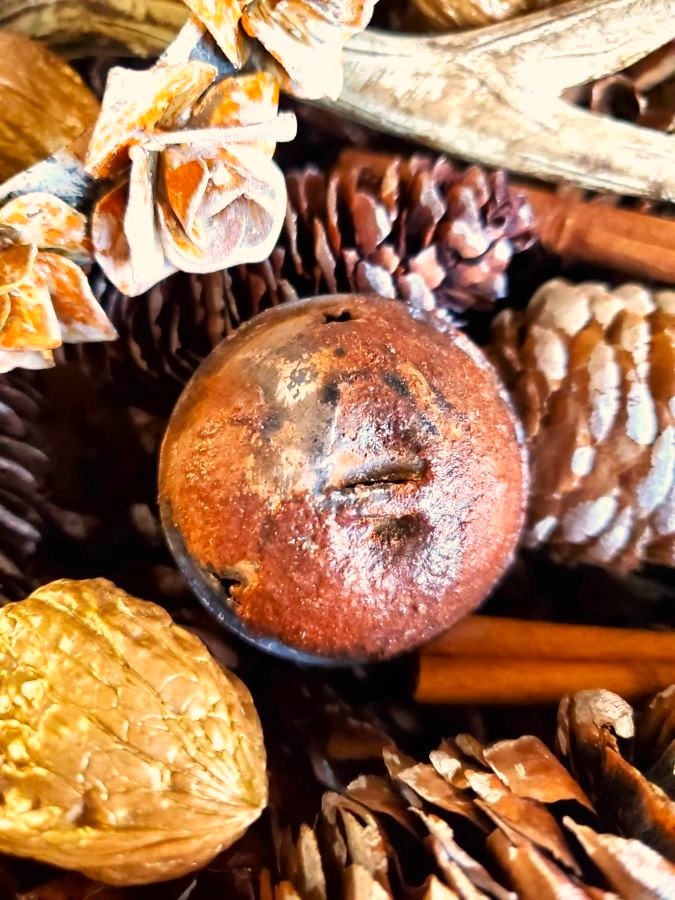

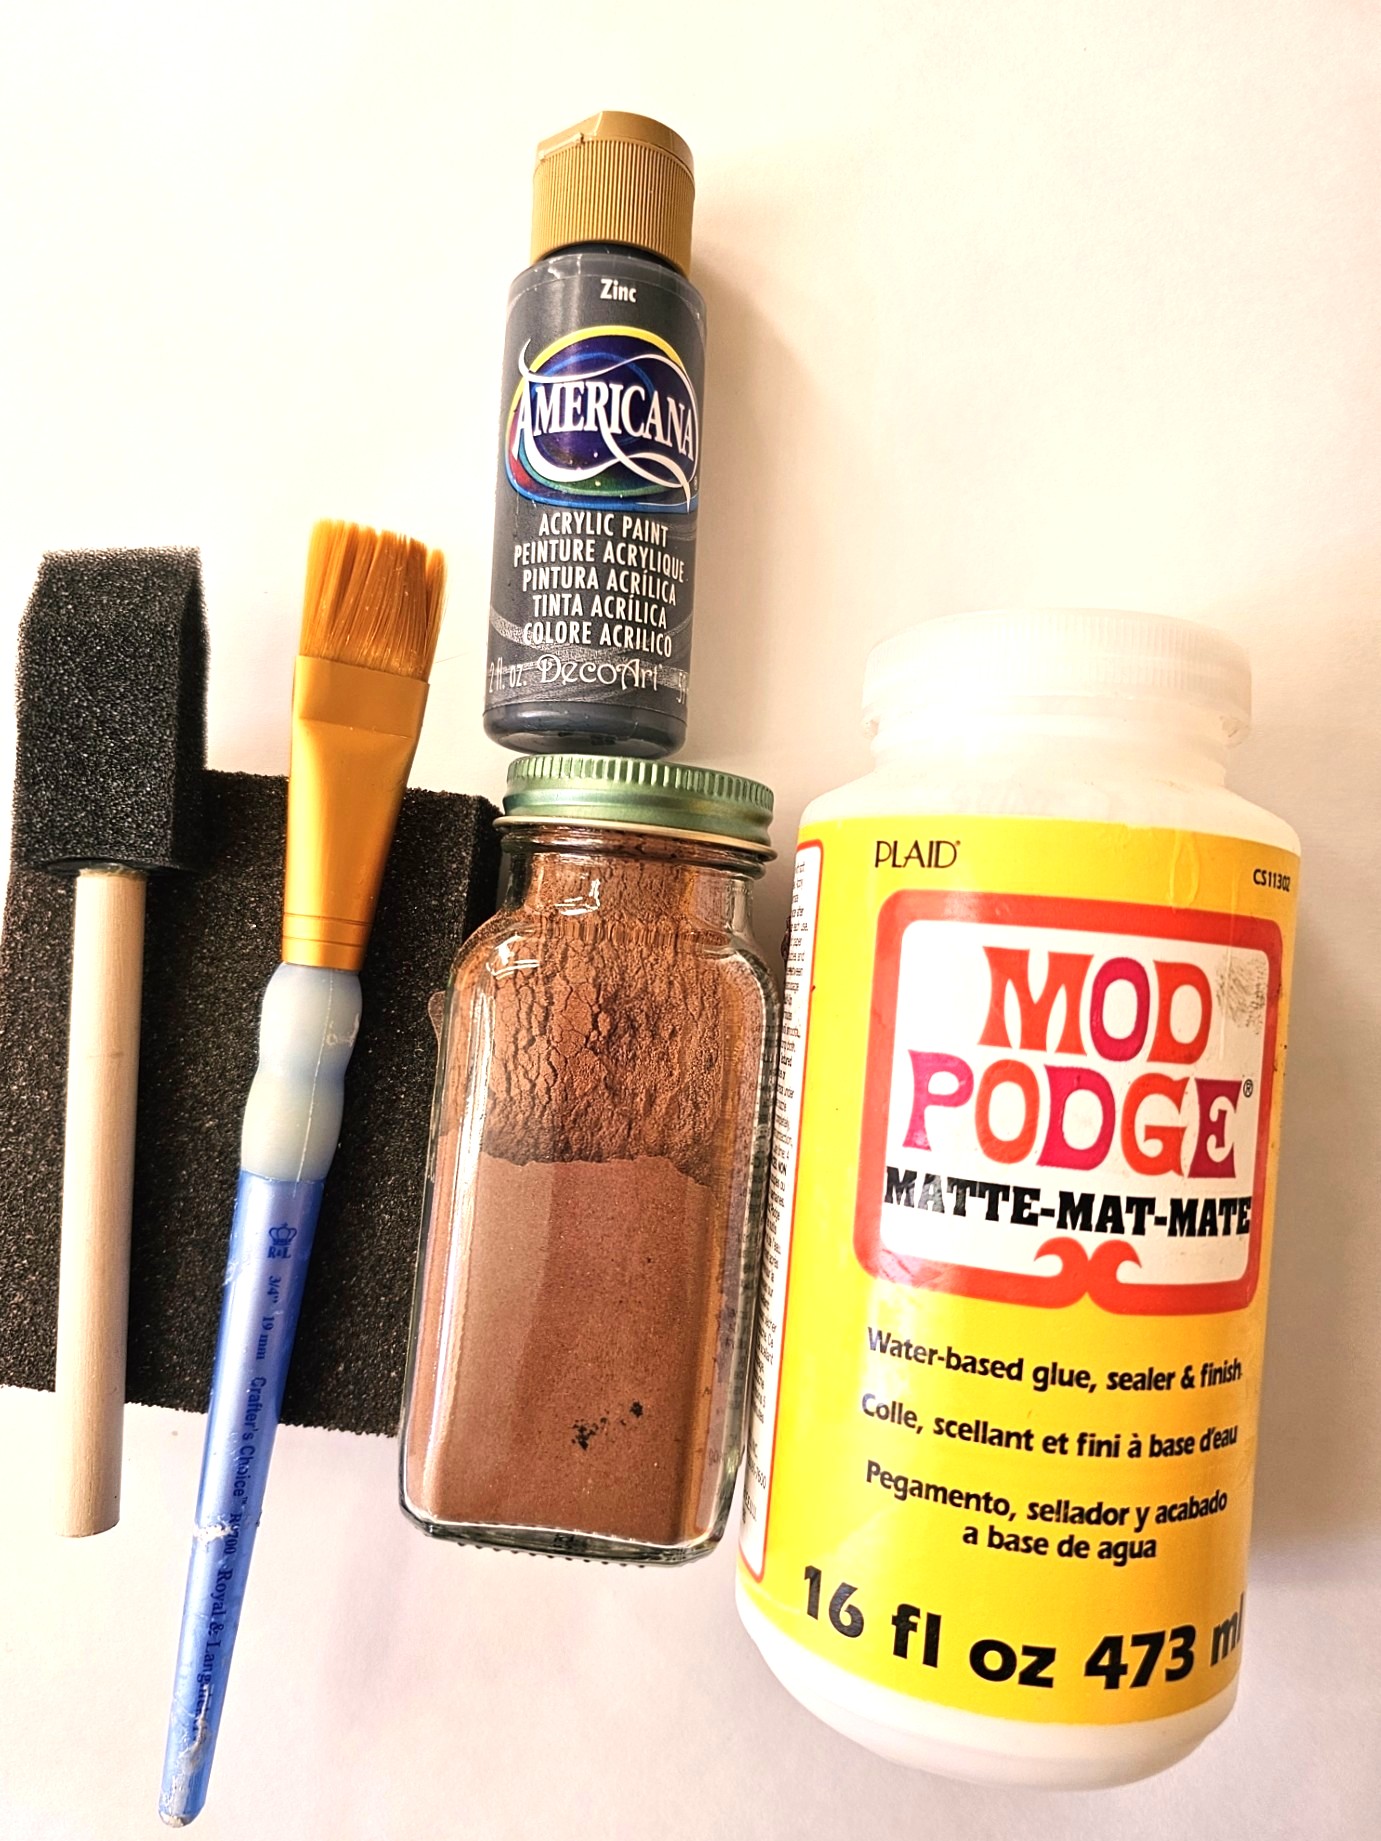
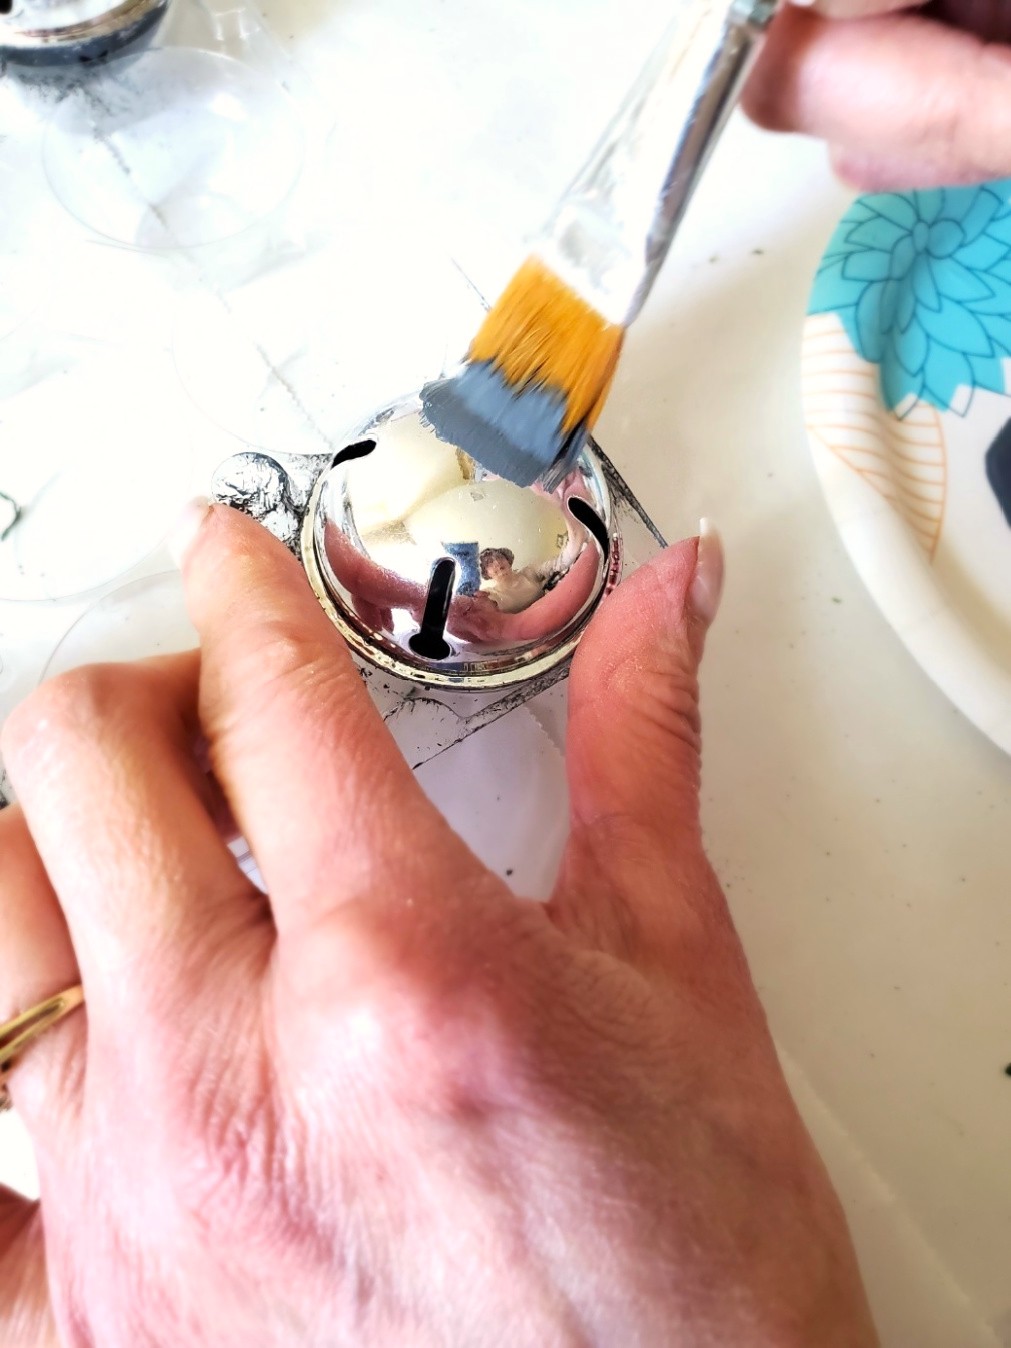
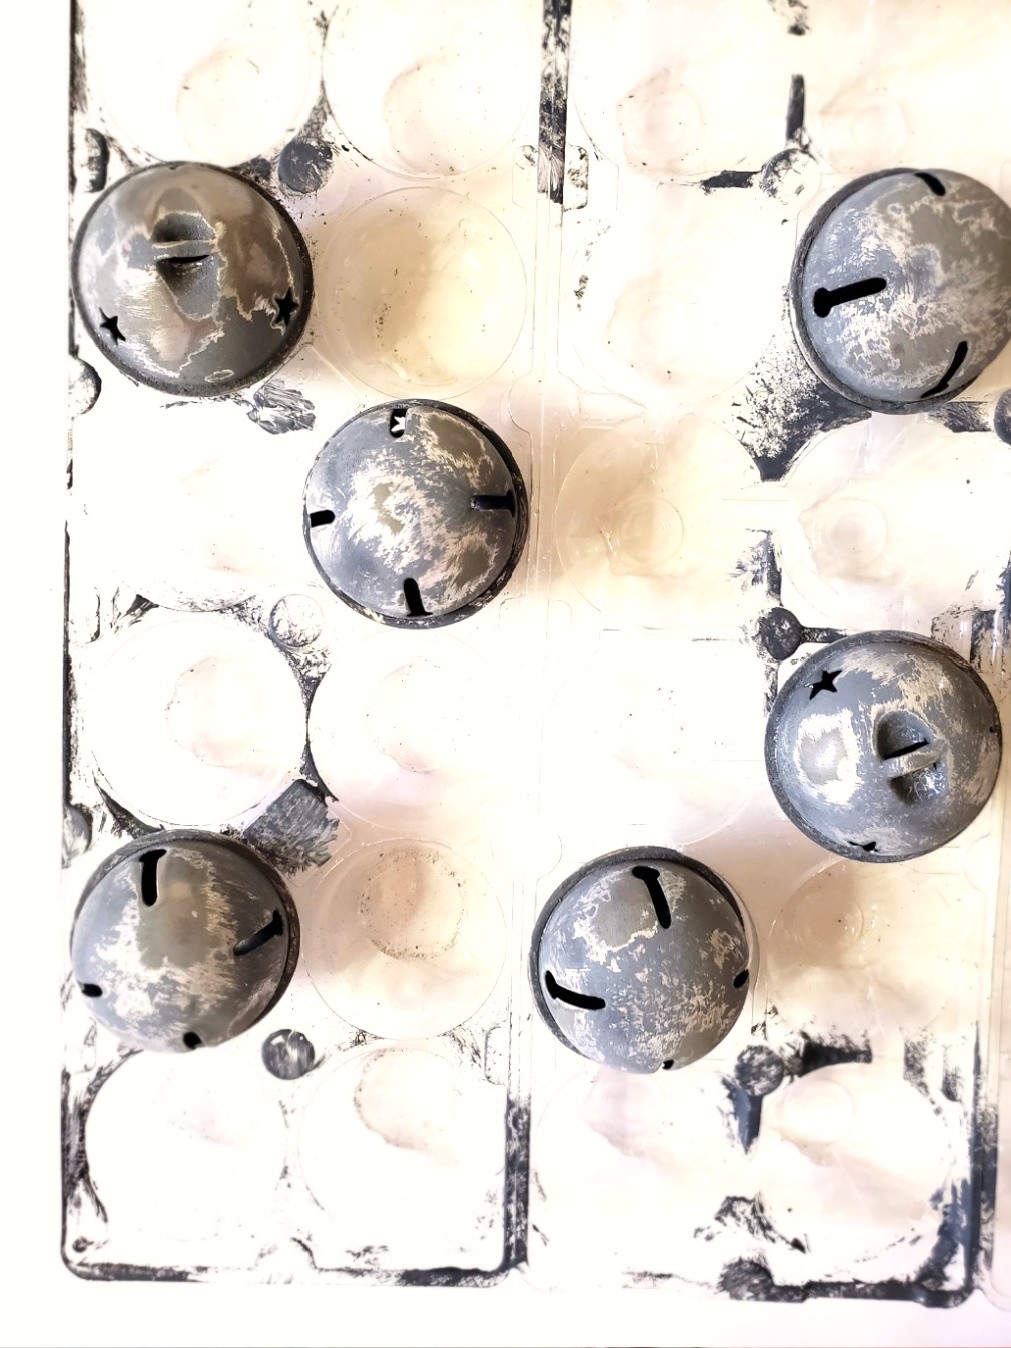
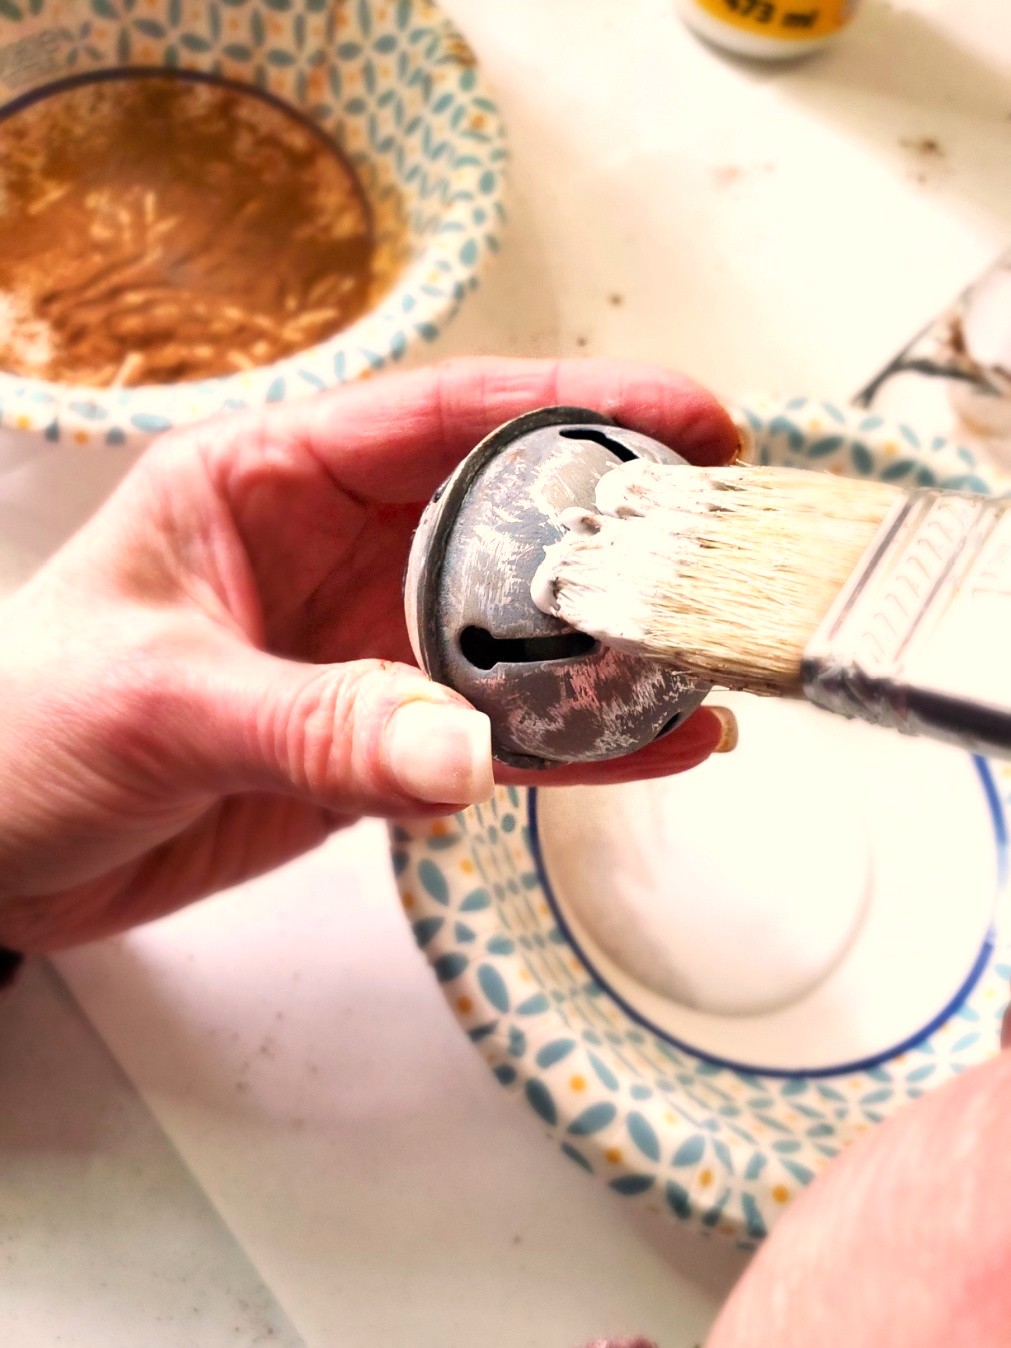
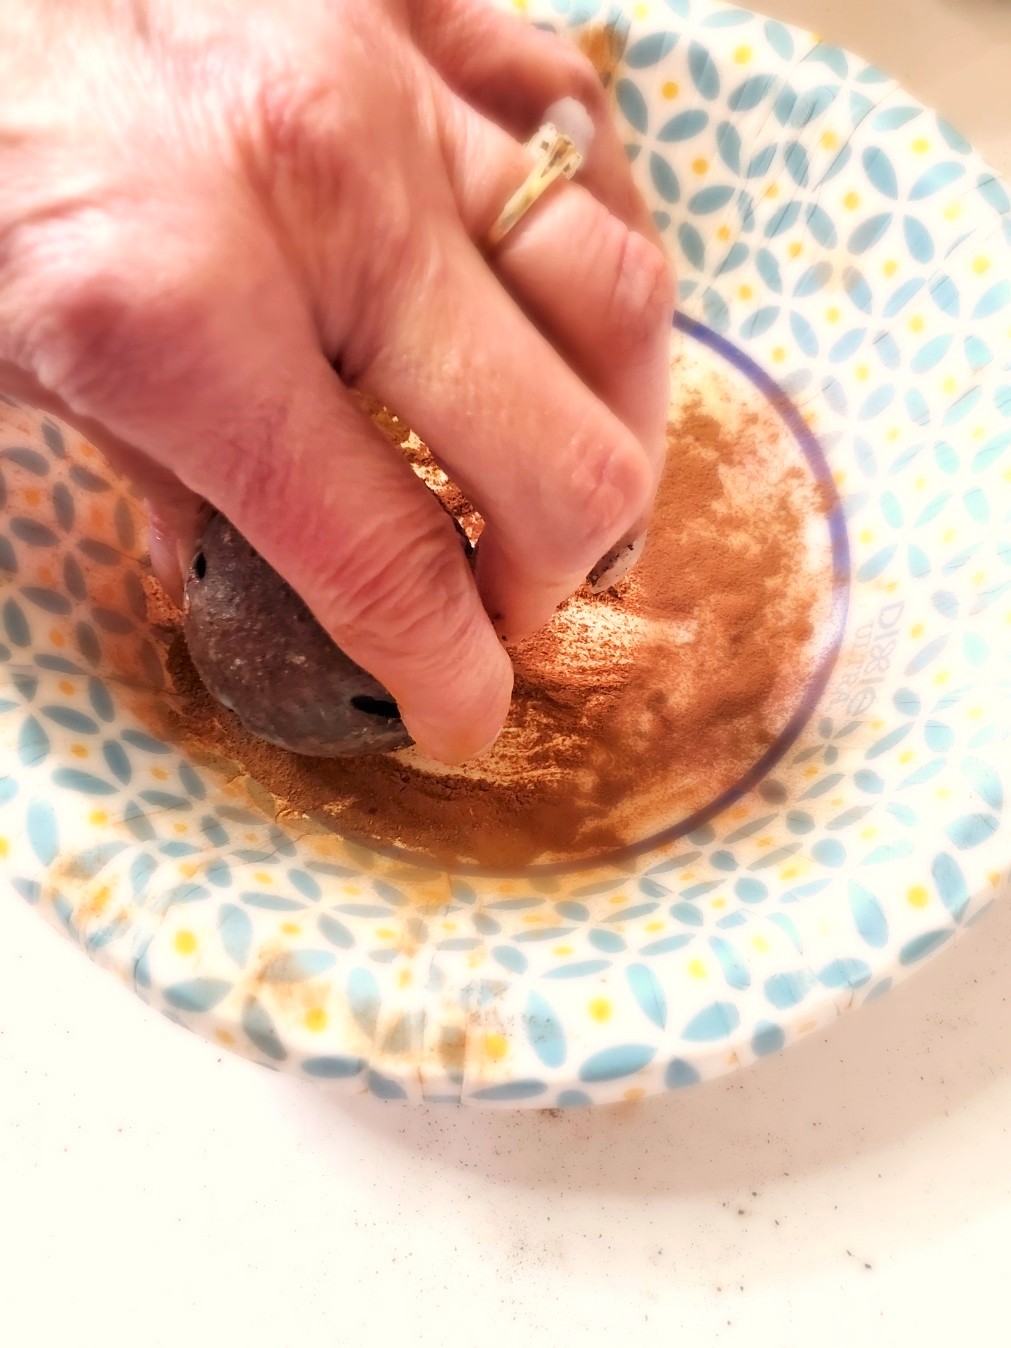
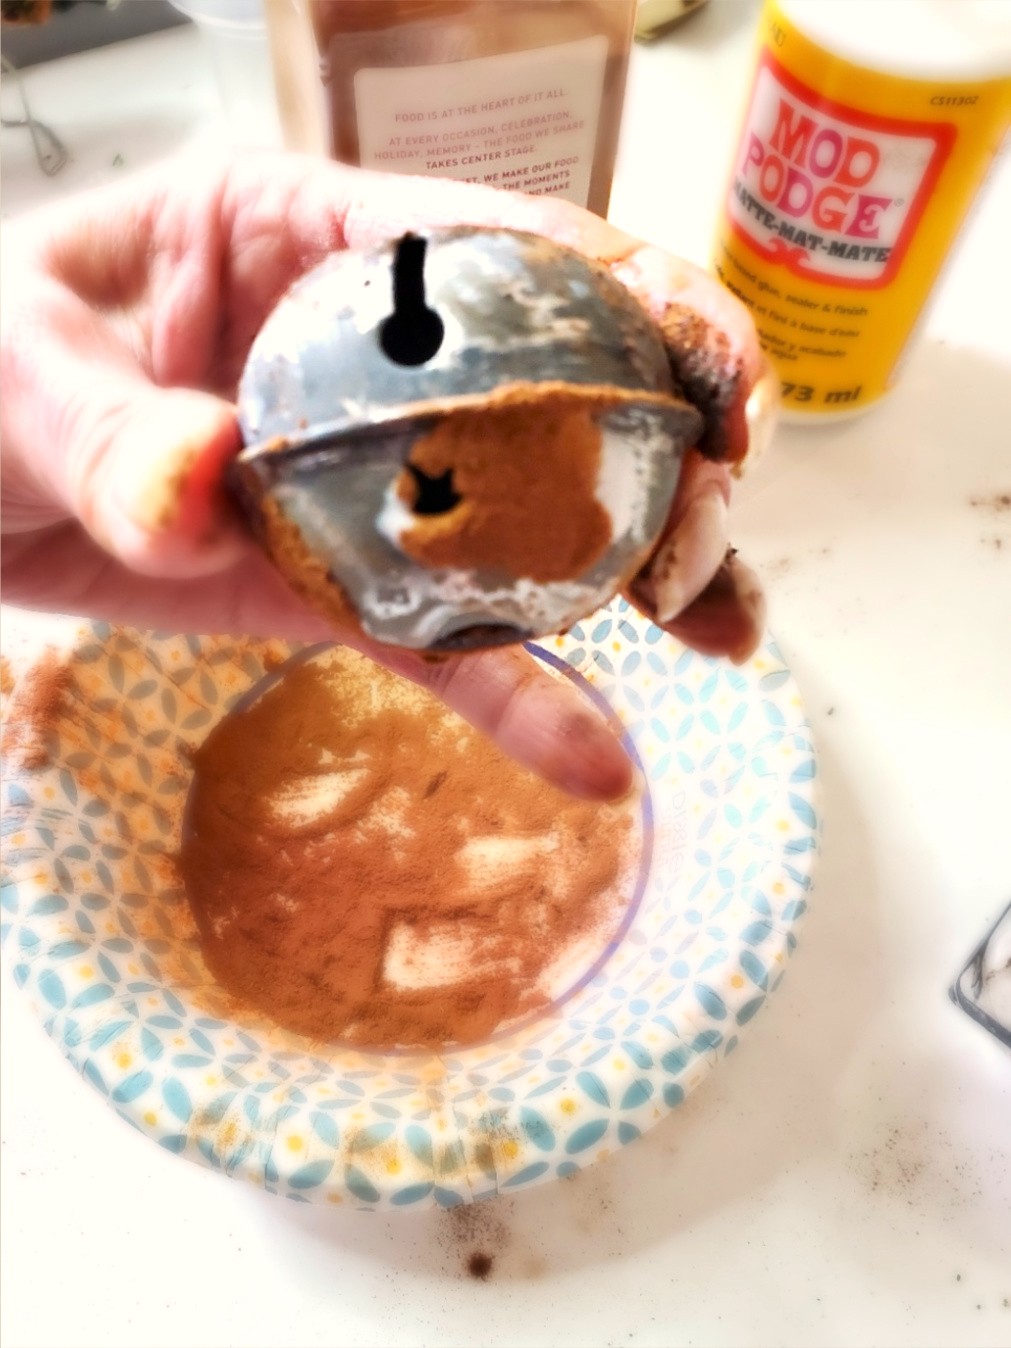
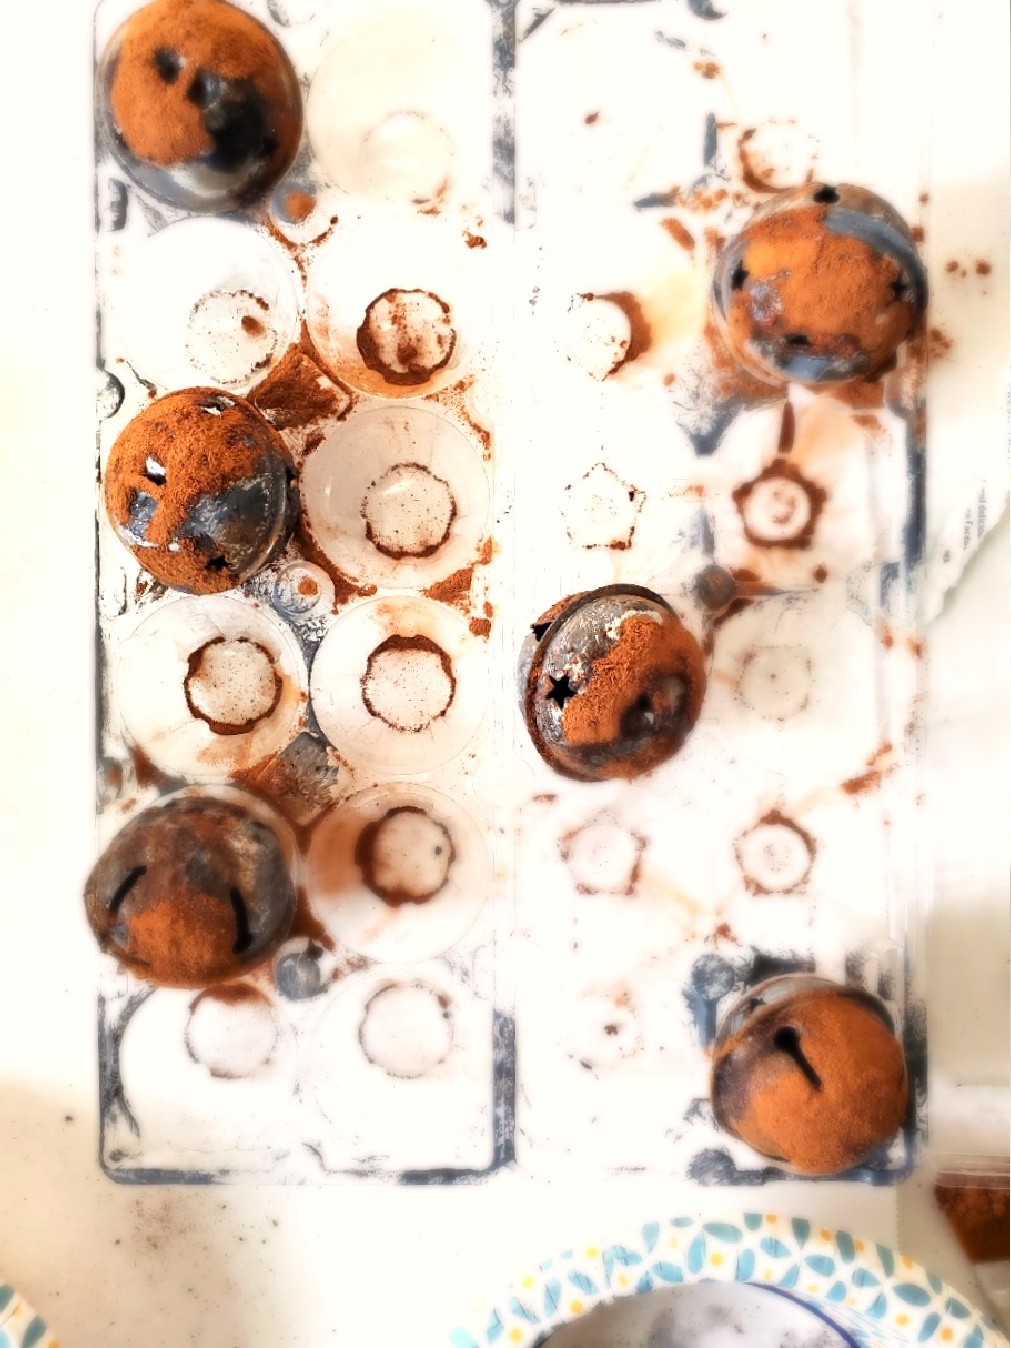
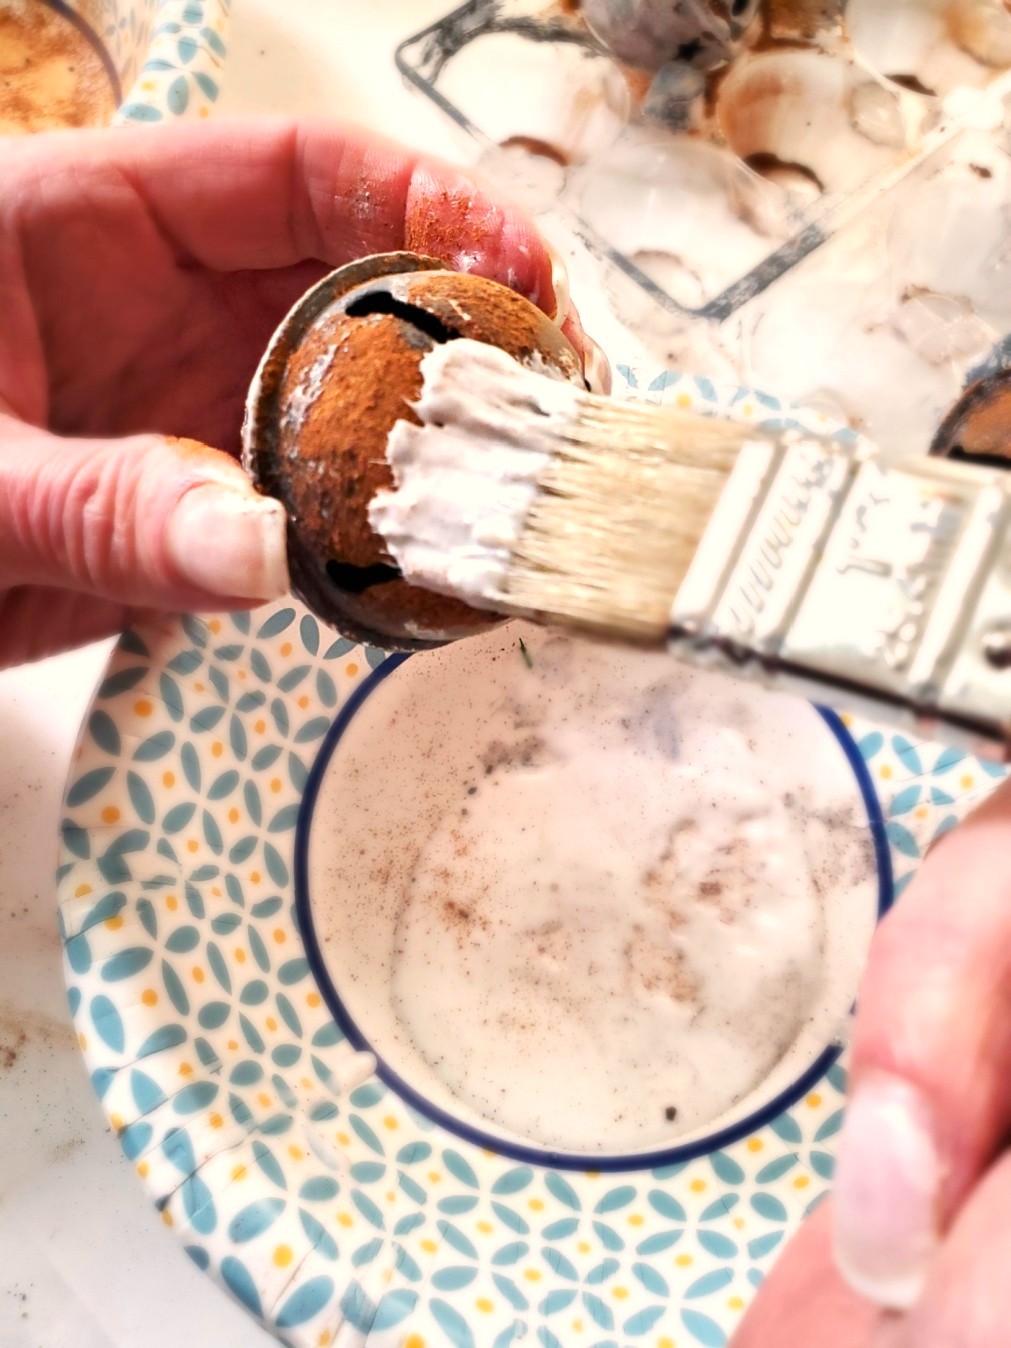
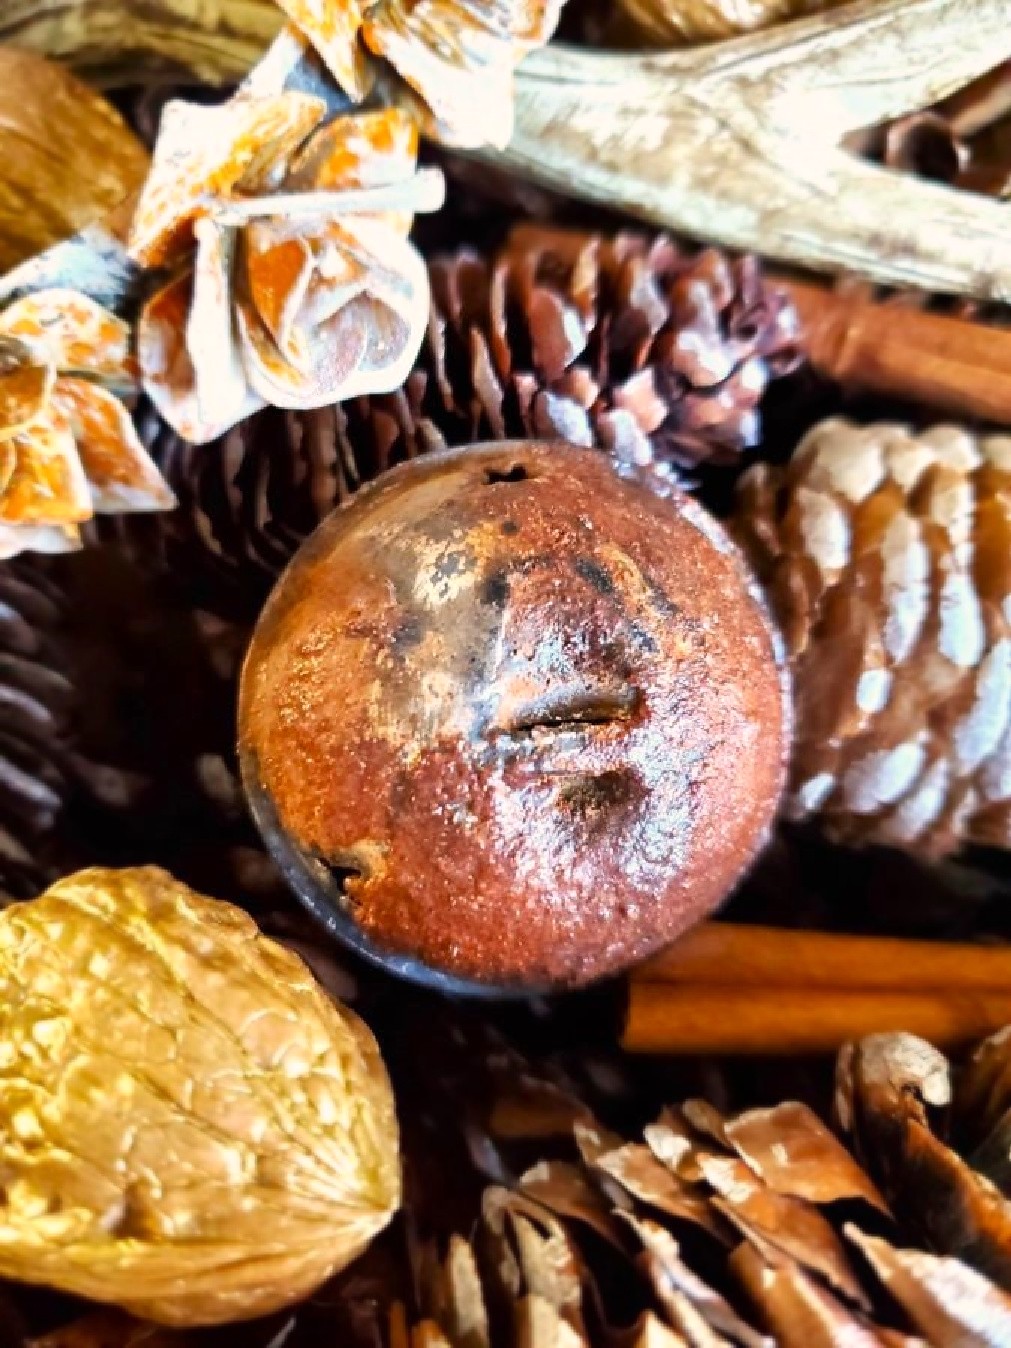


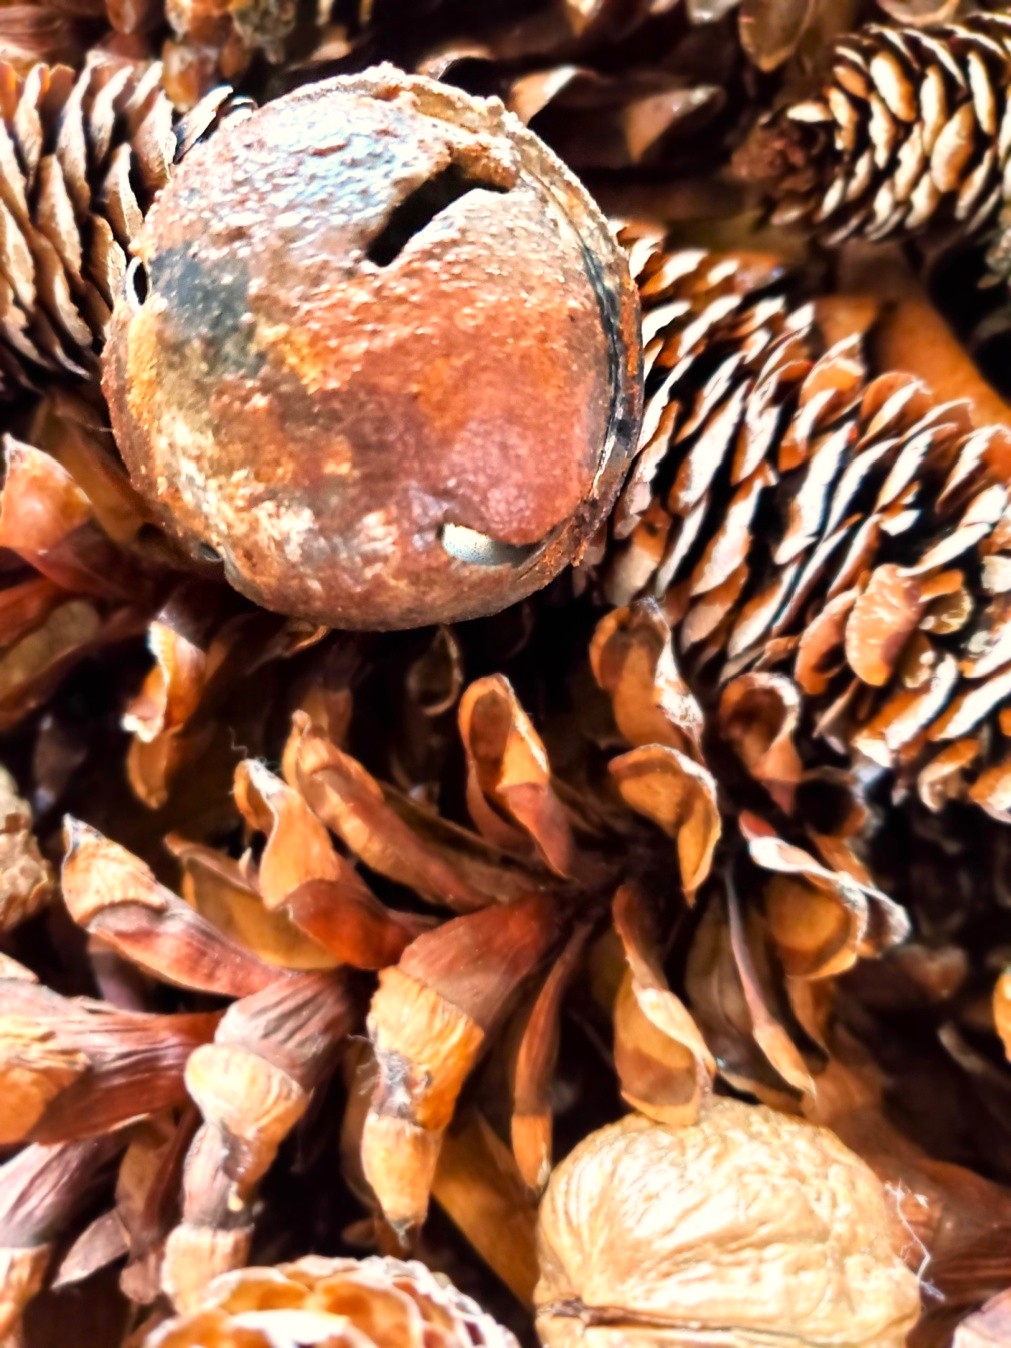
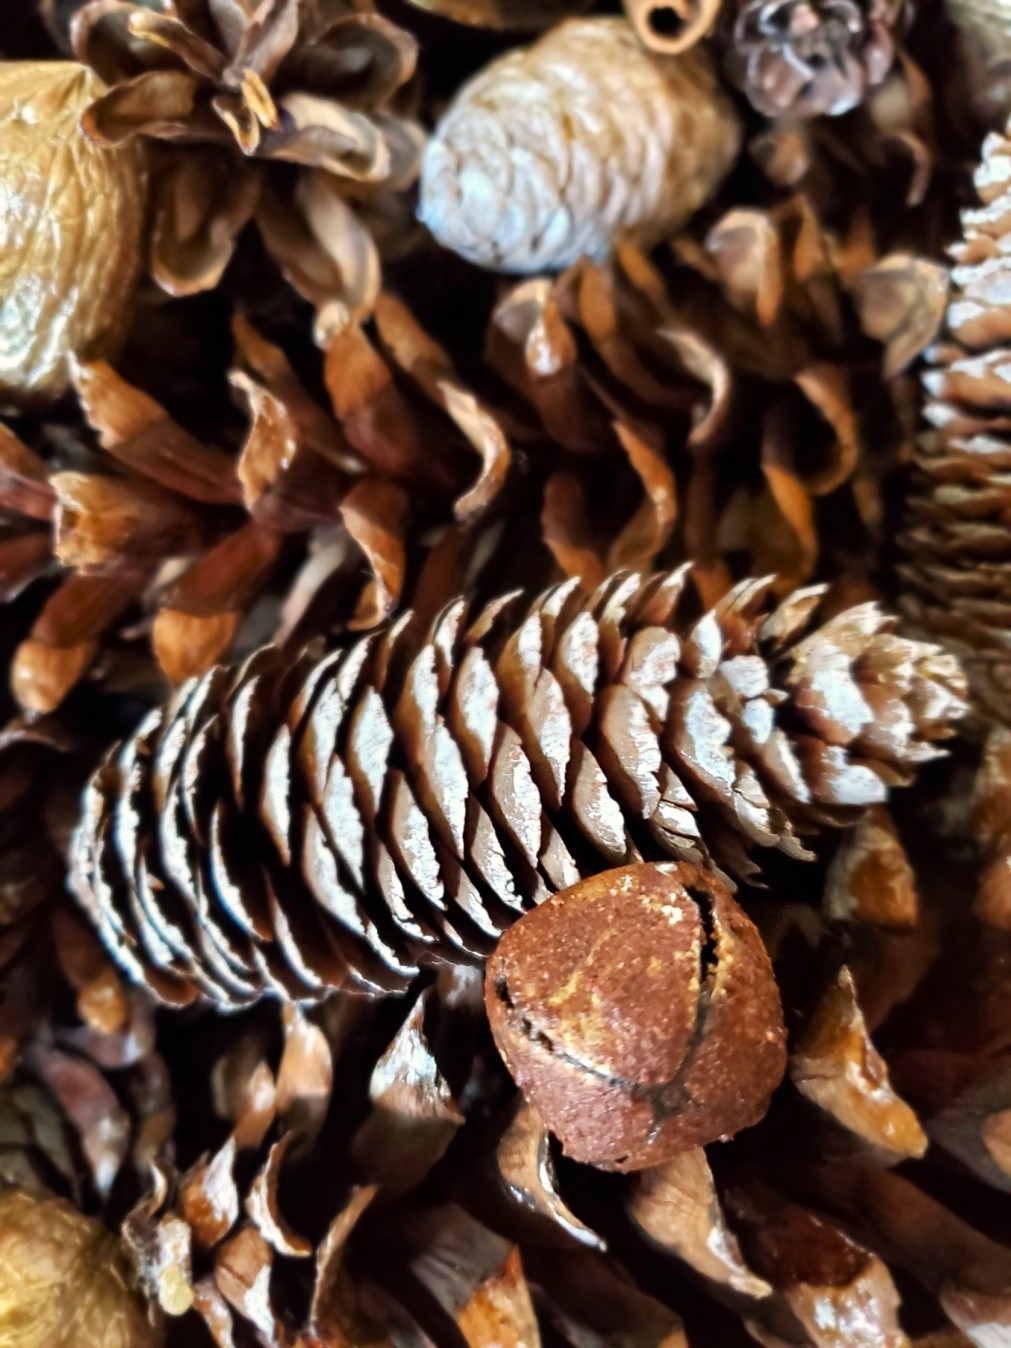
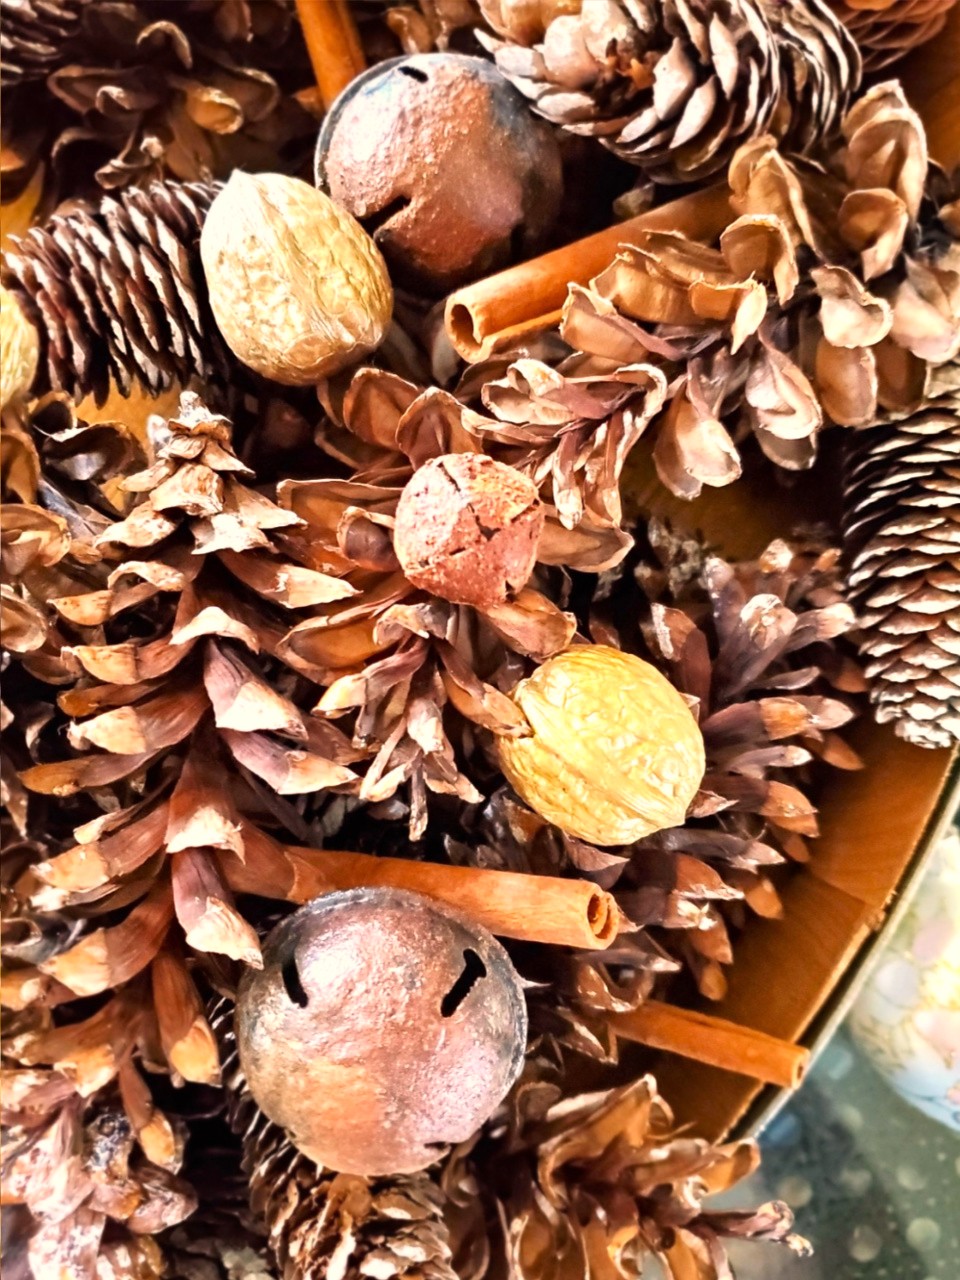
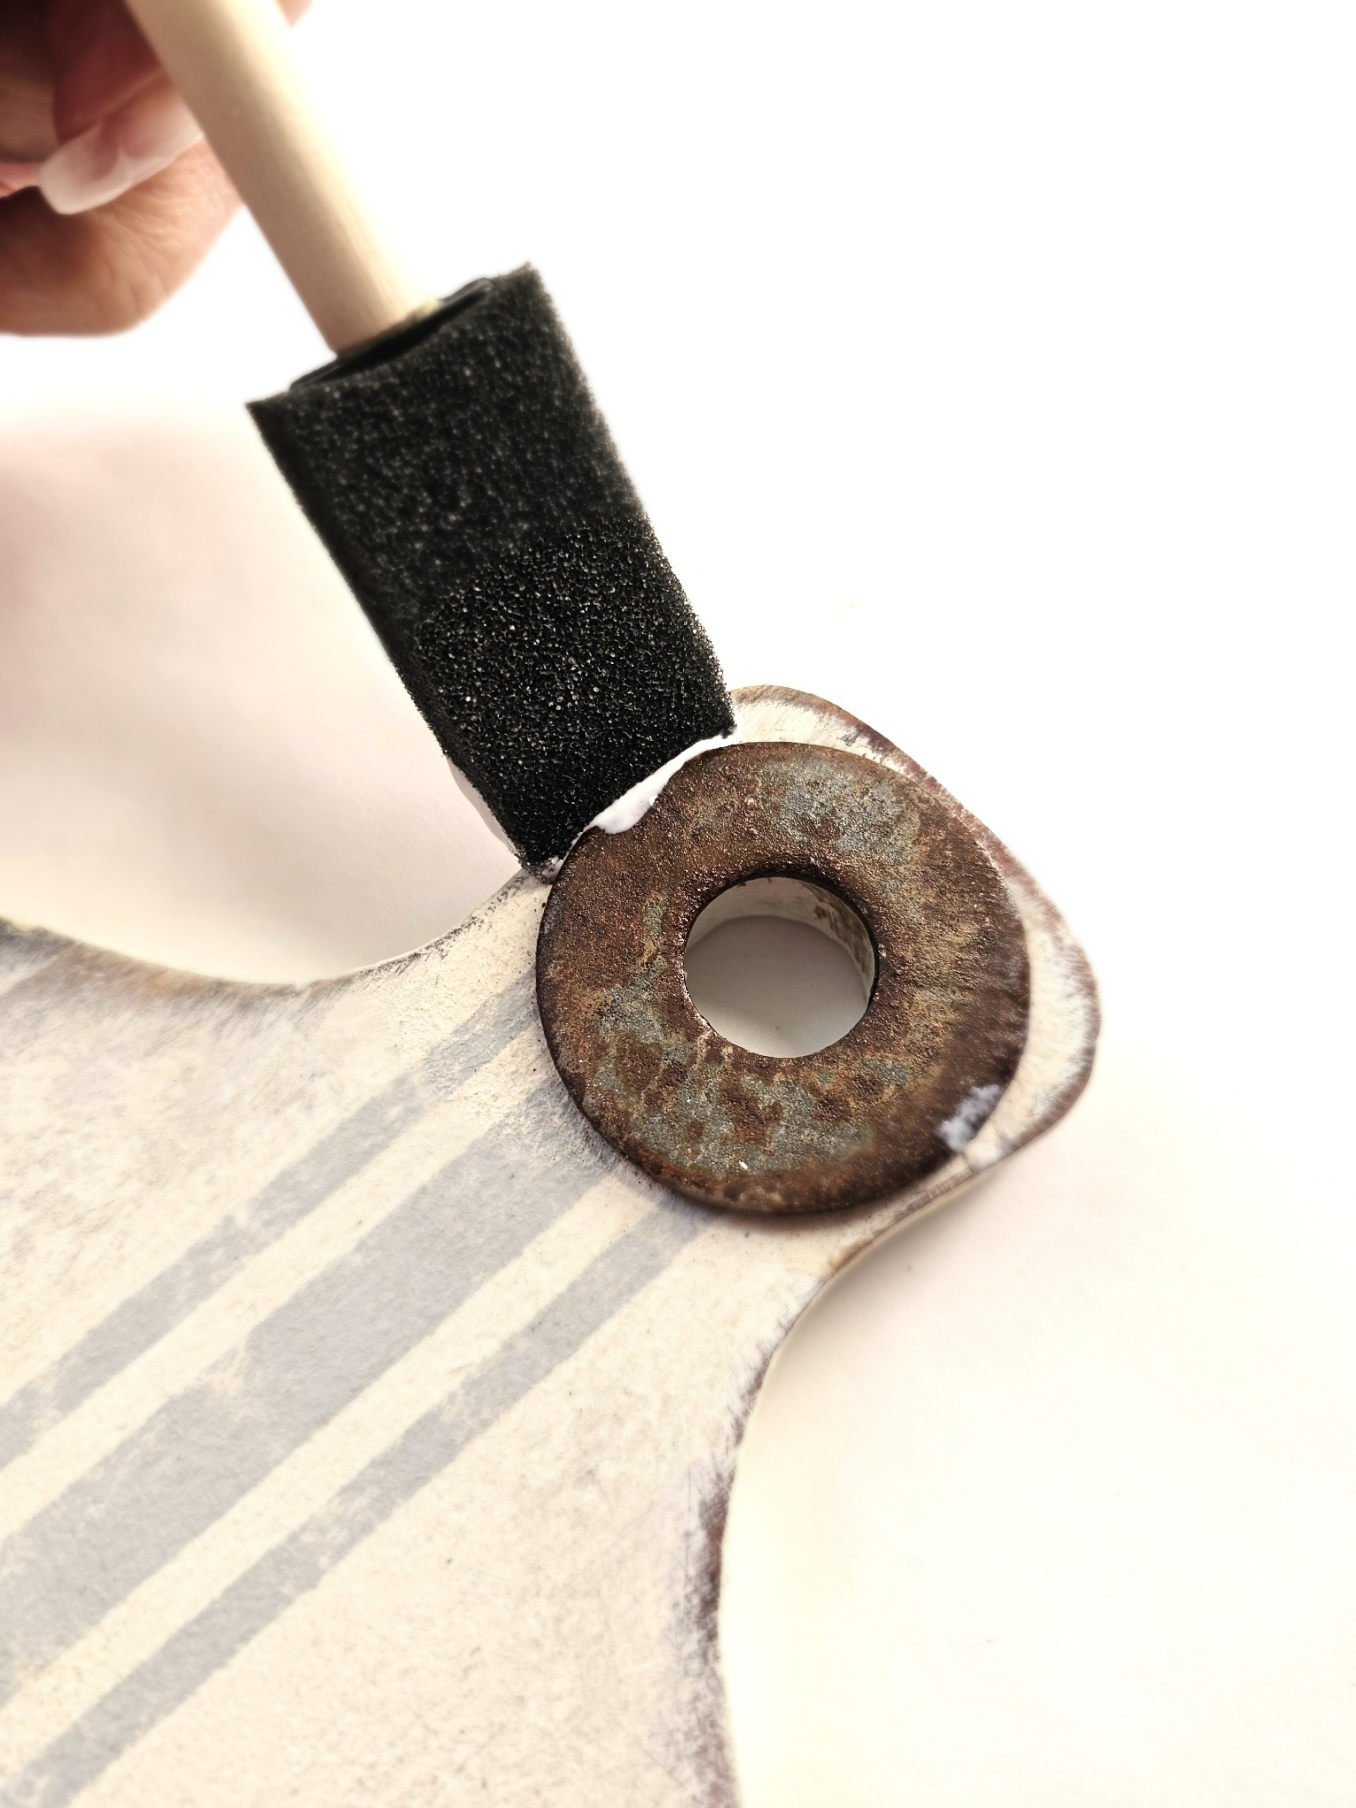
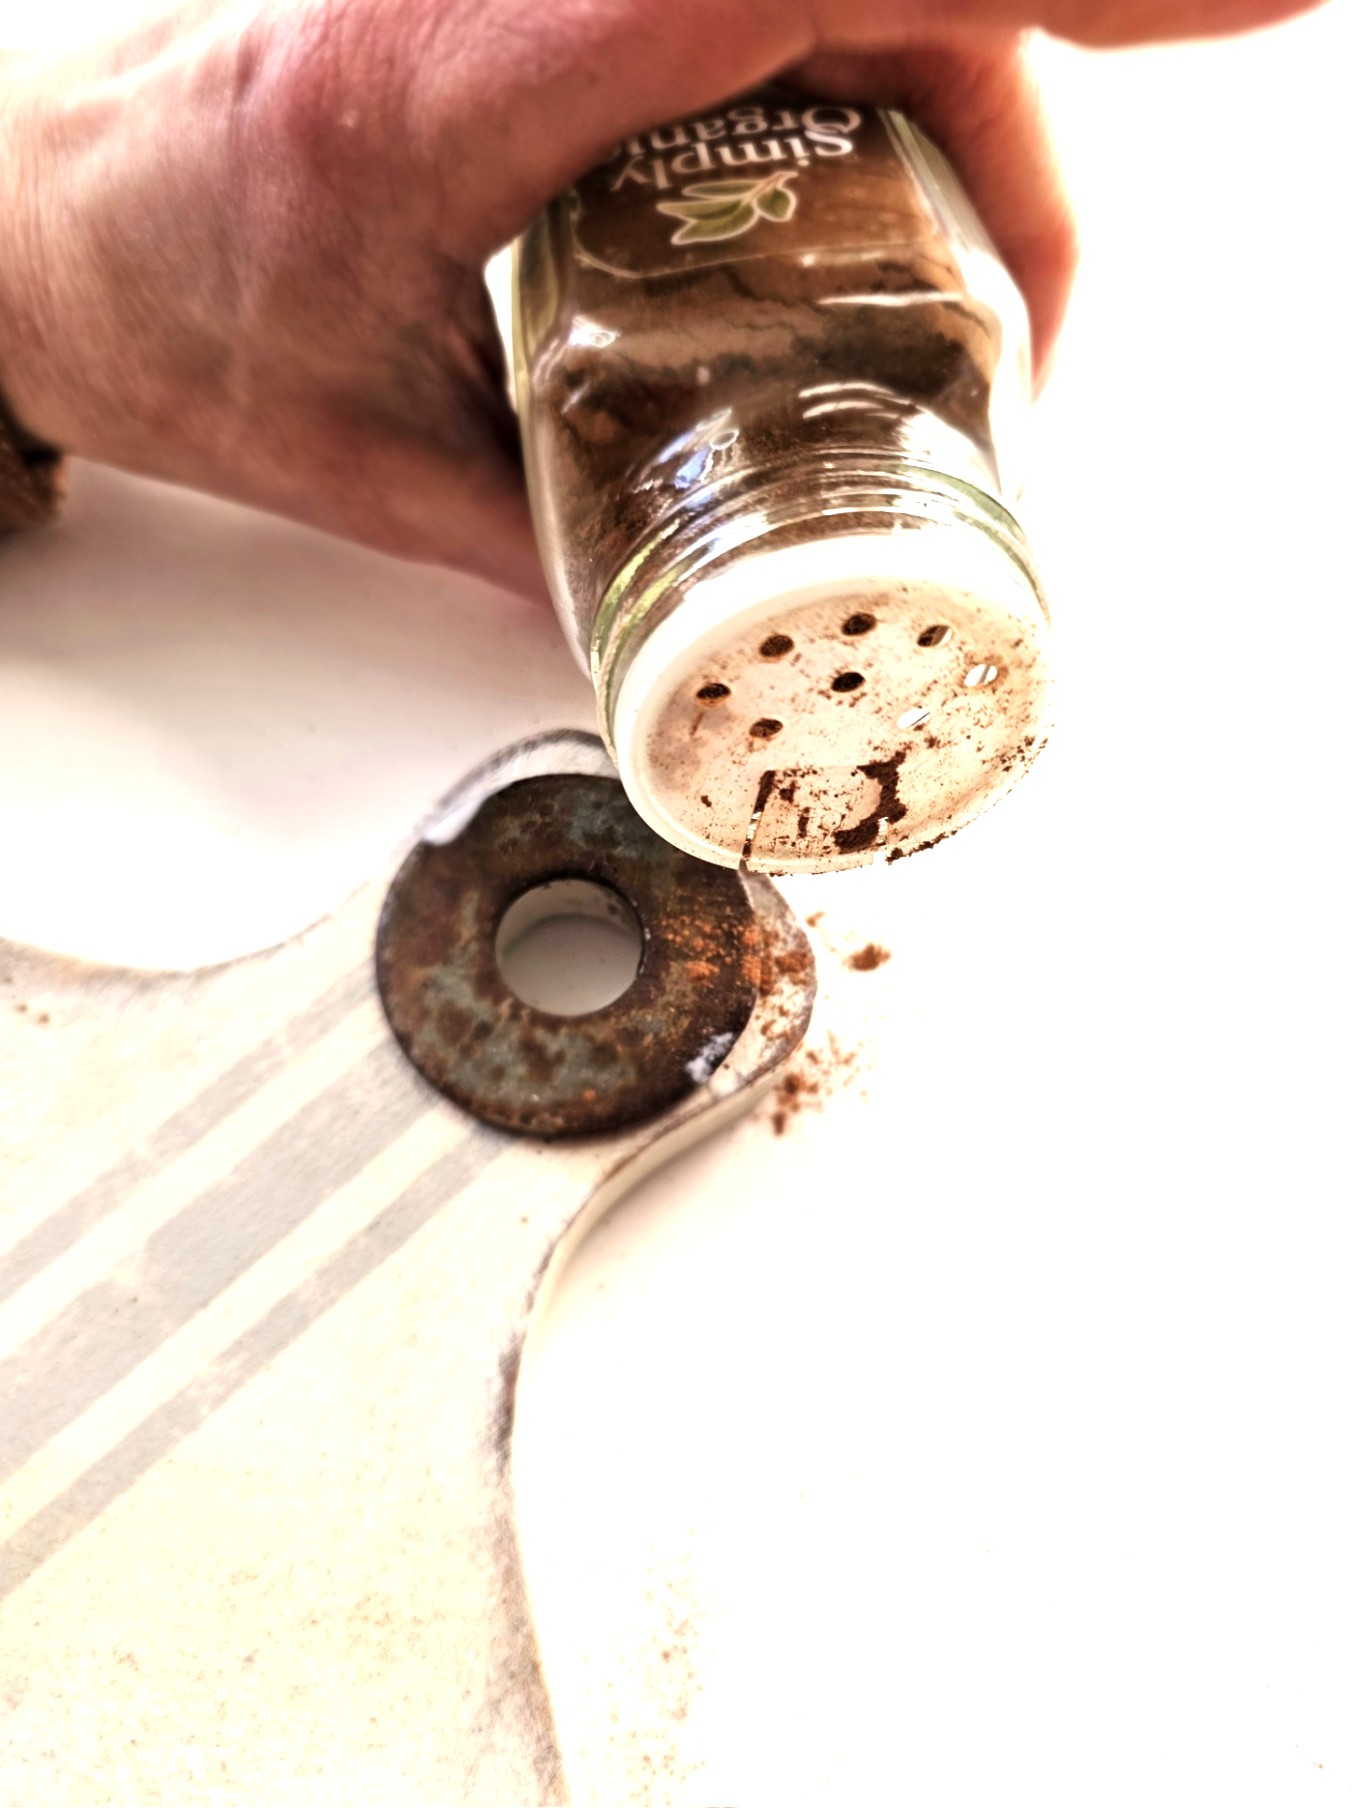
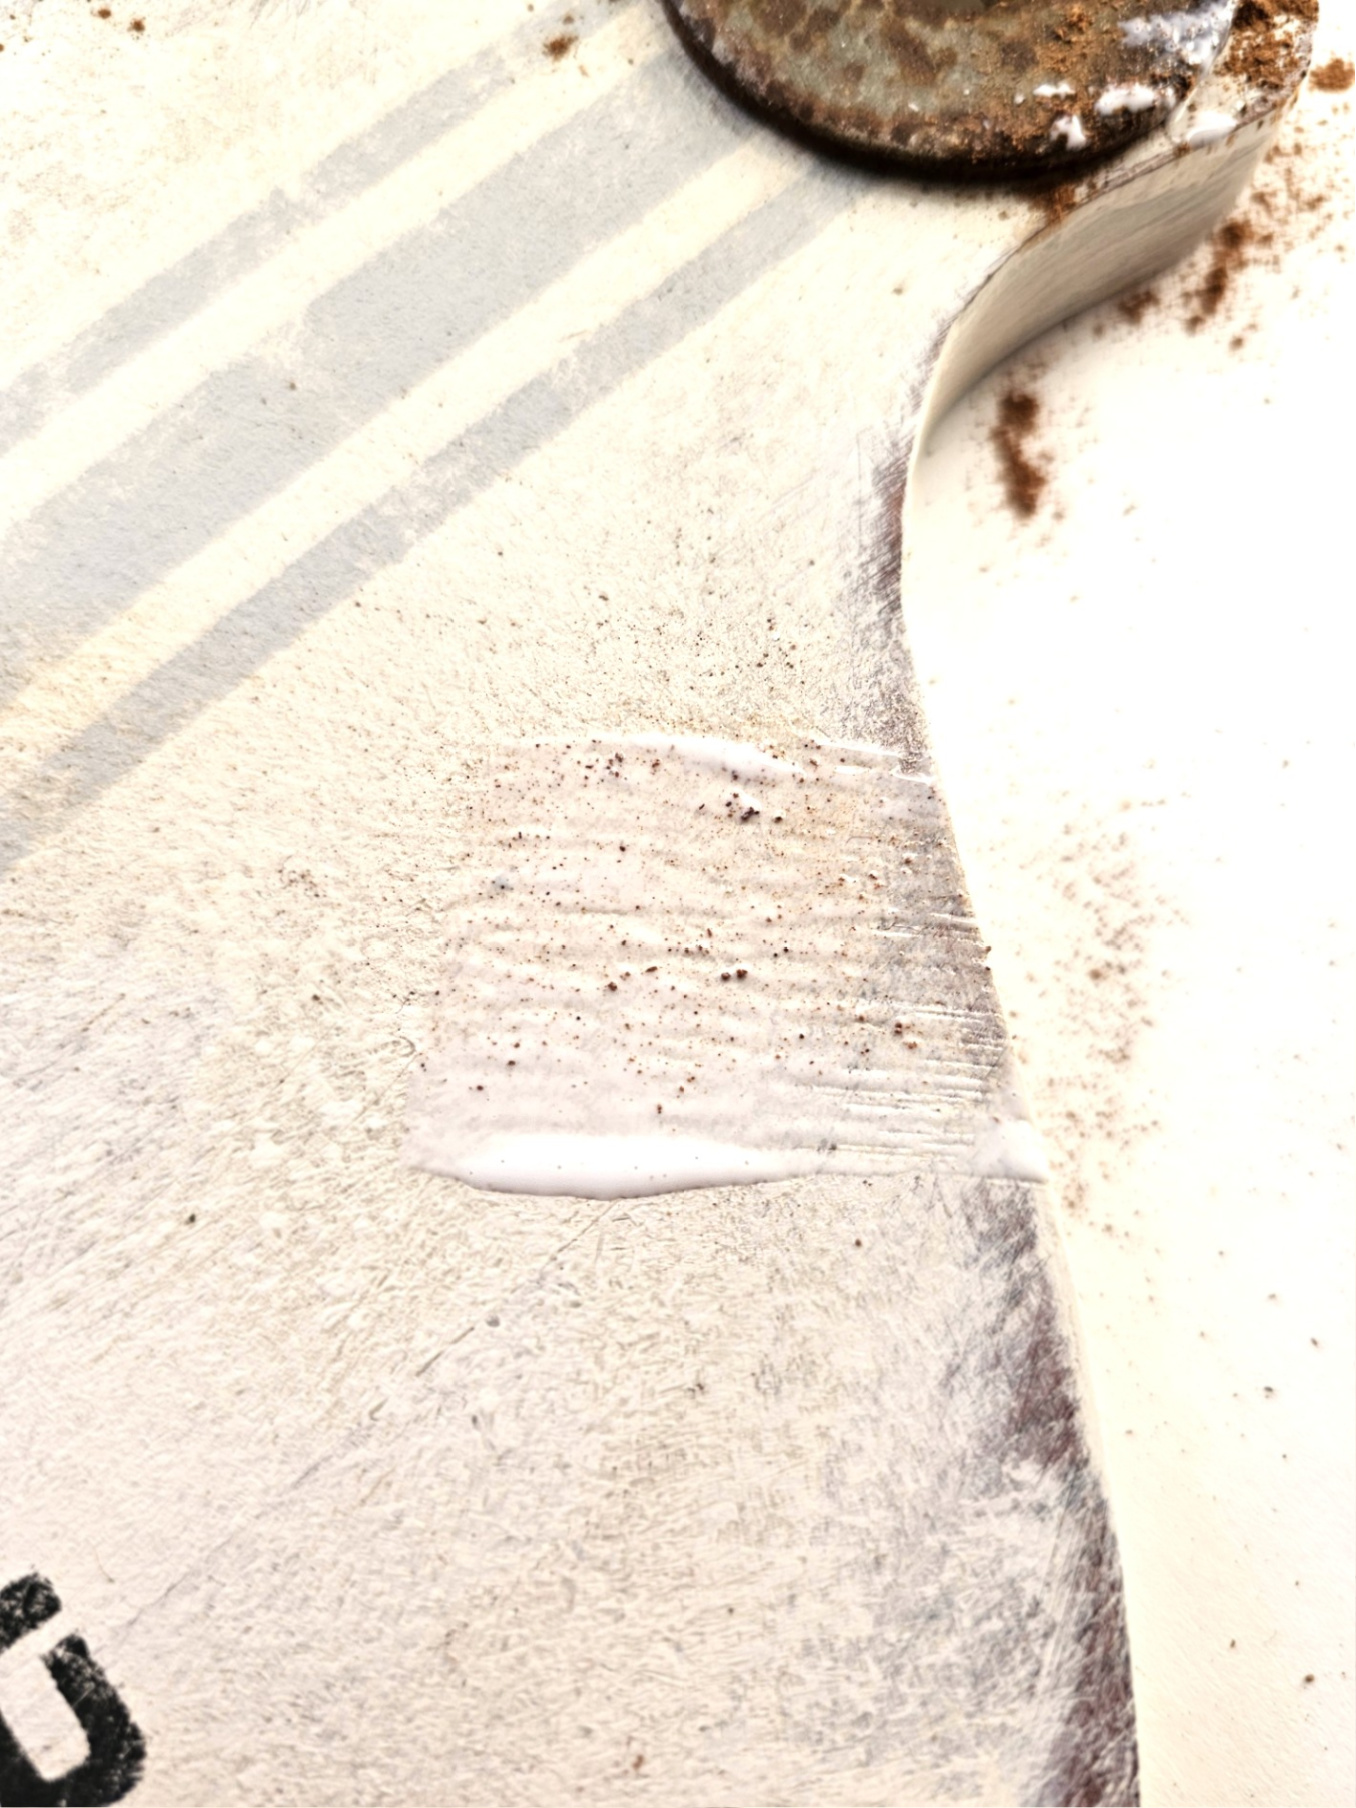
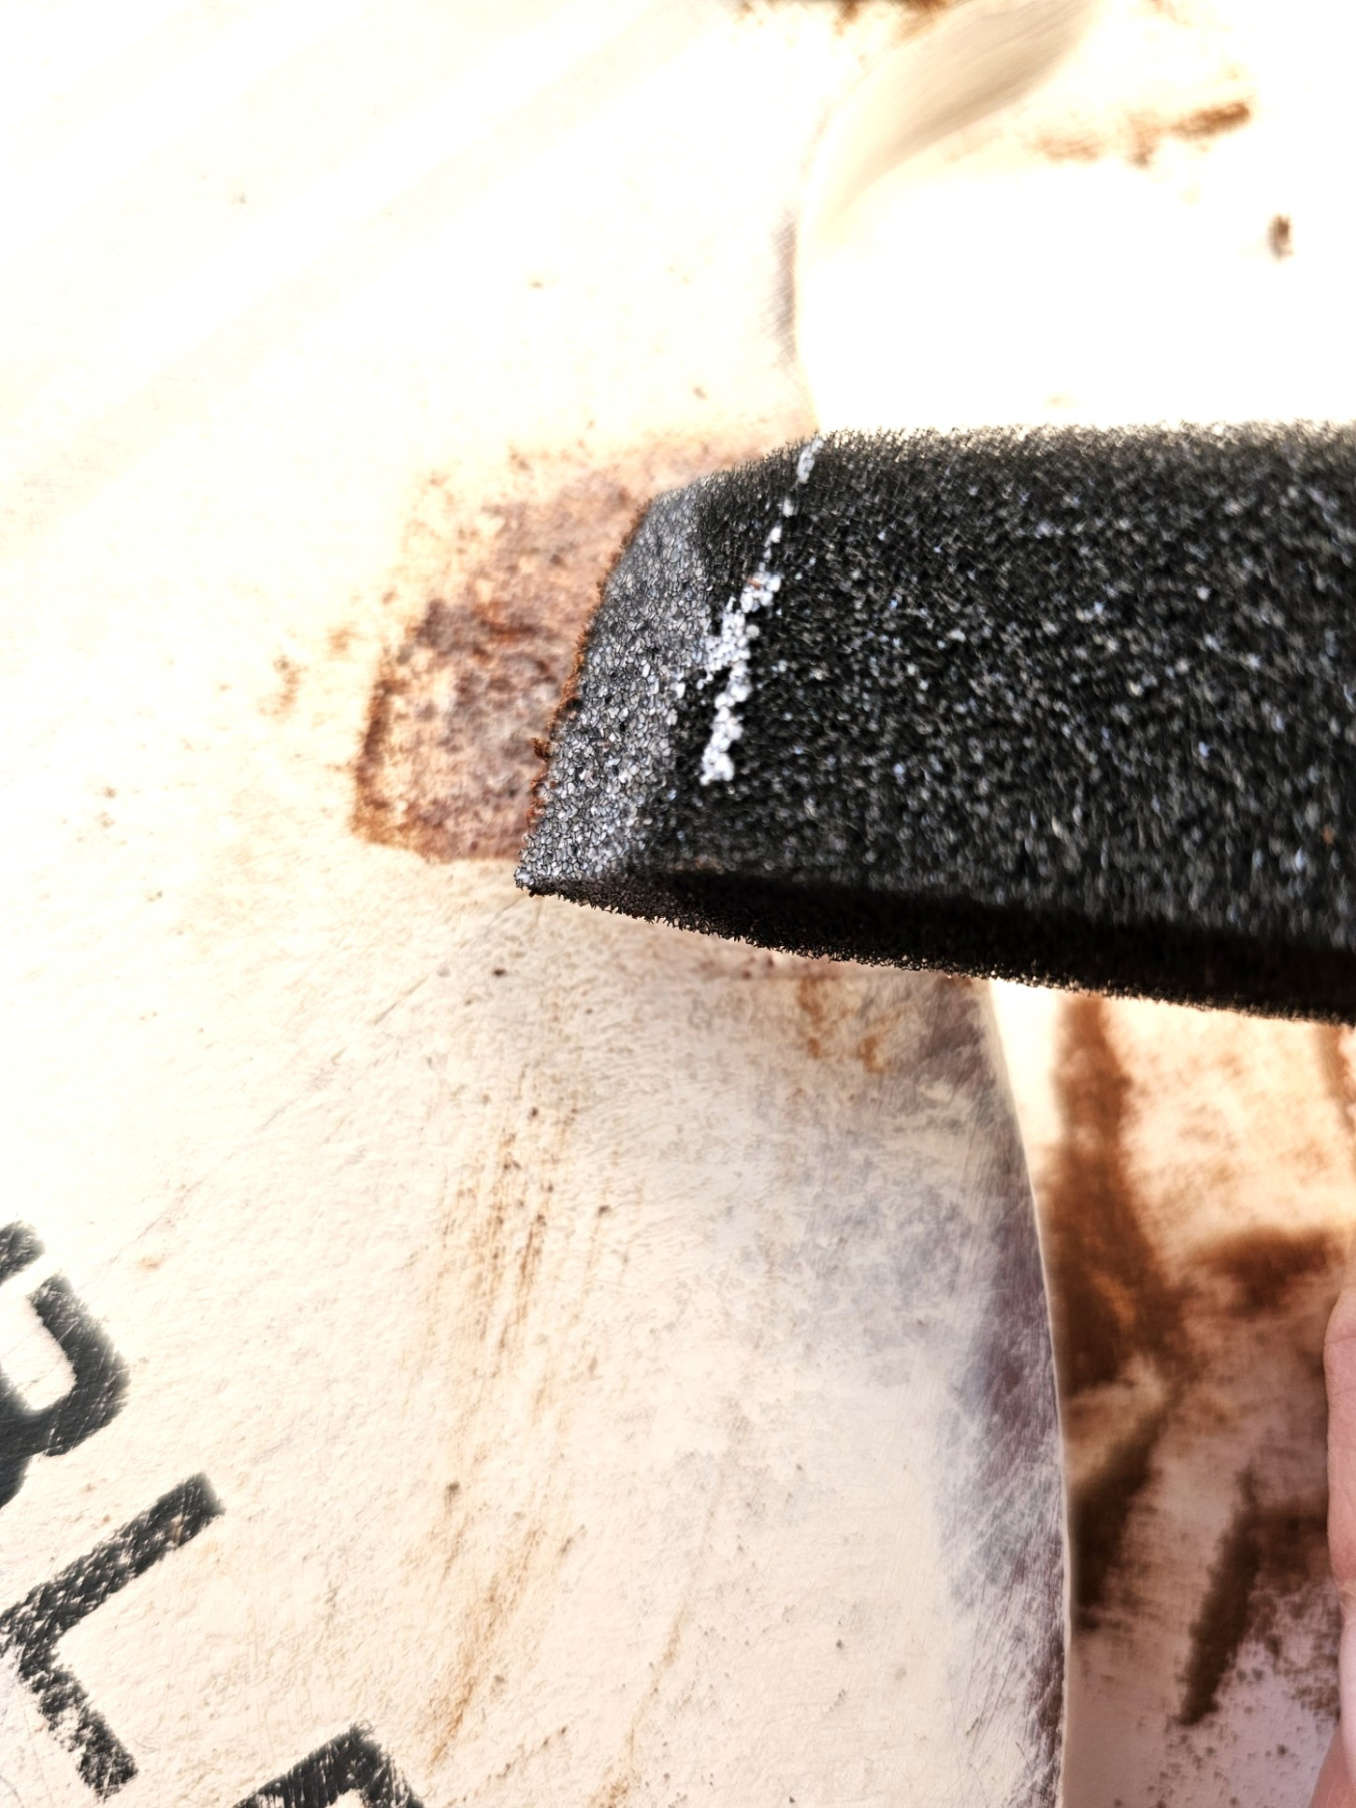
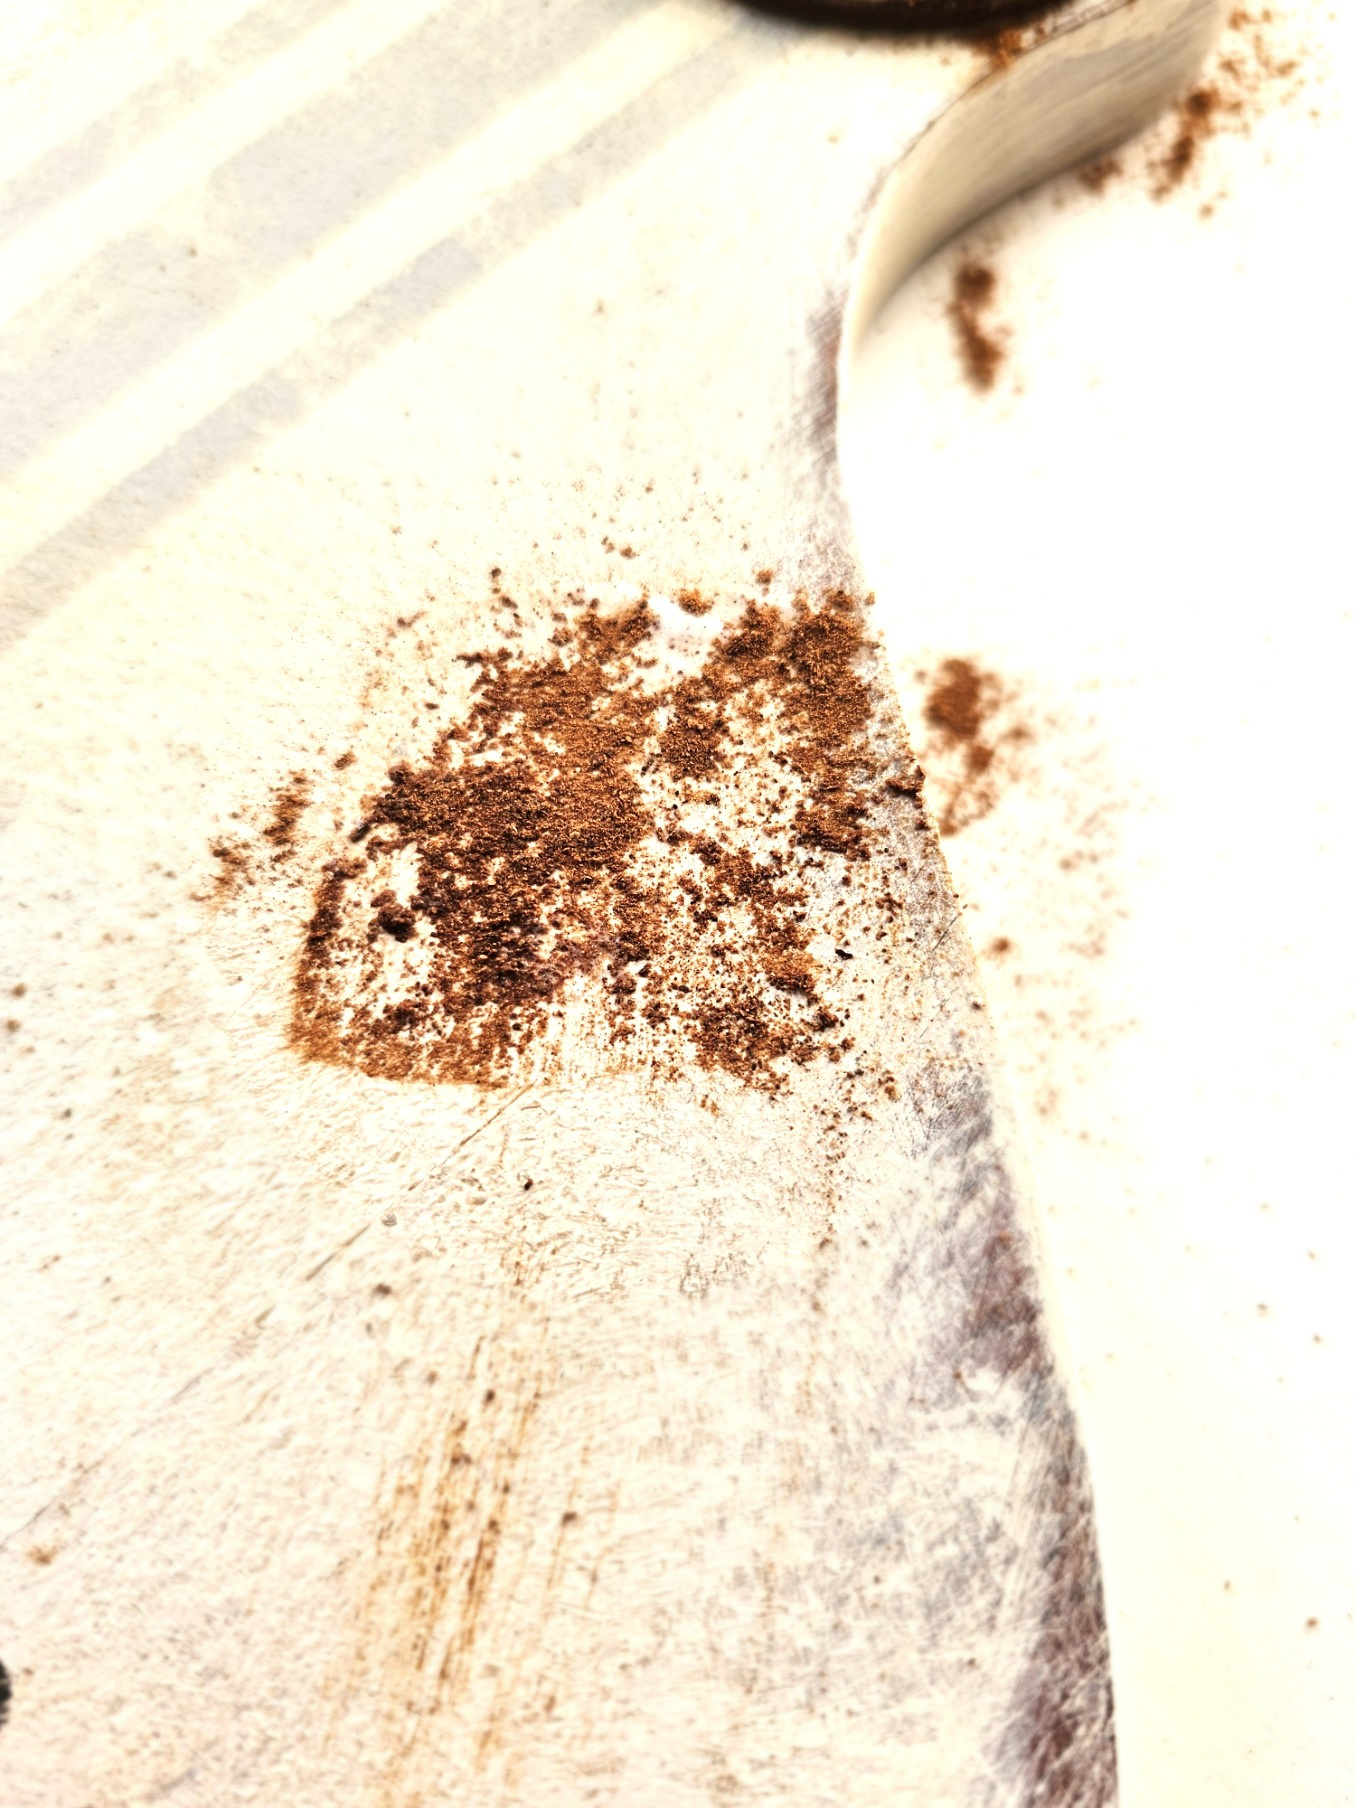
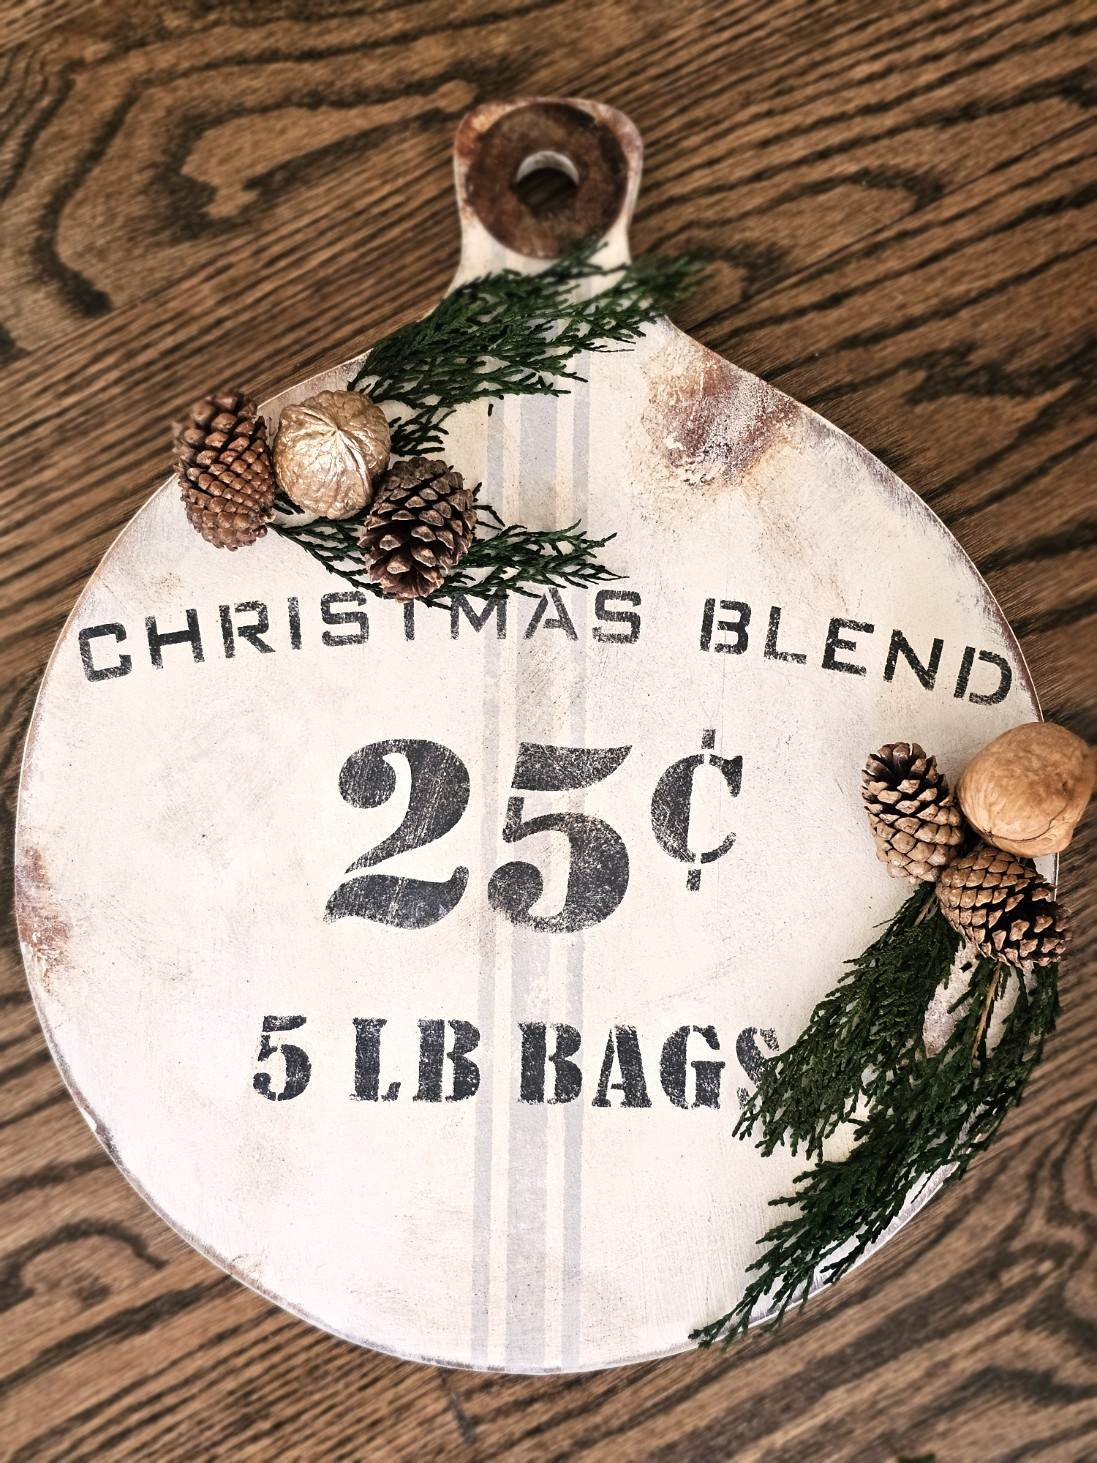
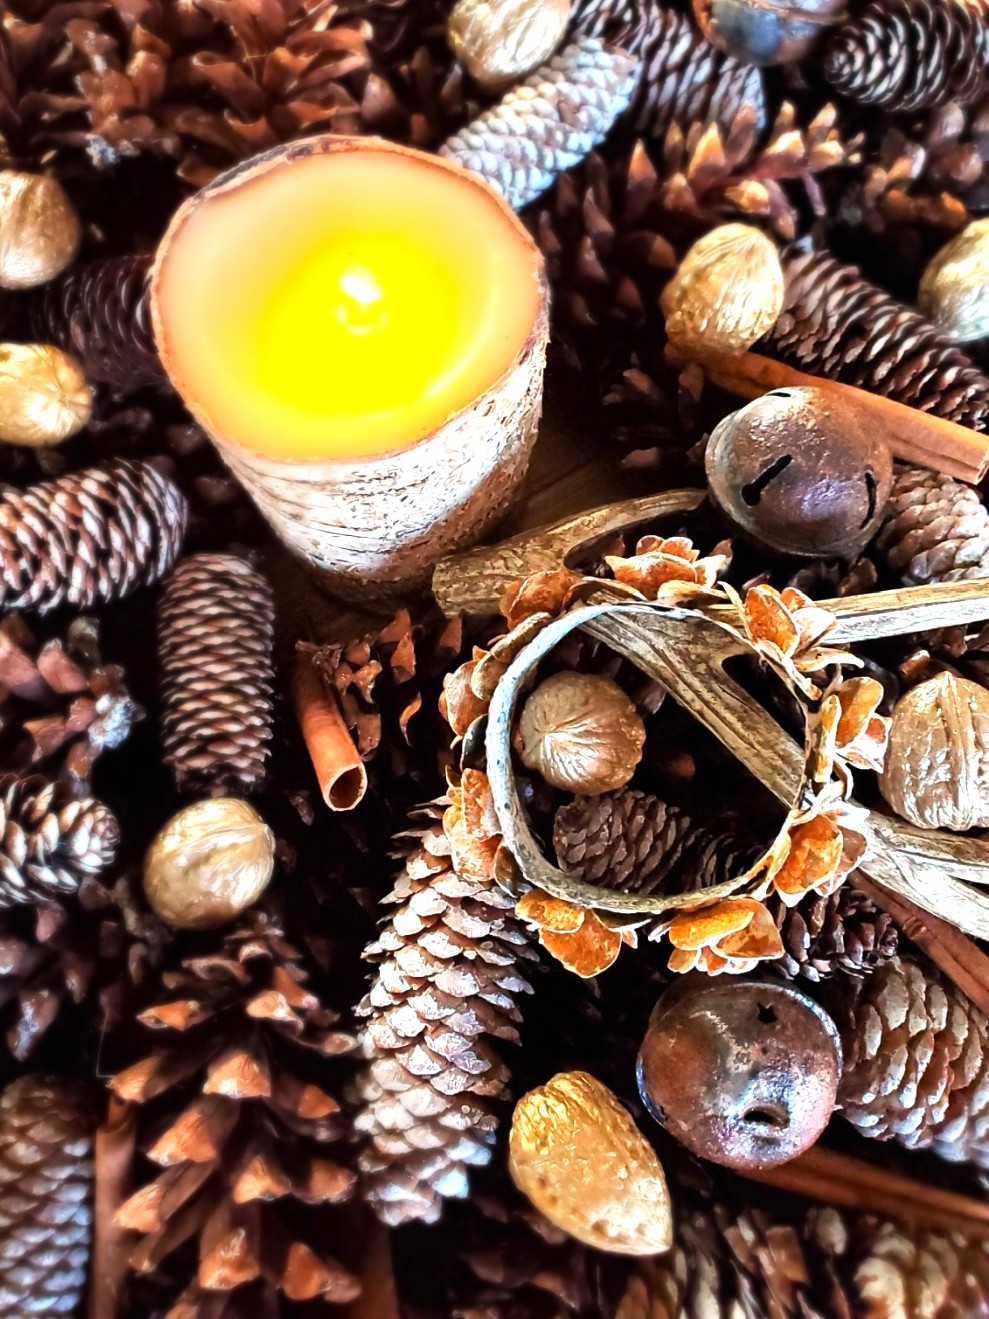

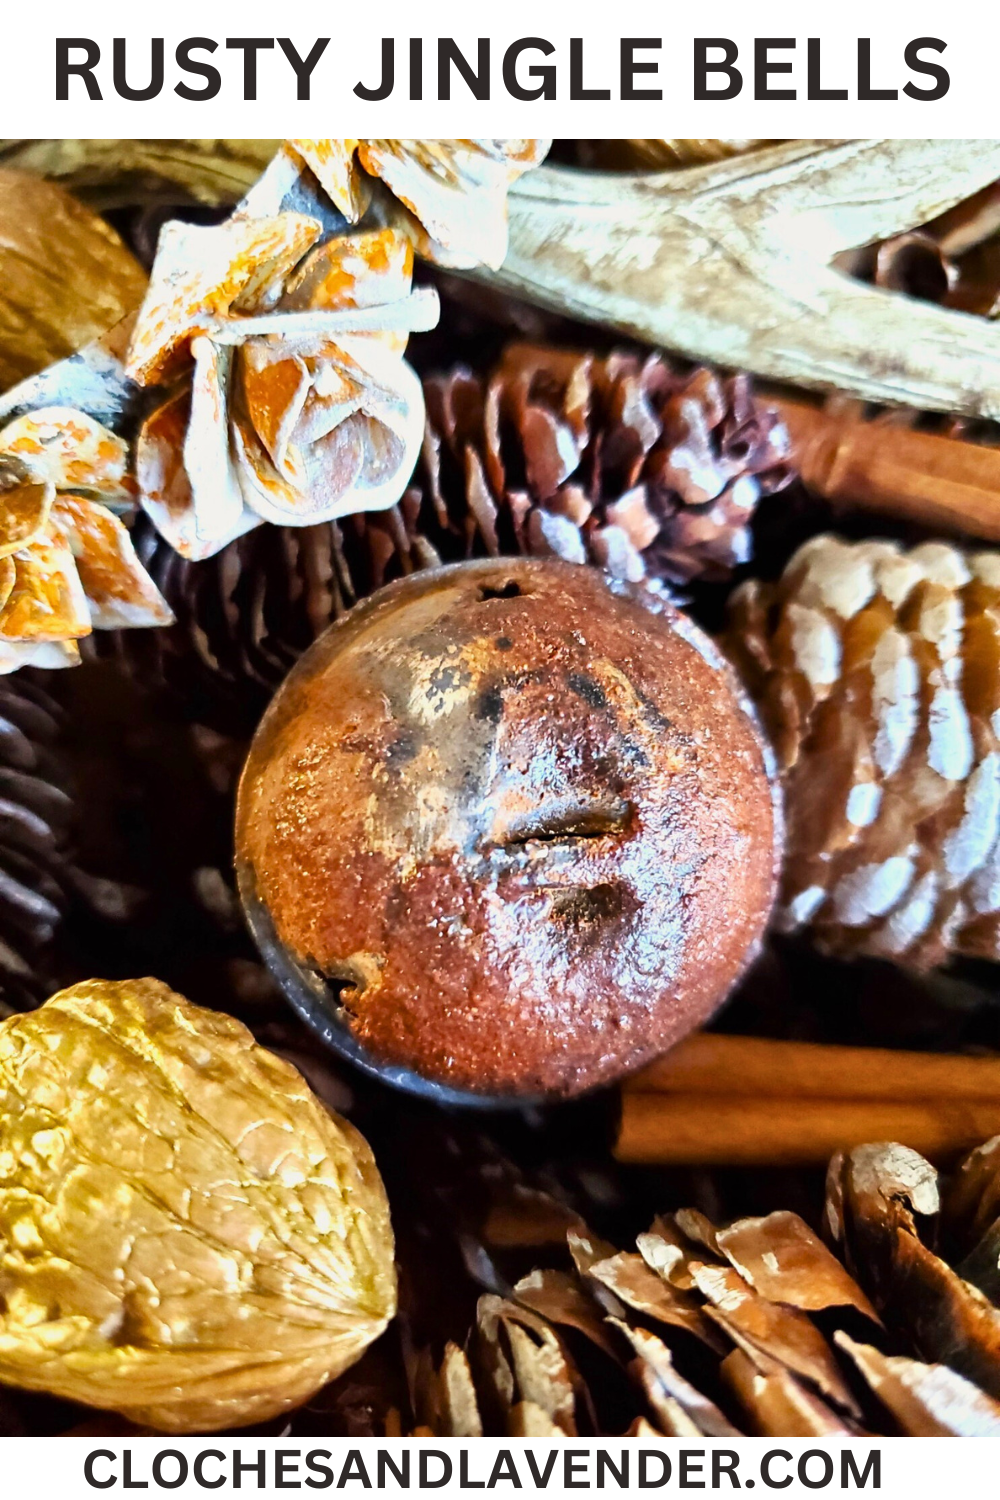

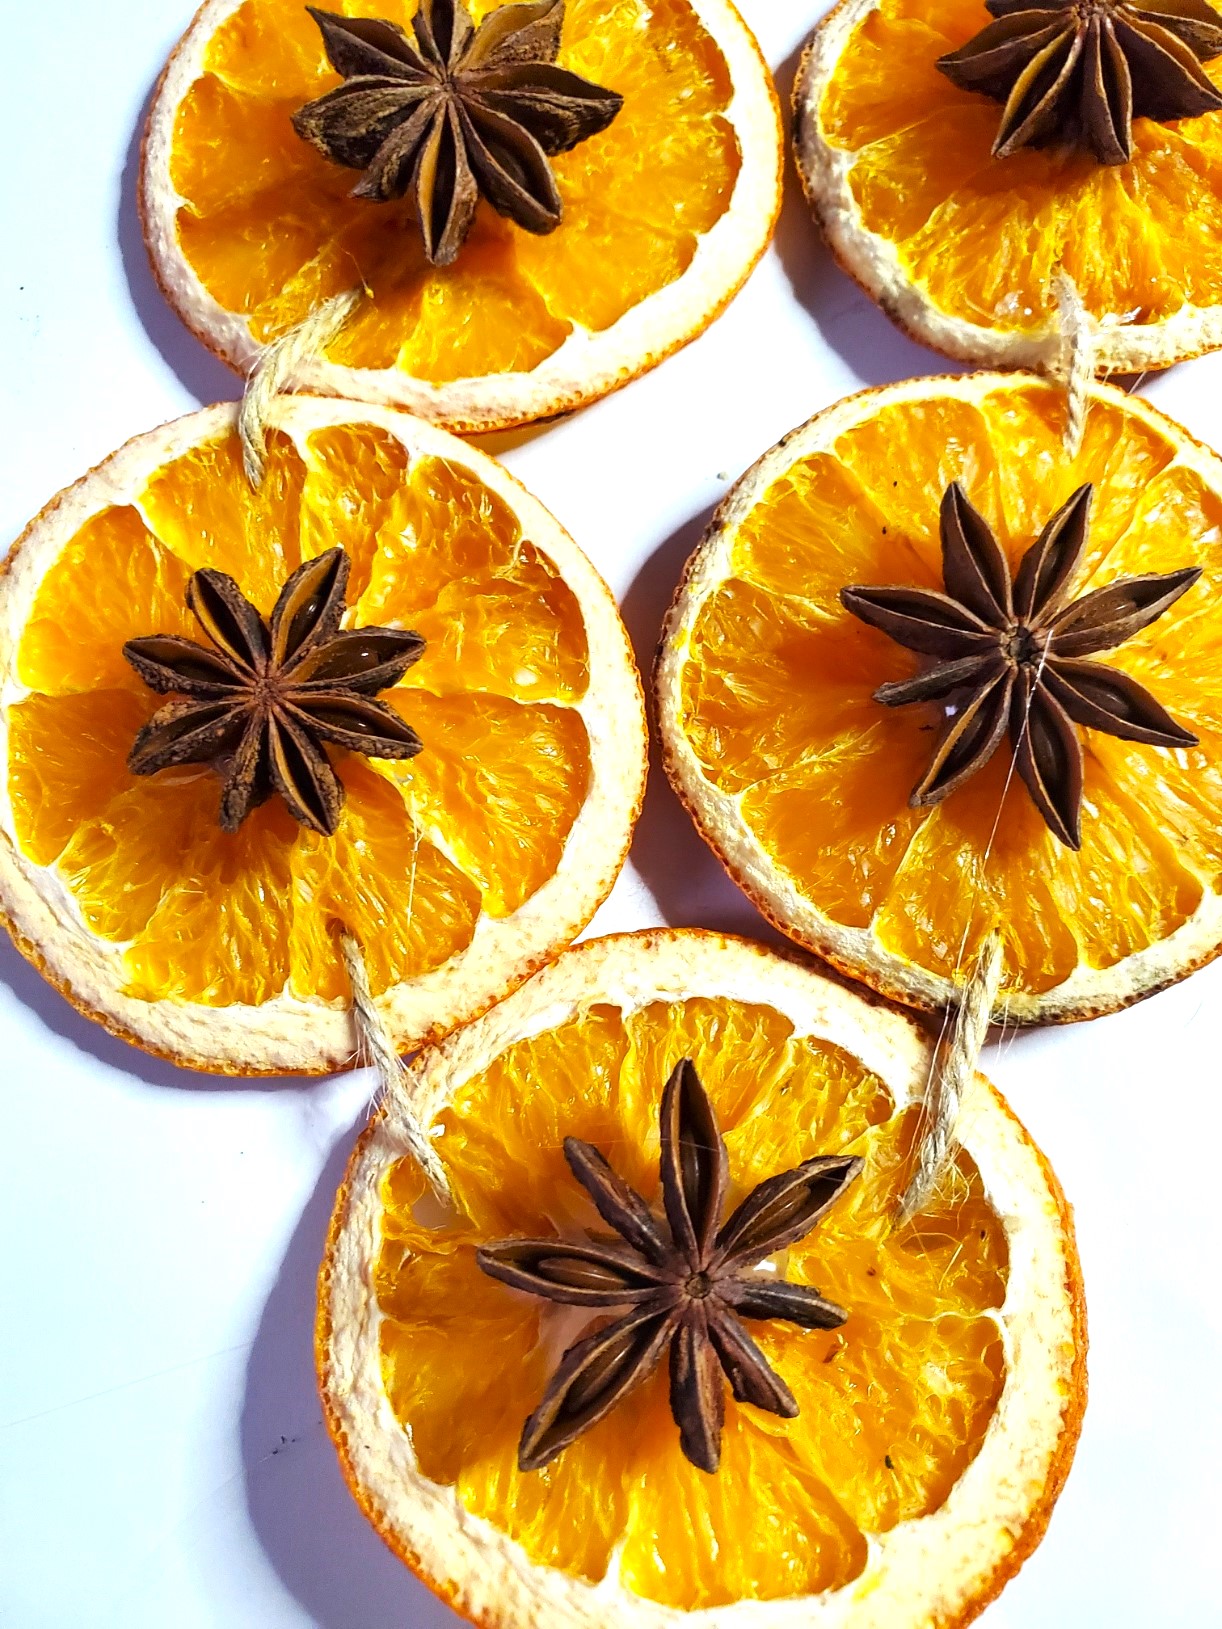
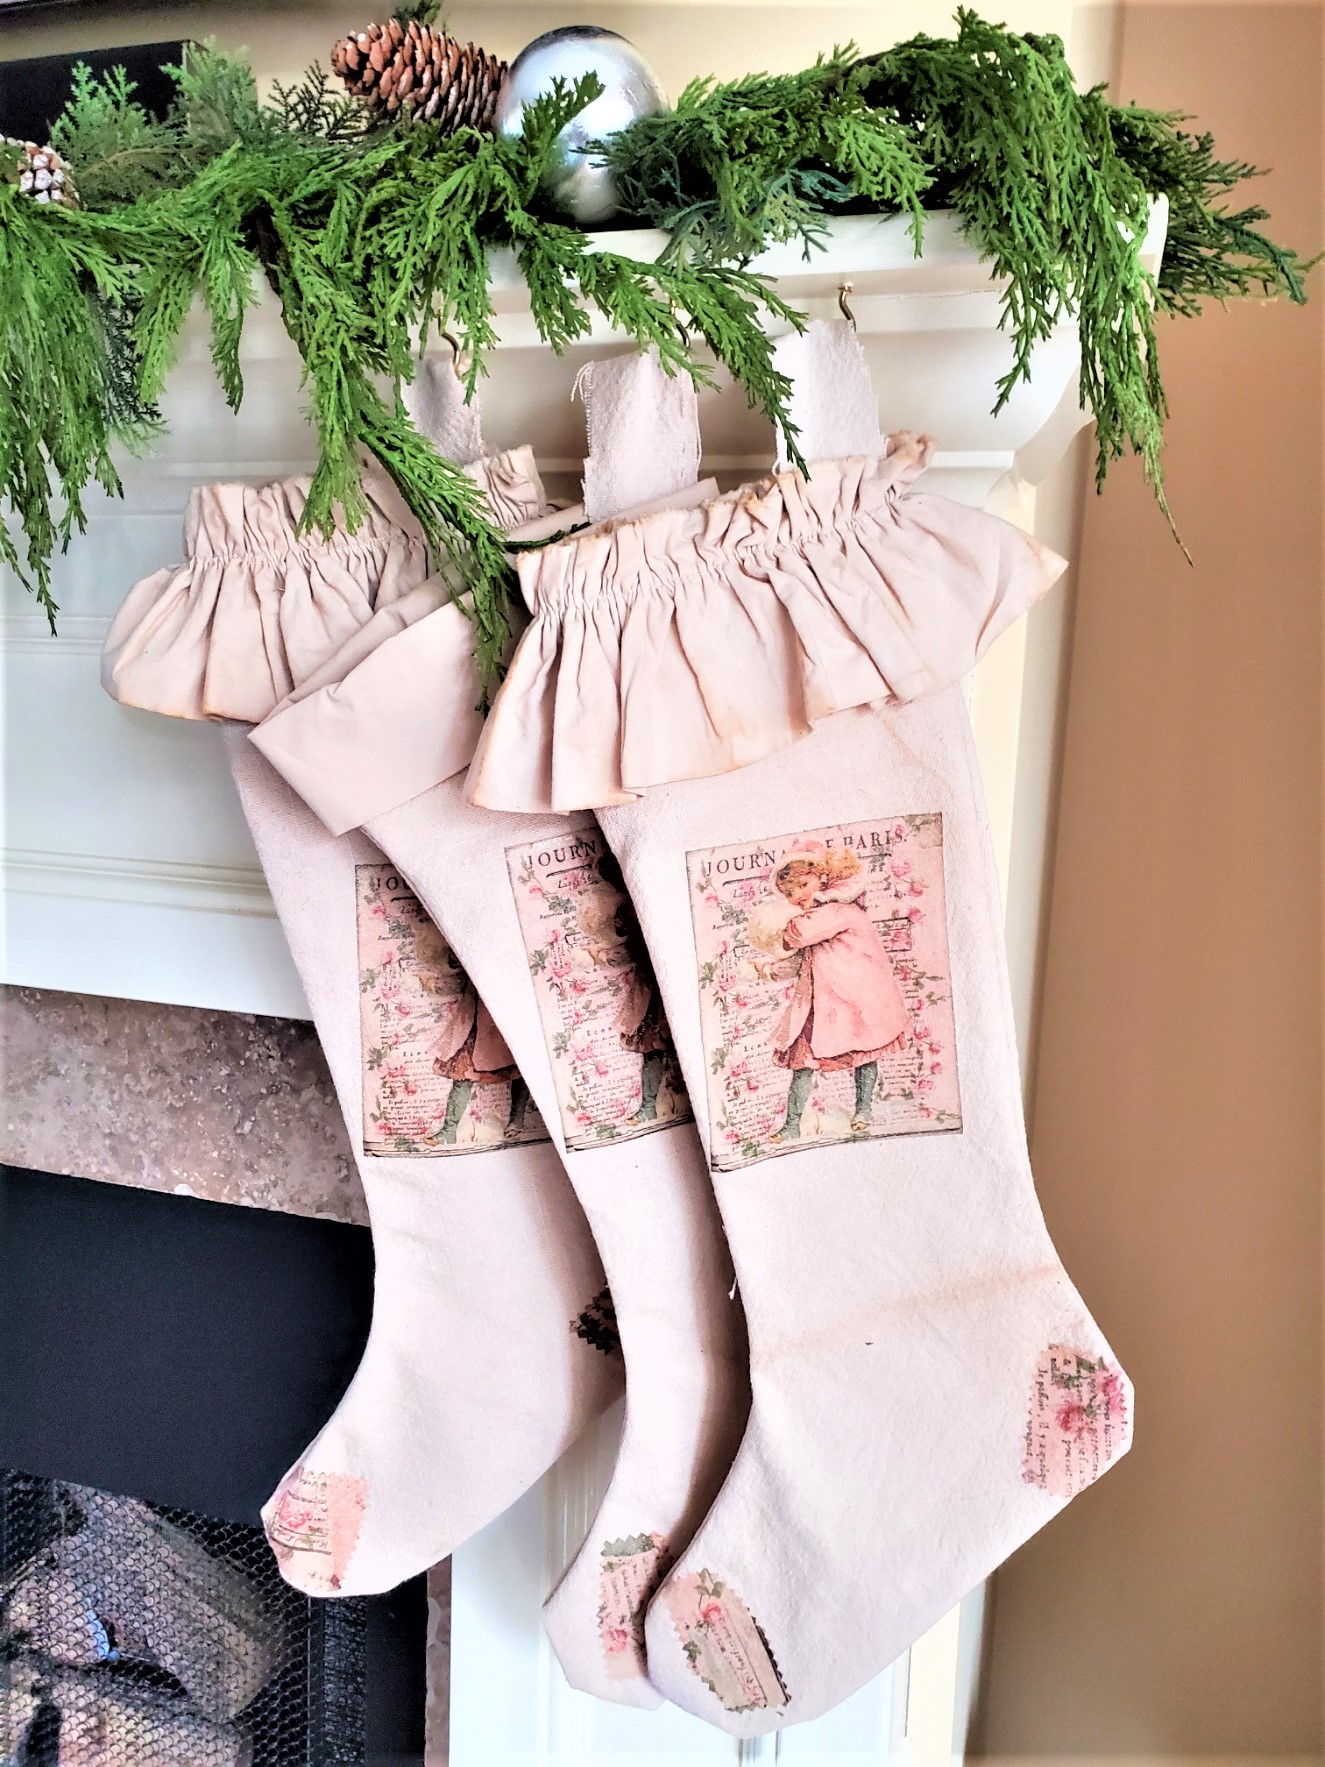
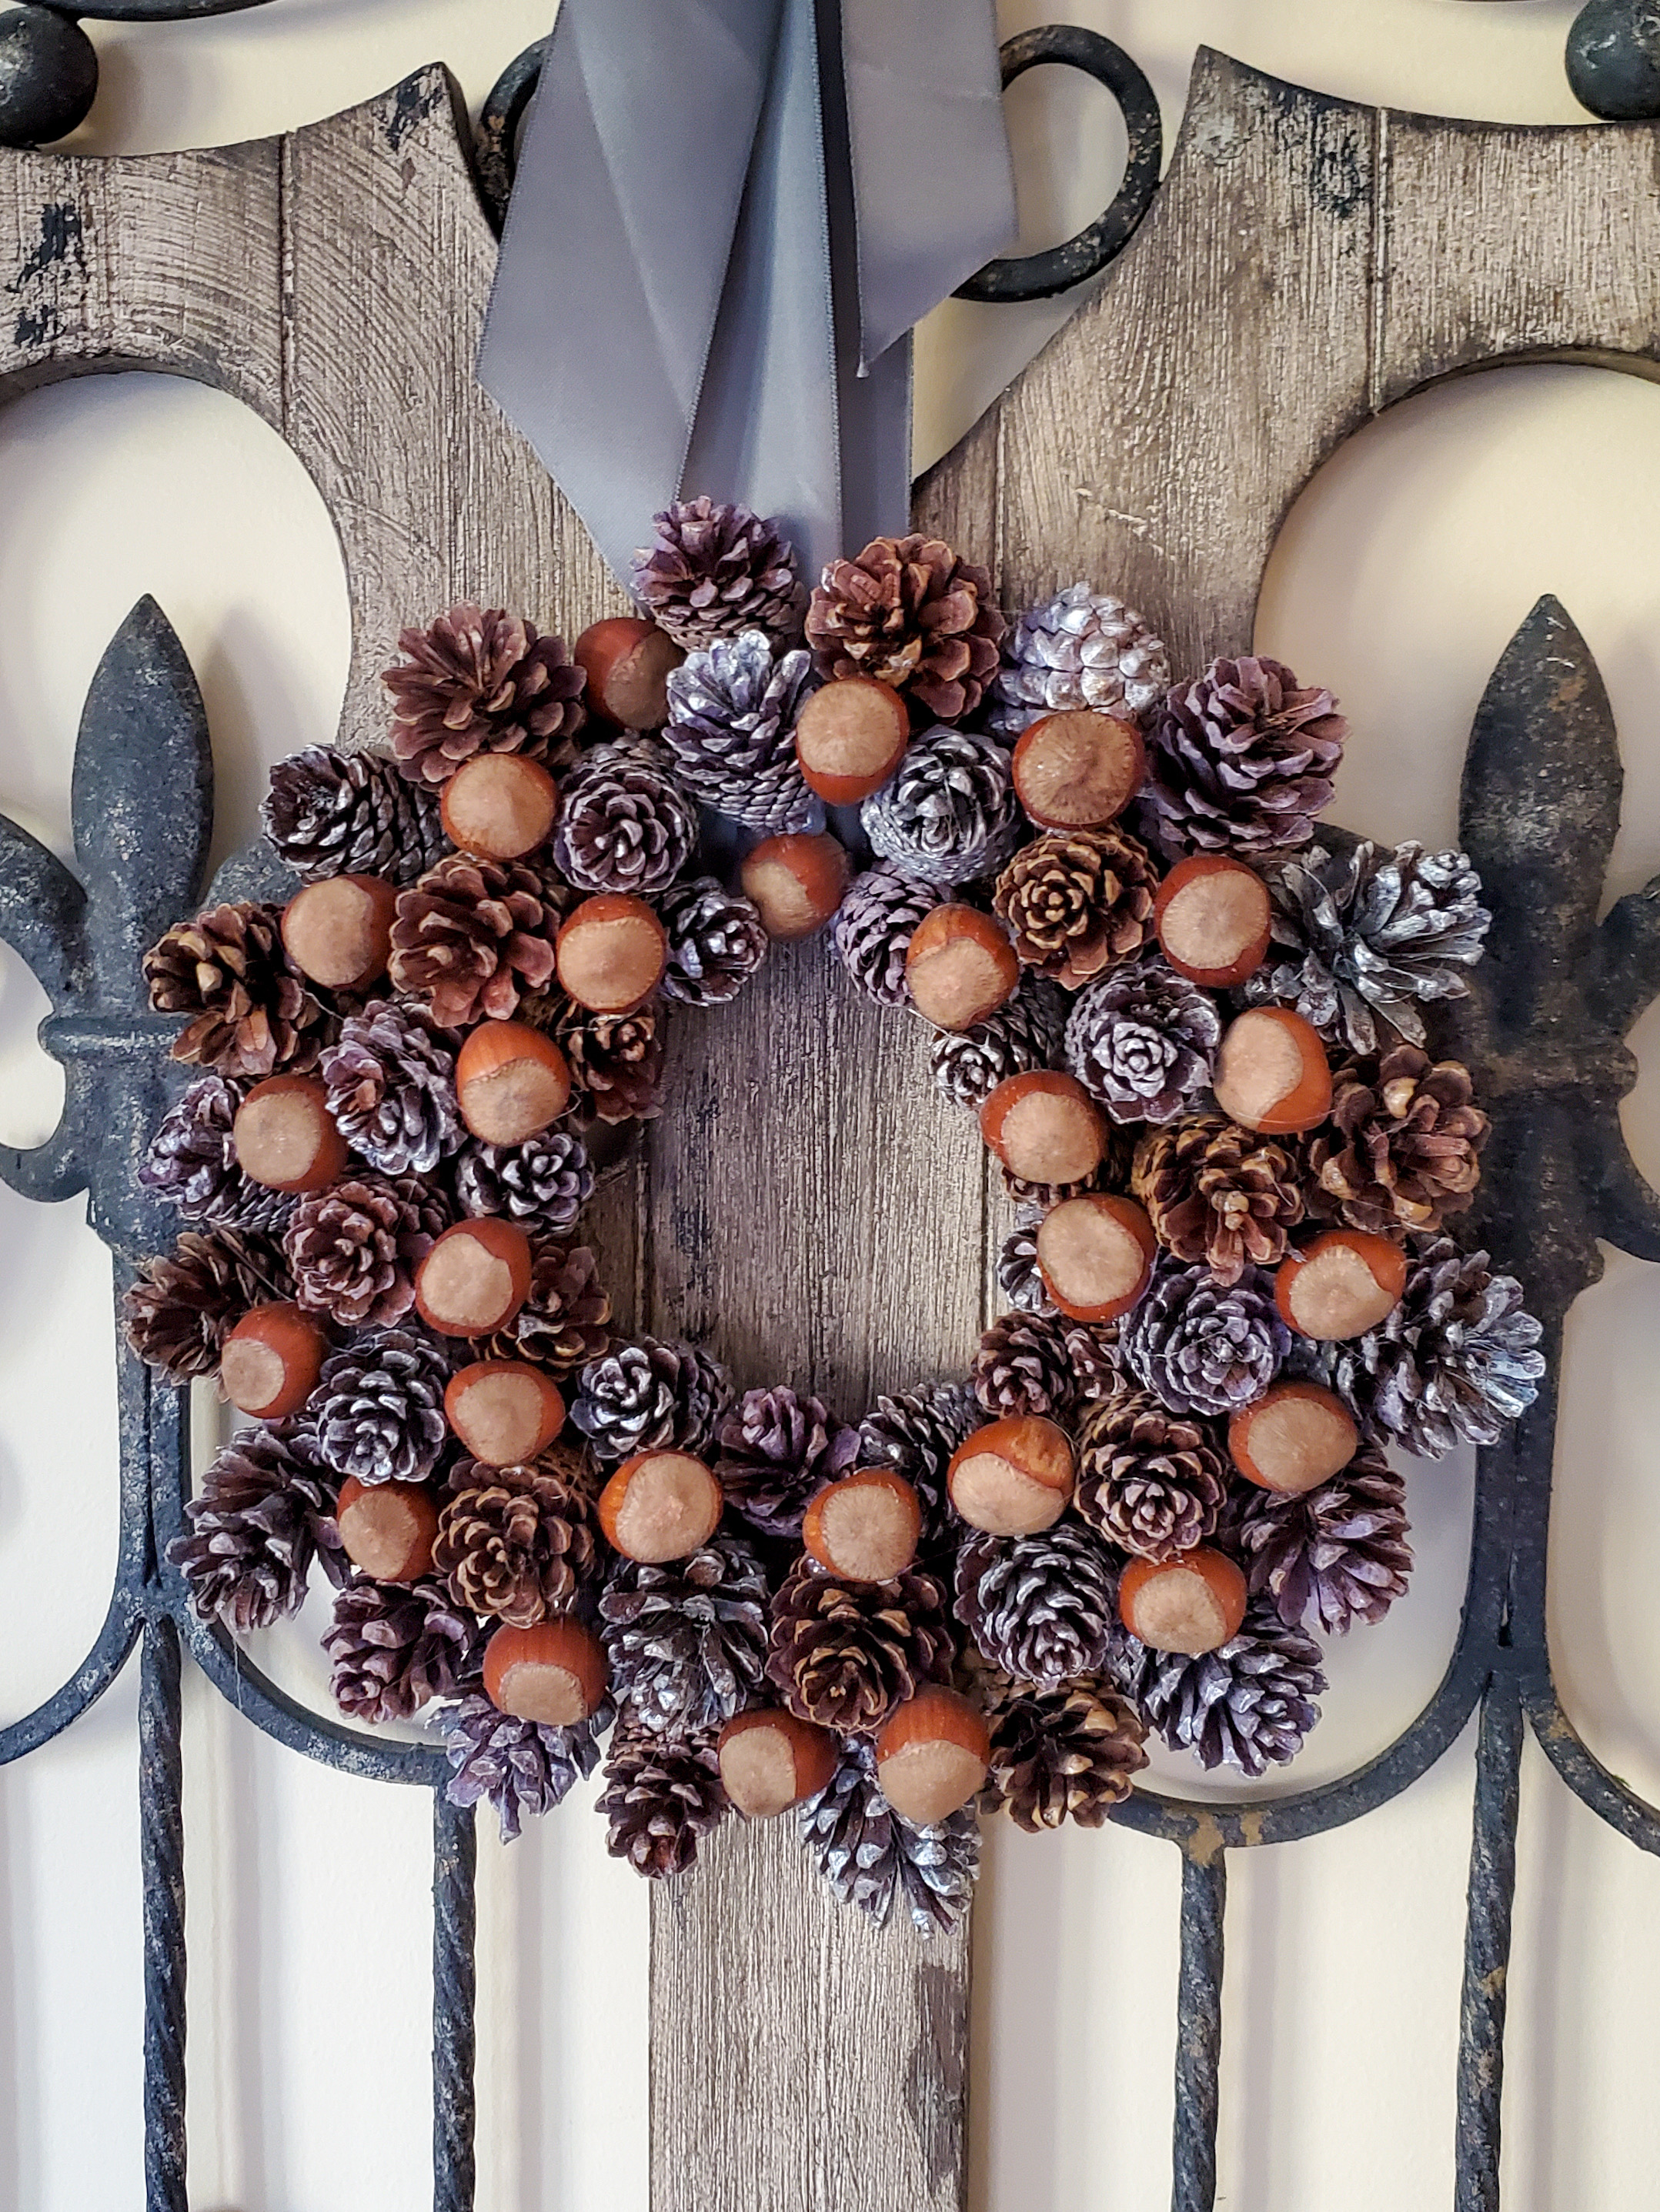


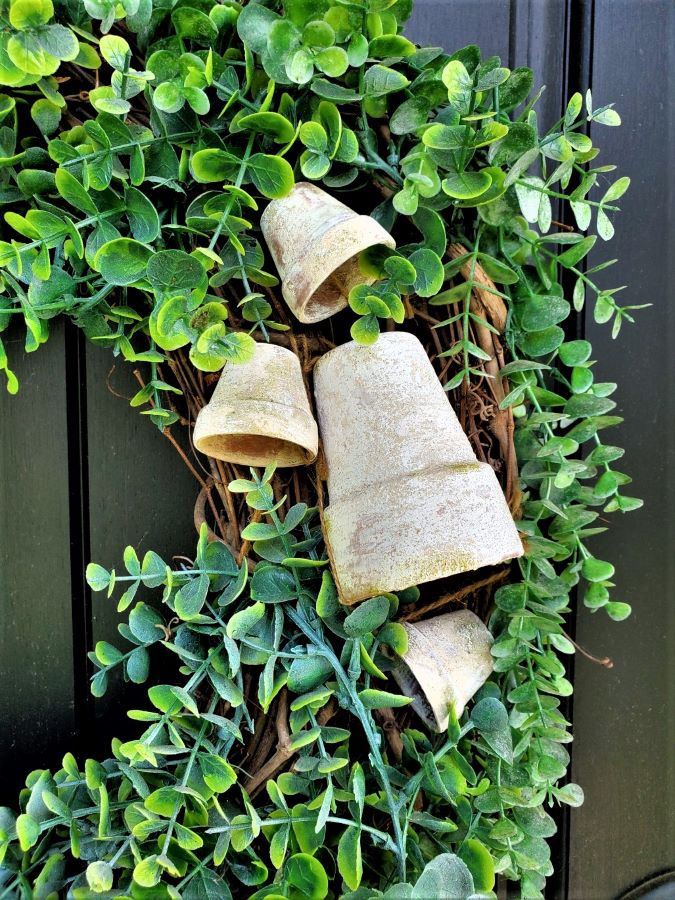
These look just like vintage sleigh bells, Cindy. I can’t get over it. Just pinned and I can’t wait to try this too. They’re amazing! Hugs, CoCo
It’s amazing
Well look at you crafty girl. This is pretty cool. Who knew cinnamon would give that look. Thanks so much for sharing. Have a good week. Kris
Thank you Kris
What an amazing transformation! I can’t believe they went from shiny to rusty! I love the look of vintage jingle bells! Great DIY! Thanks!
Thanks so much!
Such a great DIY. They look so authentic. Pinned!
Thank you so much!
These are great, I’d love some for my tree.
Thank you Rachel. That’s my plan next season
What an amazing and fun idea! Perfect to do for holiday decor! Pinned!
Thanks so much! I’m going to use the same process on another piece too
Those are very cool, Cindy! I love how you always give us the steps in such great detail, making it easy for use to replicate! Thank you!!
Awe thank you so much Kim
Hi Cindy Congrats on KA feature on thistlekeeping!
Thanks Laura!
So very clever Cindy, and excellent directions as to just how you got that great vintage look.
Wow, Cindy. What an interesting way to add a rustic look to metal. I would never have thought of cinnamon. Does it make the house smell wonderful too? That would be a bonus to the pretty jingle bells.
Thanks Carol and it’s the best because this technique can be used on so many things. Unfortunately they don’t smell when they are finished because of the second coat of Mod Podge.
I’m about to make some plasticky bells look vintage, this is a great idea for them.
This is so fun, fast and easy. I can’t wait to see your bells!
I learned something today!!! I had no idea there was such a thing as zinc paint. Thank you for sharing. I love how the cinnamon actually looks like rust in the end! Brilliant. I will be using your cinnamon idea for a bunch of plastic items. Great project Cindy.
I love your “rustic” bells, Cindy! I would’ve never thought to use cinnamon to age something; such an ingenious idea! I bet your home smells heavenly too!
I love the rusty look of these bells! Thank you for sharing how to make them! It was fun hopping with you ! Have a wonderful holiday season!
I love your diy rustic bells! They look awesome! Thank you for sharing!
Who knew cinnamon was versatile? Impressive and so festive. Pinned too. Missed hopping with you this round. Linda
These are great for the more vintage and rusty look, but I’m the more shiny and bright. Great idea though on how to use cinnamon for a rust look.