
No Sew Christmas Stockings And Free Pattern
Get ready to elevate your Christmas decor with some DIY magic! In today’s blog post, we are unwrapping an easy project for the holiday season, making your no sew Christmas stockings and free pattern.
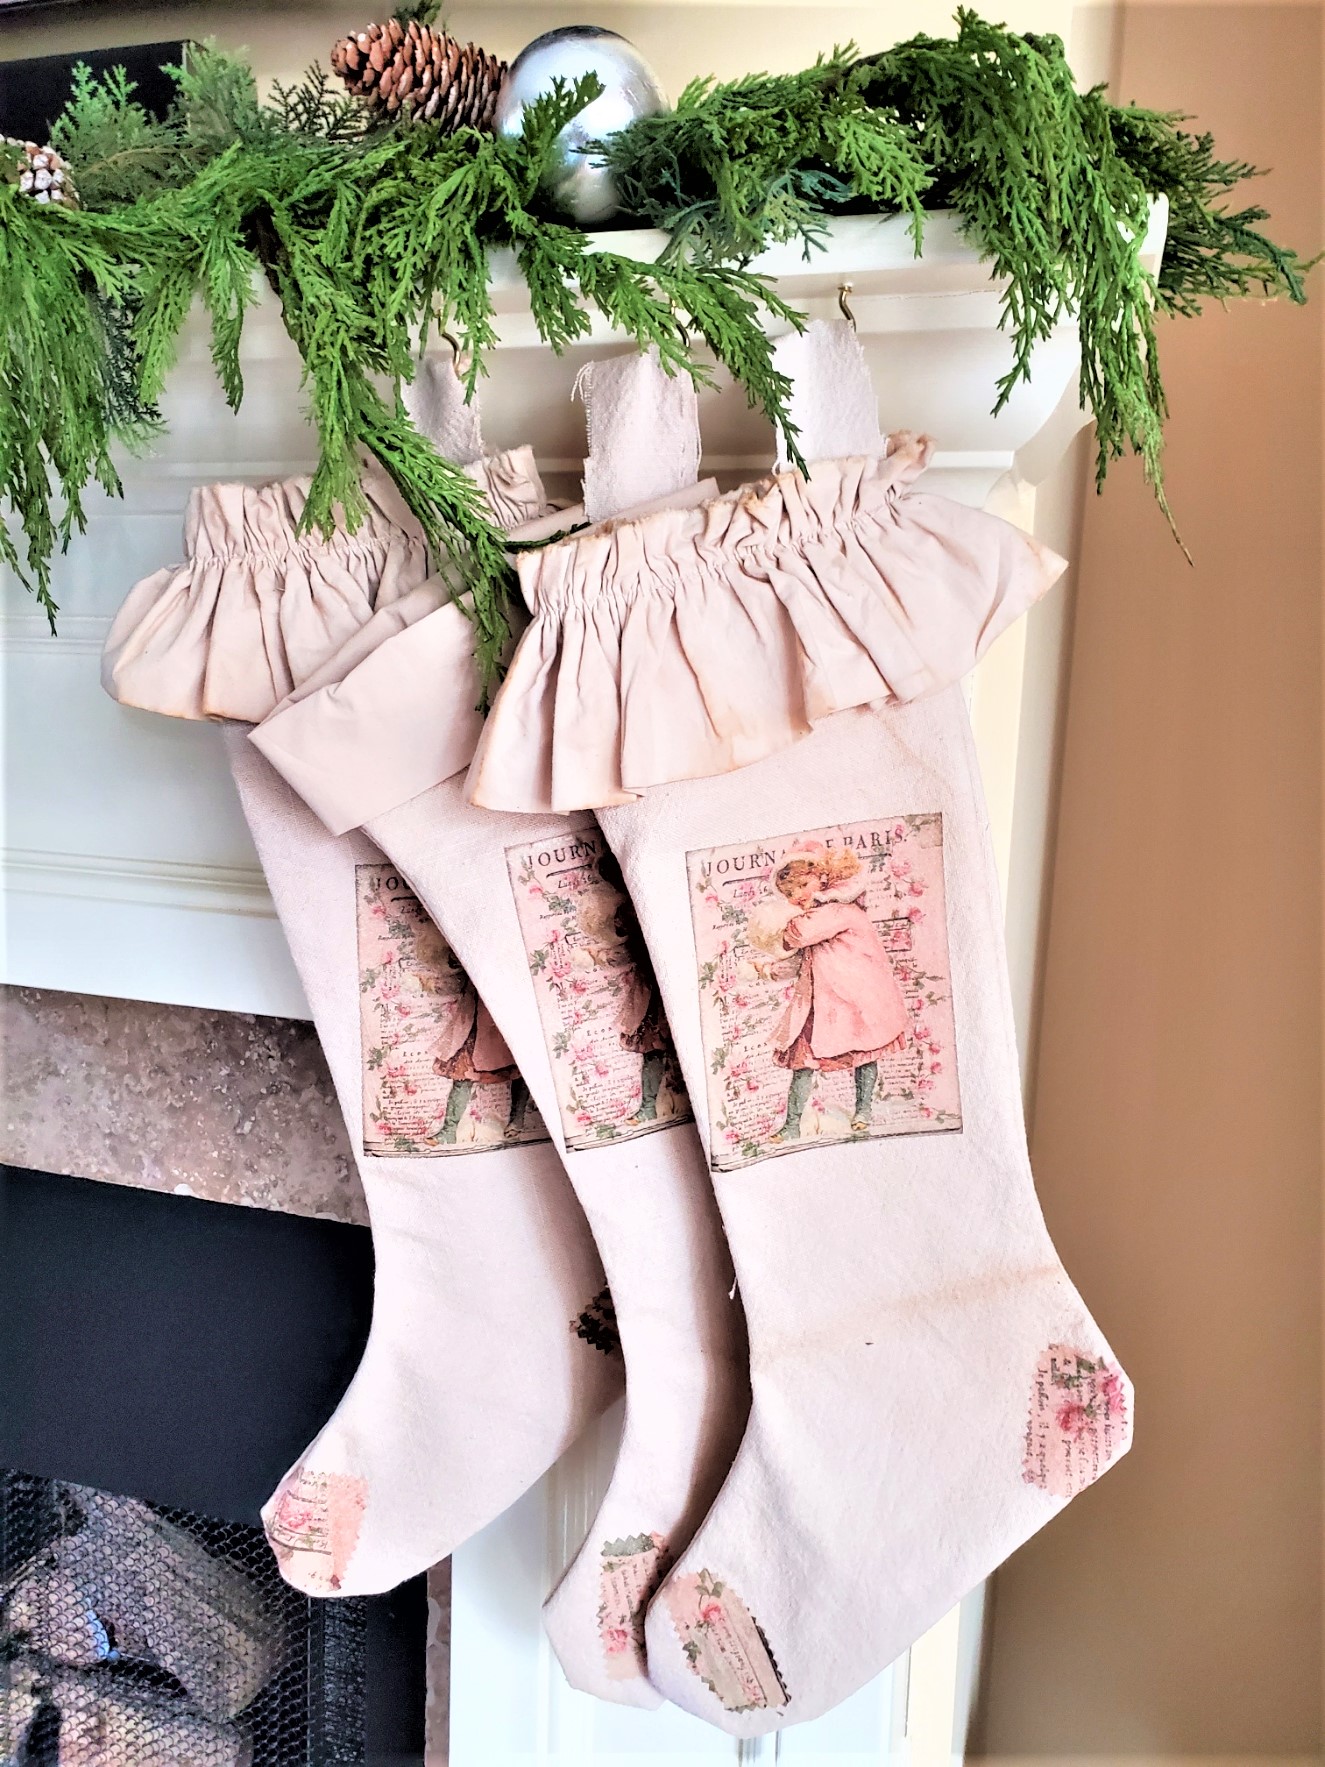
This is a great time to make your own homemade stockings and come down on Christmas morning and see these overflowing with goodies.
Jump to DIYFollow along as we share step-by-step instructions to make your own Christmas stockings. For this easy project, the best part about making your own Christmas stockings is you don’t need much fabric. You only need a piece of fabric that is a 1/2 yard. Include an extra 1/4 yard of fabric for the cuff piece.
The best part, we are sharing a free pattern to make these new stockings it is an easy project and requires no sewing patterns or sewing machine! I can’t even sew a button, no lie. I can make any craft project and paint furniture, but sew, nope, not one bit.
So, let’s learn how to make your own Christmas stocking using this basic template. So, put on your favorite movie, and let’s create this DIY stocking project together to add to our Christmas decor.
I remembered having an old tablecloth that had shrunk and it occurred to me that this would be a great way to repurpose it for a set of new handmade stockings and let me tell you this is so much fun and easy.
â–º Table of Contents
Reasons To Make These Today!
Ready to Craft Magic? Get Your Free Pattern Now!
Dive into the joy of crafting no-sew stockings with our free pattern. Download it today and start creating your festive masterpiece!
No Sew, All Wow! Join the DIY Fun: Grab Your Free Pattern!
Unleash your creativity without a single stitch. Snag your free pattern now and join the community of crafters making stunning no-sew stockings.
Start Your Festive DIY Journey: Click for Your Free Stocking Pattern!
Gather your 1/2 yard of fabric and let’s make holiday magic! Click to get your free pattern and embark on a no-sew stocking adventure.
Most Asked Questions
What Can I Use Instead Of Stockings?
You can get creative with alternatives to traditional stockings for the holiday season:
- Socks or Mittens: Hang festive socks or mittens for a cozy and playful alternative. Add embellishments such as wooden snowflakes. Add a thin coat of Mod Podge and white glitter and a dot of hot glue and you have cute stockings.
- Decorative Bags: Use small decorative bags, either store-bought or handmade, to hold small gifts. Make sure to add a pretty piece of ribbon and festive tissue paper to give them a festive look.
- Hanging Fabric Pockets: Create pockets from colorful fabric or faux fur and hang them in a row for a unique and decorative touch.
- Baskets or Wooden Crates: Arrange small gifts in baskets or wooden crates for a rustic and charming display. Again add a personal touch by painting them in colors that match your Christmas decor. Add name tags made from card stock and use Christmas-themed ribbon, and plaid fabric to add a personal touch.
- Cowboy Boots: Fill the cowboy boots with festive tissue paper or filler material for a unique idea for the holiday season. Find a sturdy place to hang them. Attach a name tag or small ornament to add a personal touch. Coordinate the cowboy boots to work with your overall holiday color scheme.
How Much Fabric Do I Need To Make My Stockings?
You only need a piece of fabric that is a 1/2 yard. Include an extra 1/4 yard of fabric for the cuff piece.
Easy Project: Fabric For No Sew Christmas Stockings And Free Pattern
Top Fabric Picks To Transform Your Stockings
We recommend considering cotton, linen, quilting cotton, or brushed cotton for your fabric choice for your own Christmas stockings and free pattern.
Browse your fabric collection and see what options are available for your pair of family stockings. Use old shirts, tablecloths, or drop cloths and add your personal touch to your own stockings.
A great way to add the look is to look for fat in different fabric patterns to make a patchwork stocking. Etsy, Amazon, or any craft store offers fat quarters of fabric and would be adorable stockings.
Now, let me walk you through another one of our free tutorials on how to make our own Christmas stockings with a free Christmas stocking pattern!
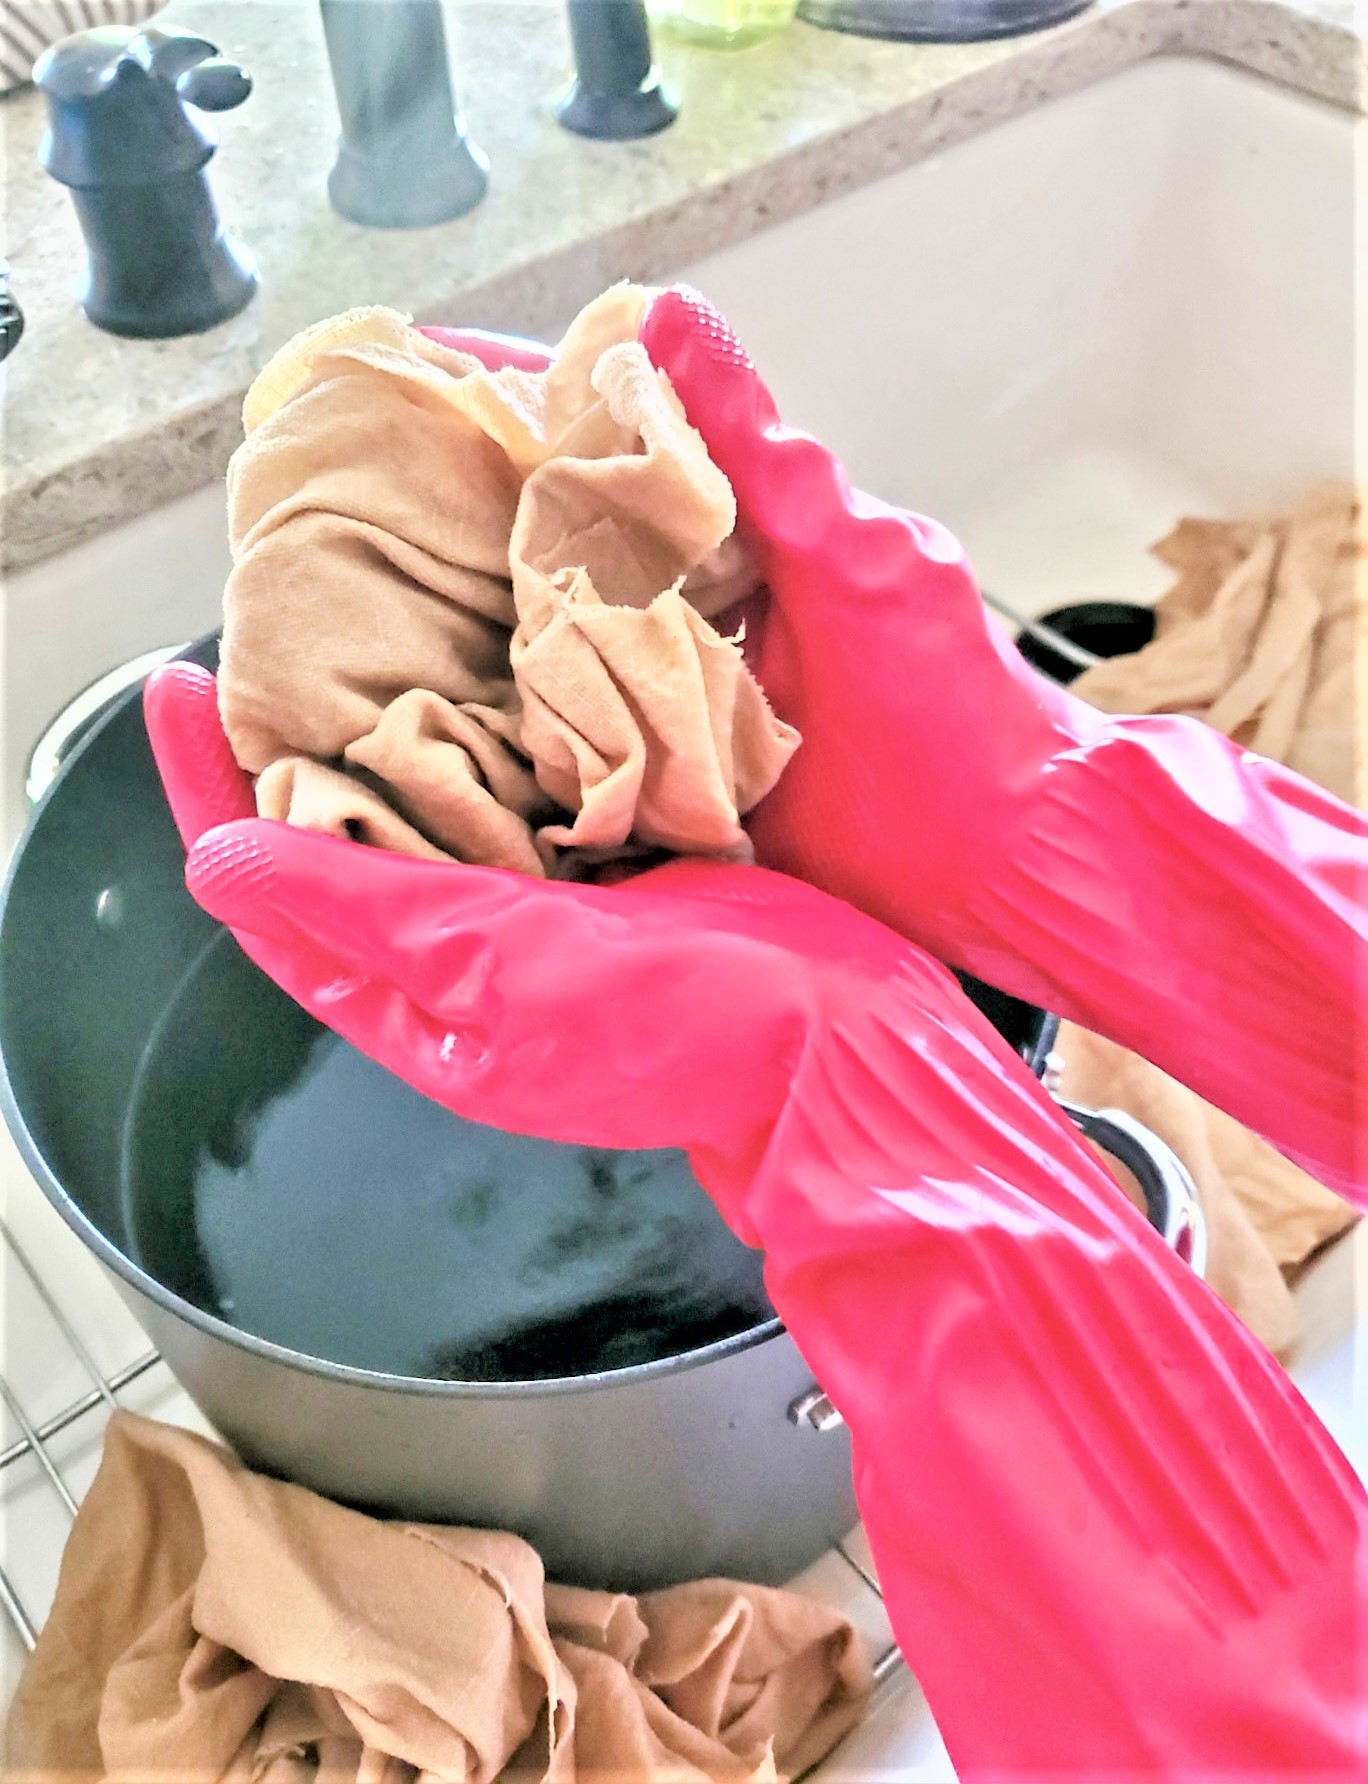
Start by cutting pieces of fabric into square pieces stockings. As a lover of vintage and weathered aesthetics, I opted to tea-stain the fabric pieces for this DIY project.
Tea Staining The Pieces For The Holiday Craft DIY
Step 1: Gathering The Items For Tea Staining
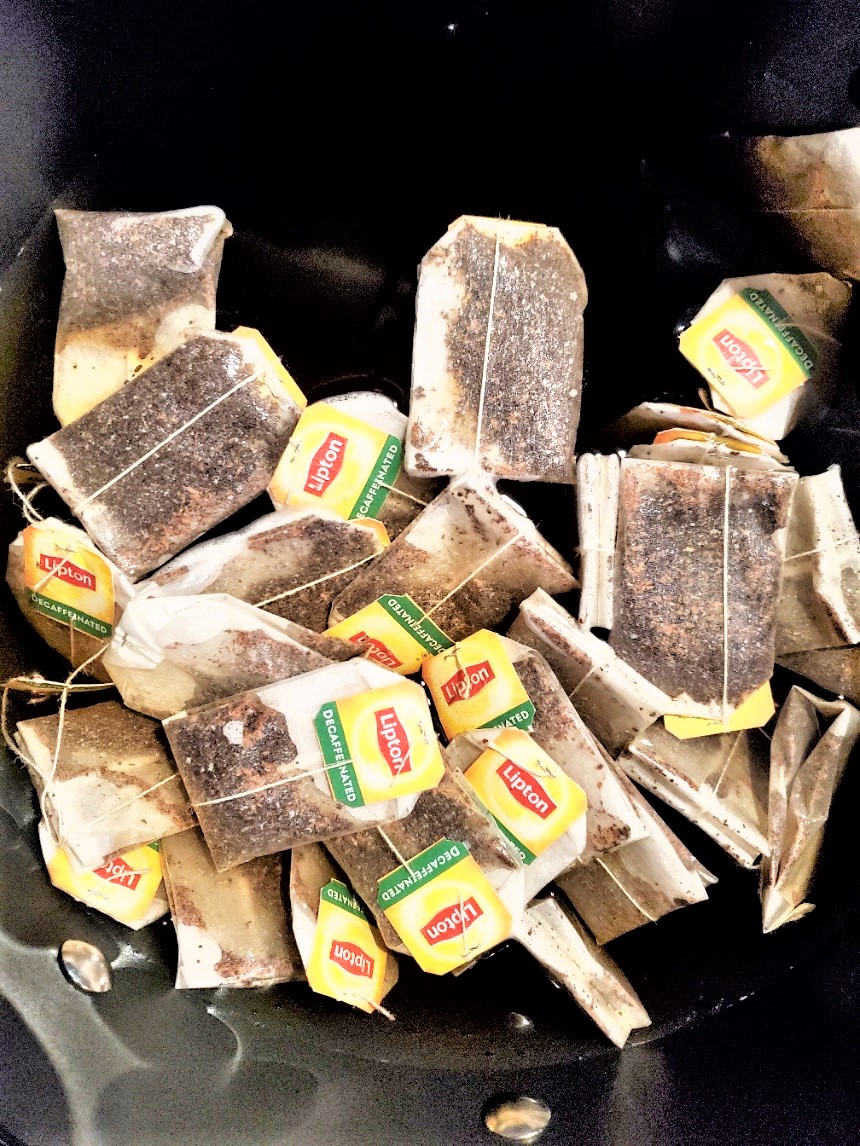
Tea staining is a fantastic technique and a great way to add a vintage touch to your handmade stockings. Here’s a step-by-step guide on how to tea stain the stocking pieces:
- A pot of water
- Tea bags
Tea staining the fabric for your handmade stockings is a straightforward process and the result is a perfect personal touch to give new Christmas stockings an aged and vintage look.
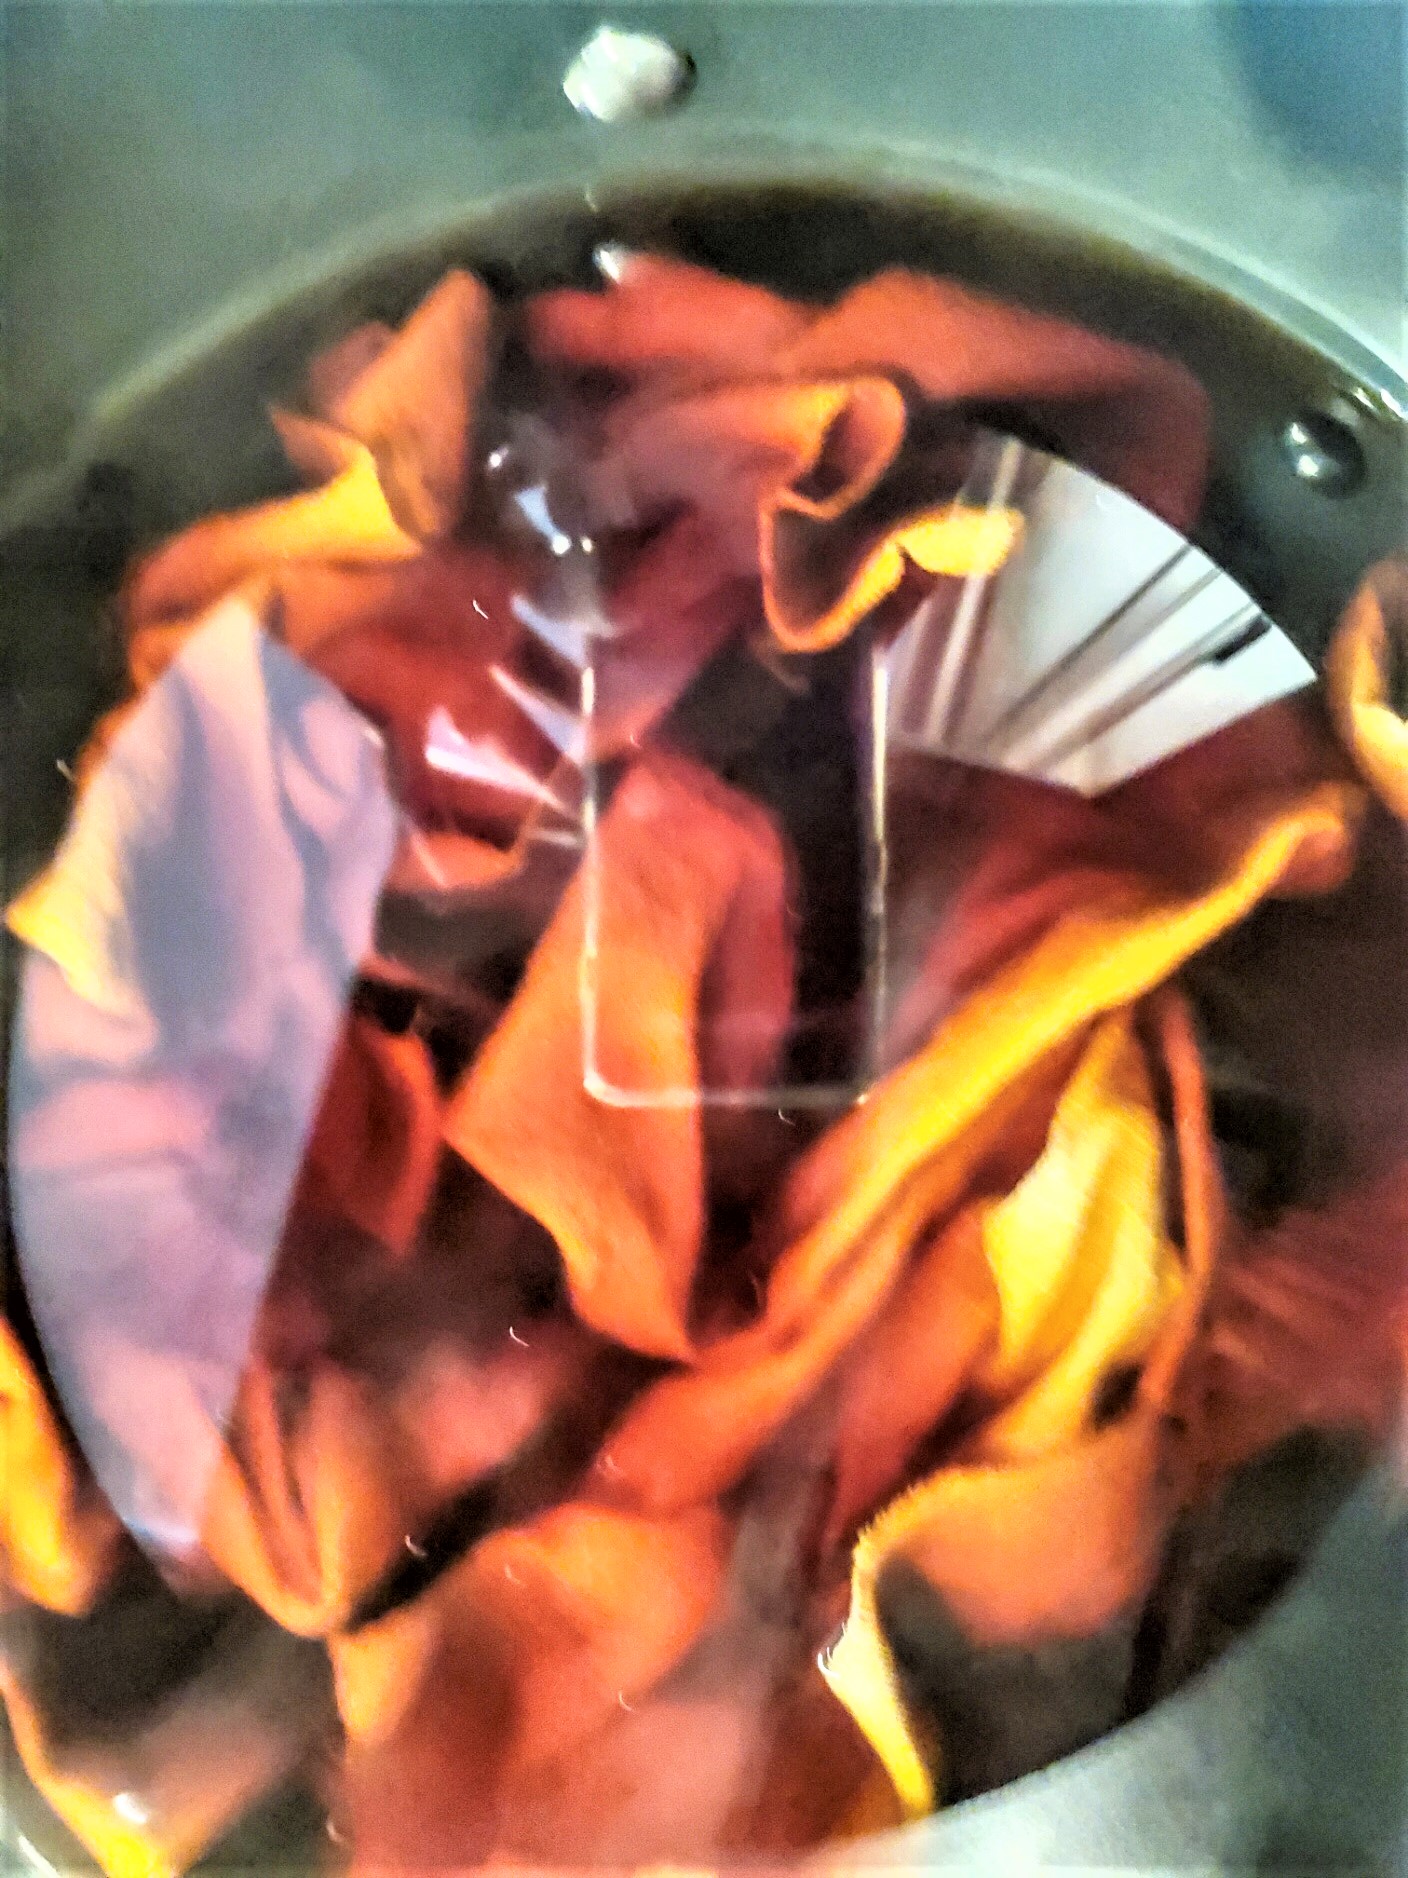
Start by filling a large pot with water and placing it on the stove to heat.
Add tea bags to the water and use a wooden spoon to stir, allowing the tea to infuse into the water. It’s important to heat the water until it becomes warm but not boiling. Once the water reaches a warm temperature, turn off the flame.
Now, carefully place your stocking fabric pieces into the pot. Stir the fabric in the tea mixture, ensuring that each piece is evenly coated. Move the pieces of fabric around gently for uniform staining.
After a few moments of tea staining, move the pot near the sink to make the process less messy when removing each piece of fabric.


Supplies For Crafting: Family Stockings Free Stocking Pattern
- free stocking pattern
- fabric
- scissors
- iron
- pen
- Jolee’s transfer sheets – white for light fabrics, dark fabrics
- fabric glue
Tracing Your DIY Christmas Stocking
Step 2: Step-By-Step Directions: Tracing Your Free Pattern
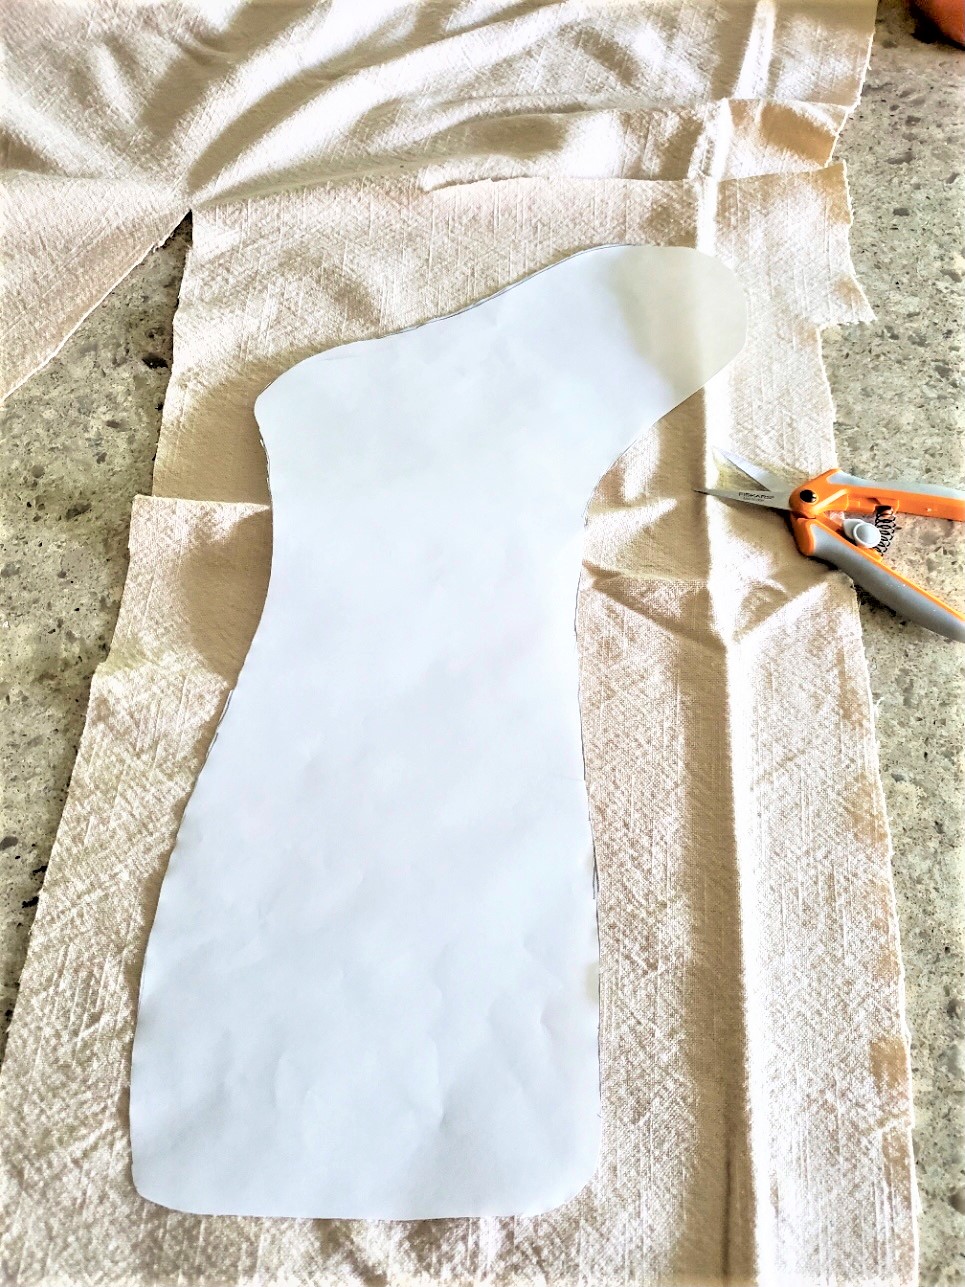
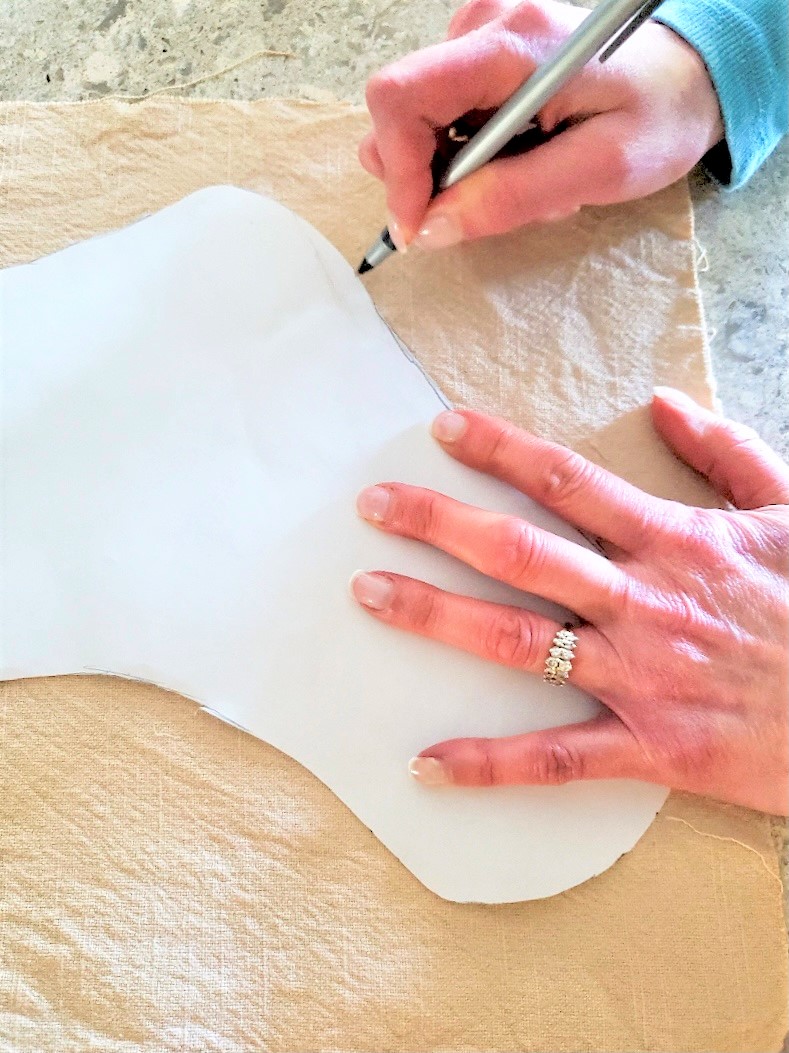
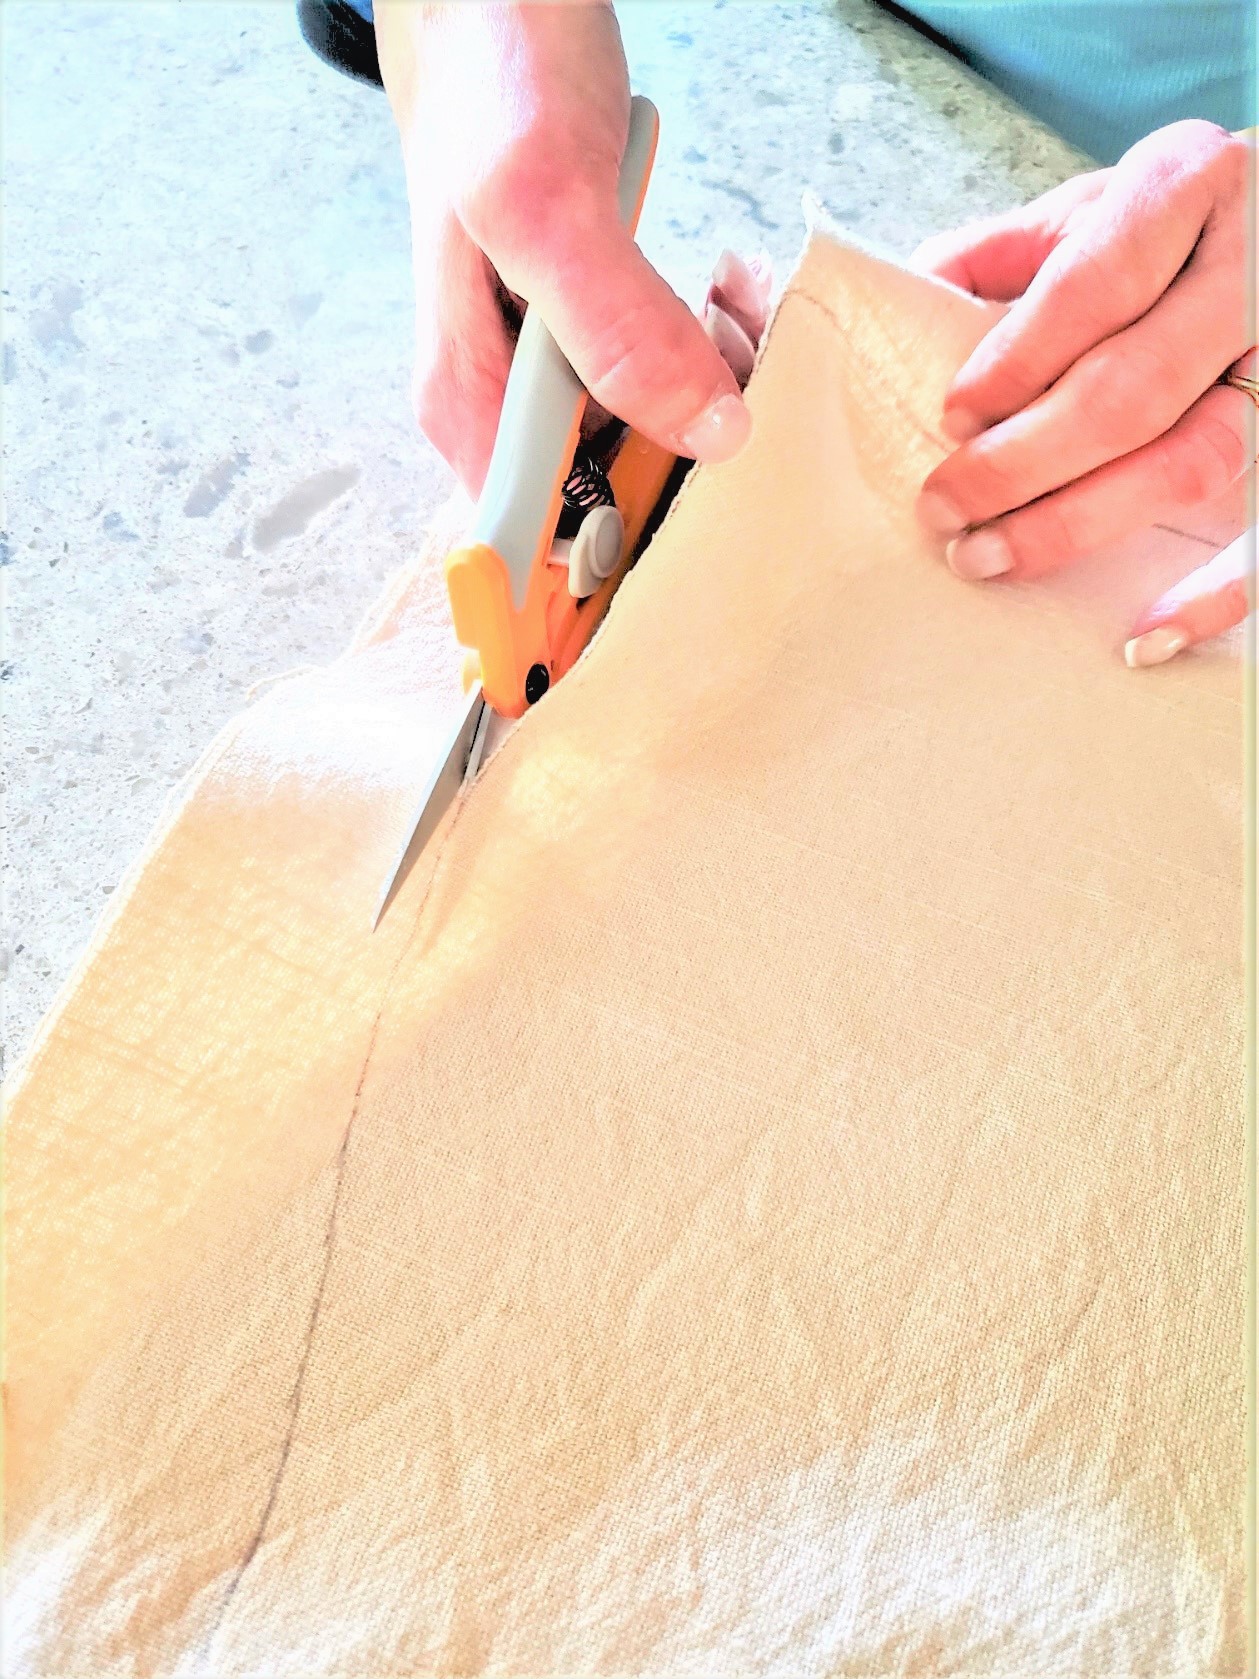
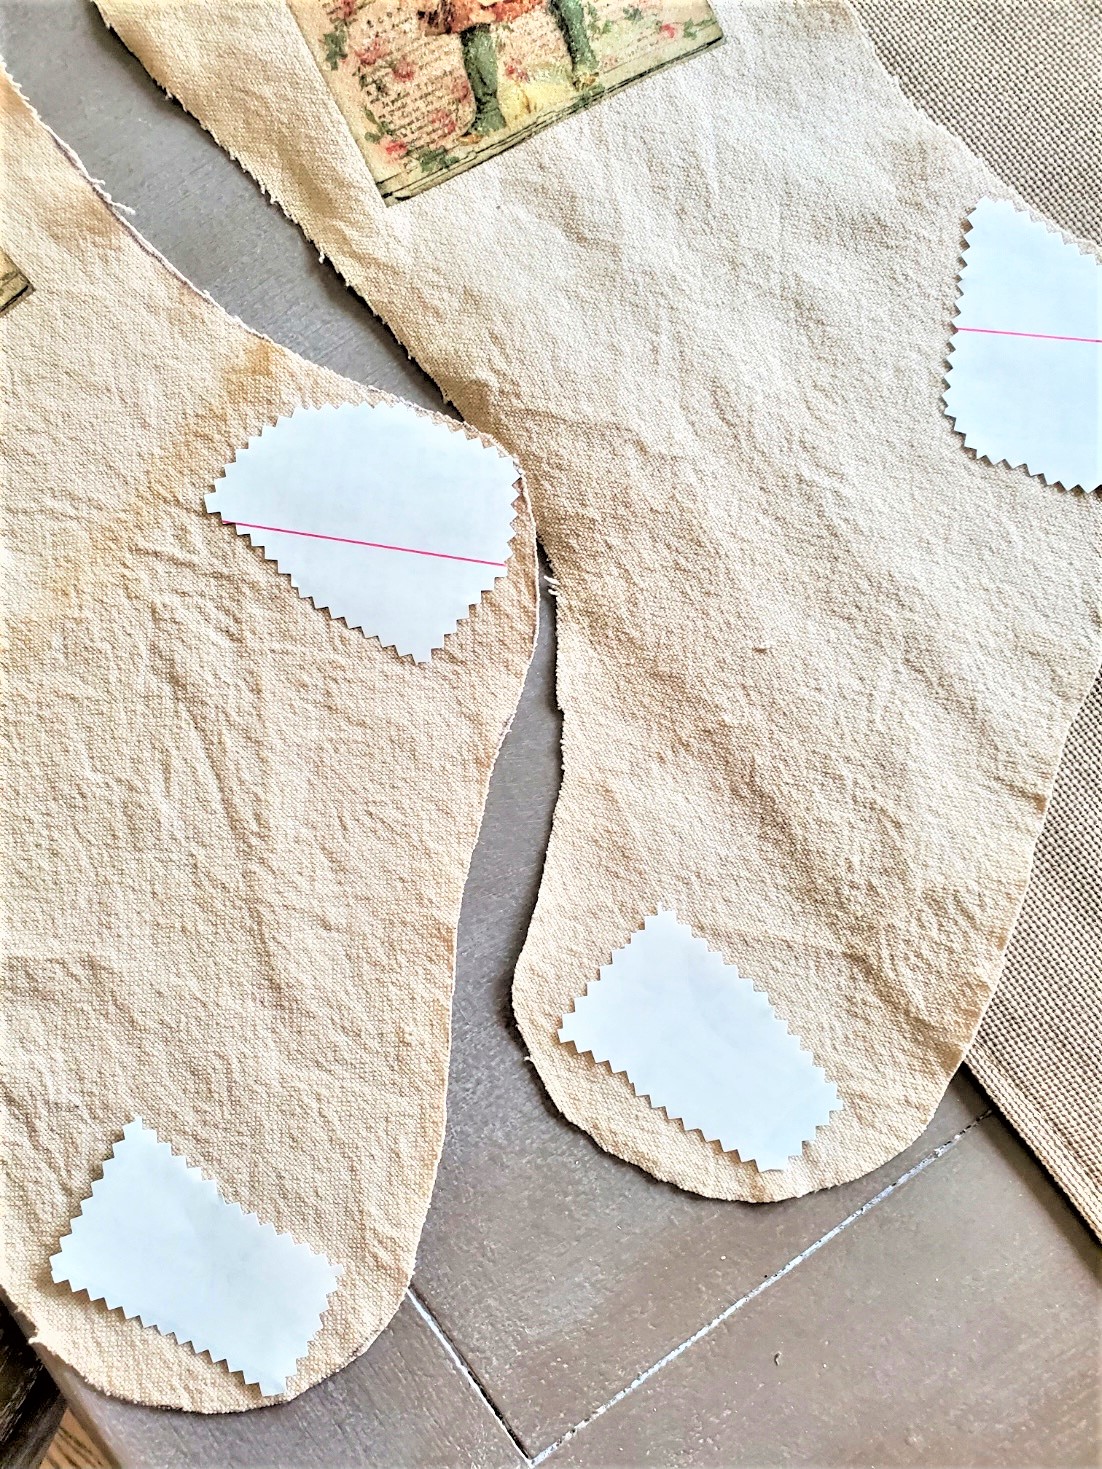
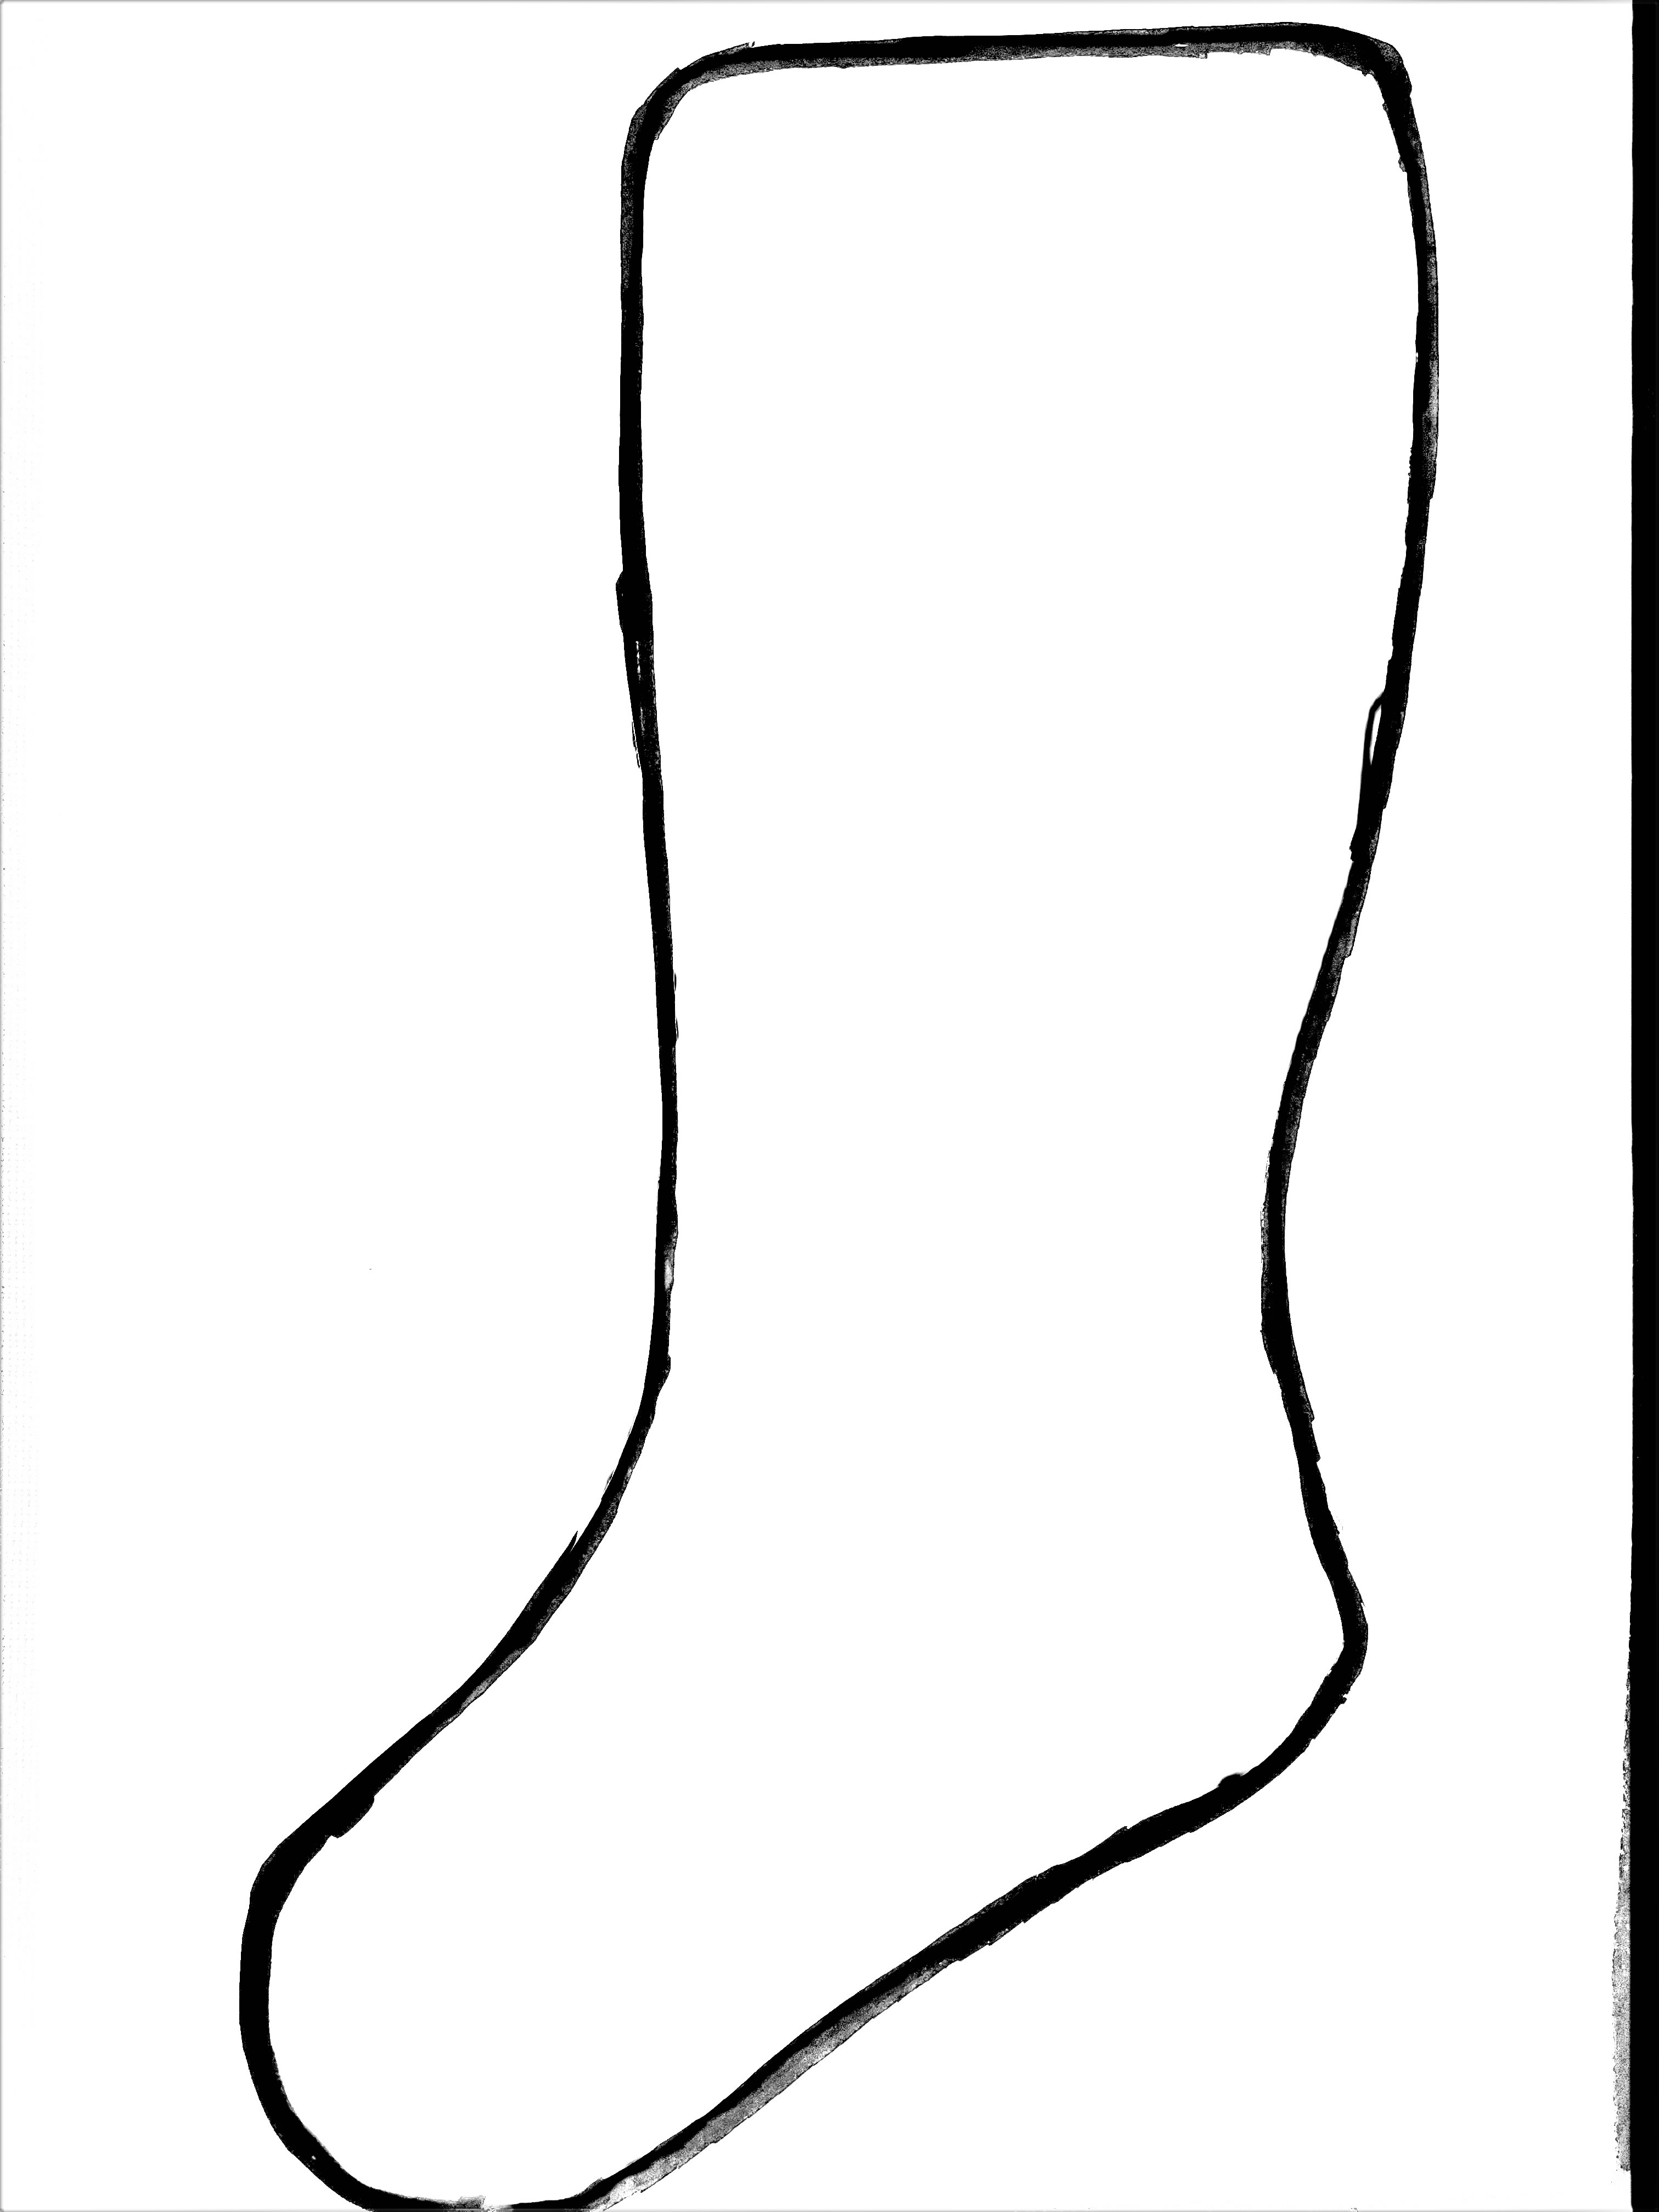
Start by using the free stocking pattern and begin tracing the body of the stocking for your set of Christmas stockings onto the tea-stained fabric or your pieces of fabric. When tracing the stocking shapes leave 1/4 seam allowance for the fabric glue.
If you’re using the free pattern and wish to have a larger size, consider taking it to a copy center where they can enlarge it at very little cost.
Once you’ve finished tracing the stocking template onto the stocking fabric, it’s time to hang the pieces up to dry. The good news is that they won’t take too long to dry, so you’ll be able to proceed with the next step of this easy project relatively quickly.
As an Amazon Associate, Black Dog Salvage Affiliate, and other Affiliate links, I earn from qualifying purchases.
If you purchase something through any link, I may receive a small commission with no extra charge to you. All opinions are my own.
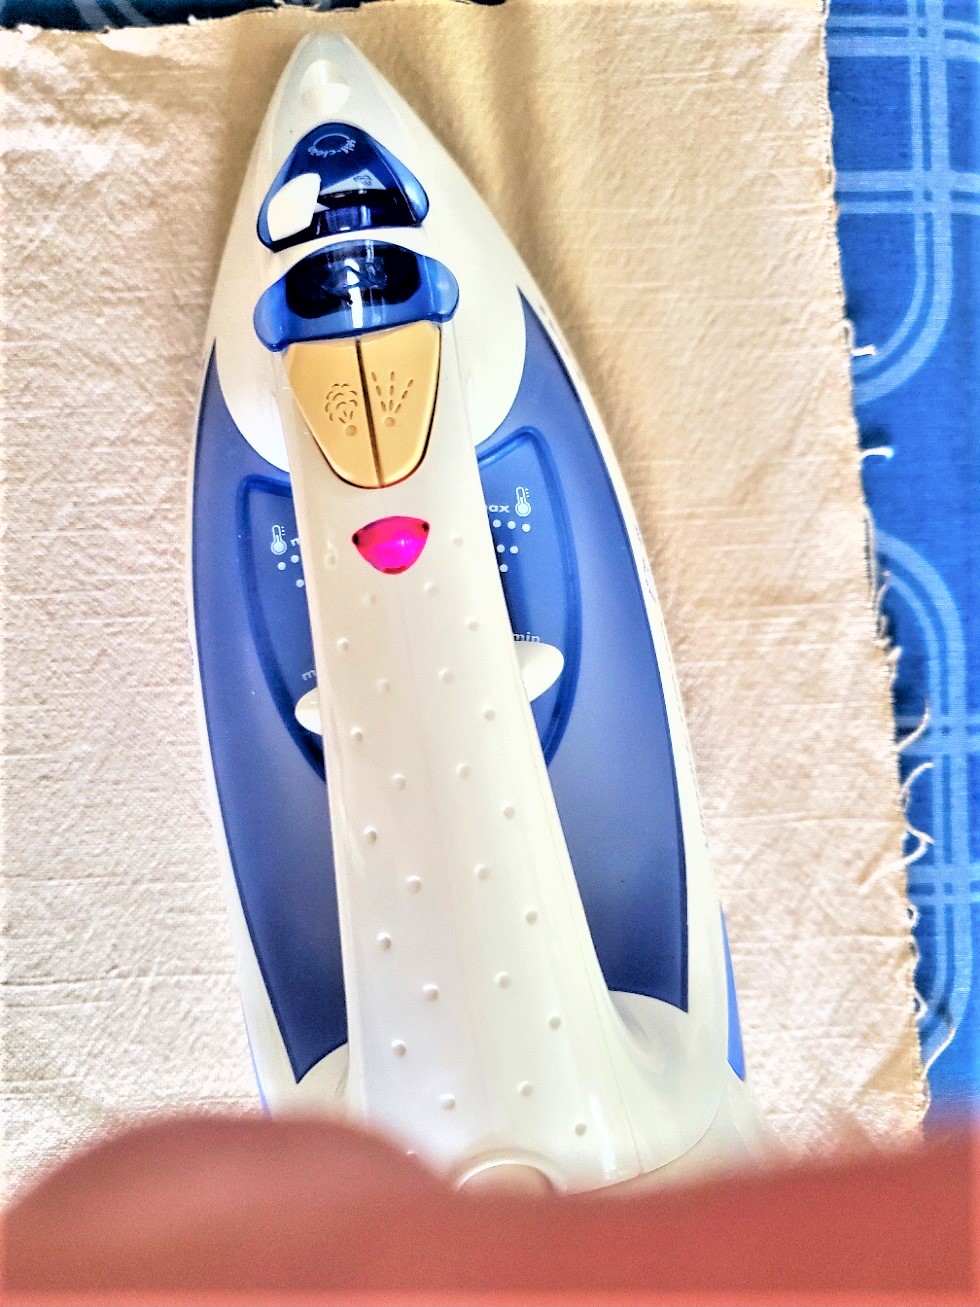
Iron Pattern Pieces Before Tracing
Step 3: Pressing Perfection: Ironing Pattern Pieces Christmas Stockings – Free Pattern DIY
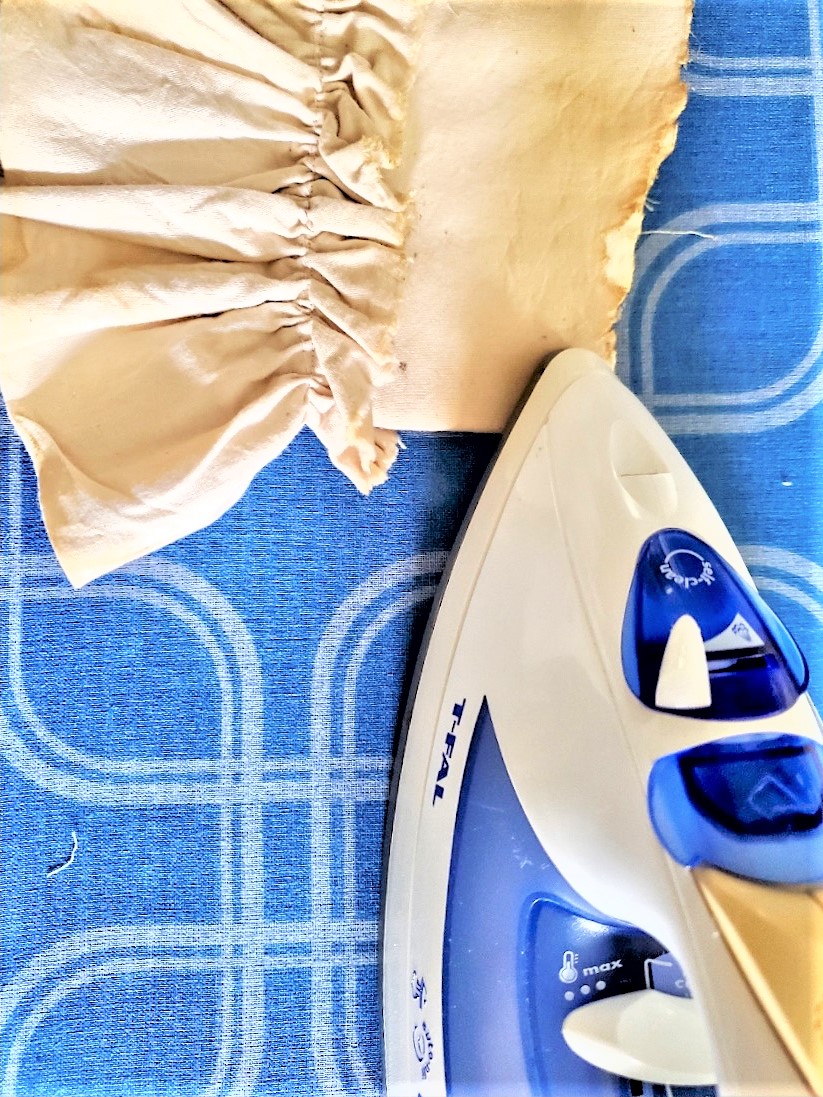
Before tracing the free pattern onto each piece of fabric, it’s important to iron them to ensure they are flat and free of wrinkles.
Since each piece of fabric may have become wrinkled from squeezing out the excess water, use a hot iron without steam to remove the wrinkles making sure you are ironing the right sides. Carefully iron each piece of fabric, taking your time to achieve a smooth and wrinkle-free surface. This step will help prepare the fabric for tracing the stocking designs and ensure you have a neat appearance.
Once you have your free stocking pattern, it’s time to trace it onto each piece of fabric to create mirror images for your stocking shapes.
Tip: Remember to use caution with a hot iron around children and pets. Keep the iron and cord safe from children and pets for safety and to avoid burners.

Tracing Pattern And Seam Allowance
Step 4: Crafting Brilliance: Tracing Pattern Pieces
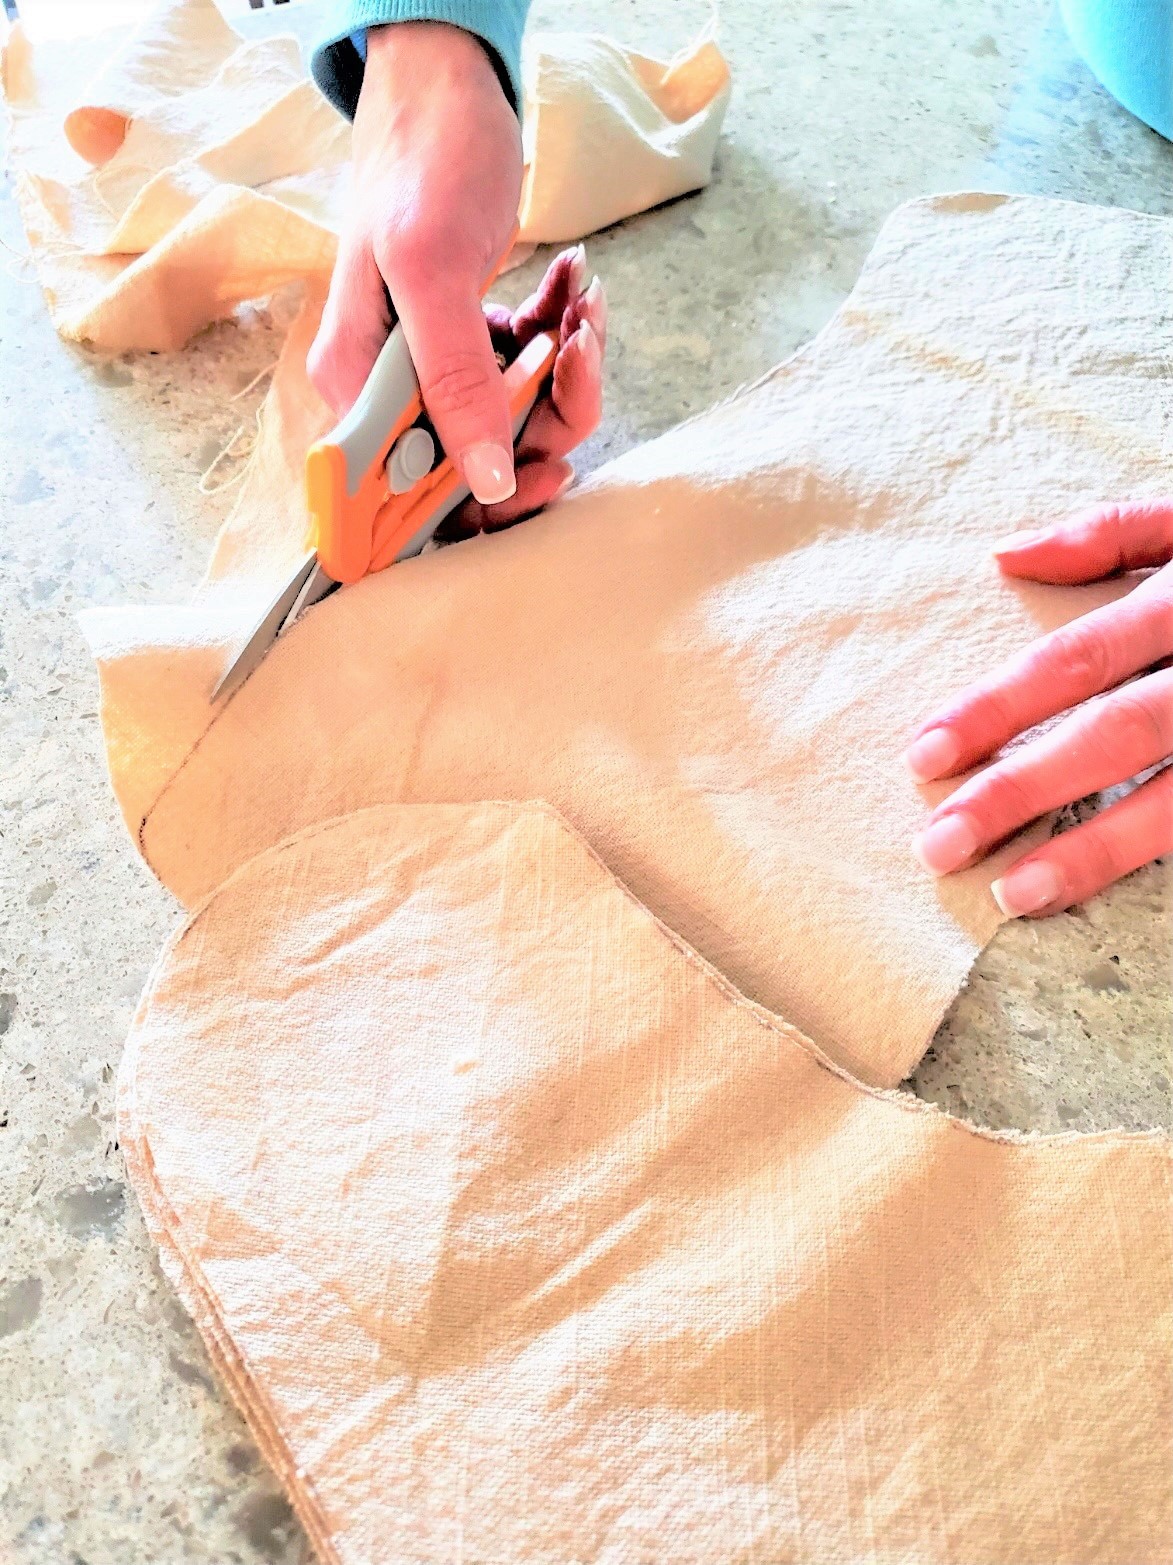
Using a pen trace the pattern onto the fabric, as it provides the best results. Carefully trace the pattern onto each piece of fabric, ensuring that you have mirror images for your handmade stockings. Take your time during this step to achieve accurate and symmetrical outlines for your Christmas stockings.
Tip: When tracing your pattern for your stocking pieces, remember the stocking will be smaller due to the seam allowance. So make sure your stocking pieces are traced wider than the free Christmas stocking pattern.
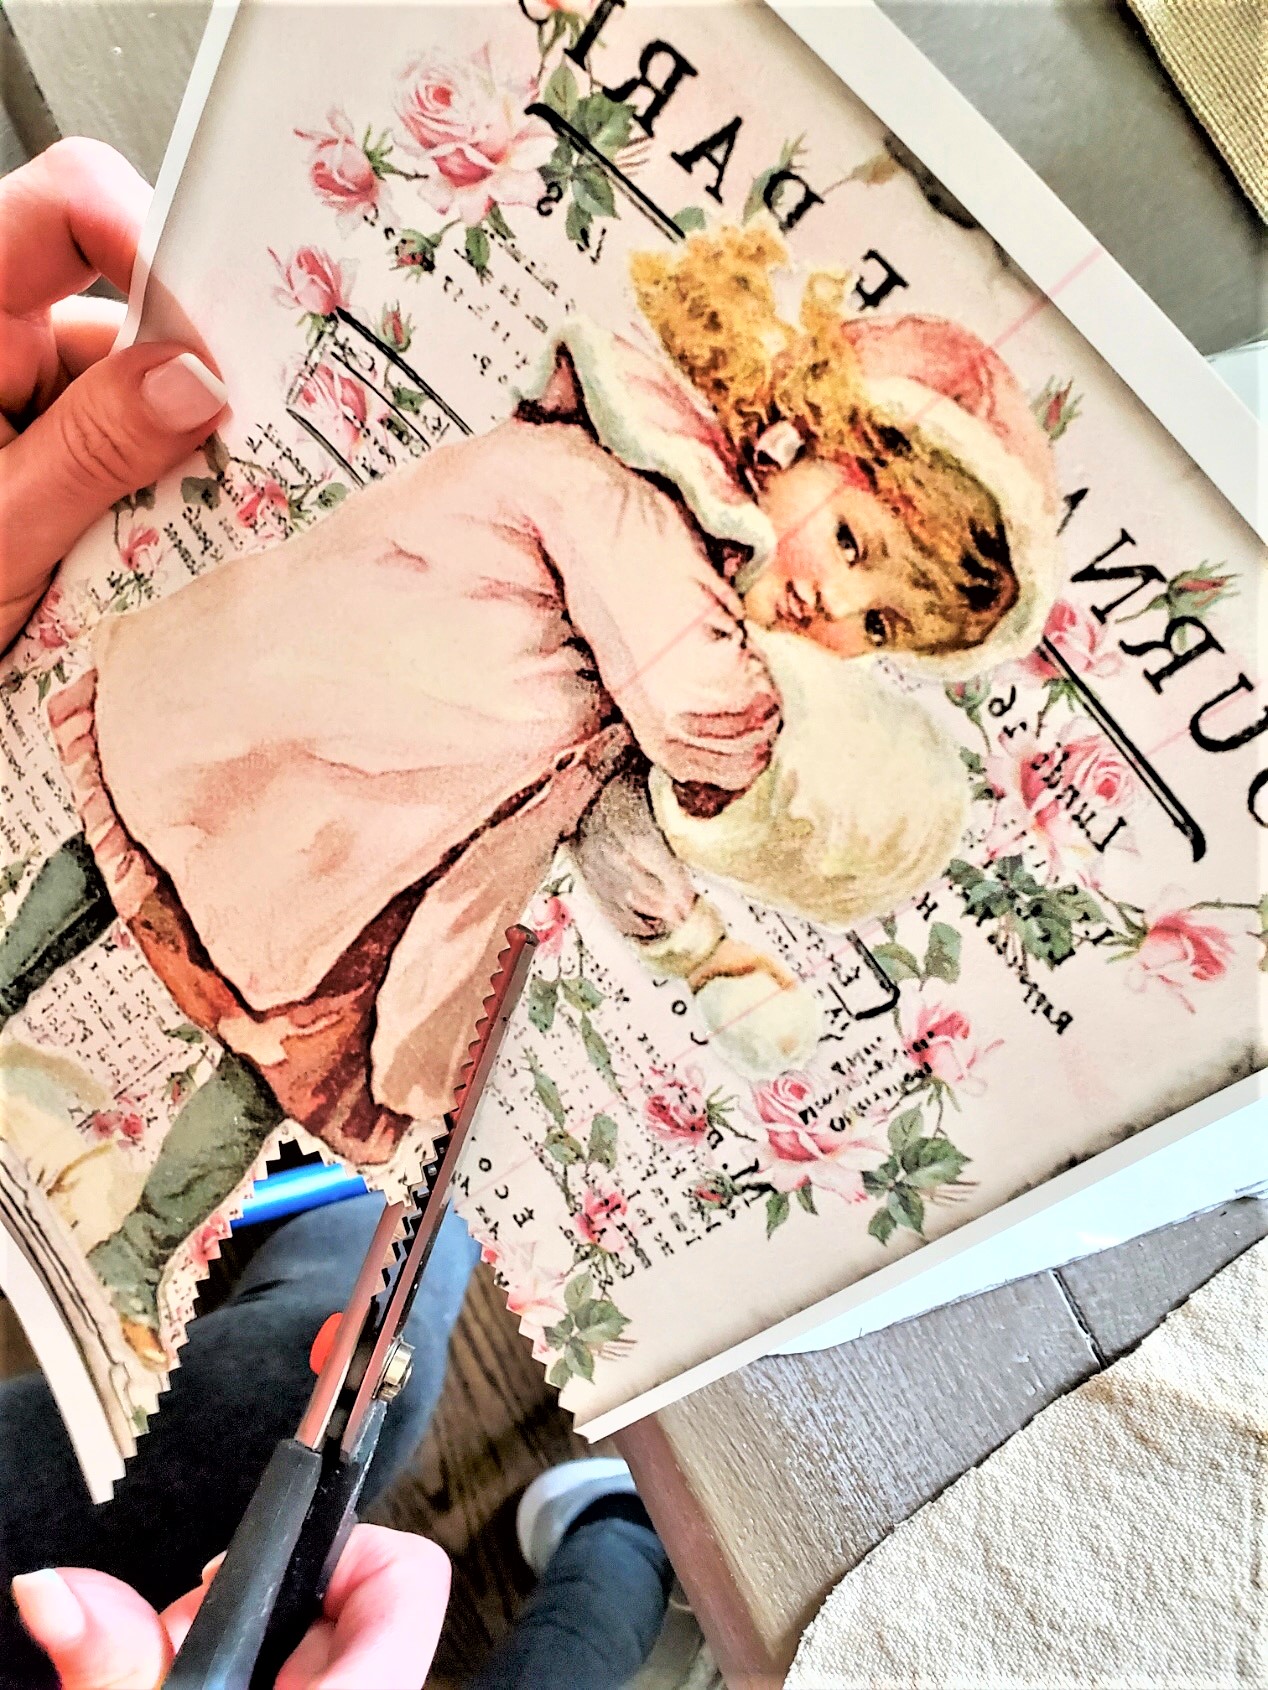
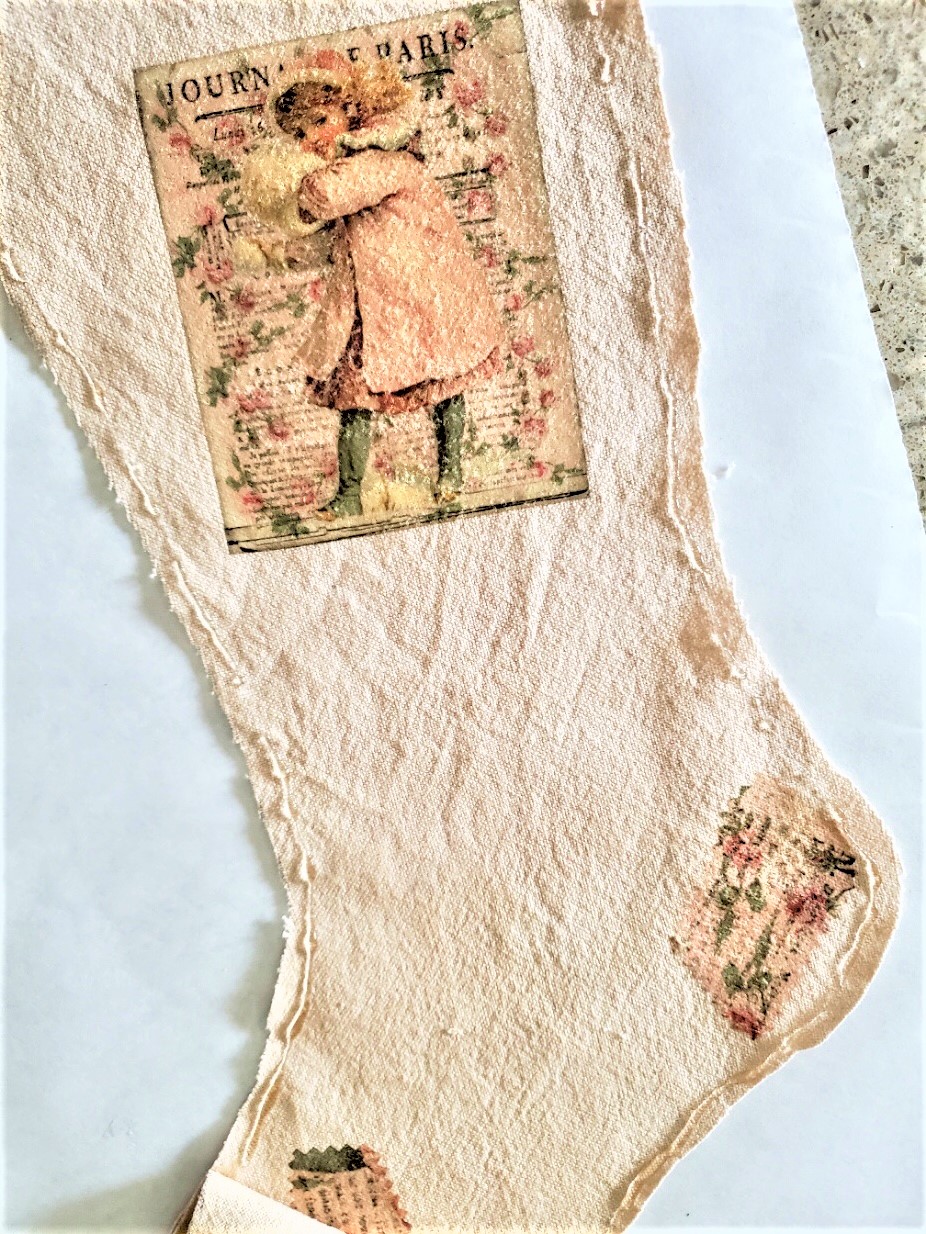
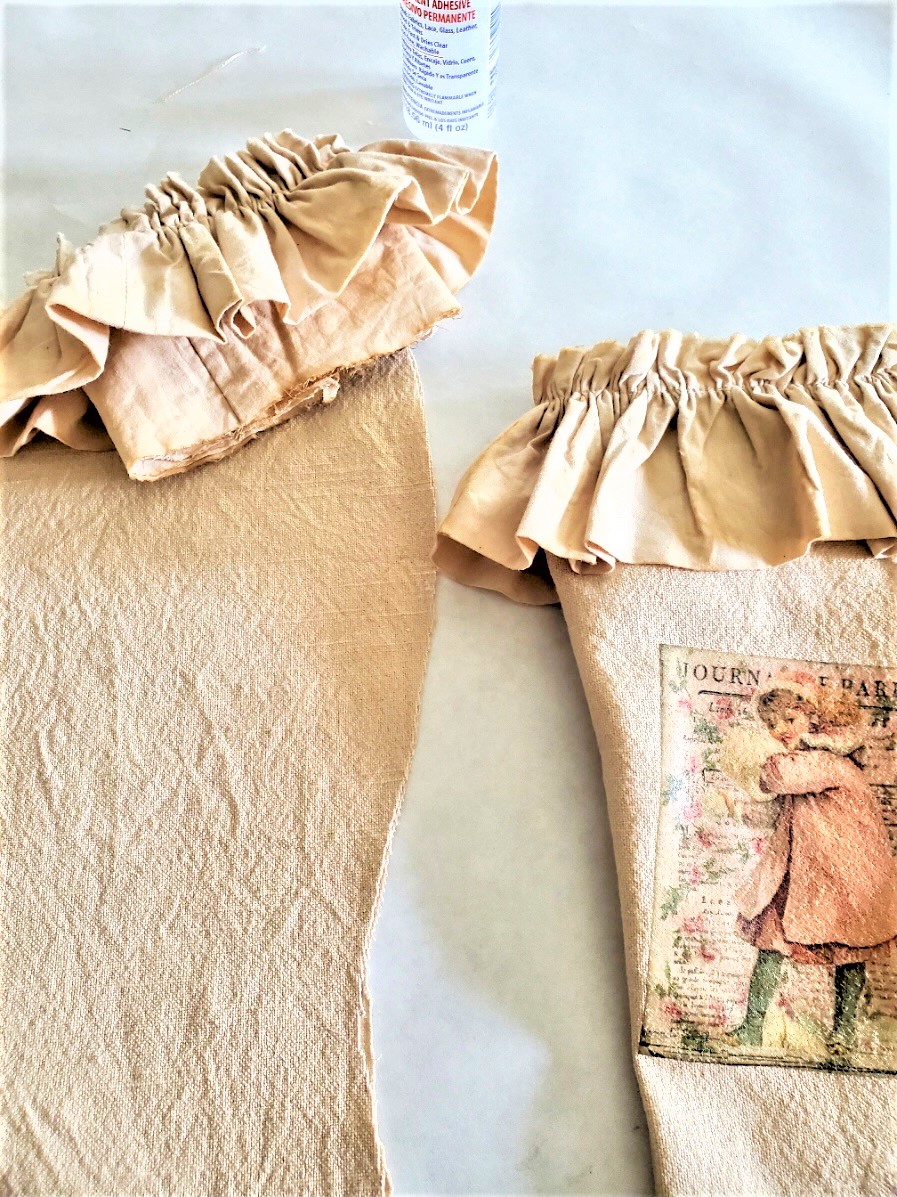
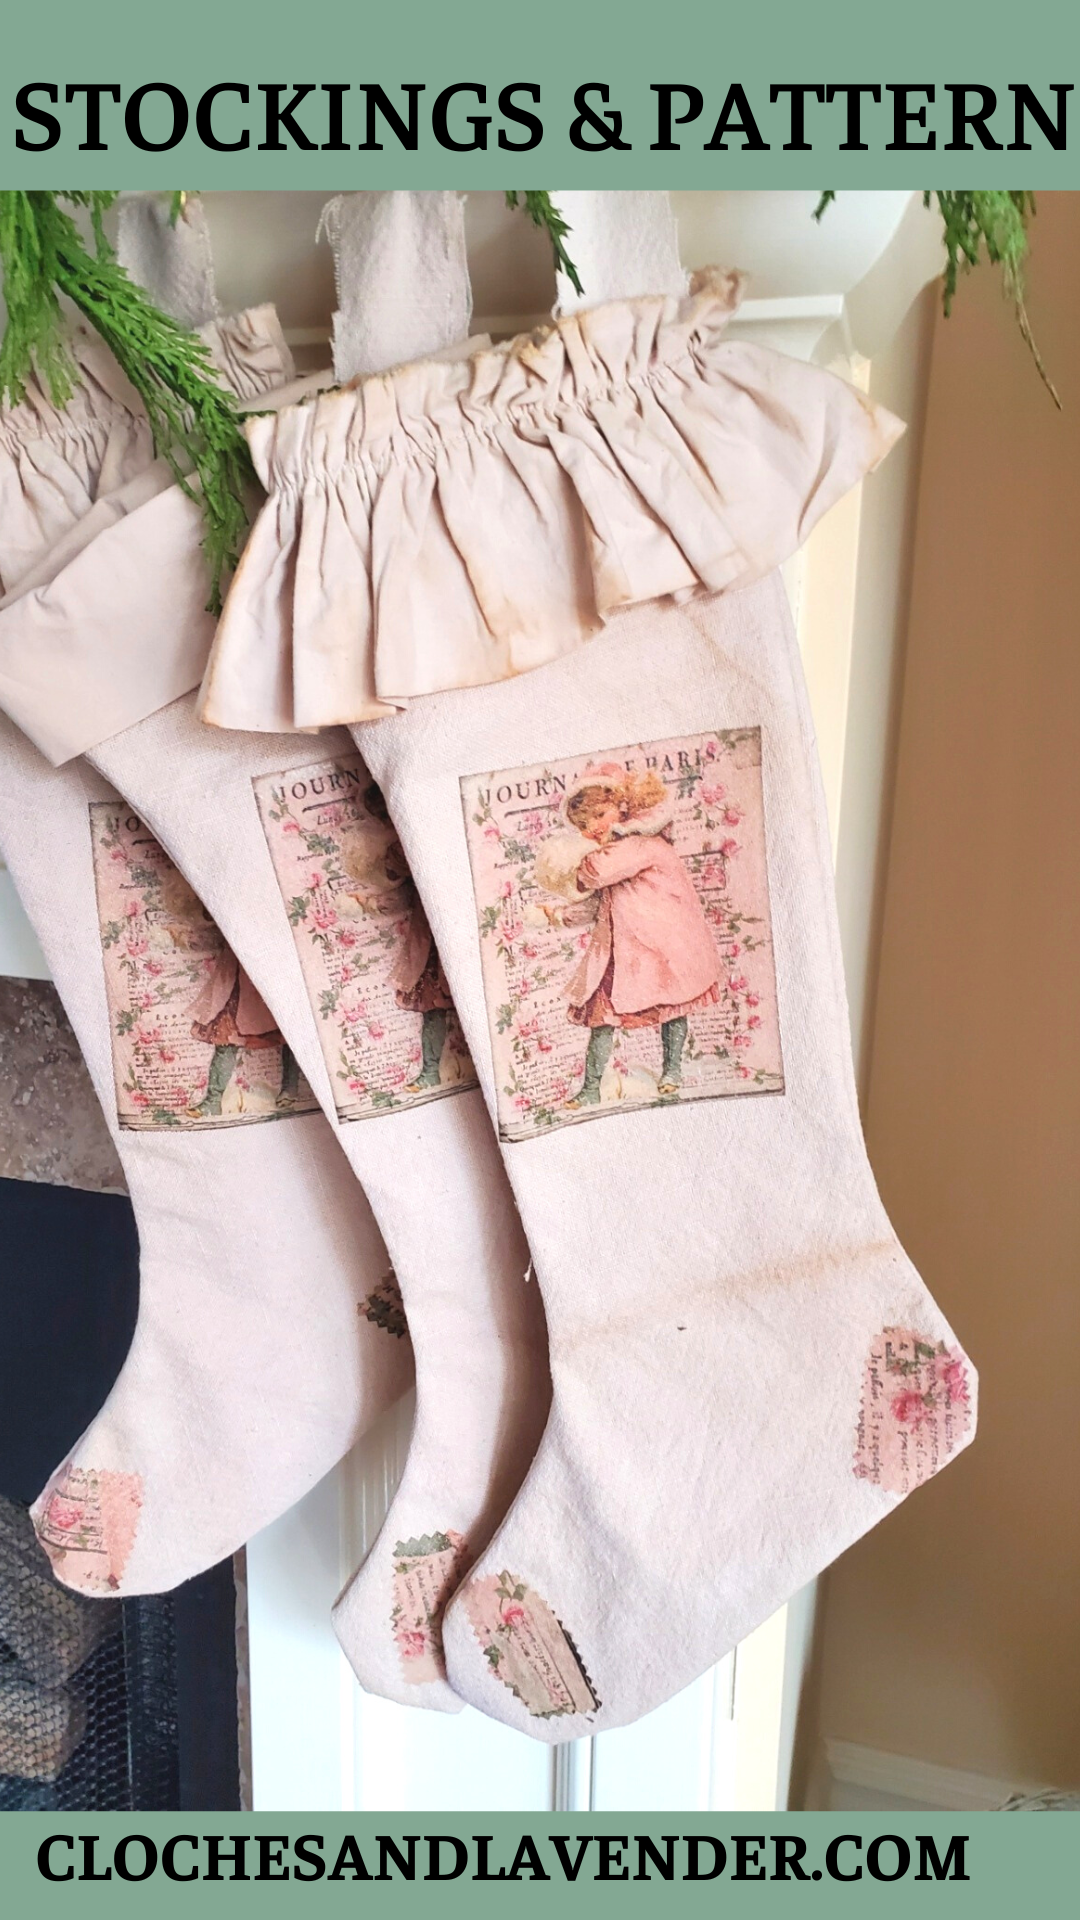
Since the transfers will be getting ironed on the top of the stockings, they need to be printed in reverse so they will not be on the wrong sides. Images can be found on Etsy (this is my favorite shop for graphic images. They don’t cost too much and they get set in reverse.) or Graphics Fairy. Adding images is a great way to add a personal touch to your stocking designs.
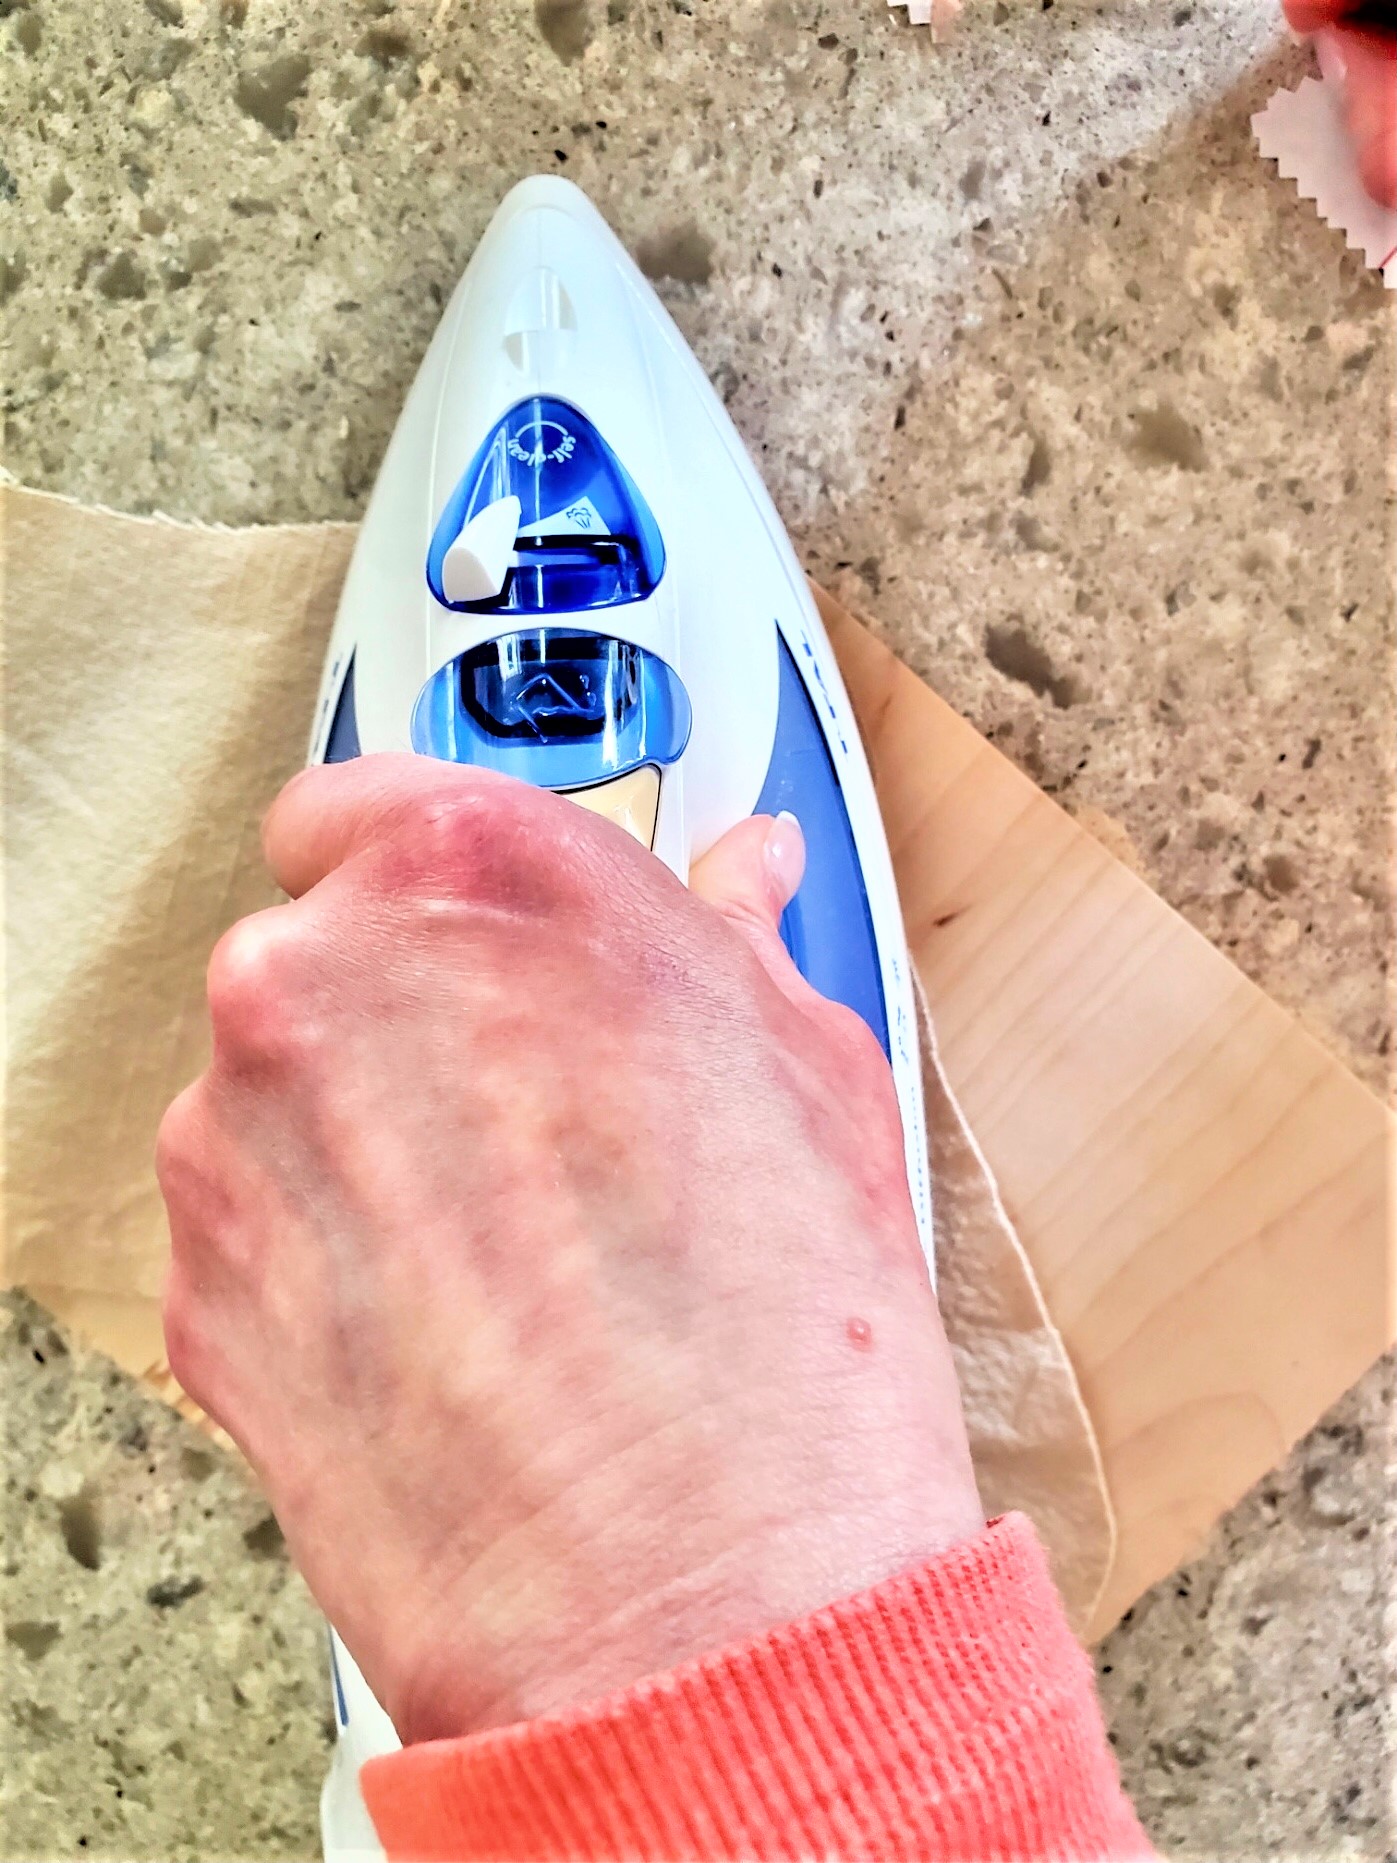
Below, you will notice a piece of wood under my Christmas stockings. The wood keeps the top of the stocking stiff and allows it to be added to the pieces of fabric. Follow the instructions on the package.
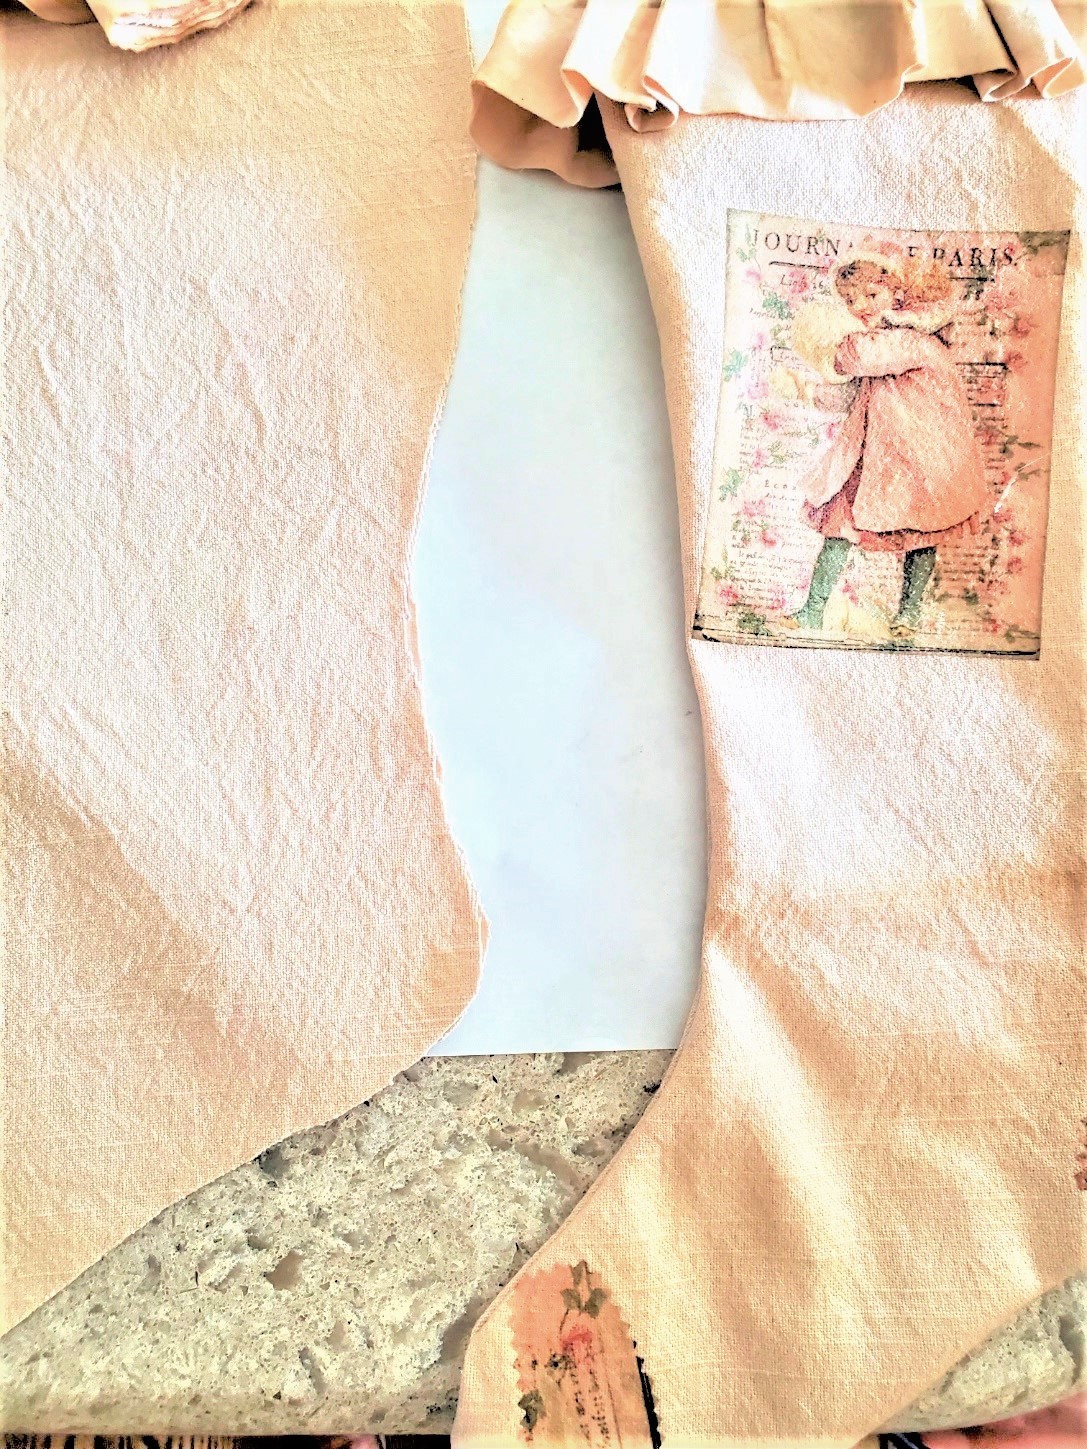
I cut extra pieces from my image for the bottom of the stocking to give it the appearance of needing patches from wear and tear over the years. This gives our new stockings more charm.
For your own set of Christmas stockings, print the images 4×6 which is a perfect fit.


Ironing The Images On
Step 5: DIY Christmas Stocking
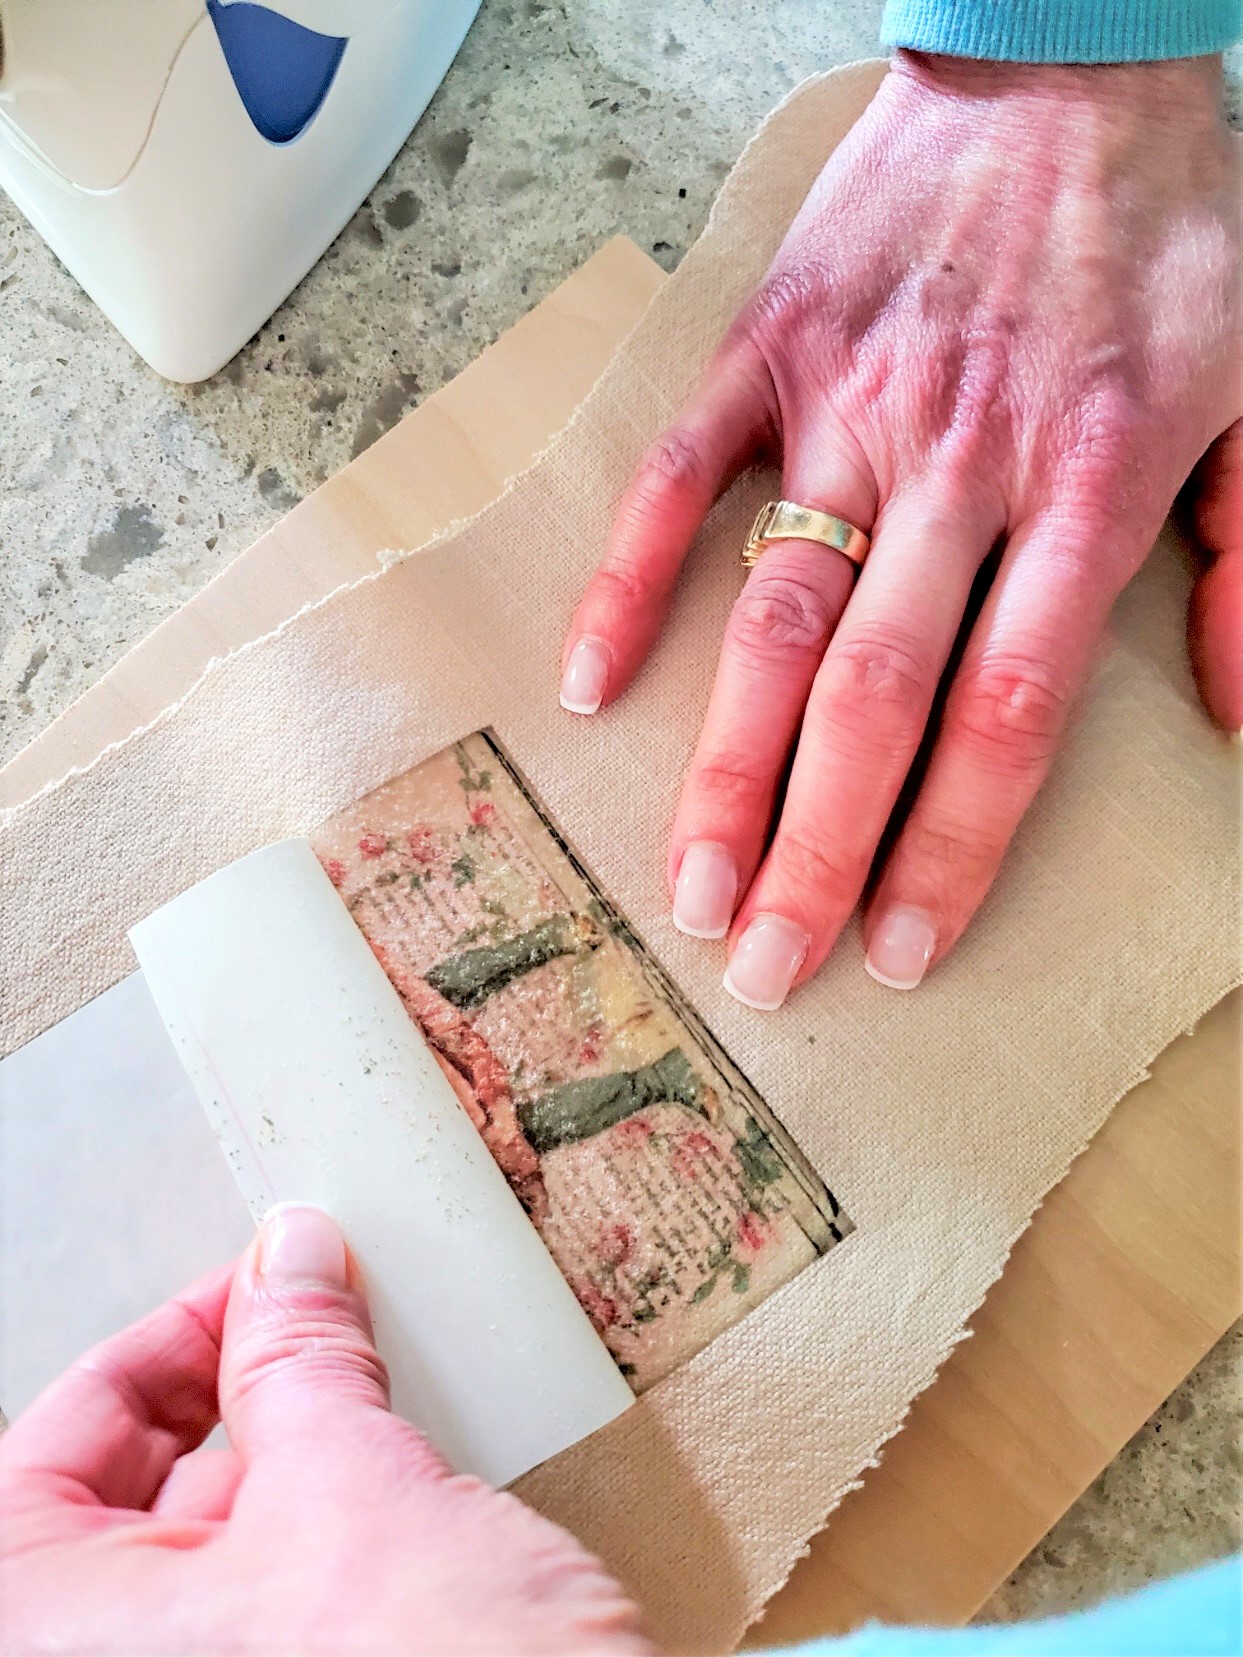
When ironing the images, using a piece of wood underneath the fabric is essential as I mentioned above. This is important because the fabric needs to be smooth. Be sure to set the iron on high with NO steam.
Heat your pieces of fabric and make sure the image is on the right side (outer piece) of the top of the stocking, and lightly add heat.
Next step, place your image face down on the outer piece of your stocking and press the iron firmly. This is important because this is when the ink transfers to your simple Christmas stocking. It’s also necessary to press firmly when moving the iron.
I suggest counting to 60. You will notice the ink pulling from the paper. Look at the packaging for instructions for your specific fabric.
After you finish ironing, carefully begin to remove the backing.

Crafting A Cuff Piece
Step 1: Putting Together The Stocking Designs
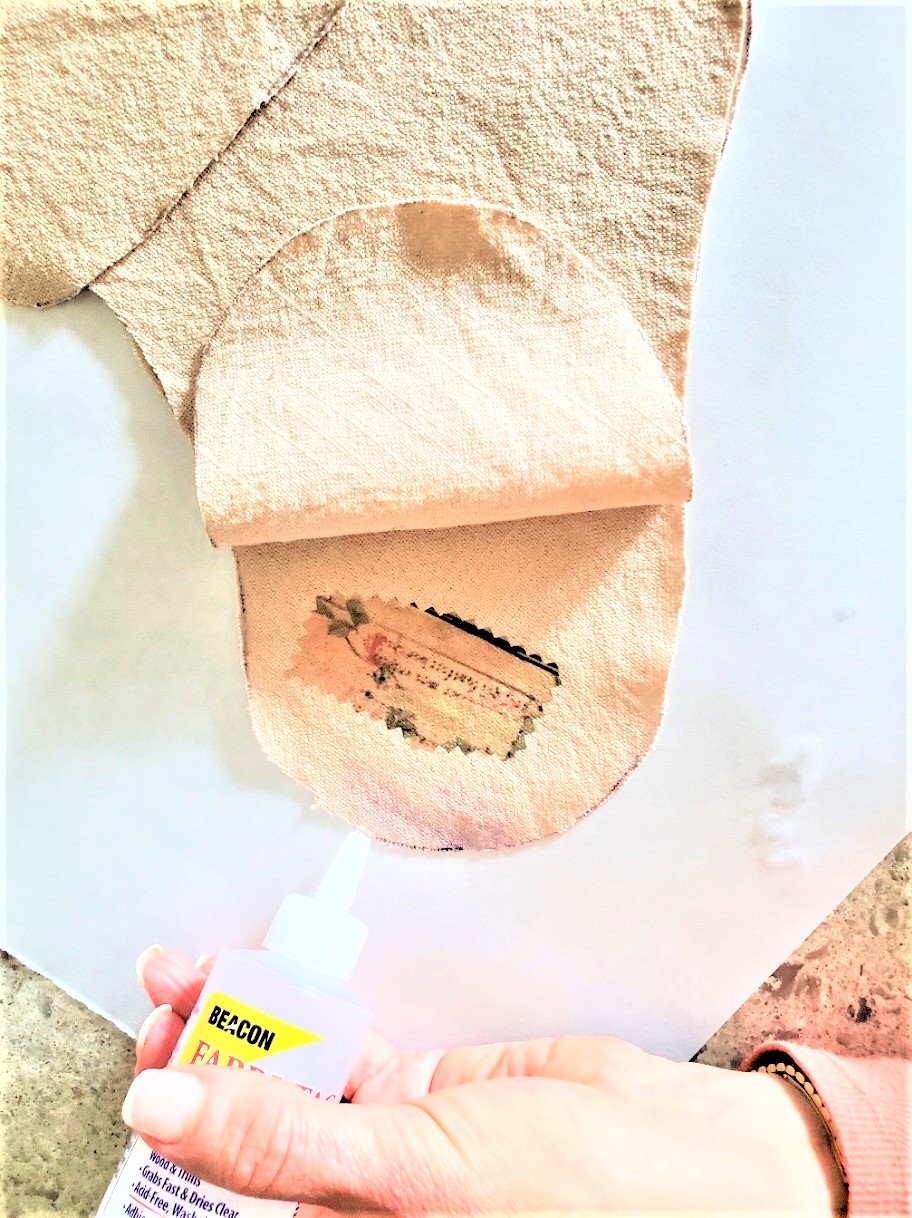
Because these stocking shapes are noty sew, we are using fabric glue to put the bottom of the stocking together. This fabric glue allows us to have the option to wash the stockings if needed in cold water. This glue also allows you to put these on air fluff in the dryer to remove dust.
Note: I have seen handmade stockings put together with hot glue. So, if you aren’t concerned with washing your set of stockings then it’s an option.
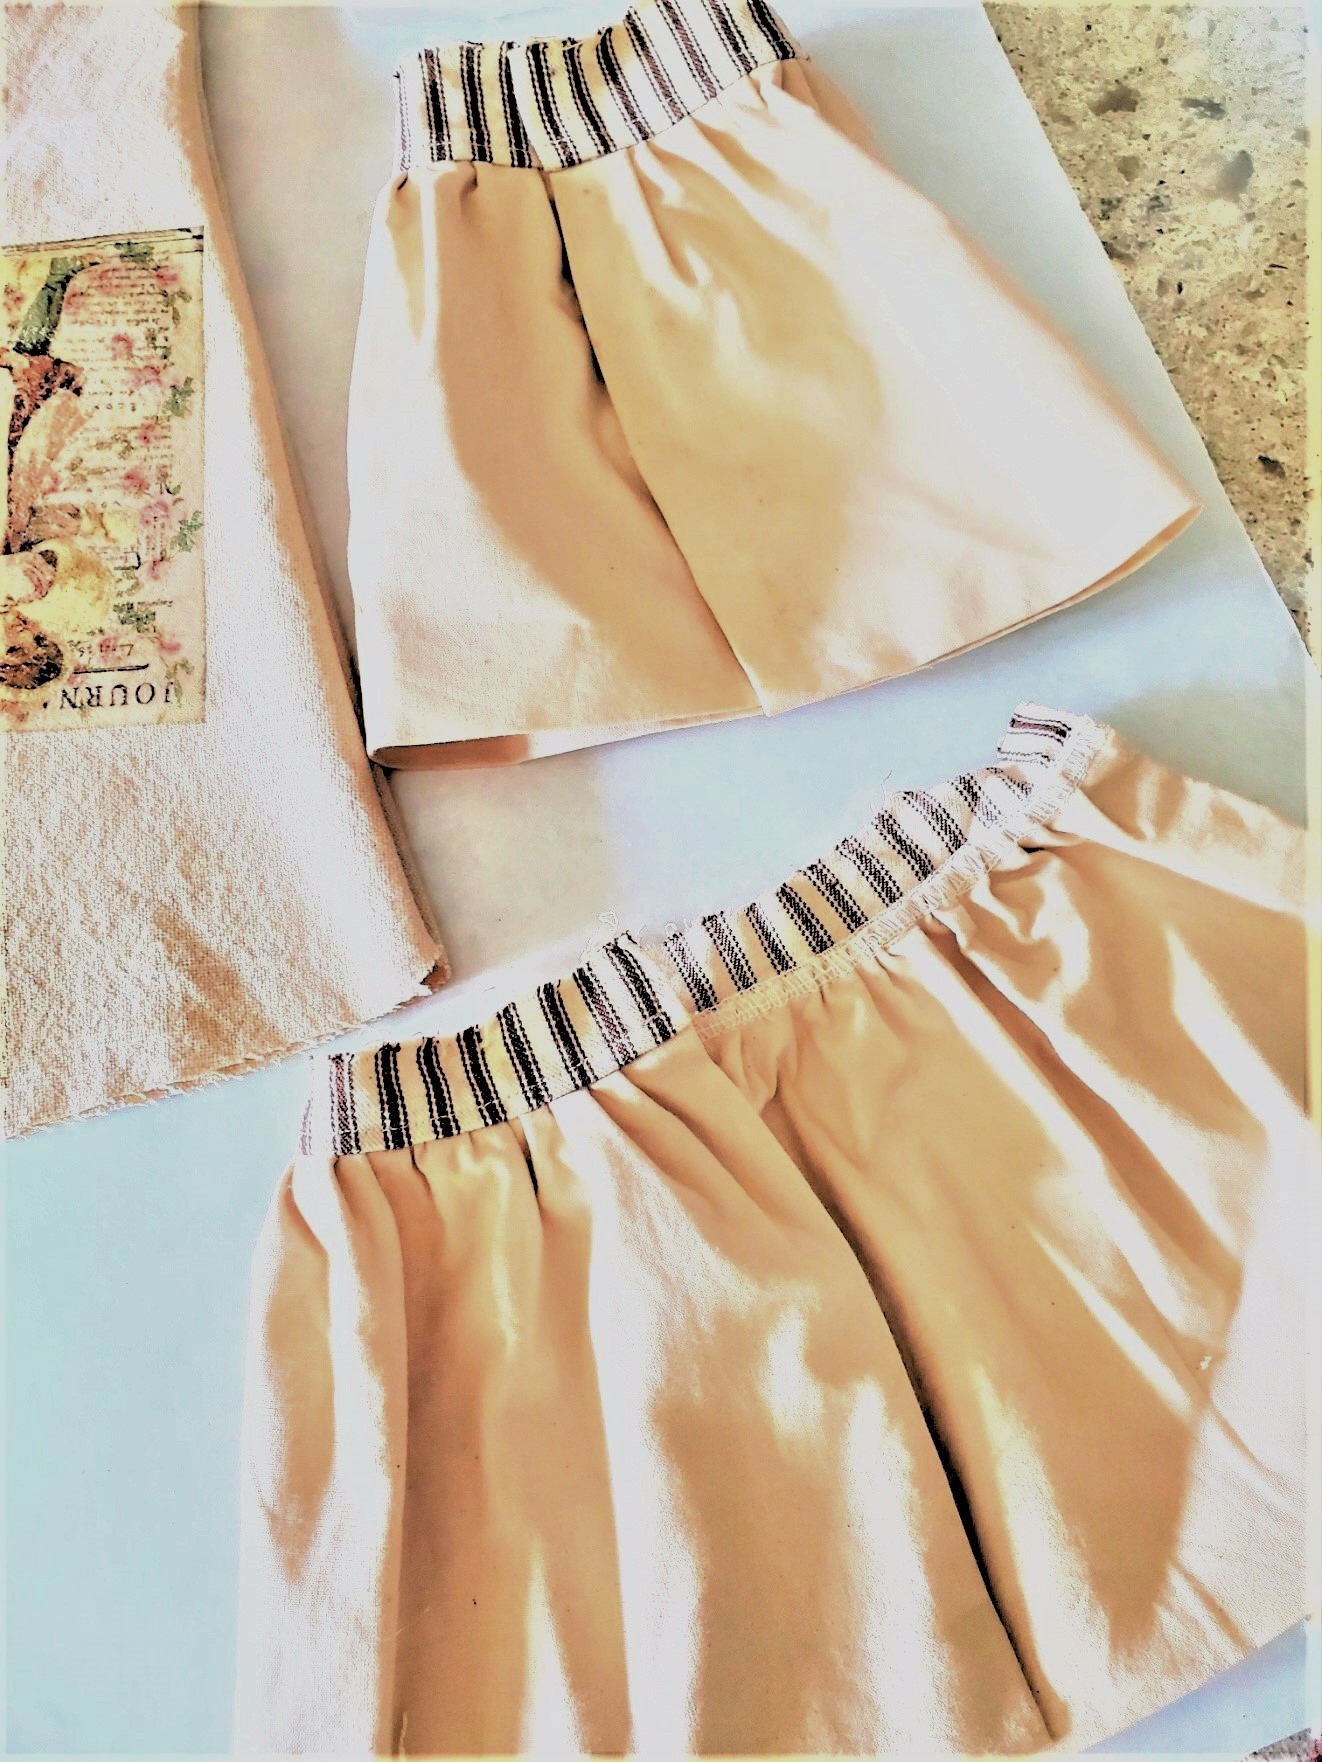
First, lay your pieces of fabric with the image facing inward. Remember we are turning the right sides out once the glue dries for the stocking shapes. Make sure, to leave a 1/4 inch seam allowance for the fabric glue around the raw edges of your stocking pieces.
Begin to press on the long sides of your stocking pieces to bond your pieces of fabric together and let dry.
After all the pieces were dry, we turned them right sides out.

Step 2: Cutting And Adding The Trim
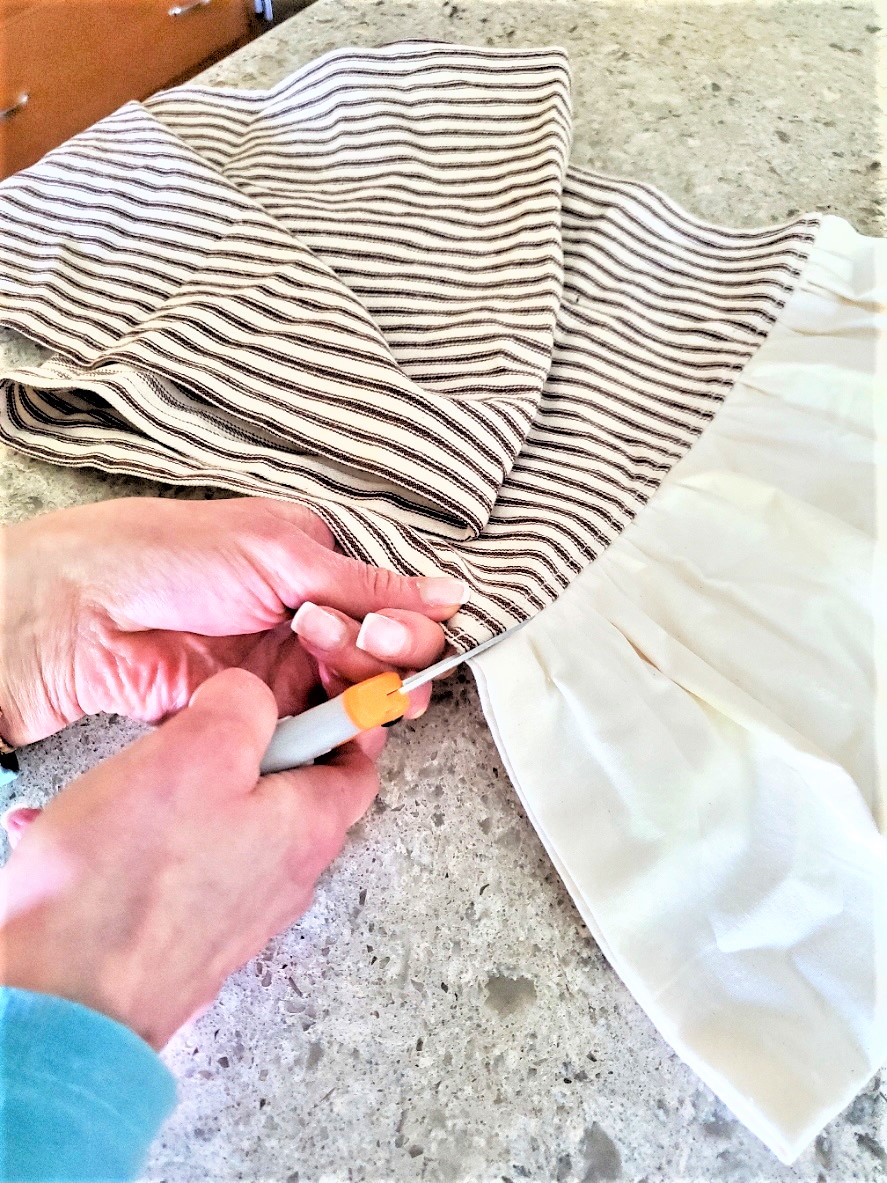
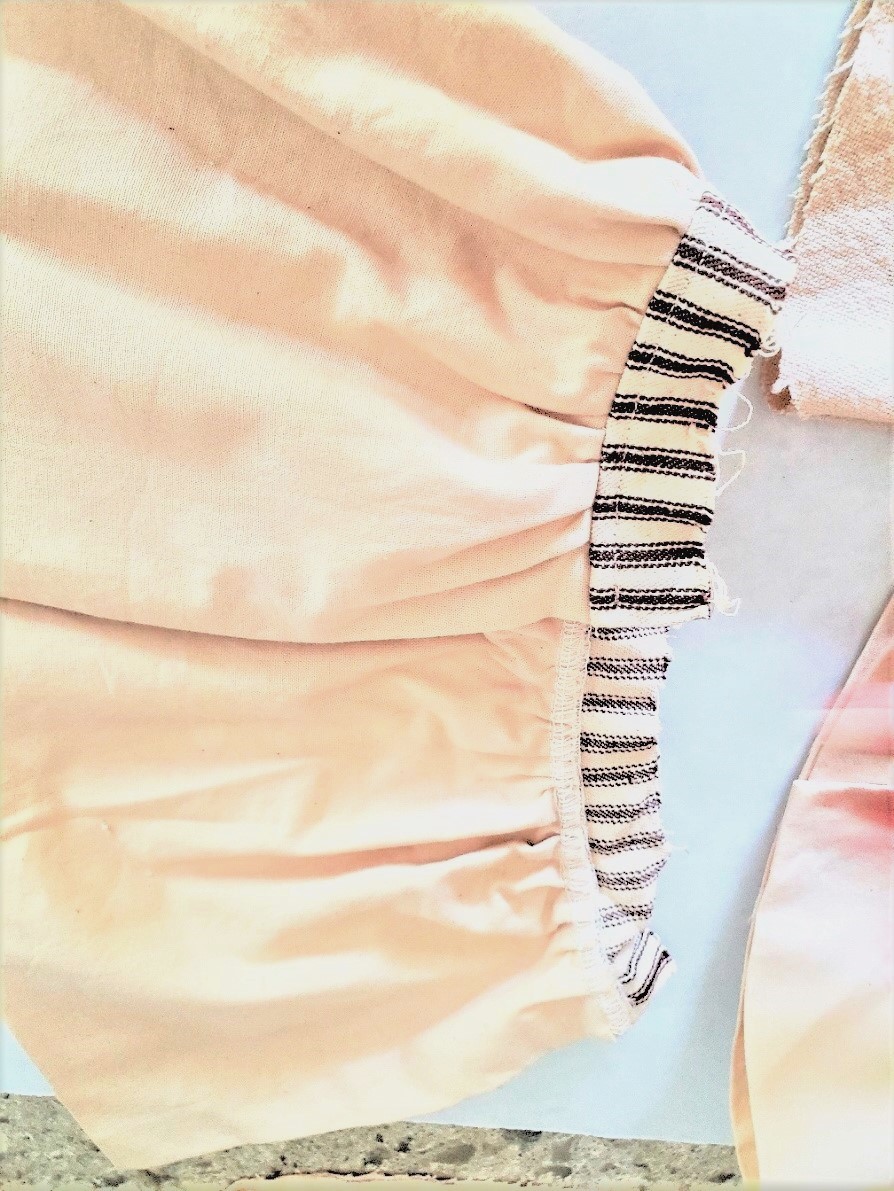
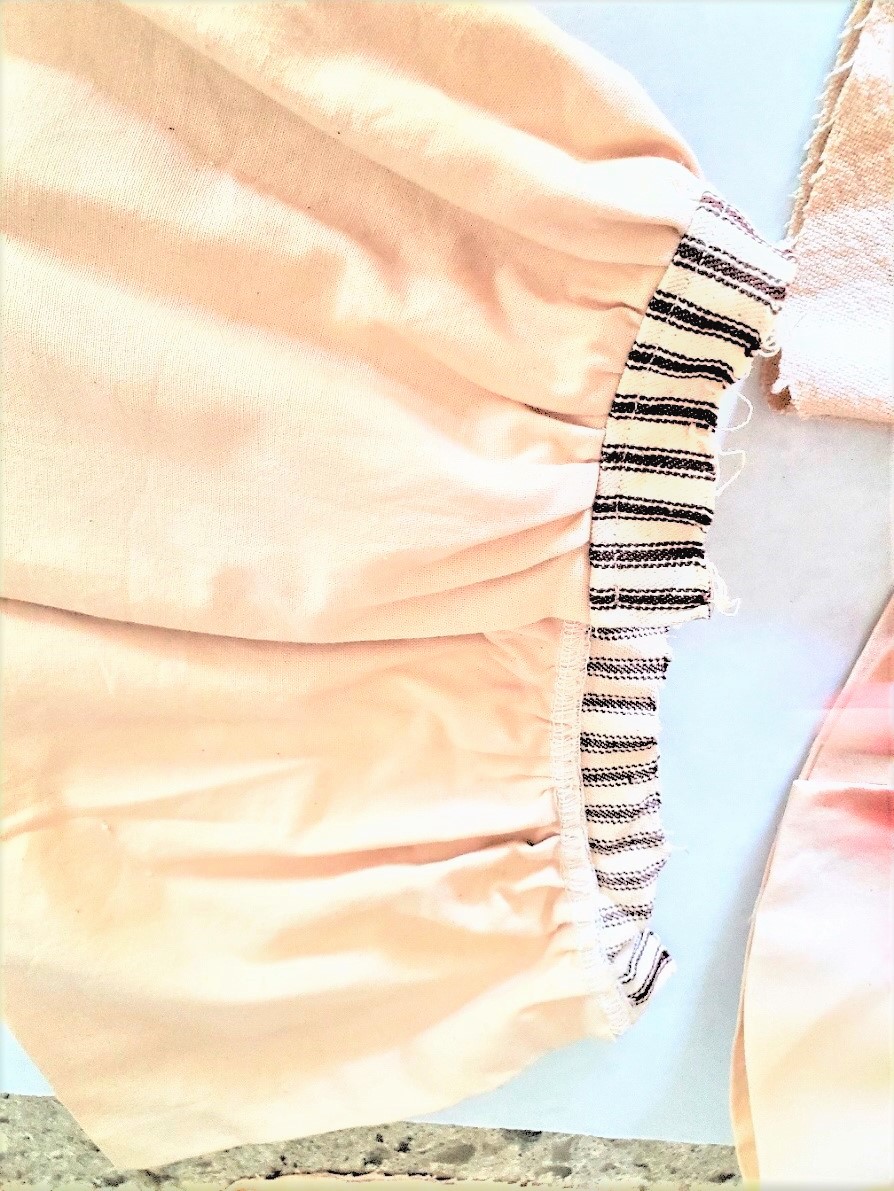
After gluing the raw edges and the long sides of the handmade stockings, it’s time to add the cuff piece to the top of the stocking.
I saved the tops of old stockings for two of my stockings. Since I am making four, I cut the ends from an old runner and added them for a cuff piece. For your own Christmas stockings, mix it up, and add plaid fabric, Ric Rac with pom poms, or faux fur for your cuff piece.
Options New Stockings:
- Faux fur is a great idea
- Wide Ruffle Trim
- Cuff Fabric
- Red heart hygge fur
- Mini stockings make cute stockings to hang on the Christmas tree
- Make a little Christmas stocking for a baby’s first Christmas
- Ric Rac with pom poms
- Bulky weight yarn and look for a knitting pattern here’s a YouTube video I found.
- 2 colors of bulky yarn with crochet hooks or a single crochet needle for a marled look. I found you a free knitting pattern.
Add The Cuff Piece To Top Of The Stocking
Slide each stocking bottom into each cuff piece with the right sides facing inwards. Add fabric glue to the wrong sides (the piece inside the bottom of the stocking), and glue each cuff piece. After each cuff piece is glued and dried, fold the cuff and you have new handmade stockings.
Add a hanging loop using leftover fabric pieces or a strong piece of ribbon.
Note: Our raw edges on our hanging loop are uneven and rough so this gives our new stockings an aged and vintage look.
Place a dot of fabric glue on the inside corner of the cuff piece. Attach the first piece of the hanging loop and let it dry for a few moments. Next, glue the rest of your hanging loop and let it dry.
Lastly, heat the iron on high with no steam, and iron the bottom of the stocking to press the seam and cuff piece, the end result is clean and professional handmade stockings.

FREE PRINTABLE
I hope you enjoyed learning how to make Christmas stockings and a free pattern DIY. I’m sharing links for your shopping needs to purchase supplies to make your own Christmas stockings for your family. I’m so happy with the end result, and I think these are perfect for Christmas morning overflowing with little presents and a gift card to someone’s favorite store!
This quick Christmas sign is an easy project and makes great gifts and works in any home decor!
I’d love to hear your thoughts and if you will consider making these to suit your home for the holiday season. If you have any questions, please send me an email and I will help in any way I can with your family’s stockings.

Christmas Stockings And Free Pattern
Equipment
- 1 Pair of Scissors
- 1 hot iron with no steam
- 1 large pot with warm water optional
- 1 wood cutting board or a piece of wood
- 10 tea bags optional
- 1 pair of rubber gloves optional
- 1 bottle of washable fabric glue
- 1 Jolee Iron on Transfer Sheets
- 1 old tablecloth, cotton, or quilting cotton
- 1 lace, cotton, or faux fur for the stocking cuff piece
- 1 Pen to trace the free Christmas stocking pattern
Instructions
- Step 1: Gathering the Items for Tea StainingTea staining the fabric for your handmade stockings is a relatively straightforward process.Start by filling a large pot with water and placing it on the stove to heat.Next, add tea bags to the water and use a wooden spoon to stir, allowing the tea to infuse into the water. It’s important to heat the water until it becomes warm but not boiling. Once the water reaches a warm temperature, turn off the flame.Now, carefully place each piece of fabric into the pot. Stir the fabric pieces in the tea mixture, ensuring that each piece of fabric is evenly coated. Move each fabric piece around gently for uniform staining.After a few moments of tea staining, move the pot near the sink to make the process less messy when removing the fabric.Tea staining is a fantastic technique to add a vintage touch to your DIY Christmas stockings. Here’s a step-by-step guide on how to tea stain the fabric pieces:Carefully remove each piece of fabric from the pot and give it a good squeeze to eliminate the excess tea water. Take your time with this step to ensure you achieve the desired level of staining.Next, hang them to dry.
- Step 2: Trace the Pattern for the ProjectStart by using the free stocking pattern and begin tracing the body of the stocking onto each piece of fabric. Leave 1/4 inch for seam allowance for the fabric glue.If you’re using the free pattern and wish to have a larger size, consider taking it to a copy center where they can enlarge it for a little cost.Once you’ve finished tracing the pattern onto each piece of fabric, hang your new Christmas stockings to dry. These won’t take too long to dry, so you’ll be able to proceed with the next steps of this easy project.
- Step 3: Ironing the Cut Squares FlatBefore tracing the pattern onto the fabric squares, it’s important to iron each piece of fabric to ensure they are flat and free of wrinkles. Since each piece of fabric may have become wrinkled from squeezing out the excess water, use a hot iron without steam to remove the wrinkles. Carefully iron each piece of fabric, taking your time to achieve a smooth and wrinkle-free surface. This step will help prepare each piece of fabric for tracing your free Christmas stocking pattern.
- Step 4: Tracing the Pattern onto the FabricUse a pen to trace the free pattern onto each piece of fabric, ensuring you have mirror images for DIY Christmas stocking. Take your time during this step to achieve accurate and symmetrical lines for your new Christmas stockings and leave a 1/4 inch seam allowance for the fabric glue.After you have your free Christmas stocking pattern, trace it onto each piece of fabric to make mirror images for your stocking shapes. I suggest using a pen to trace the pattern.Using scissors, carefully cut along the traced lines to separate each pattern piece. Since we are making four handmade stockings, you will need eight pieces of fabric to create mirror images for the new stockings. Take your time and ensure precise cuts to maintain the integrity of the pattern and each piece of fabric.
- Step 5: Adding The Images to StockingsHeat your pieces of fabric and make sure the image is going on the right sides of your new stockings, and lightly add heat. Next step, place your image face down and press the iron firmly. This is important because this is when the ink transfers to your stockings.It’s also necessary to press firmly when moving the iron.I suggest counting to 60. You will notice the ink pulling from the paper. Look at the packaging for instructions for your specific fabric.After you finish ironing, carefully begin to remove the backing.
- Putting The New Stocking Together and Adding the Top TrimStep 1: Let’s Begin Putting These TogetherBecause these new stockings are no sew, we are using fabric glue to put the bottom of the stocking together. This fabric glue allows us to have the option to wash the stockings if needed in cold water. I have seen handmade stockings put together with hot glue. So, if you aren’t concerned with washing your set of stockings then it's an option.Using the glue also allows them to go in the dryer on low heat or air fluff to remove dust.First, lay your pieces of fabric with the image facing inwards. Remember we are turning the right sides out once the glue dries on the new set of Christmas stockings.Make sure to leave a 1/4 inch seam allowance for the fabric glue around the raw edges of your stocking pieces. Begin to press on the long sides of your stockings together to bond your handmade stockings and let them dry. After all the pieces are dry, turn the right sides out.
- Step 2: Cutting and Add the Cuff PieceAfter gluing the raw edges and the long sides of your new Christmas stockings, it’s time to add the cuff piece to the top of the stocking. I saved the tops of old stockings for two of my stockings. Since I am making four, I cut the ends from an old runner and added them for a cuff piece. For your own Christmas stockings, mix it up, and add plaid fabric, Ric Rac with pom poms, or faux fur for your cuff piece.REMEMBER CHECK MY TIPS ABOVE AND OTHER OPTIONS FOR YOUR NEW STOCKINGS.
- Add The Cuff Piece To Top Of The StockingSlide each stocking bottom into each cuff piece with the right sides facing inwards. Add fabric glue to the wrong sides (the piece inside the bottom of the stocking), and glue each cuff piece. After each cuff piece is glued and dried, fold cuff and you have new handmade stockings.Add a hanging loop using leftover fabric pieces or a strong piece of ribbon.Place a dot of fabric glue on the inside corner of the cuff piece. Attach the first piece of the hanging loop and let it dry for a few moments. Next, glue the rest of your hanging loop and let it dry.Lastly, heat the iron on high with no steam, and iron the bottom of the stocking to press the seam, the end result is a clean and professional handmade stockings.
Notes
Christmas Stockings And Free Pattern
Items Needed:
- old cotton tablecloth, cotton fabric, or cotton muslin fabric
- stocking trim, plain fabric, or faux fur
- 10 tea bags
- pot of simmering warm water
- Jolees iron fabric transfer sheets light for light fabric, buy dark for dark fabrics
- wood cutting board
- iron
- large pot
- transfer of your choice – Etsy – a variety of images not just French images available
- washable fabric glue
- free stocking pattern, 1 copy needed from any copy store
Step 1: Gathering The Items For Tea Staining
Tea staining is a fantastic technique and a great way to add a vintage touch to your handmade stockings. Here’s a step-by-step guide on how to tea stain the stocking pieces:-
- A pot of water
- Tea bags
Step 2: Step-By-Step Directions: Tracing Your Free Pattern
Start by using the free stocking pattern and begin tracing the body of the stocking for your set of Christmas stockings onto the tea-stained fabric or your pieces of fabric. When tracing the stocking shapes leave 1/4 seam allowance for the fabric glue. If you’re using the free stocking pattern and wish to have a larger size, consider taking it to a copy center where they can enlarge it at very little cost. Once you’ve finished tracing the stocking template onto the stocking fabric, it’s time to hang the pieces up to dry. The good news is that they won’t take too long to dry, so you’ll be able to proceed with the next step of this easy project relatively quickly.Step 3: Ironing Pattern Pieces – Free Pattern DIY
Before tracing the free printable stocking pattern onto each piece of fabric, it’s important to iron them to ensure they are flat and free of wrinkles. Since each piece of fabric may have become wrinkled from squeezing out the excess water, use a hot iron with NO steam to remove the wrinkles making sure you are ironing the right sides. Carefully iron each piece of fabric, taking your time to achieve a smooth and wrinkle-free surface. This step will help prepare the fabric for tracing the stocking designs and ensure you have a neat end result. Once you have your simple Christmas stocking pattern, it’s time to trace it onto each piece of fabric to create mirror images for your stocking.

Step 4: Tracing Pattern Pieces
Using a pen trace the pattern onto the fabric, as it provides the best results. Carefully trace the pattern onto each piece of fabric, ensuring that you have mirror images for your new stockings. Take your time during this step to achieve accurate and symmetrical outlines for your Christmas stockings. Since the transfers will be getting ironed on the stocking pieces, they need to be printed in reverse so they will not be on the wrong sides. Below, you will notice a piece of wood under my new stockings. The wood keeps the pattern pieces stiff and allows them to be added to the pieces of fabric. Follow the instructions on the package. For your simple Christmas stocking, print the images 4×6 which is a perfect fit.Step 5: Transform Your DIY Christmas Stocking
When ironing the images, it’s essential to use a piece of wood underneath the fabric as I mentioned above. This is important because the fabric needs to be smooth. Be sure to set the iron on high with NO steam. Heat your pieces of fabric make sure the image is going on the right sides (outer piece) of the pattern pieces, and lightly add heat. Next step, place your image face down on the outer piece of your stocking and press the iron firmly. This is important because this is when the ink transfers to your new stockings. It’s also necessary to press firmly when moving the iron. I suggest counting to 60. You will notice the ink pulling from the paper. Look at the packaging for instructions for your specific fabric. After you finish ironing, carefully begin to remove the backing.Step 1: Putting The Stocking Designs Together
Because these stocking designs are no sew, we are using fabric glue to put the bottom of the stocking together. This fabric glue allows us to have the option to wash the stockings if needed in cold water. I have seen handmade stockings put together with hot glue. So, if you aren’t concerned with washing your set of stockings then it’s an option. First, lay your pieces of fabric with the image facing inwards. Remember we are turning the right sides out once the glue dries for the stocking shapes. Make sure, to leave a 1/4 inch seam allowance for the fabric glue around the raw edges of your stocking pieces. Begin to press on the long sides of your stocking pieces to bond your handmade stockings together and let dry. After all the pieces were dry, I turned them right sides out.Step 2: Cutting And Adding The Trim
After gluing the raw edges and the long sides of the family stocking, it’s time to add the cuff piece to the top of the stocking. I saved the tops of old stockings for two of my stockings. Since I am making four, I cut the ends from an old runner and added them for a cuff piece. For your own Christmas stockings, mix it up, and add plaid fabric, Ric Rac with pom poms, or faux fur for your cuff piece.Add The Cuff Piece To Top Of The Stocking
Slide each stocking bottom into each cuff piece with the right sides facing inwards. Add fabric glue to the wrong sides (the piece inside the bottom of the stocking), and glue each cuff piece. After each cuff piece is glued and dried, fold the cuff over and you have new handmade stockings. Add a hanging loop using leftover fabric pieces or a strong piece of ribbon. Place a dot of fabric glue on the inside corner of the cuff piece. Attach the first piece of the hanging loop and let it dry for a few moments. Next, glue the rest of your hanging loop and let it dry. Lastly, heat the iron on high with no steam, and iron the bottom of the stocking to press the seam, the end result is a clean and professional handmade stocking.Step 4: Tracing the Pattern onto the Fabric
Using a pen is recommended for tracing the pattern onto the fabric, it provides the best results. Carefully trace the pattern onto each fabric piece, ensuring that you have mirror images for the stocking shapes. Take your time during this step to achieve accurate and symmetrical outlines for your stockings.Step 5: Adding The Images to Stockings
If you plan to add images to your handmade stockings, now is the perfect time to do so. Incorporating images into your stockings is a simple and easy process. As a recommendation, consider using Jolee’s Boutique Easy Image Iron Transfer paper in white, especially if you’re working with light-colored fabrics. This transfer paper is also available for use with darker colors. Follow the instructions provided with the transfer paper to print your desired images onto the iron transfer sheets. Once printed, carefully cut out the images, leaving a small border around each one. Position the images onto your fabric pieces, ensuring they are arranged to your liking. Make sure to follow the specific instructions provided with the transfer paper to iron the images onto the fabric effectively. Adding images to your stockings adds a personal touch and enhances their overall appearance. Get creative and enjoy this step of the process!
Step 6: Carefully Iron on Images of Your Choice
Iron the images, it’s essential to use a piece of wood underneath the fabric as I mentioned above. This is important because the fabric needs to be smooth. Also, set the iron on high with NO steam. First, go over the outer fabric where you want the image, and add heat. Next, place your image face down and press the iron firmly. This is important because this is when the ink transfers to your stocking fabric. It’s also necessary to press firmly when moving the iron. I suggest counting to 60. You will notice the ink pulling from the paper. Look at the packaging for instructions for your specific fabric.

Putting Them Together and Adding the Top Trim
Step 1: Let’s Begin Putting These Together
Because I don’t sew, I am using fabric glue to put the bottom of the stocking together. I am using this fabric glue because it allows me to have the option to wash them in cold water if needed. I have seen this done with hot glue. So, if you aren’t concerned with washing these stockings then that is an option. This glue also dries quickly so don’t make that a concern.


Step 2: Cutting and Add the Trim
Glue the body of the stockings together and add the top of the stocking. I saved the tops of old stockings from years ago, perfect for two stockings. However, I am making four. So, having a runner I don’t use anymore, is the solution.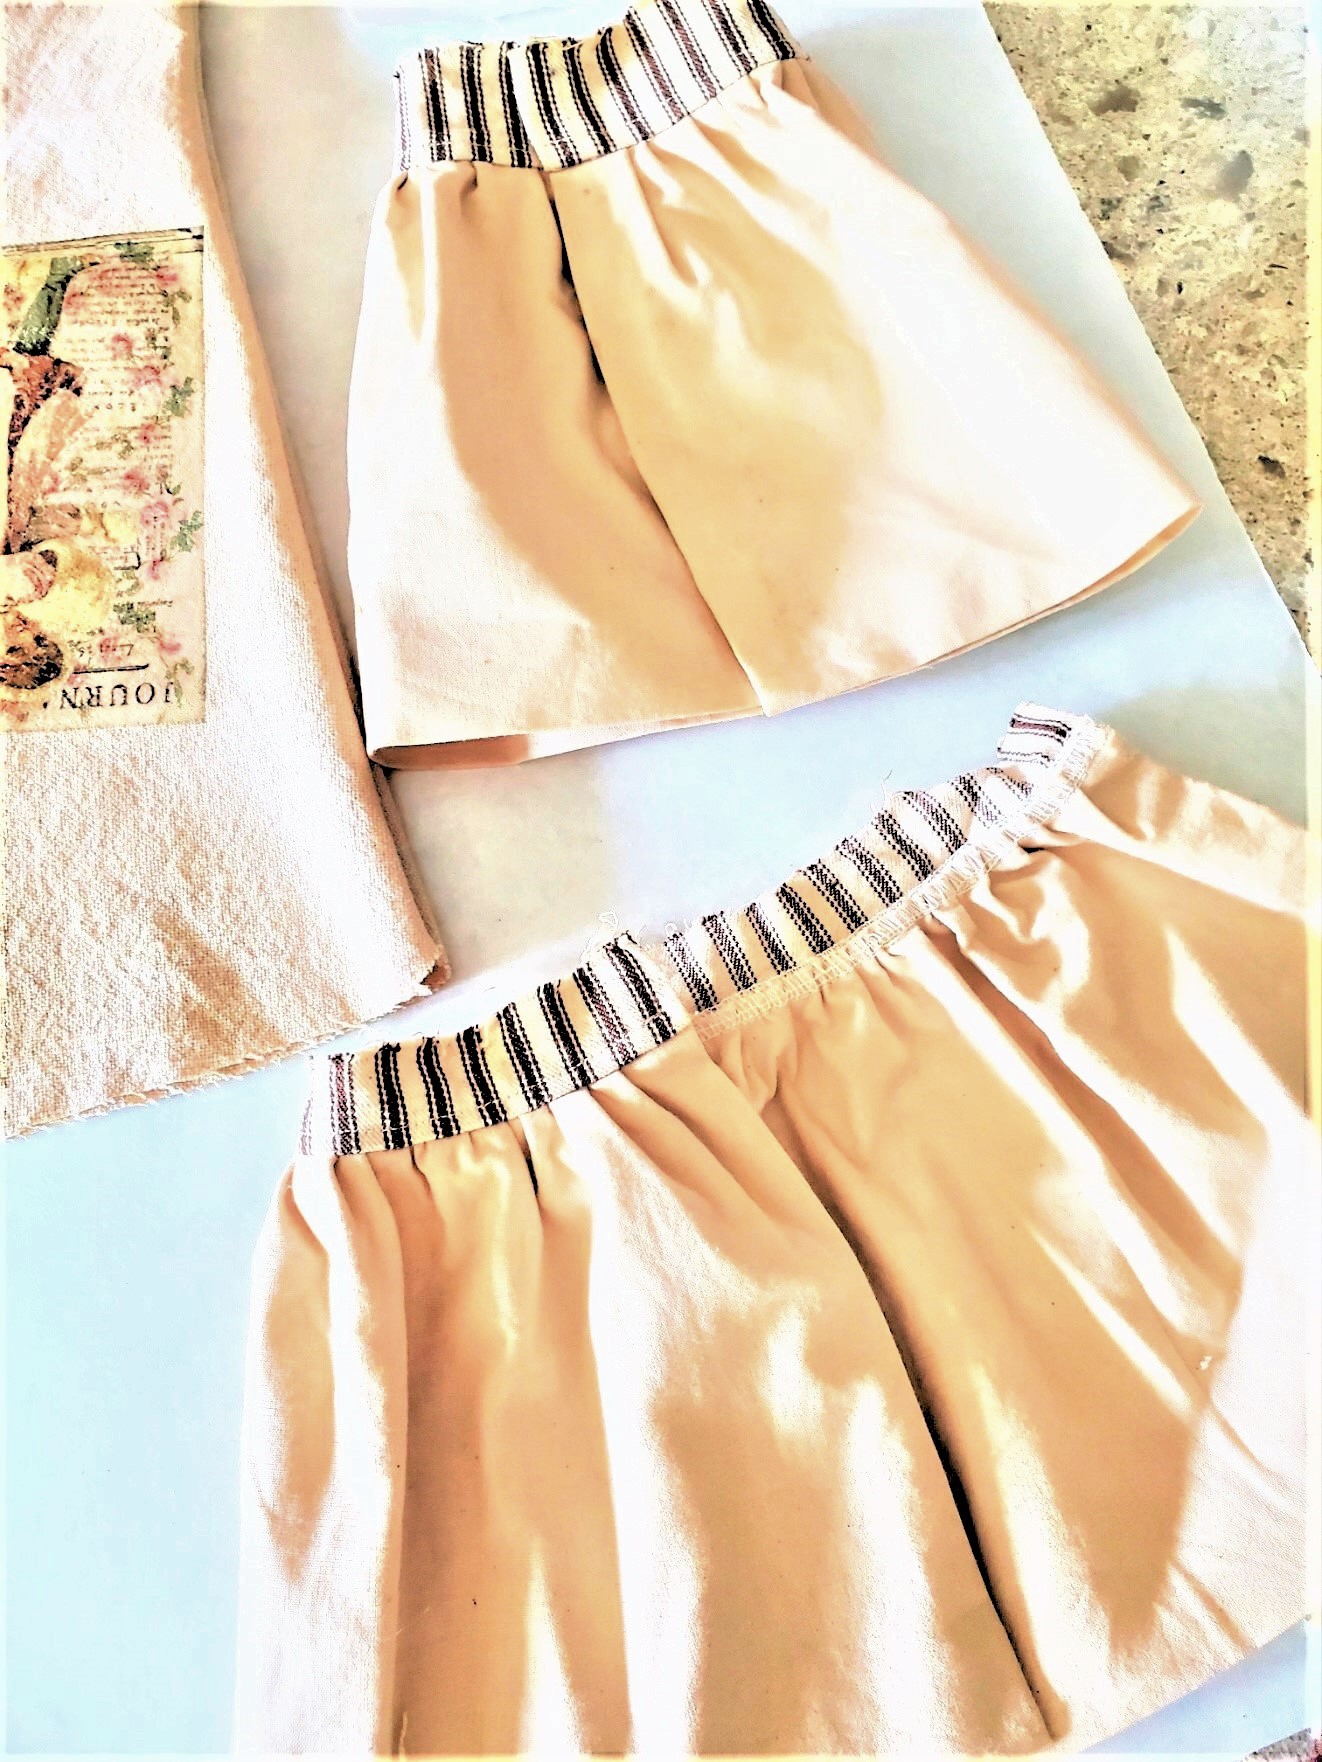
Other Holiday Posts


These are so great Cindy. Thanks for sharing the pattern. You my friend are so creative. xoxo Kris
Thanks so much. You are one to talk about creative. You’re a superstar
Great tutorial and free pattern. Love the transfers – so unique!
Thanks Jayne
I love these stockings, Cindy!
Thank you Paula!
Oh Cindy, these stockings are absolutely adorable. I just love them.
Thanks so much Tammy
These stockings are just adorable and so fun! I love the vintage vibe and your attention to detail. Thanks for sharing the whole tutorial-from the tea staining to the iron-on and ruffles, these are gorgeous!
Thanks so much Meegan. I really wanted to get the vintage look
These are adorable!! I love the vintage look and the tea-stained fabric. How many tea bags did you use to get your fabric that color?
Thanks Michelle. I think I used about 10
Thank you! I’ve had some fabric I’ve wanted to stain for awhile but I wasn’t sure how many tea bags to use. 🙂
No problem. Let the water be warm too
Such a great project! I love how the stockings turned out! Now it’s time to deck the halls!
Happy day!
KariAnne
I love your stocking, Cindy. xo Laura
Thanks so much!
Beautiful stockings, Cindy! You’re all set for the holidays with your pretty pattern.
Thanks Kim!
Cindy your stocking are perfect for your home. Thanks for the tutorial and free pattern. Great Christmas hop!
Thank you
The ruffle detail is very pretty. My auntie would love the Victorian little girl. So sweet.
These vintage style stockings are so sweet, Cindy! I love the ruffle trim at the top. It’s great that you don’t need any sewing skills to make them, either. Thanks for sharing. Pinned!
Such beautiful vintage Christmas stockings. I love your techniques. This is a great tutorial.
Thanks so much Janet
OMG, I love your idea to cut off the ruffle from a table runner you are no longer using. These gorgeous stockings are one-of-a-kind masterpieces.
Merry Christmas,
Kippi
Thank you Kippi. I can’t wait to hang them at Christmas
I love your stockings Cindy! The tea staining adds a nice vintage feeling to them! pinned 🙂
I love how you tea stained the fabric, such a nice touch! Thanks for sharing.
Thank you Olivia
Cindy! Adorable!!! I am just seeing your post here early this morning and I love how your stockings turned out. <3 I worked with some transfer paper this summer for a project my mother-in-law was working on. Might have to make a few new stockings this year! 😉
Enjoy yours,
Barb 🙂
Thanks Barbara. I love them!
These look like they could be sold in a French market, Cindy! Wow – they are amazing – super pretty and so creative too. Can’t wait to see what your up to this holiday season. I’m in love already, CoCo
So pretty; I love the vintage look!
Brilliant. Swooning over these beauties.
Thank you, they were fun to make
Thanks so much Rebecca
Love these stockings, Cindy! Thanks for sharing them at Celebrate Your Story! Link Party. You’ve been featured this week 🙂
I saw and thank you. Hope you saw it
Thanks for sharing. I read many of your blog posts, cool, your blog is very good. https://www.binance.com/sl/register?ref=OMM3XK51