Easy Pool Noodle Grapevine Wreath
Love grapevine, moss, and pool noodles? Discover a great way to create this easy craft idea a DIY Pool Noodle Grapevine Wreath. Add it to a front door or home decor. As we create this beautiful wreath, we will explore different ways and a great way to make pool noodles into seasonal wreaths. Make a pool noodle wreath with faux succulents for a summer party. Use traditional fall colors for the fall season. Add vintage ornaments for a DIY Christmas wreath. Use with holiday decor.
Jump to DIY PRINTABLETable of Contents
- 1 Explore Craft Store Treasures For Gorgeous Wreaths
- 2 Why Make A DIY Pool Noodle Grapevine Wreath Frame?
- 3 Here are a few reasons why you might want to make one:
- 4 Frequently Asked Questions: Your Guide To Crafting Gorgeous Wreaths
- 4.1 How do I shape the pool noodle for the wreath?
- 4.2 Are there alternative methods to duct tape for keeping the pool noodles in shape?
- 4.3 Can I make a pool noodle wreath for different seasons?
- 4.4 How do I attach decorations or ornaments to the pool noodle wreath?
- 4.5 Are there any specific techniques for adding moss or greenery to the wreath?
- 5 Must-Have Craft Store Finds For A Pool Noodle Wreath
- 6 Assembling The Wreath Frame: Pool Noodle Grapevine Wreath
- 7 Adding the Wood Dowel
- 8 Cutting the Moss
- 9 Tackling The Issue Of Moss Shedding A Solution
- 10 Add Charm With Natural Beauty
- 11 Discover Inspiration At Craft Stores: Transform Your Home With Seasonal Wreaths:
- 12 Begin This Easy Craft Idea Today!
- 13 Conclusion:
- 14 Posts Of Interest
- 15 Click The Image And Go Directly To The Product!
- 16 Easy Pool Noodle Grapevine Wreath
- 16.1 Notes
- 16.2 EASY POOL NOODLE WREATH
- 16.3 Craft Supplies:
- 16.4 Step 1: Shaping the Pool Noodle Oval To Fit The Grapevine Wreath Form
- 16.5 Step 2: Securing The Wood Dowel With A Hot Glue Gun
- 16.6 Step 3: Crafting With Moss Cut For A Beautiful Wreath
- 16.7 Step 4: Craft Idea: A Nest A Great Way For Natural Beauty
- 16.8 Embrace Beautiful Wreaths: Seasonal Wreaths For Your Home Decor
Explore Craft Store Treasures For Gorgeous Wreaths
Visit craft stores such as Hobby Lobby and the Dollar Store to find the craft supplies to make a beautiful wreath. At the end of this post, we will share wreath forms such as straw wreaths, wire wreath forms, and the easiest way to make your own wreath to enjoy in different ways.
Why Make A DIY Pool Noodle Grapevine Wreath Frame?
A pool noodle wreath with a grapevine wreath form is a fun DIY wreath project that allows you to customize your home decor.
Here are a few reasons why you might want to make one:
- Cost-effective: Pool noodles are cheap, and you can often find grapevine wreath forms at craft stores for a great price. Isn’t it one of the best things when we can make a beautiful wreath without spending a lot of money?
- Customizable: It’s a good idea to make your wreath in different ways for a front door and seasonal wreaths. We can choose the colors and decorations that fit our home decor. We can use different types of ribbon such as burlap ribbon, or my favorite ribbon, lace. Craft stores and the Dollar store have flowers and faux greenery to create a gorgeous wreath that complements our home decor style, front porch, and front door for all the seasons.
Easy Crafts And Versatility
- Easy Craft Idea: Pool noodle wreaths are easy to assemble, even if you don’t have much crafting experience. Wrap the pool noodles into a circular shape, and connect the ends with hot glue, and duct tape. Insert it in the middle of a grapevine wreath form and cover it with moss. The easiest way to customize a wreath is to add faux greenery, larger flowers, or scraps of fabric for pops of color.
- Versatile: A pool noodle wreath with a grapevine wreath form can be used in different ways, a front door, a front porch, or seasonal wreaths for different seasons. It’s a great way to make a faux succulent wreath to enhance a spring or summer party.
Frequently Asked Questions: Your Guide To Crafting Gorgeous Wreaths
How do I shape the pool noodle for the wreath?
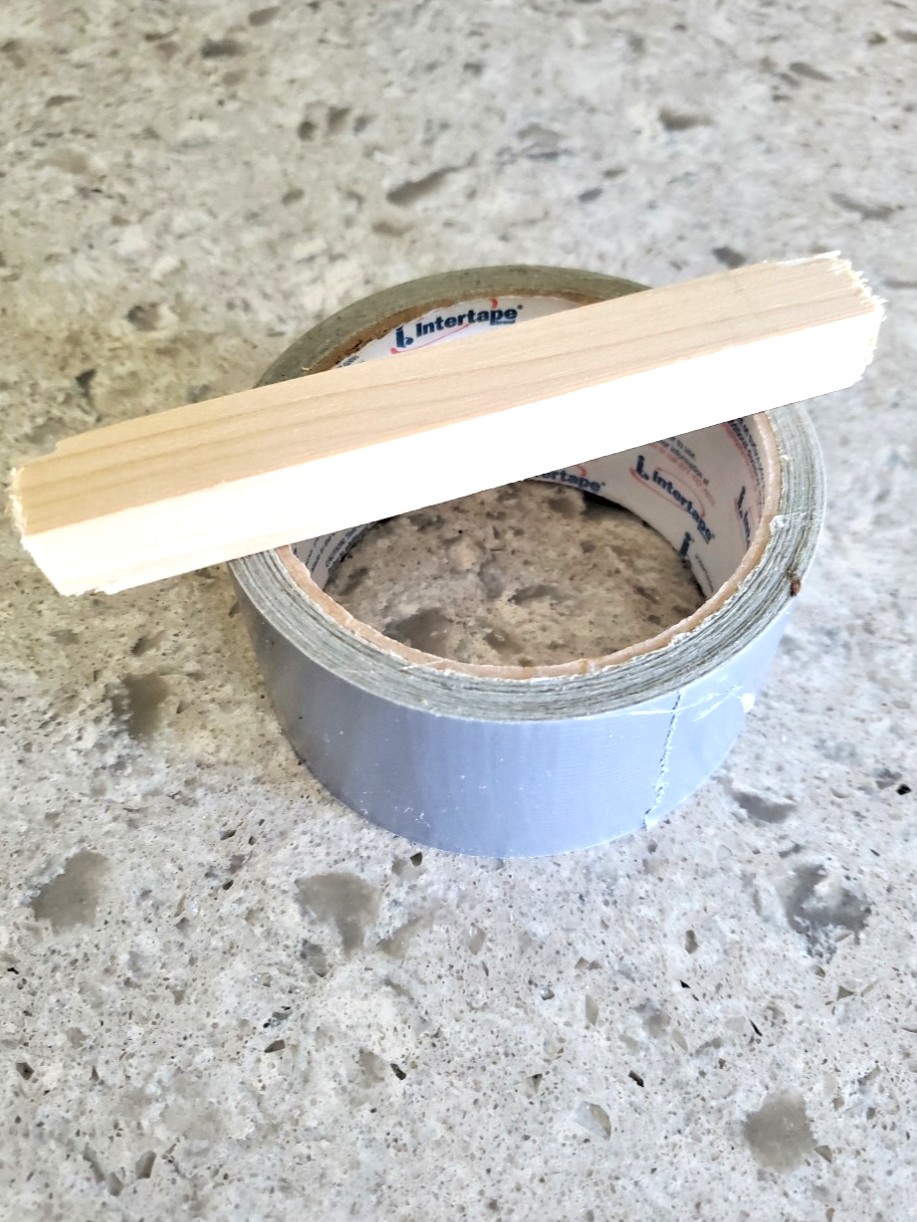
The easiest way to form it into a round shape is to take either end of the pool noodle. Bend it into a circle shape, and secure it with duct tape. For added support, we will share a great idea in our tutorial.
Are there alternative methods to duct tape for keeping the pool noodles in shape?
To keep the circular shape hot glue is an option as well as Gorilla glue or E-6000. For my craft idea, I set my hot glue gun to a low temperature. Hot glue has the potential to break down Styrofoam over time. I didn’t want to take any chances.
Can I make a pool noodle wreath for different seasons?
Yes, it’s a great way to make seasonal wreaths. Make a faux succulent wreath for spring and summer. A DIY Christmas wreath is an easy way to add a piece to holiday decor. Add Christmas decorations such as ornaments, small gingerbread houses, or bottle brush trees in different sizes. At the end of this post, we will share different ways to make gorgeous wreaths using assorted wreath forms.
How do I attach decorations or ornaments to the pool noodle wreath?
Use the hot glue gun to attach ornaments for ornament wreaths. Work your way along the pool noodle to build up the look. Once ornaments are attached a fun way to fill in the gaps add small pine cones or faux greenery. Another great idea is to create a faux evergreen wreath.
Are there any specific techniques for adding moss or greenery to the wreath?
Have you ever worked with self stick moss? I began using it a few years ago. This is a super simple way to add moss to a Styrofoam wreath for a spring wreath or the fall season.
**As always use extra caution with a hot glue gun. Keep children and pets away to avoid burns. Make sure they can’t get tangled in the cord. This prevents the hot glue gun from falling and causing damage or harm.**
Must-Have Craft Store Finds For A Pool Noodle Wreath
Craft Supplies:
- A pool noodle — grocery stores, Dollar Store, Dollar Tree, or Home Depot
- Grapevine wreath form
- Scissors
- Self stick moss — craft stores
- Wood dowel
- Hot glue gun — love mine
- Duct tape
- Popsicle stick
- Protective fingertips
Pro Tip: Set the hot glue gun at a low temperature to secure the pool noodle and the dowel. Add duct tape for extra stability. This is a great idea because the pool noodles will be added to the inside whole of the grapevine wreath.
Assembling The Wreath Frame: Pool Noodle Grapevine Wreath
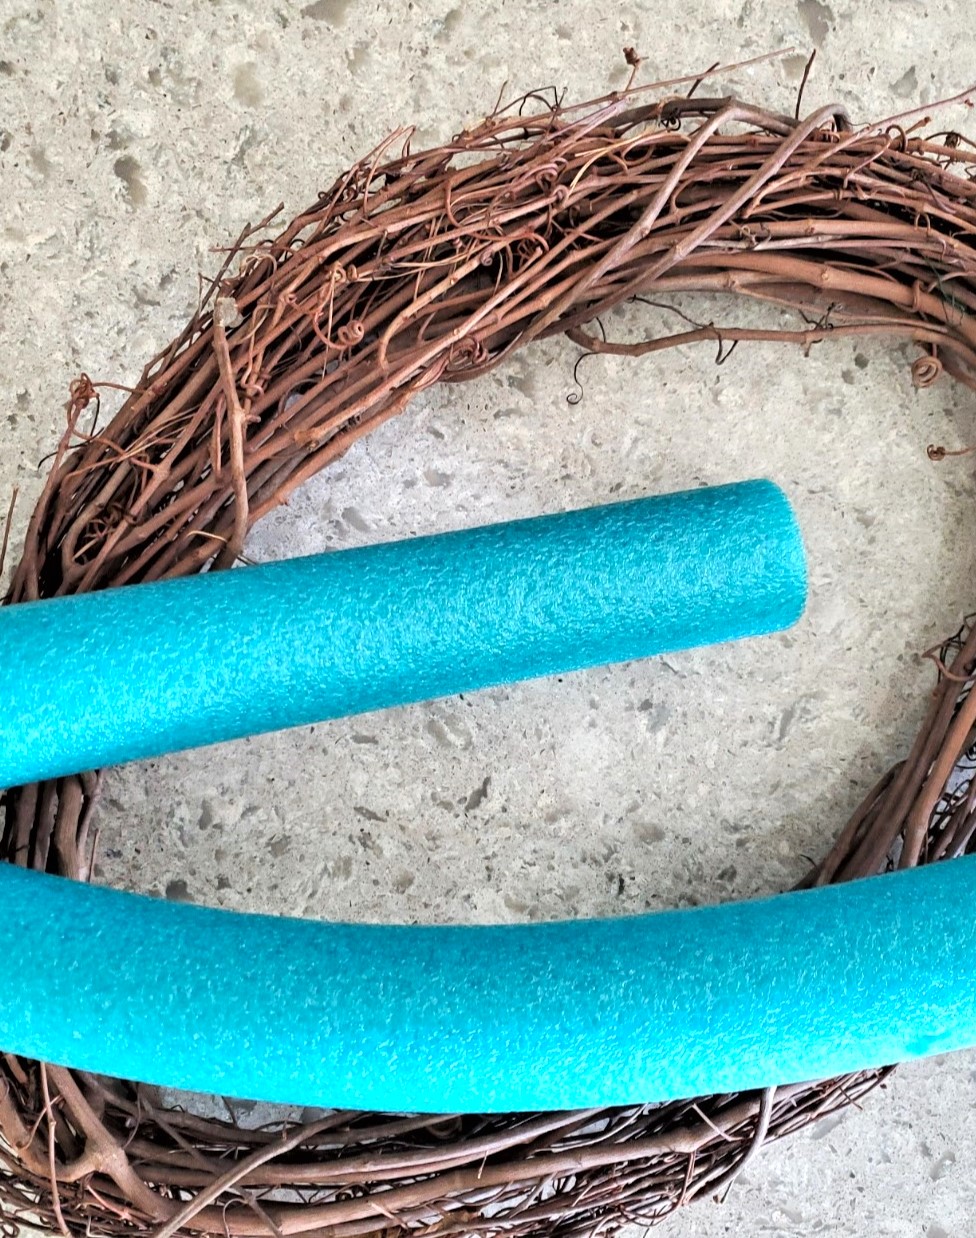
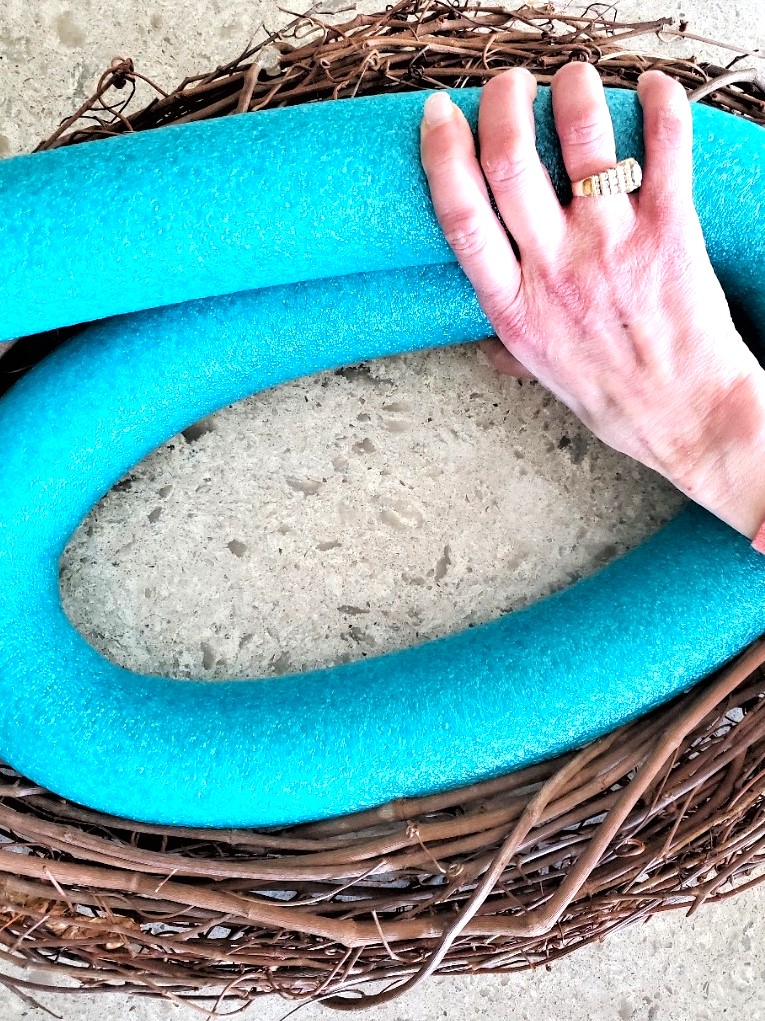
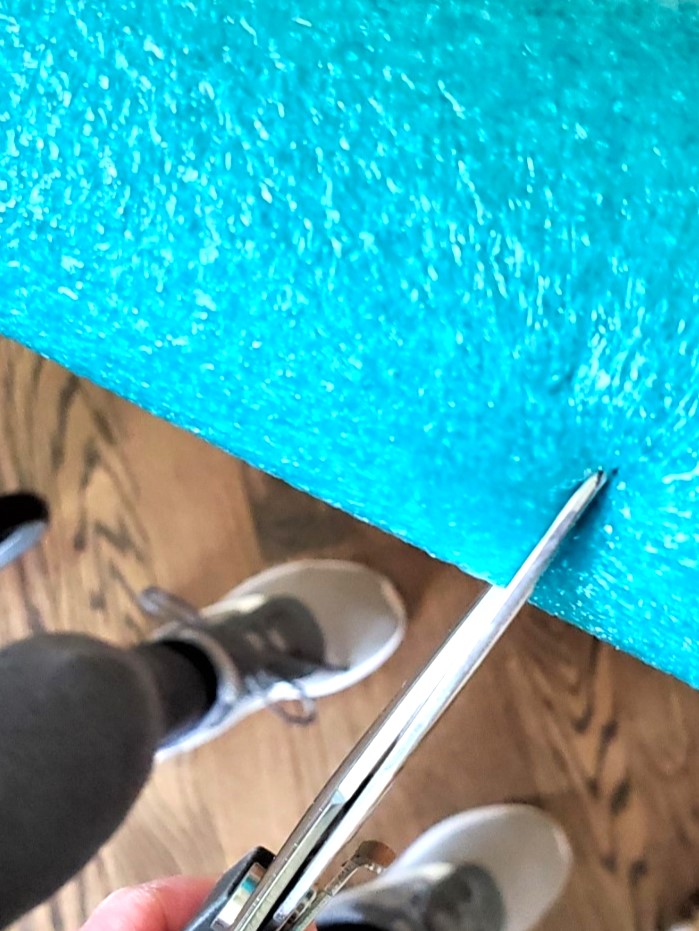
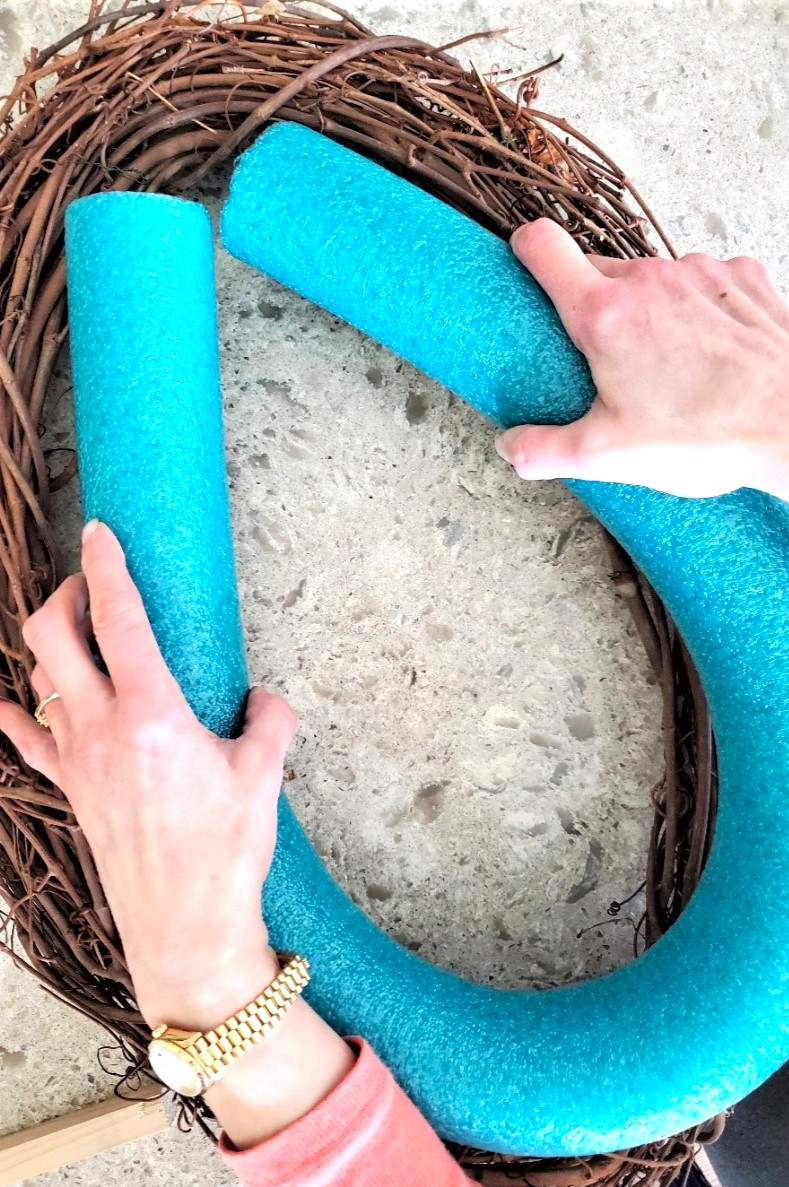
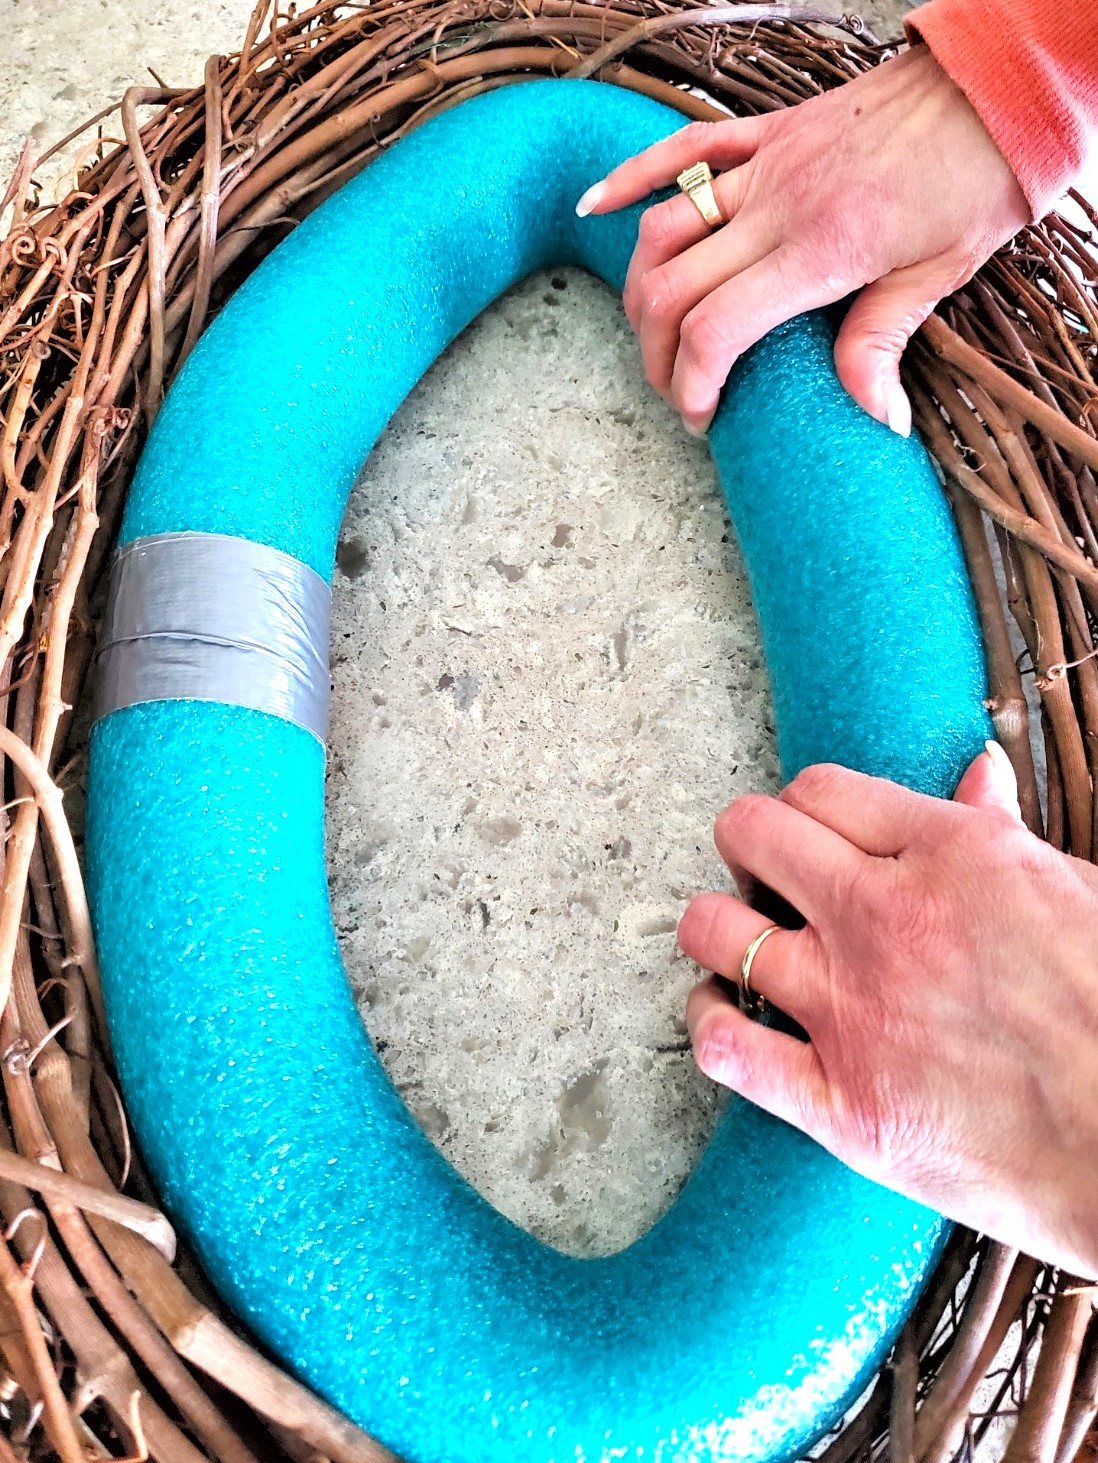
Step 1: Shaping the Pool Noodle Oval To Fit The Grapevine Wreath Form
Let’s discuss the method to keep the pool noodle in a round shape or oval. First thing, pre-measure your pool noodles before cutting. Add it to the middle of the grapevine wreath. This gives a good measurement. Using scissors cut the pool noodles to size. On social media, Pinterest, and blogs, many used duct tape to connect the ends of the pool noddle. So I decided to give it a shot. Once added to the center of my large grapevine wreath, I heard a loud noise in my craft room. Imagine my surprise when the pool noodle suddenly popped apart and out of the grapevine. It was obvious that I neededed a more efficient solution.
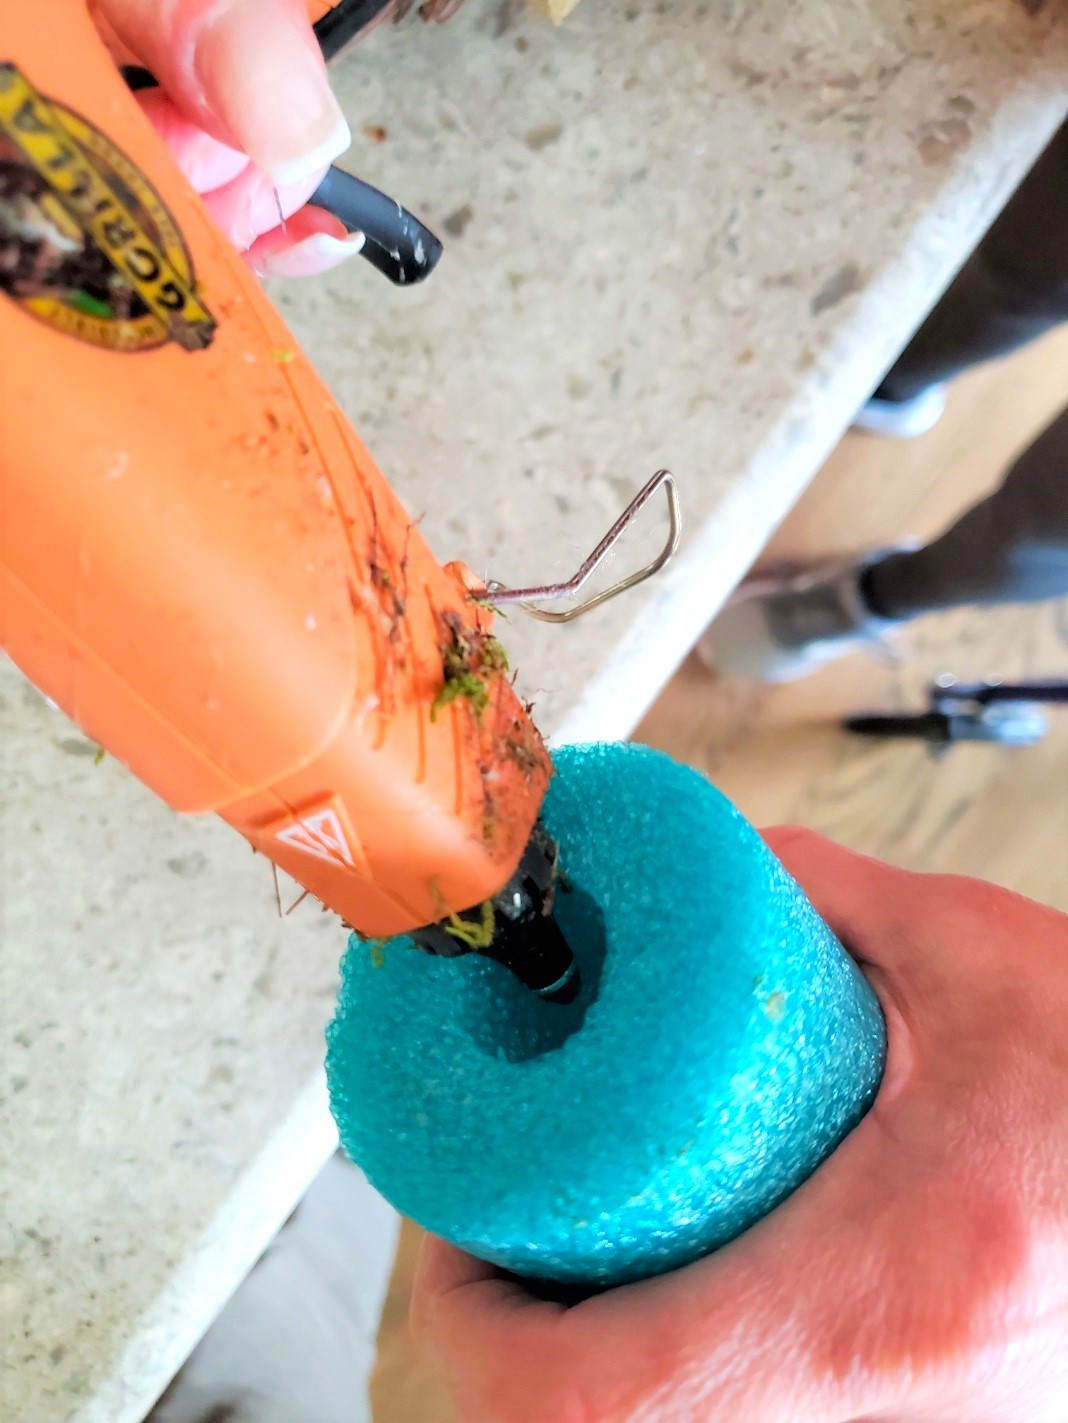
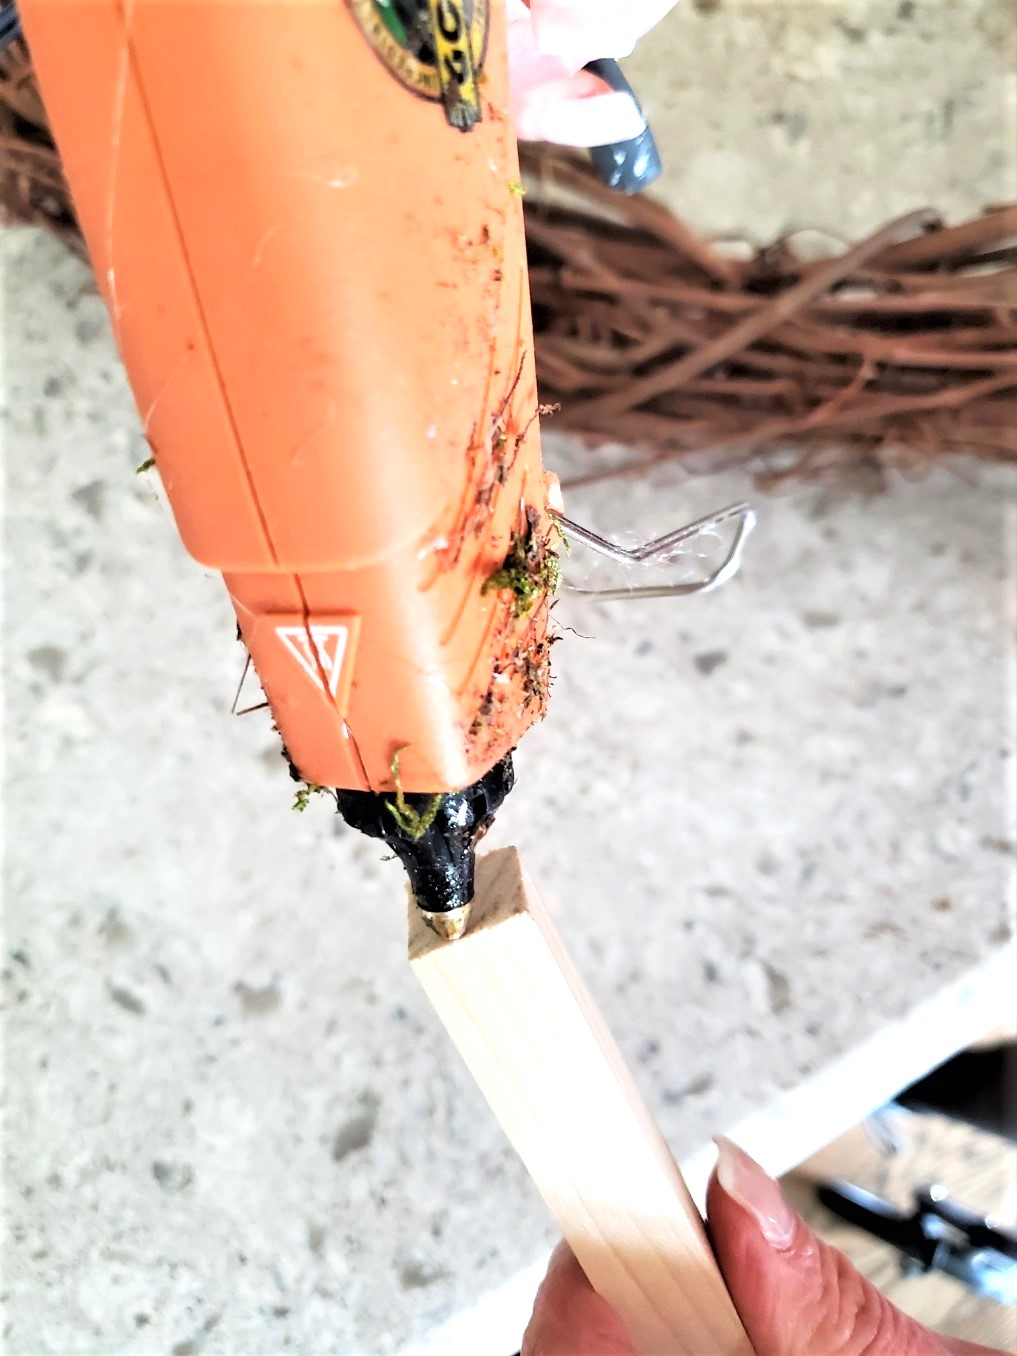
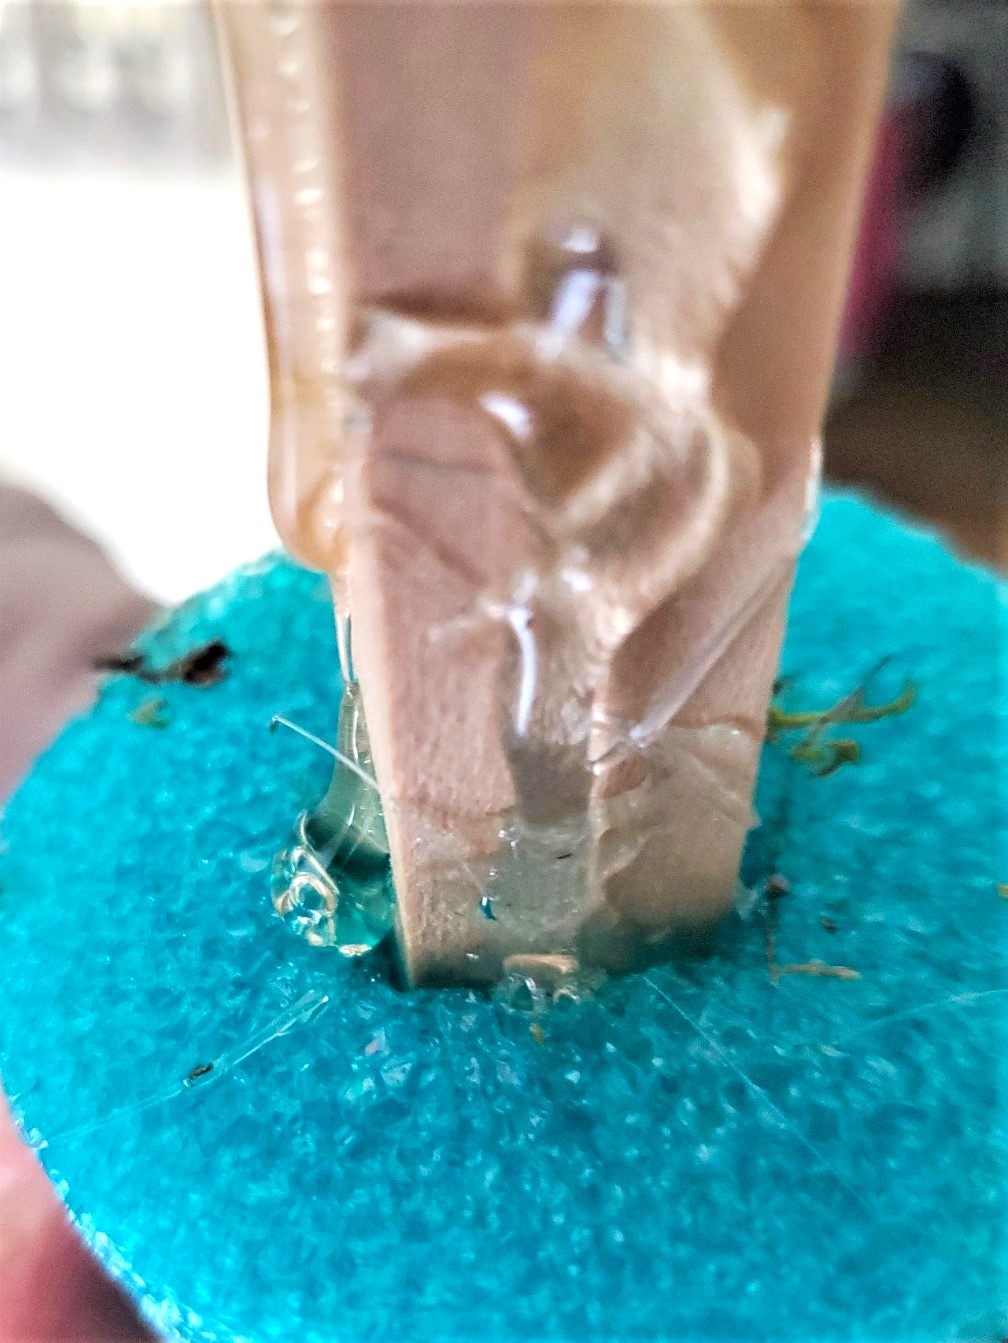
Adding the Wood Dowel
Step 2: Securing The Wood Dowel With A Hot Glue Gun
We want to ensure the pool noodle is just the right size to fit snugly in the middle of the wreath. My grapevine wreath form is a large oval, so I made the pool noddle into an oval. Feel free to purchase a round grapevine wreath form. For a 16 inch grapevine wreath, approximately 14.5 inches should fit the middle of the wreath. First thing, using a hot glue gun add low temperature hot glue to the sides of the hole of the pool noodle. Add a bit of hot glue to the bottom of the wood dowel and the sides. (This may seem a bit much but keeping this secure is the key to this easy craft idea).
Pro Tip: Applying hot glue: First thing, begin by spreading hot glue on the ends and applying pressure to push the ends together. One of the best things to do is wrap duct tape around the pool noodle while the glue is drying.
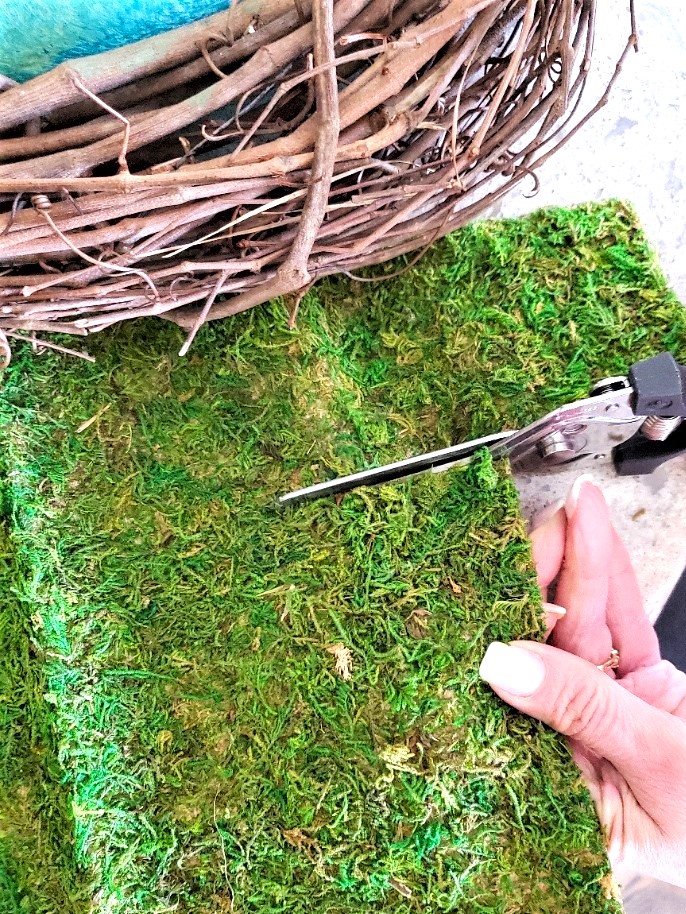
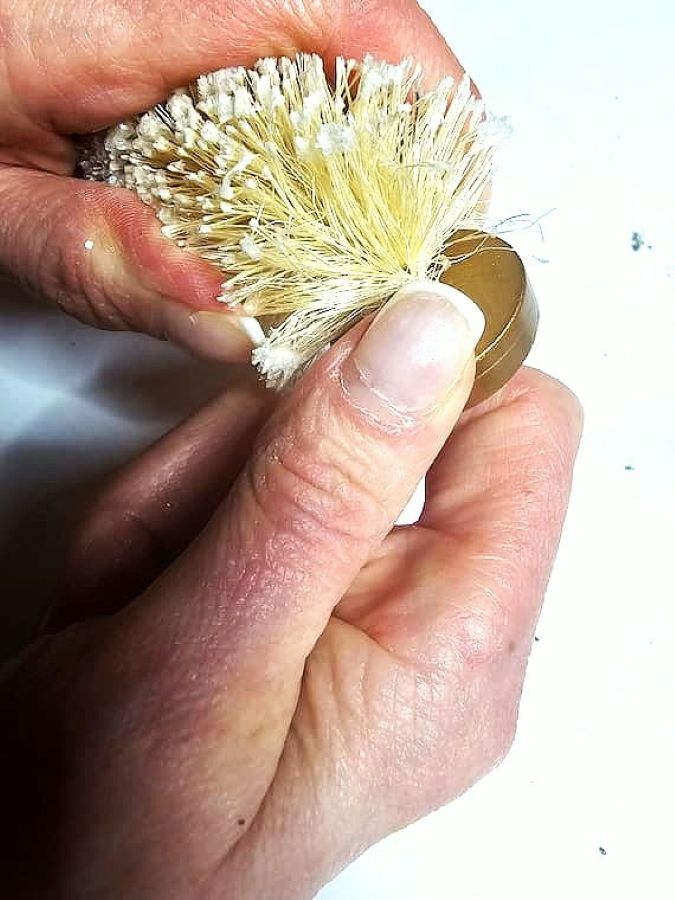
Cutting the Moss
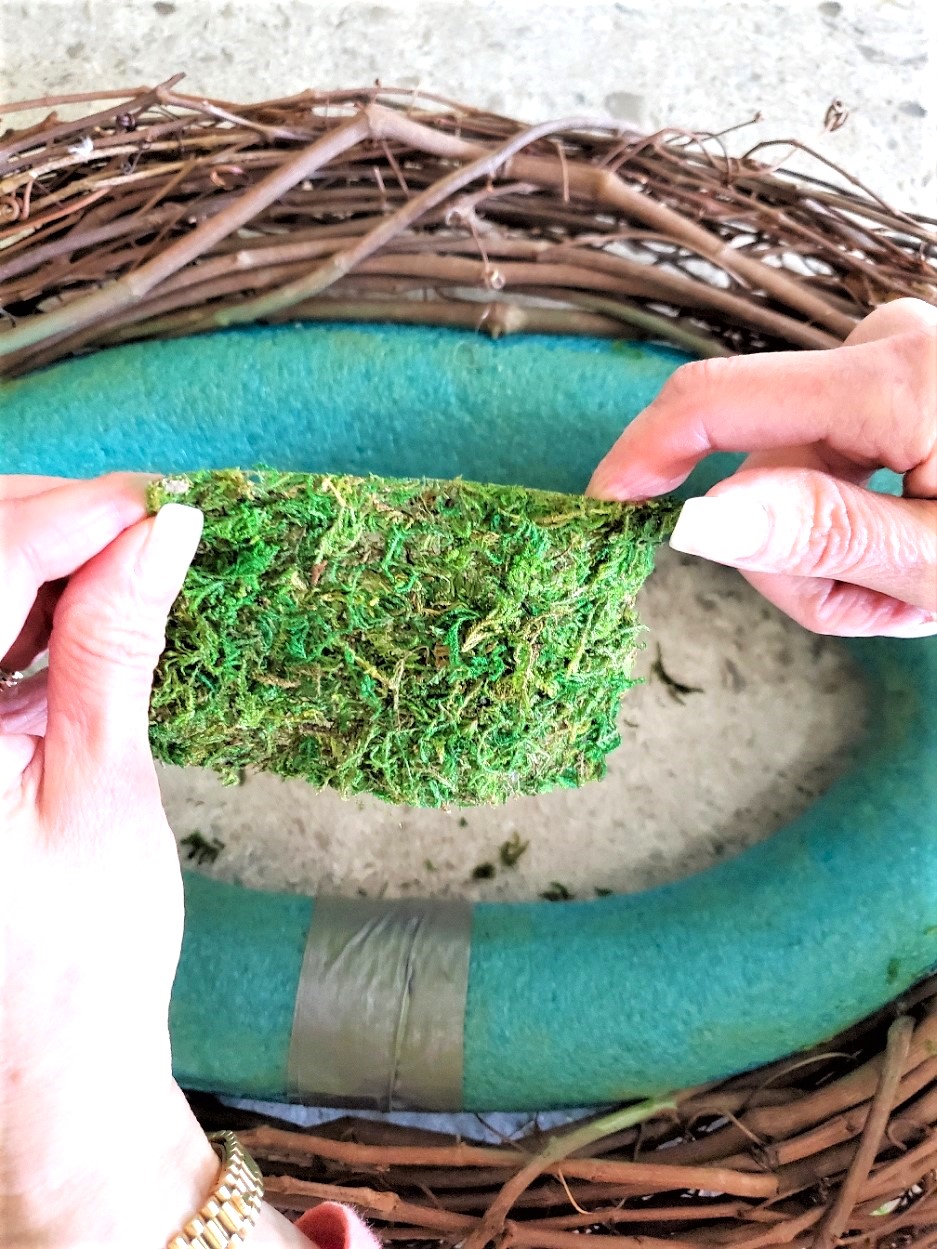
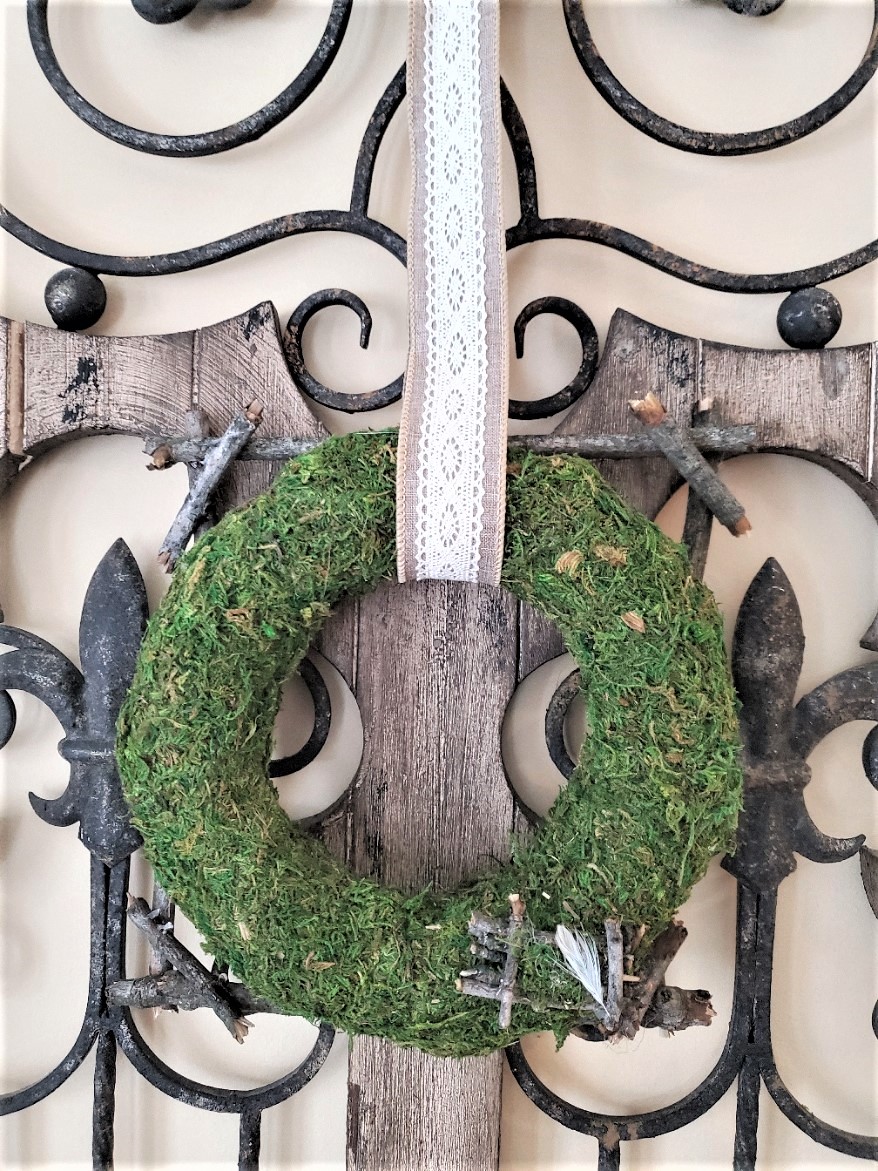
Step 3: Crafting With Moss Cut For A Beautiful Wreath
Have you ever worked with self stick moss? I began using it a few years ago. This is a super simple way to add moss to a Styrofoam wreath form that’s the perfect spring wreath or fall season. Another great idea is making easy crafts with old cans as vases for fresh flowers!
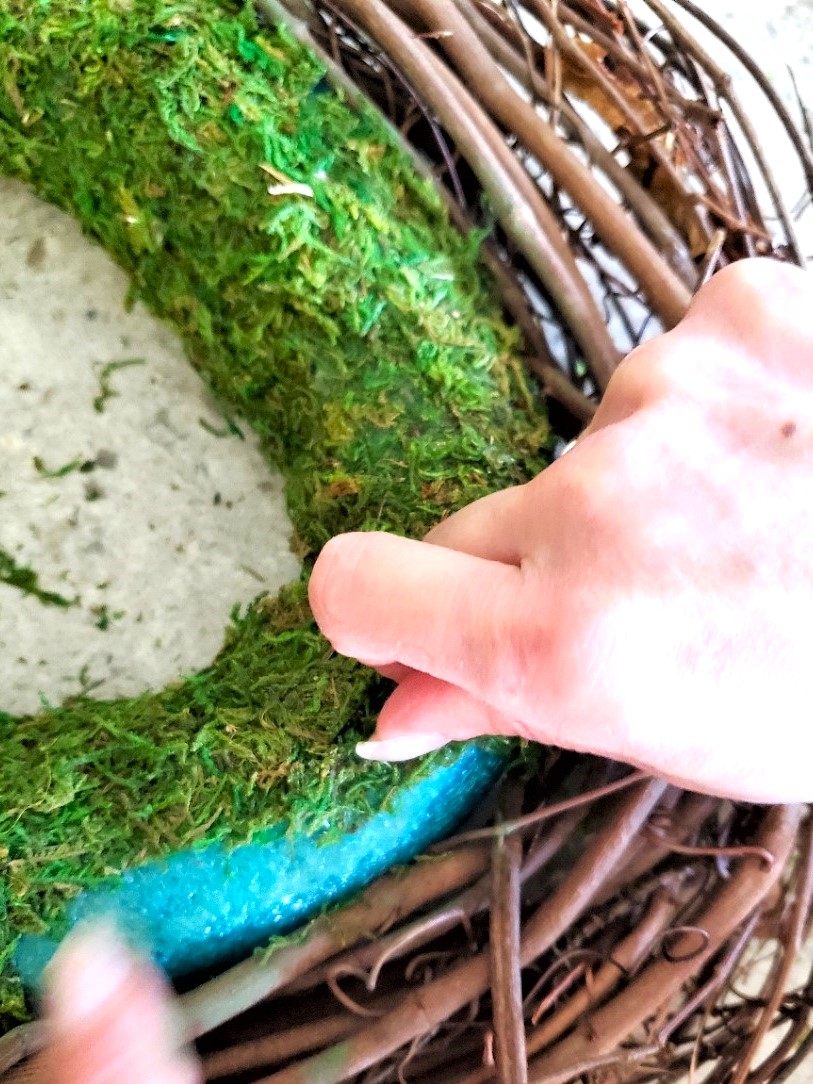
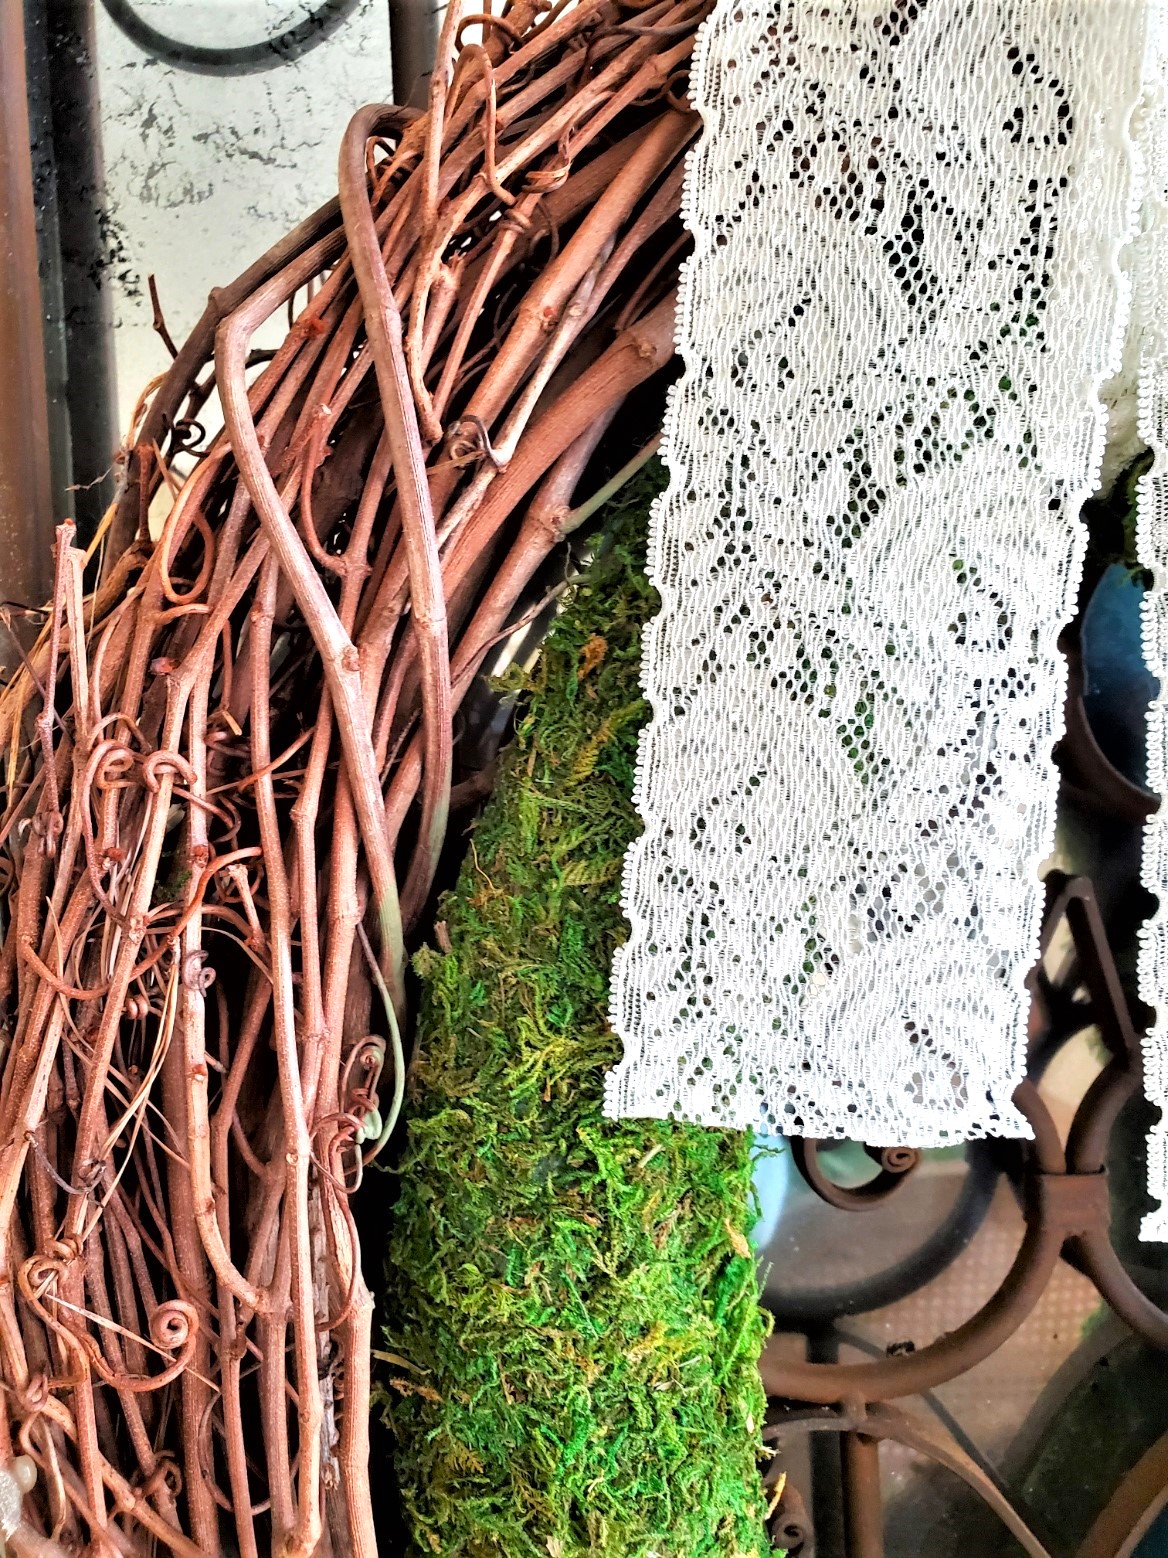
First thing, set your hot glue gun at a low temperature. Grab the self stick moss and cut strips to cover the pool noodle. Cut the moss into approximately 4 inch wide strips.
Peel the backing off the sticky moss, and add it to the pool noodle. Before pressing the moss on the wreath carefully add a little bit of hot glue. Press the moss strip down and move to the next section. Cover the entire pool noodle wreath with moss strips. This process goes rather quickly. The moss is very sticky but don’t skip adding the hot glue. Over time the moss may become loose and ruin your DIY wreath.
Tackling The Issue Of Moss Shedding A Solution
You may wonder if the moss sheds from the wreath. I’m happy to say no it doesn’t. If you have concerns about shedding, add Mod Podge Matte spray sealer.
Pro Tip: I can’t stress enough that having a dual temperature hot glue gun to make easy crafts is one of the best things. Thirty years of making easy crafts, I have had several burns from the glue, being too hot. It helps avoid burns. Invest in fingertip protectors. Always have a popsicle stick when adding hot glue to hold flowers, and faux greenery to protect your fingers.
Add Charm With Natural Beauty
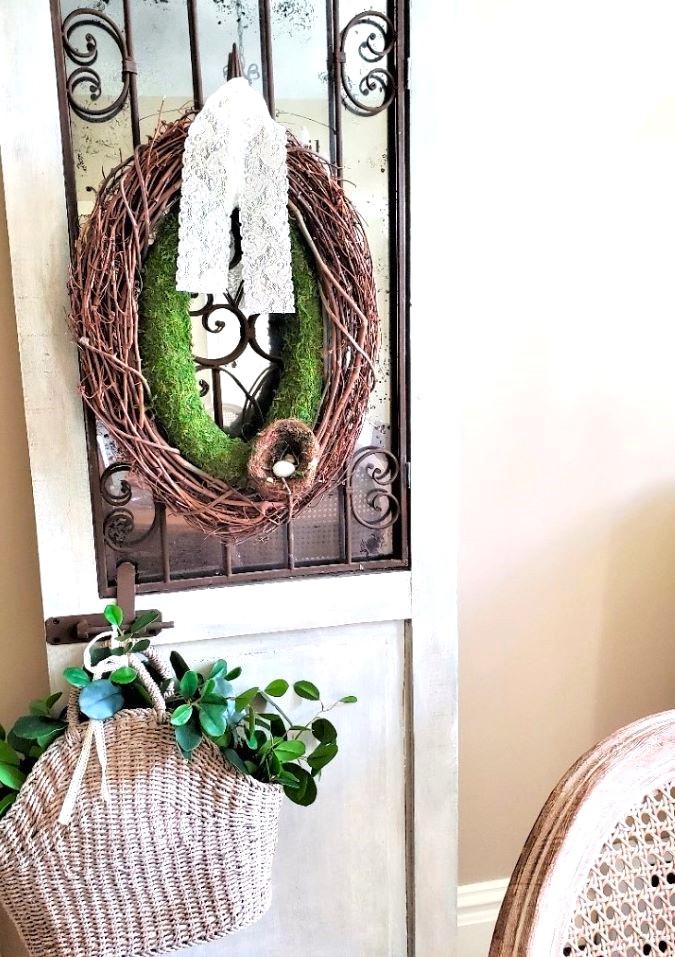
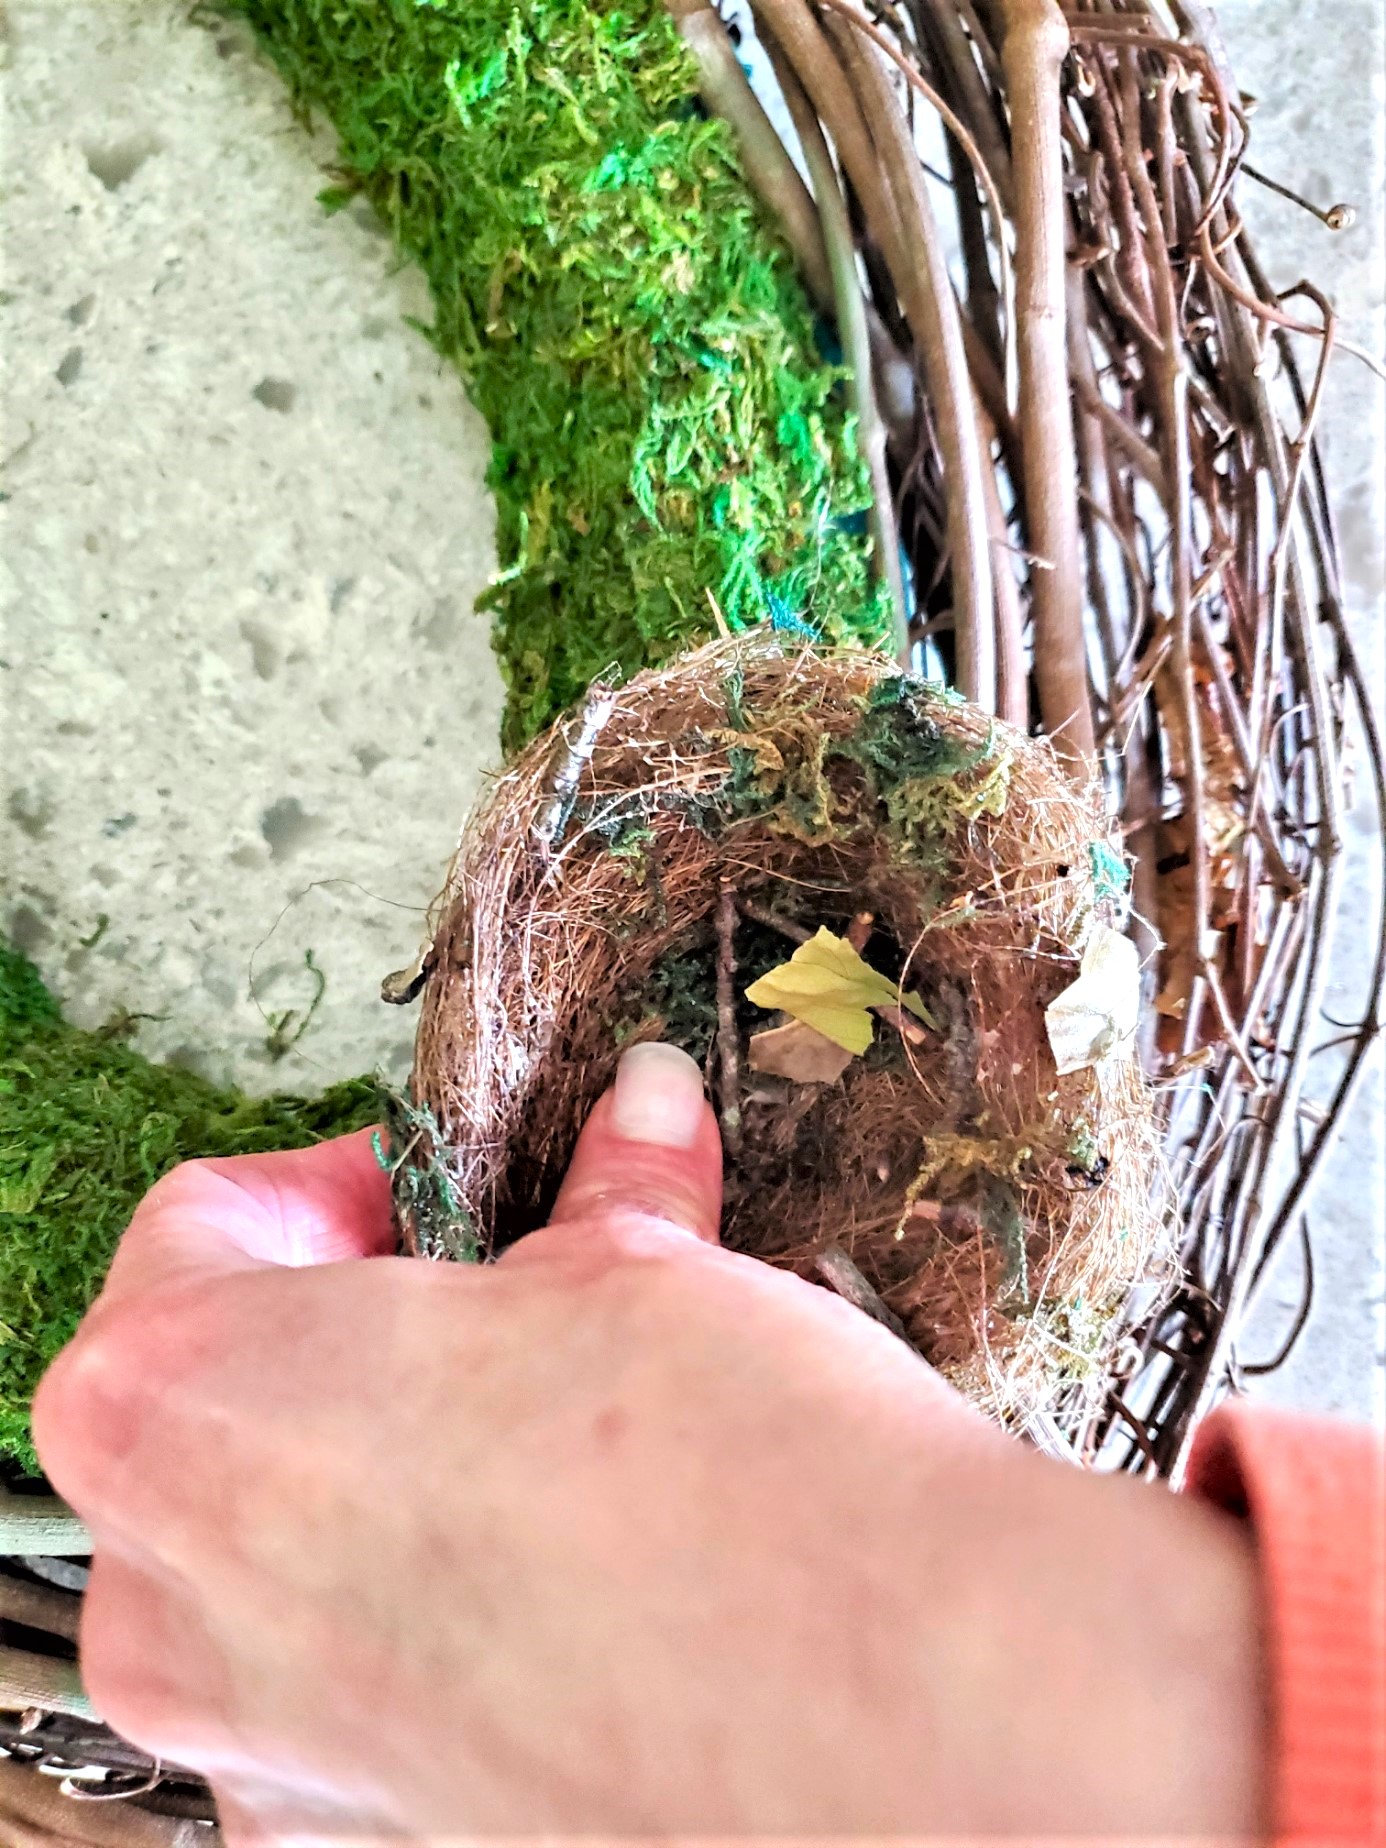
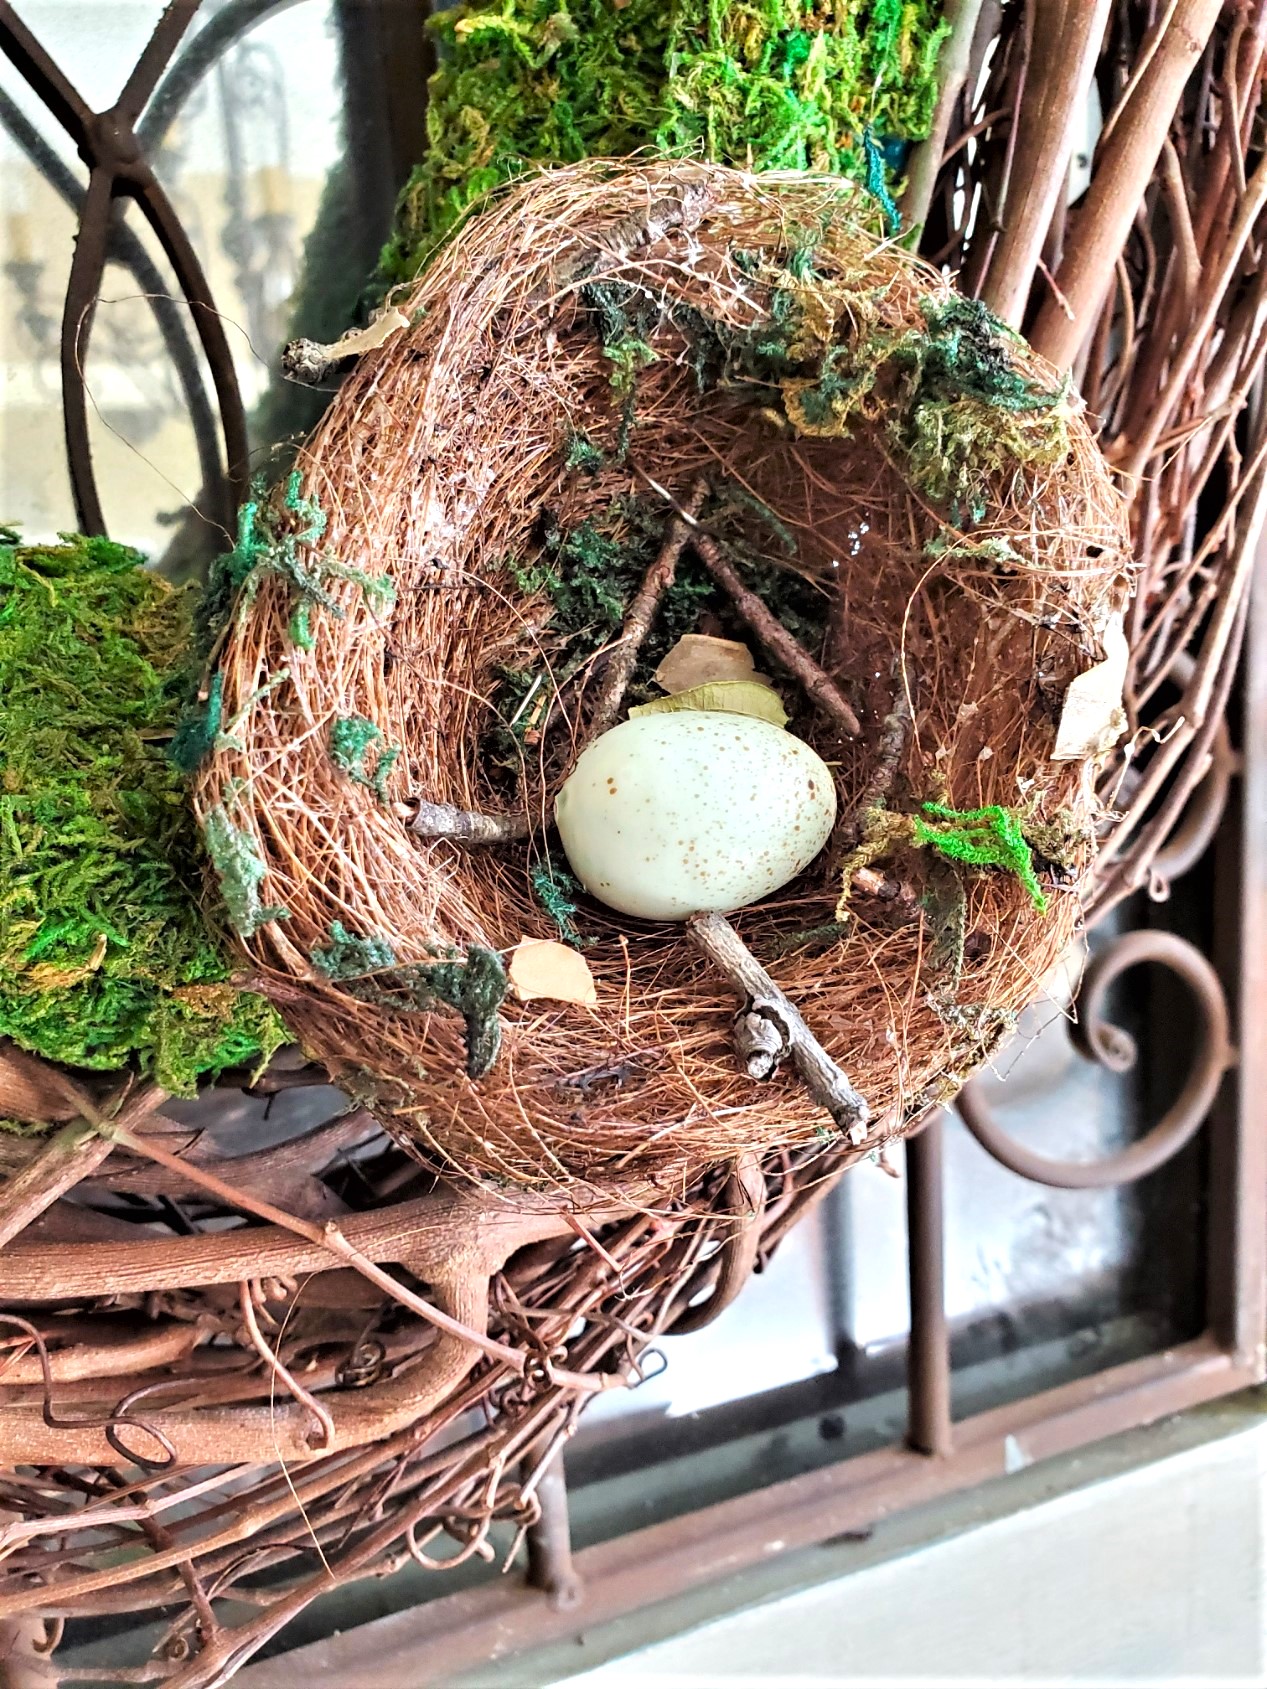
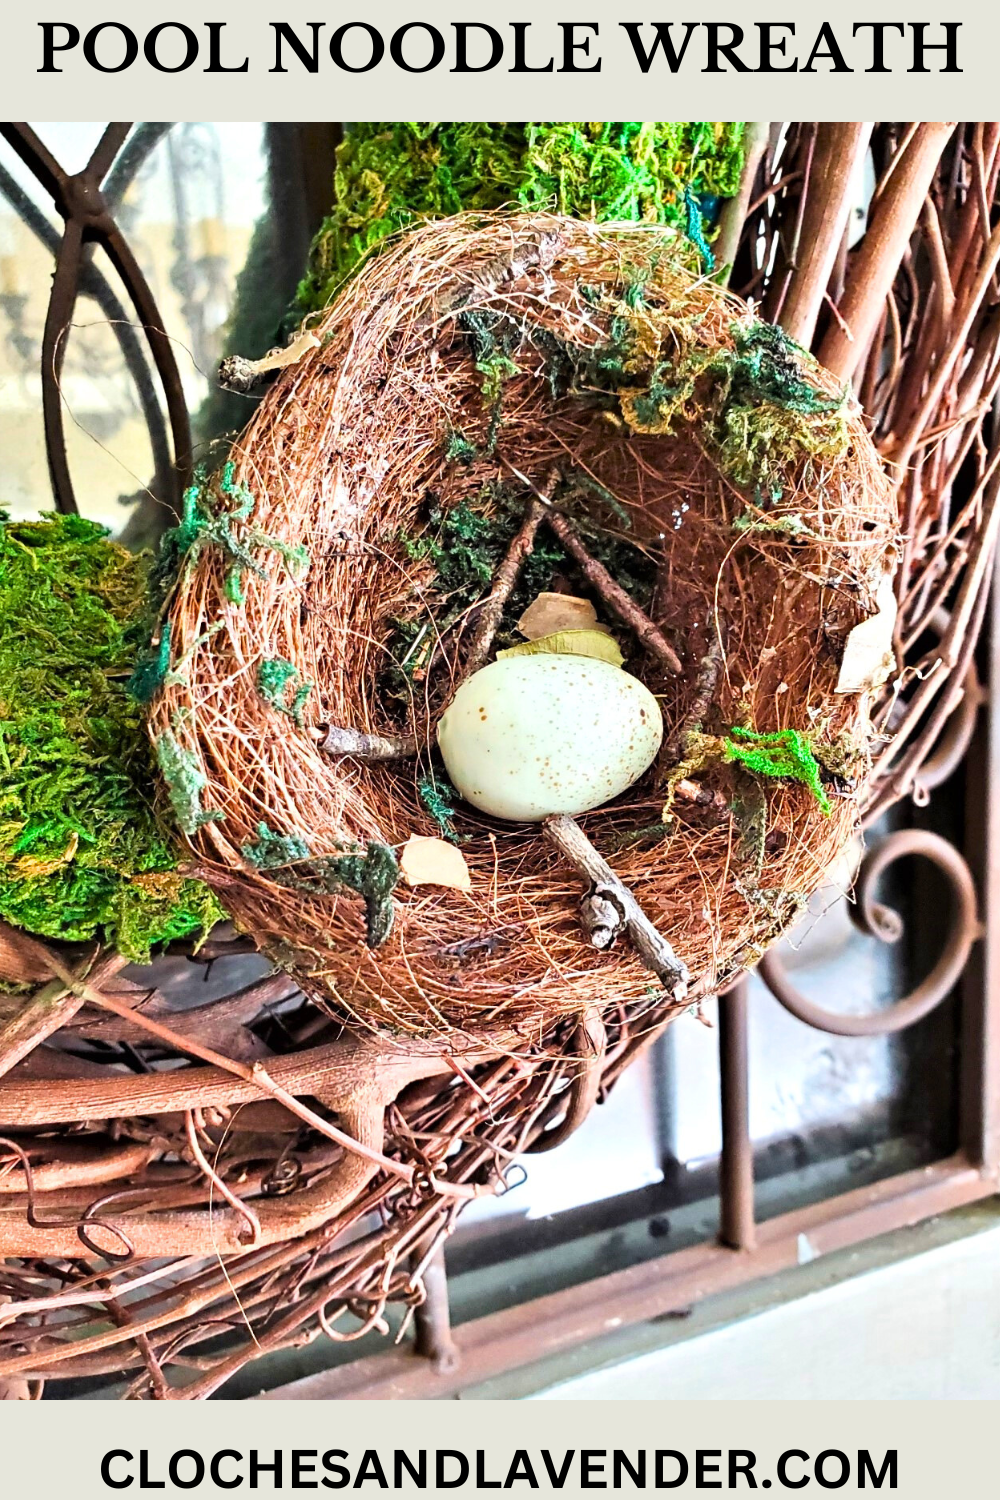
Step 4: Craft Idea: A Nest A Great Way For Natural Beauty
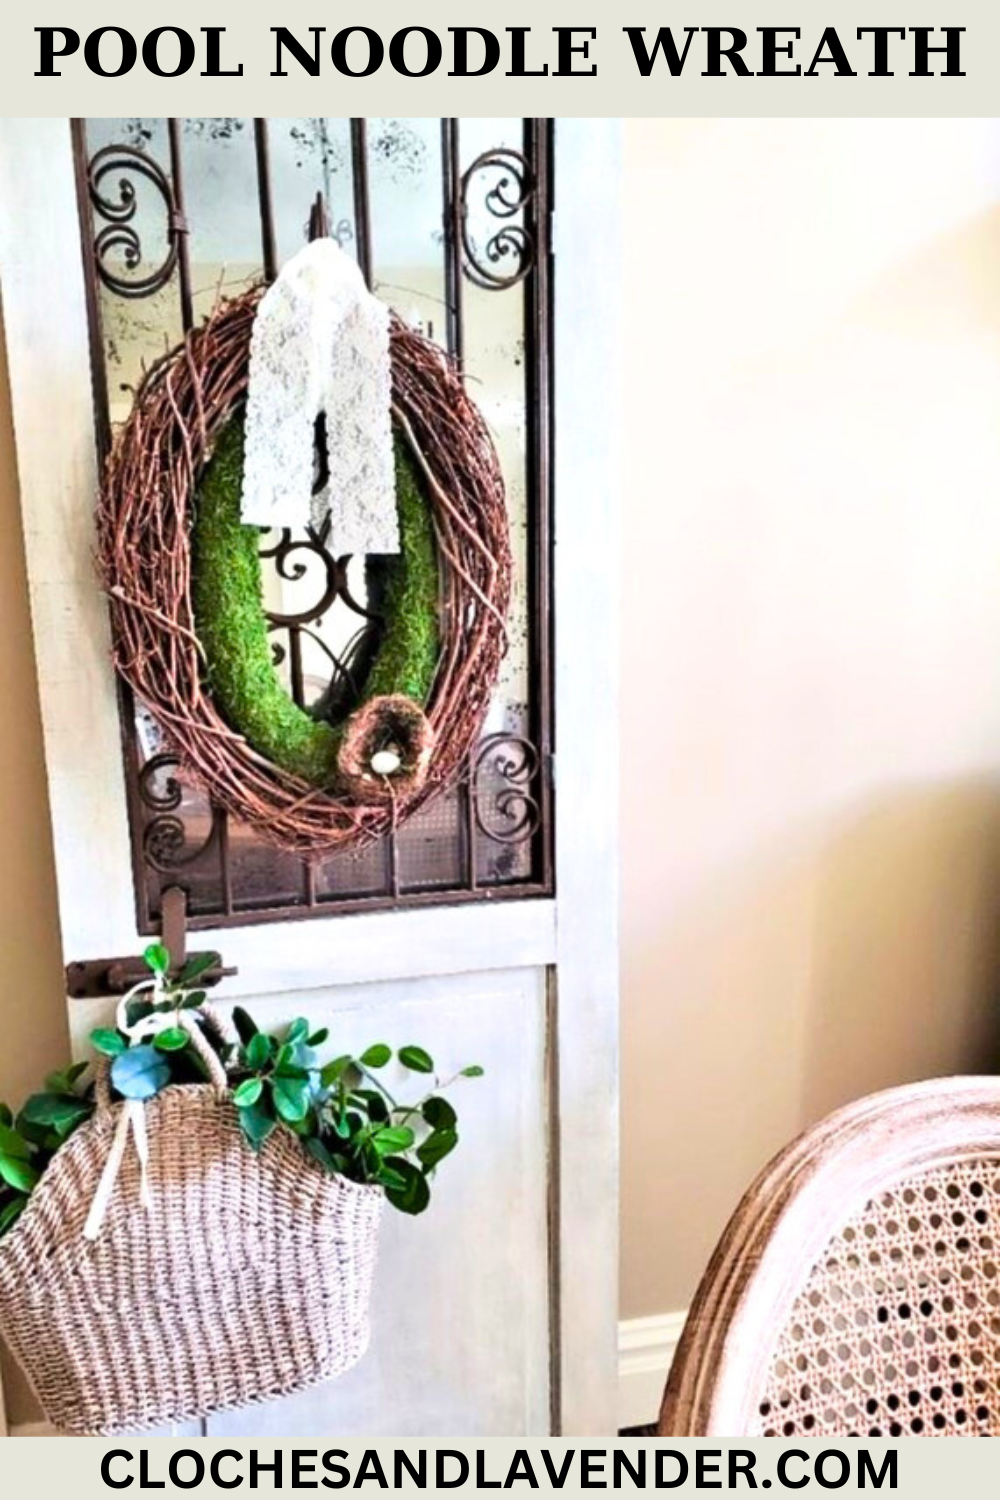
A simple way to add a touch of nature and natural beauty. Add a bird’s nest secured using floral pins. I have a passion for adding a touch of nature to my favorite things in our home decor. This can be seen with seasonal wreaths throughout our home during any time of year.
I added one of my favorite things, lace ribbon to the back of the wreath to hang on a door. Add burlap ribbon to hang this on the door or front porch. A piece of scrap fabric is also a fun way to hang your wreath.
Pro Tip: This wreath can be made using a foam wreath form. If you are adding a grapevine wreath, be sure to measure the middle of the wreath. This will also look pretty if you want to skip the grapevine.
*As an Amazon Associate, Black Dog Salvage Furniture Paint, and other Affiliate links I earn from qualifying purchases* USE CODE C-L20 and get 20% off.
I earn a small commission from qualifying purchases through affiliate links. I use affiliate links, which means a small commission is earned if you purchase through the link. The price will be the same whether you use the affiliate links or go directly to the website. All opinions are my own. (Read our privacy policy and full disclosure policy)
Discover Inspiration At Craft Stores: Transform Your Home With Seasonal Wreaths:
Spring Wreaths
- Fluffy Easter Bunny Wreath: This fluffy Easter Bunny wreath is a cute wreath and a perfect spring wreath, especially for Easter. The Thrifty Decor Chick shares all the details for this great idea!
- Succulent Wreath: This faux succulent wreath from The Navage Patch uses a grapevine wreath and faux succulents. It’s a beautiful wreath that can be made using straw wreaths, wire wreath forms, or a foam wreath form. One of the best things is no watering. Add it to your home decor or spring and summer front porch.
DIY Fall Wreaths
- Halloween Wreath: I found a fun way to make a Halloween wreath. Visit Country Living to learn an easy way to make these easy crafts in different sizes. This is one of those round ups with 44 wreath ideas. I checked every link. All are accessible and you won’t be disappointed. This is a cute wreath from Home and Garden.
- Fall Season DIY Wreath: This DIY wreath from DIY Candy is a super simple way to make a wreath. Perfect for the fall season. Hang on a front door or your fall front porch – no hot glue. Attach the fabric in traditional fall colors using floral pins.
- Burlap Wreath: Elizabeth from A Well Purposed Woman shares how to make a burlap wreath the easy way using a wire frame. In her post, she shares how to make this and a video. Make this beautiful wreath and learn how to attach items using floral wire.
Holiday Season Wreaths
- DIY Christmas Wreath: This DIY Christmas wreath is a great way to make ornament wreaths. Make it in different sizes to add it to the chair backs or holiday decor. Watch this YouTube video from A Well Purposed Woman to make this project for the holiday season!
- Faux Evergreen Wreath With Pine Cones: Better Homes & Gardens shares beautiful wreaths for the front door and home. One of the best things is that they share different ways to make a faux evergreen wreath. These are a good idea to add to your holiday decor and many work through winter. Be sure to click the link at the beginning of this article to see 7 easy ways to update a store-bought faux evergreen wreath.
Begin This Easy Craft Idea Today!
- Start your wreath-making journey today! Head to craft stores, like Hobby Lobby or the Dollar Store, to gather craft supplies needed for a beautiful wreath.
- Explore the versatility of wreath forms beyond pool noodles. Learn about straw wreaths, wire wreath forms, and the easiest way to create your own wreath. Make this easy DIY wreath today!
- Ready to elevate your home decor with a gorgeous wreath? Make this easy craft idea yourself. Follow the tips shared in this post. Craft your own seasonal wreaths to add to your home!
Conclusion:
Embrace Beautiful Wreaths: Seasonal Wreaths For Your Home Decor
In the end, crafting your own wreath is a great way to make these wreaths that can be customized using your favorite things and to make seasonal wreaths to fit your decorating style. This pool noodle grapevine wreath offers a super simple way to elevate your home decor, whether for a spring wreath, fall harvest, or the holiday season. Think about wreath-making and enjoy the natural beauty of these beautiful wreaths to add to your home. Thank you for Pinning my easy crafts. This helps our blog grow, I appreciate you taking the time to Pin this beautiful wreath and easy crafts.
FOLLOW US ON: FACEBOOK, INSTAGRAM, PINTEREST, X, THREADS, AND TIKTOK

Posts Of Interest
Click The Image And Go Directly To The Product!

Easy Pool Noodle Grapevine Wreath
Notes
EASY POOL NOODLE WREATH
Craft Supplies:
-
- A pool noodle — grocery stores, Dollar Store, Dollar Tree, or Home Depot
-
- Grapevine wreath form
-
- Scissors
-
- Self stick moss — craft stores
-
- Wood Dowel
-
- Hot glue gun
-
- Duct tape
-
- Popsicle stick
-
- Protective fingertips
Step 1: Shaping the Pool Noodle Oval To Fit The Grapevine Wreath Form
First thing, pre-measure your pool noodles before cutting. Add it to the middle of the grapevine wreath. This gives a good measurement. Using scissors cut the pool noodles to sizeStep 2: Securing The Wood Dowel With A Hot Glue Gun
We want to ensure the pool noodle is just the right size to fit snugly in the middle of the wreath. For a 16-inch grapevine wreath form, approximately 14.5 inches should fit the middle of the wreath. First thing, using a hot glue gun add low-temperature hot glue to the sides of the hole of the pool noodle. Add a bit of hot glue to the bottom of the wood dowel and the sides. (This may seem to be a bit much but keeping this secure is the key to this easy craft idea).Step 3: Crafting With Moss Cut For A Beautiful Wreath
set your hot glue gun at a low temperature. Grab the moss and cut strips to cover the pool noodle. Cut the moss into approximately 4-inch wide strips. Peel the backing off the sticky moss, and add it to the pool noodle. Before pressing the moss on the wreath carefully add a little bit of hot glue. Press the moss strip down and move to the next section. Cover the entire pool noodle wreath with moss strips. This process goes rather quickly. The moss is very sticky but don’t skip adding the hot glue. Over time the moss may become loose and ruin your DIY wreath.Step 4: Craft Idea: A Nest A Great Way For Natural Beauty
A super simple way to add a touch of nature and natural beauty. Add a bird’s nest secured using floral pins.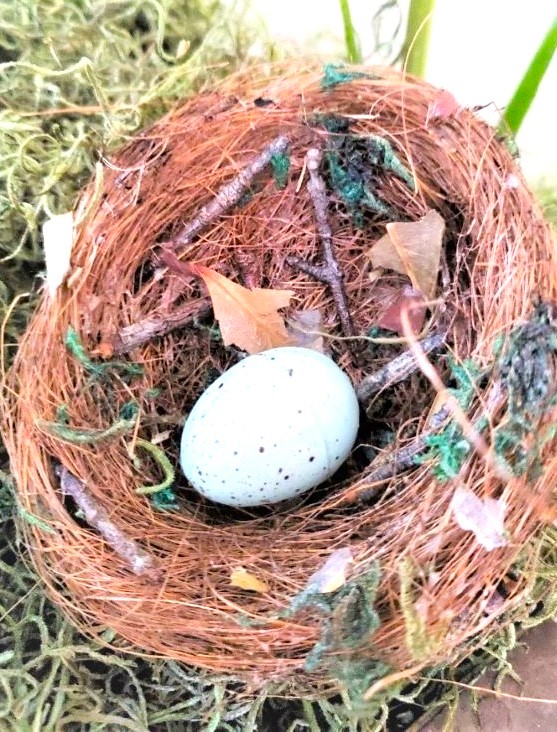


Happy Friday Cindy. You are so creative and clever. Love this. It looks amazing on that old door. Door love! Have a good weekend. xoxo Kris
Thank you so much Kris! Wishing you a great weekend
So this is what it was!!! Haha and I thought it was a rolling pin ahaha. How smart!!! Love this! You are so creative!
Thanks so much Crystal!
You come up with the best ideas, Cindy! I would have never thought to do this in a million years. I swear you are so creative. You definitely need to write a book about all things rustic and refined from moss projects to diy birds nests to chestnuts! Loving and pinning as always, CoCo
Thanks so much for your support
What a wonderfully fun and creative idea Cindy. I love this! Your tip to glue a wood piece inside to keep it together is truly genius. What a lovely way to create a wreath for Spring. Xo Lidy
Thanks so much Lidy
Such a simple and cute idea, Cindy. Hugs, Laura
Thank you
I never see pool noodle creations so this blew my mind! Love the nest especially.
I love nests. Thank you Rachel
Your mind works in mysteriously creative ways, Cindy! This is fantastic!
Thanks so much Amy!
You are so good with wreath making Cindy! I had to chuckly about buying a pool noodle this time of the year in New Jersey! 😂 Pinned!
I was really intrigued by the title of this post and then when I saw what you did – so creative.
Thanks Carol
I love this idea Cindy! The birds nest is a perfect touch. Great step by step instructions!
I admire your tenacity in searching for the elusive pool noodle ha ha! wreath looks great!
Thank you so much!
So many fun things for pool noodles – and I love anything moss covered.