
How To Decorate A Wire Wreath Frame
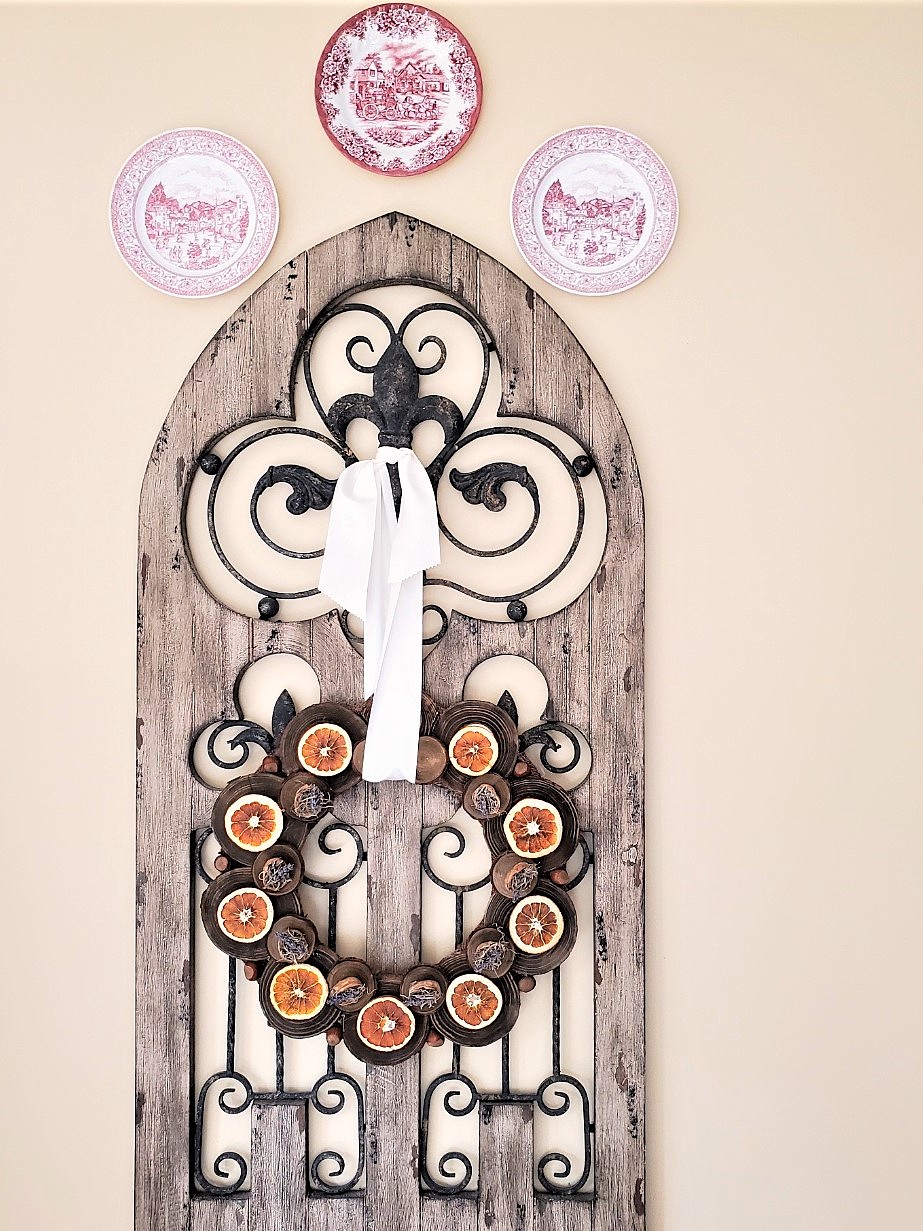
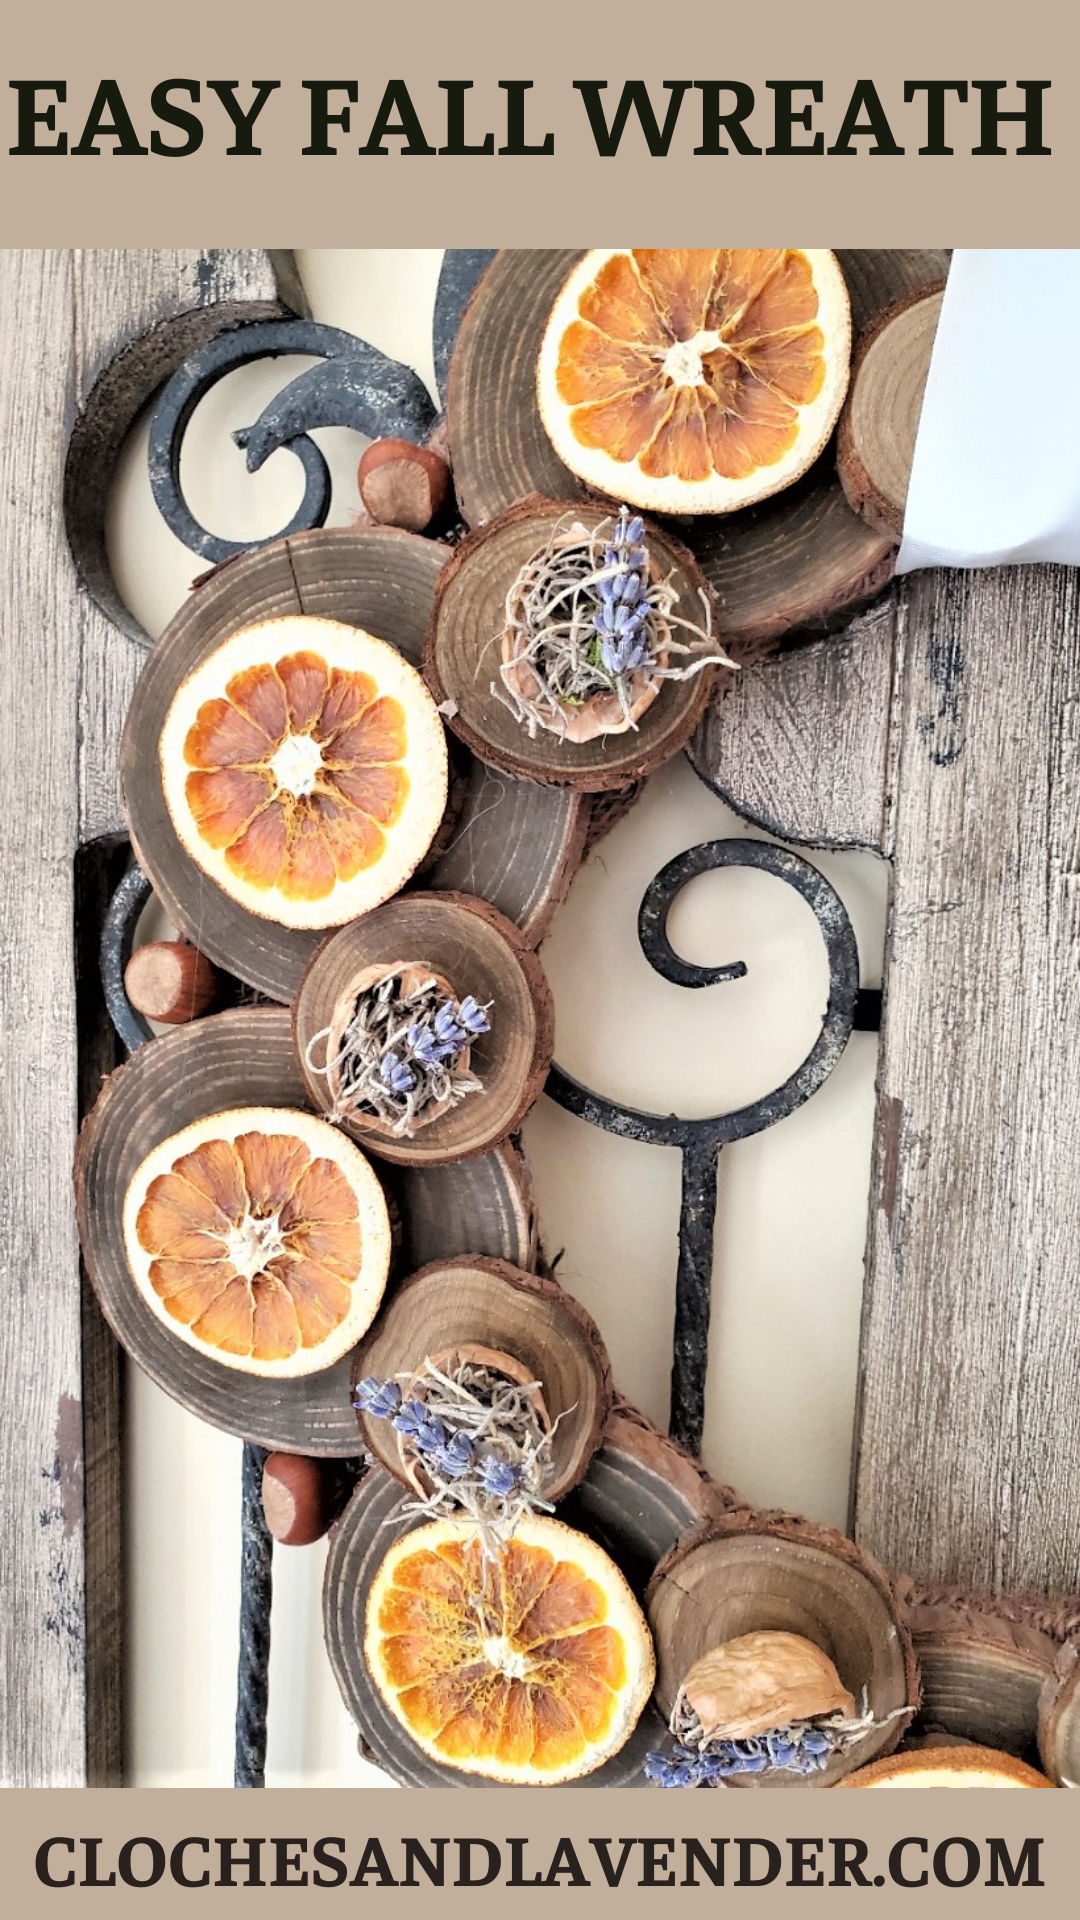
Do you enjoy beautiful wreaths? Today, I will dive into easy step-by-step instructions on how to decorate a wire wreath frame. If you have been following Cloches & Lavender or are visiting for the first time, one of my passions is making beautiful wreaths and adding natural elements to our home. I have used all the wreath bases out there and I love them all. This wreath has it all, small wood slices, walnut shells, dried orange slices, whole hazelnuts, and one of my favorites dried lavender.
Jump to PRINTABLE DIYTable of Contents
- 1 New Season – New Wreath
- 2 Farmhouse Wreath
- 3 What Can You Do With A Wire Wreath Frame?
- 4 Basic Wreath Ideas:
- 5 Holiday Wreaths
- 6 Small Wreaths
- 7 Seasonal Wreaths
- 8 Optional Wreath Bases
- 9 Wreaths to Make With a Wire Wreath Frame
- 10 What Are Great Wreath Supplies?
- 11 How to Decorate a Wire Wreath Frame
- 12 Aging Wood
- 13 Adding Wood Rounds
- 14 Splitting and Filling Shells
- 15 Tip: Splitting Walnut Shells
- 16 Attaching Walnuts
- 17 Orange Slices
- 18 Add Nuts
- 19 Dried Fruit
- 20 Ornaments
- 21 Last and Final Step
- 22 Best Parts About This Tutorial
- 23 POSTS OF INTEREST
- 24 Decorate A Wire Wreath Frame
- 25 How to Decorate a Wire Wreath Frame
- 25.1
- 25.2
- 25.3 Step 1: Step-by-Step Tutorial Wrapping a Wire Wreath Form
- 25.4
- 25.5
- 25.6
- 25.7 Step 2: Aging the Wood Rounds With Varathane Wood Accelerator
- 25.8
- 25.9
- 25.10
- 25.11
- 25.12
- 25.13
- 25.14 Step 3: Adding the Wood Step-by-Step-Instructions
- 25.15
- 25.16
- 25.17
- 25.18
- 25.19
- 25.20
- 25.21 Step 4: Add Charm and Natural Elegance to a Farmhouse Wreath
- 25.22 Tip: Splitting Walnut Shells
- 25.23
- 25.24 Step 5: Elevate Your Wreath: Tips for Gluing Walnut Shells
- 25.25 Step 6: Rustic Beauty: Dried Orange Slices Transform Seasonal Wreaths
- 25.26 Step 7: A Fun Twist: Hot Glue Nuts for a Rustic Touch
- 25.27 Hang a Wreath or Make a Gorgeous Wreath Centerpiece
New Season – New Wreath
A DIY Wreath: Easy, Affordable, and Perfect for Fall
When a new season is on the horizon, my mind buzzes with ideas for DIY wreaths to hang on the front door and our home. When I plan a wreath project I like to add items found in nature in different ways and add a fun twist. I accomplished what I wanted with this fall wreath. The best part about my wreaths is making the items easy to find.
Farmhouse Wreath
Budget-Friendly Supplies Perfect for Your First Wreath
Most items can be found at Dollar Tree or local craft stores and my goal is to have them work for two seasons. This farmhouse style wreath works for fall, a a Christmas wreath for your home. If this is your first wreath, this is a great place to start!
What Can You Do With A Wire Wreath Frame?
A wire wreath frame is a versatile wreath form that can be used to create beautiful wreaths for any special occasion and season. A wire form is often dark green but if you can only find another color when visiting Dollar Tree or craft stores, no problem. Here’s a great idea, grab a can of spray paint, and lay it on a flat surface covered with craft paper or newspaper to protect the surface. Paint the wire from different colors to match your color palette for your project!
Basic Wreath Ideas:
Common Uses How to Decorate a Wire Wreath Frame
Holiday Wreaths
- Wire wreath frames are often used to make a Christmas wreath. These wreath bases are great for attaching evergreen boughs with floral wire, green pipe cleaners, or a fishing line. Adding magnolia leaves and pinecones with floral wire or a twist tie to add natural elements. To attach magnolia leaves and pine cones I wrap wire around the base of the pine cone and through the bottom scales. Wrap the wire around the wreath frame or branch of the evergreens. Twists the ends together to attach. Mix shatterproof Christmas ornaments in different colors with pine cones for a pretty holiday decoration. Hang it from the top of the door with a wreath hook, wreath hanger, or burlap ribbon.
Small Wreaths
- Buy a small wire wreath form for each window of the house. Add evergreen boughs with wire the same as above. Make a plain greenery wreath. A great place to hang these DIY wreaths is from each window with buffalo plaid ribbon or a holiday theme burlap ribbon. Here’s my tip for hanging these. Open the top half of the window. Add each piece of ribbon through the back of the grilles. Tie a tight bow. These beautiful wreaths aren’t only pretty outside. The bow makes a pretty addition on the inside.
Seasonal Wreaths
- Wire wreath frames can be used to create wreaths for any special occasion for different seasons. For example spring, you can make butterflies. Summer wreaths can feature bright blooms and seashells. Fall wreaths can include leaves, pumpkins, and acorns. And winter wreaths can be decorated with pinecones, berries, and snowflakes.
Remember, the possibilities with a wire wreath frame are endless, and limited to your creativity. Feel free to experiment with different ways and techniques to create a wreath that suits your color palette and style.
Optional Wreath Bases
- *Straw forms and straw wreaths
*Grapevine wreath forms
*Foam wreath form
Tip: My favorite wreath bases to work with, are metal, foam wreath form, and grapevine wreath forms. I have used metal wreath frames and grapevine wreath forms the most because I enjoy decorating with natural elements and they make a gorgeous wreath base! I keep a supply of different sizes in my craft closet.
Wreaths to Make With a Wire Wreath Frame
- Burlap wreath – I found this video tutorial from Dave’s Wreath and Things. Learn two different ways to make a burlap wreath!
Deco mesh wreath – I found this video tutorial to make a Deco mesh wreath from Julie’s Wreath Boutique. She has 48 Deco Mesh wreath tutorials! She shares gorgeous wreaths from a floral wreath, a Christmas wreath, Patriotic, and an adorable turkey wreath perfect for Fall.
Floral wreath
Ribbon wreath – This is another video tutorial from Julie’s Wreath Boutique with 174,000 views for a ribbon wreath.
Greenery wreath
Fabric wreaths – David’s Wreaths and Things shares a video tutorial using fabric scraps from Dollar Tree to make fabric wreaths.
Buffalo plaid fabric wreaths
What Are Great Wreath Supplies?
Essential Wreath Supplies And Tips: How to Decorate a Wire Wreath Frame
- *floral tape
- *burlap ribbon – different colors
- *floral pins
- *floral foam for fresh flowers
- *twist tie – great to hold floral foam down
- *hot glue sticks and a hot glue gun (my favorite)
- *floral wire
- *straw wreaths
- *metal frames
- *a wire form
- *grapevine bases
- *pipe cleaners – great for adding flowers, and greens, and holding floral foam
- *wire cutters or wire snips
- *assorted artificial flowers
Affordable Supplies, Simple Instructions, and No Glue Required!
Craft stores, Dollar Tree, the Dollar Store, and Amazon are great places to find these. I keep different sizes of wreath bases in my craft room so I’m prepared to make any farmhouse style wreath. This is another one of my DIY wreaths that works for two seasons. It’s a perfect fall wreath, spring, and summer. This is why I love sharing my passion for making seasonal wreaths and craft projects. A great place to hang this wreath is a front door and I share easy step-by-step instructions. One of the best parts this works for multiple seasons and you don’t need the hot glue gun!
Here is a great time to plug in your glue gun.
How to Decorate a Wire Wreath Frame
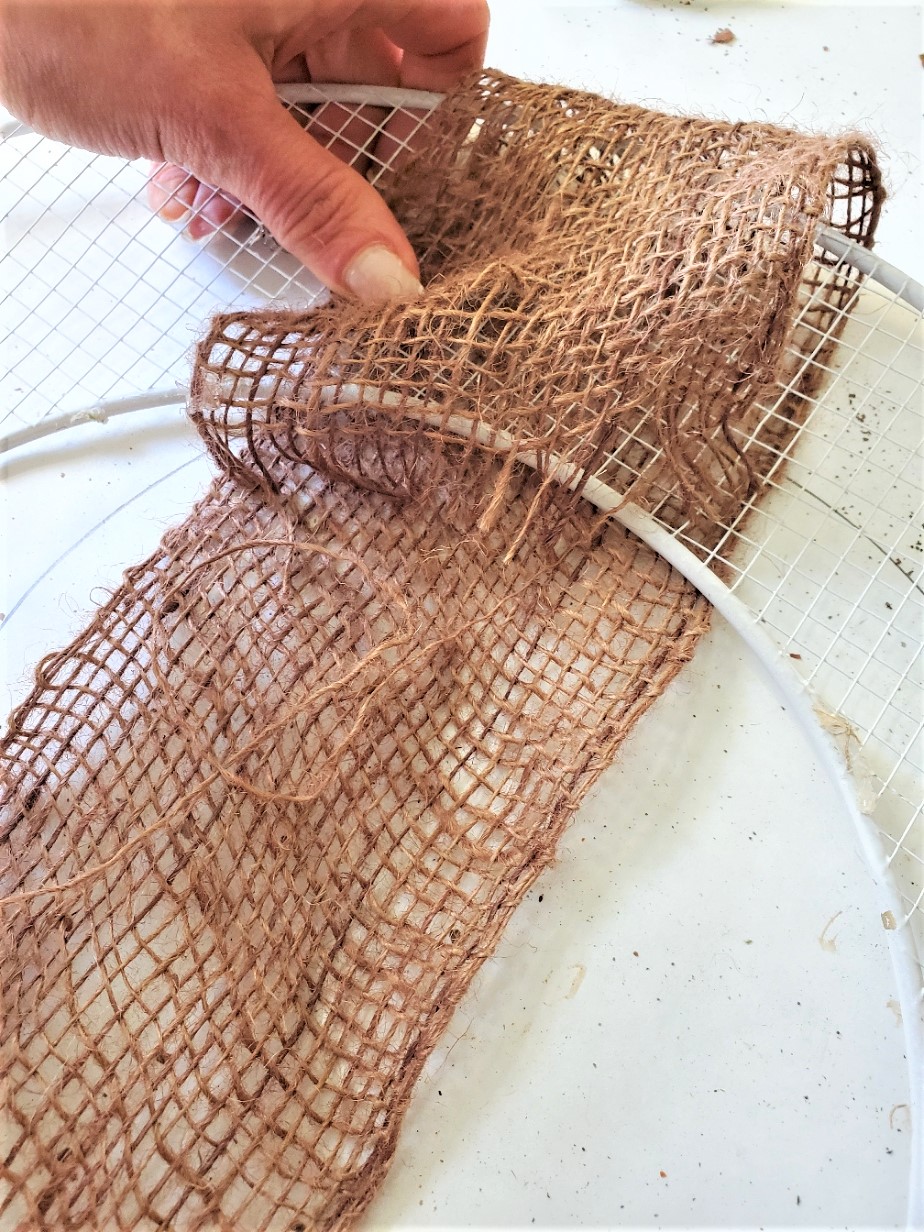
Step 1: Step-by-Step Tutorial Wrapping a Wire Wreath Form
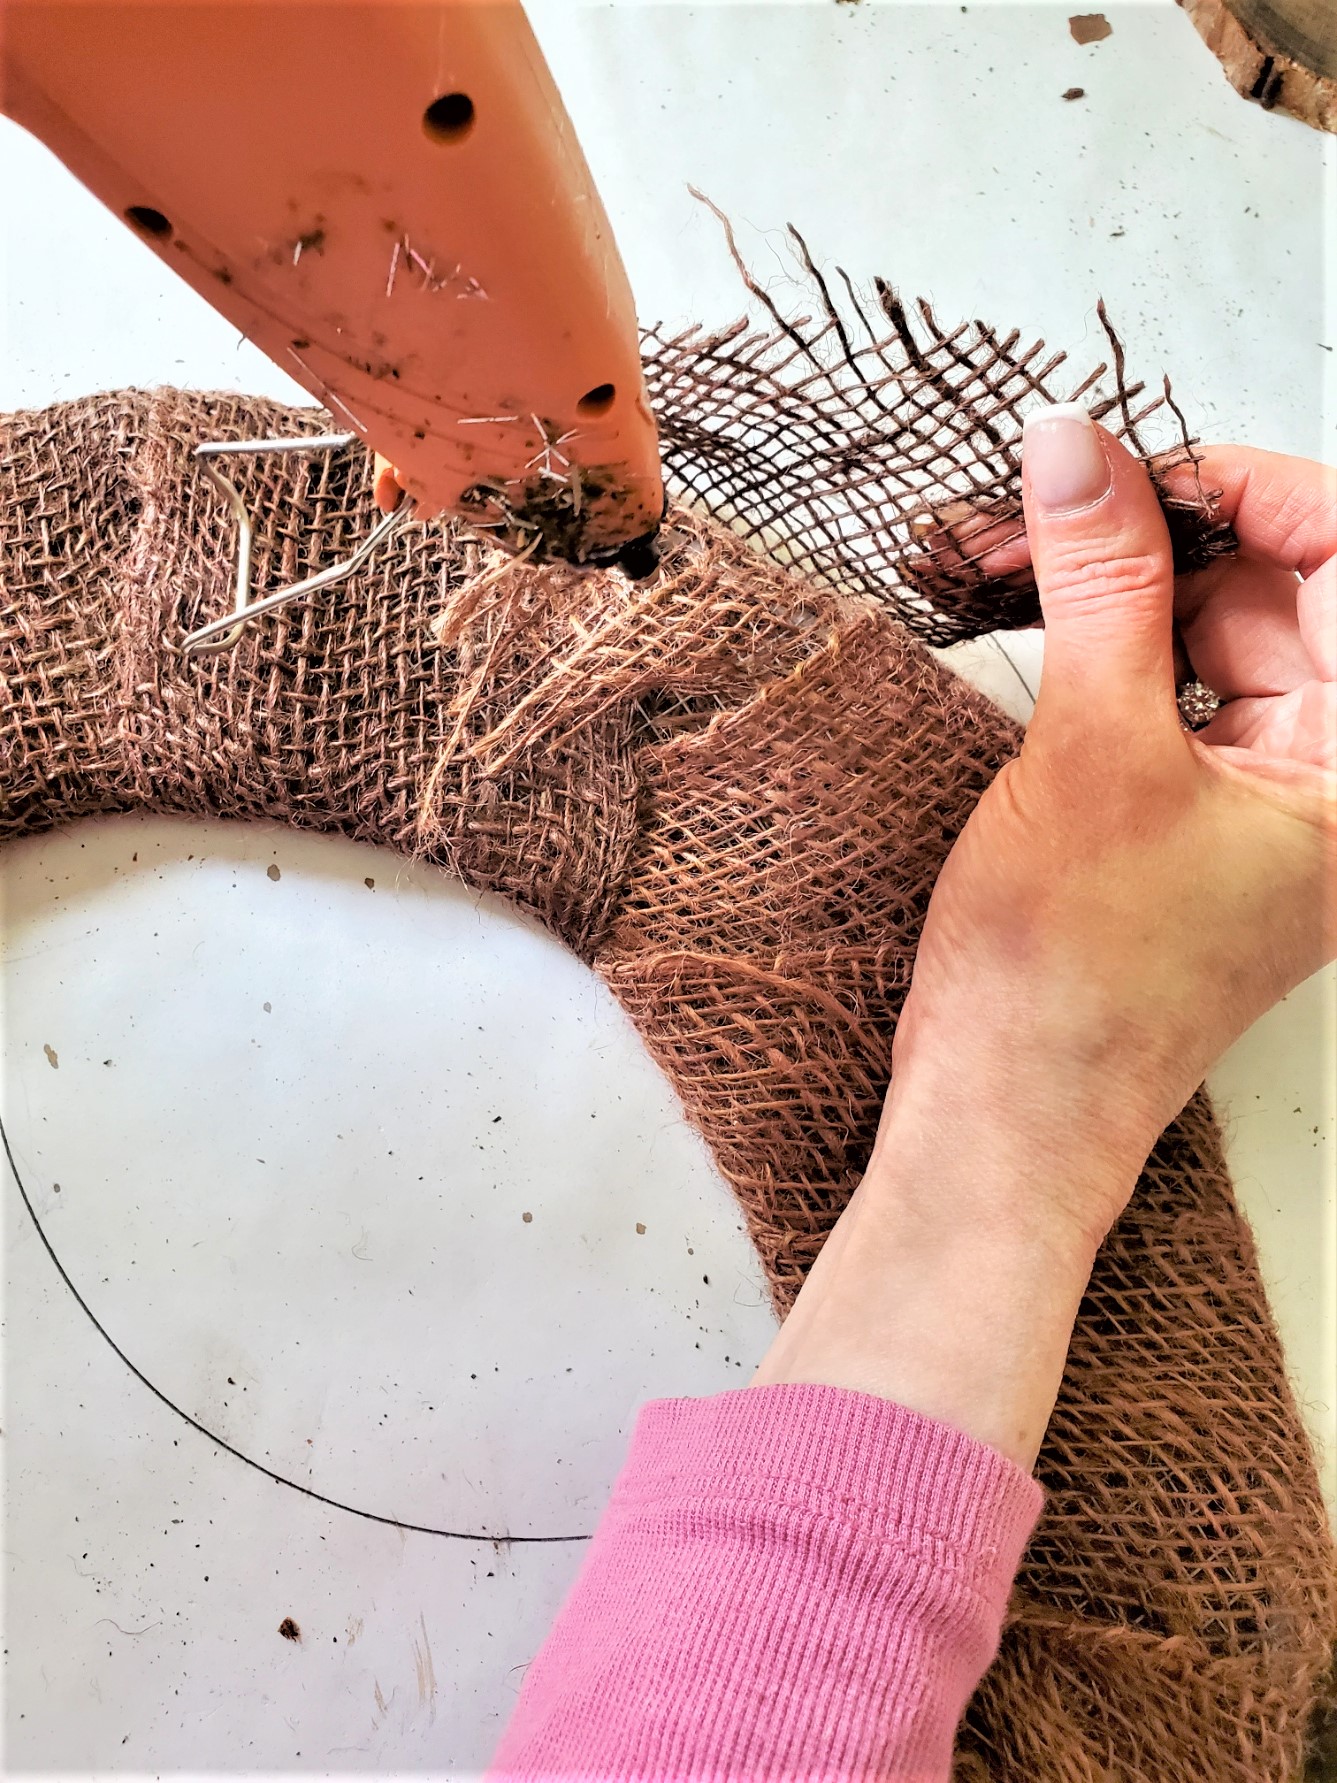
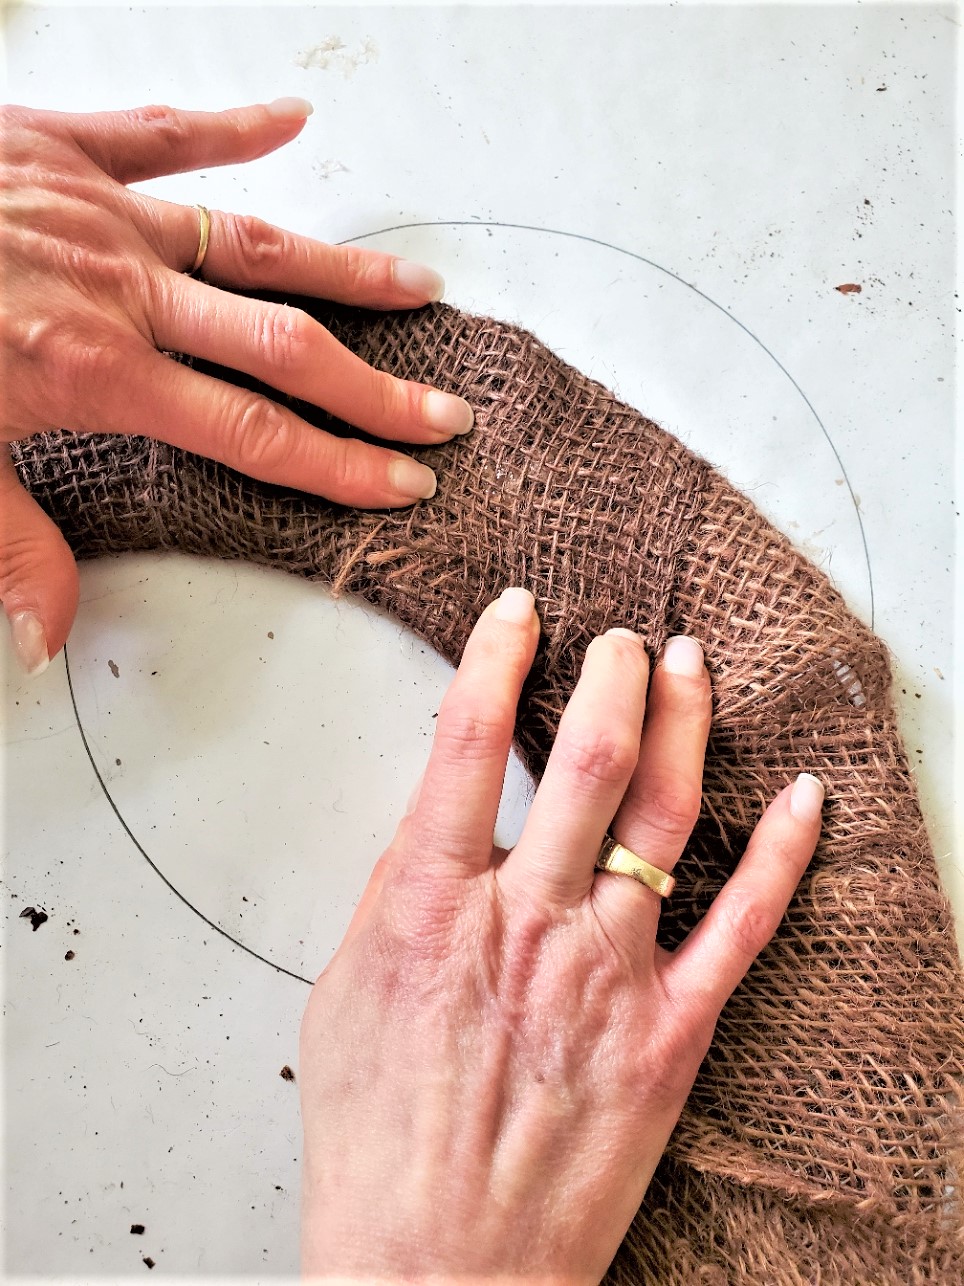
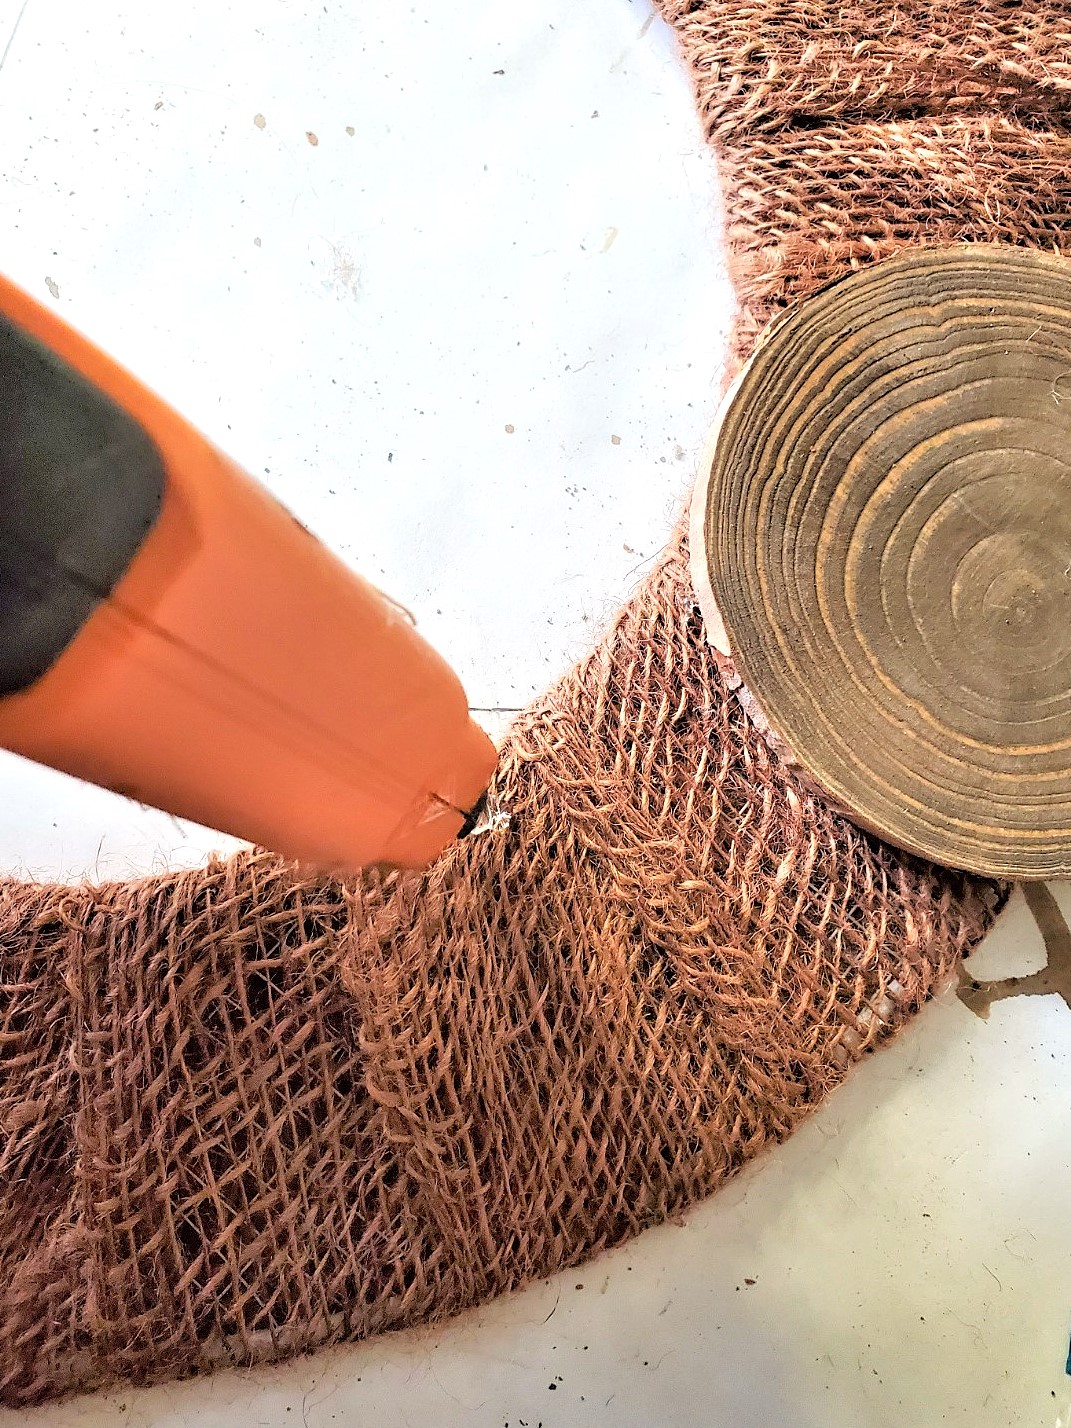
The first step is to wrap a 16 inch wire wreath form with burlap ribbon. This step is important when using metal frames. This provides a foundation when using a hot glue gun to add artificial flowers or fresh flowers to cover the entire wreath form.
This 16 inch wire wreath frame is one of my favorites to work with, and it used to be available at Michaels craft stores. Unfortunately, I recently discovered that they no longer carry it. However, any flat wreath base or wire form will work.
I found a foam wreath form that’s a great alternative at JoAnn. Because it’s Styrofoam wrap the wreath with burlap to prevent melting from the hot glue.
Wrap burlap ribbon around the entire wreath. Once you reach the end, add a bit of glue and hold to set.
Supplies Needed to Decorate a Wire Wreath Frame:
- *16 inch wire wreath frame or another option
- *hot glue gun and glue sticks
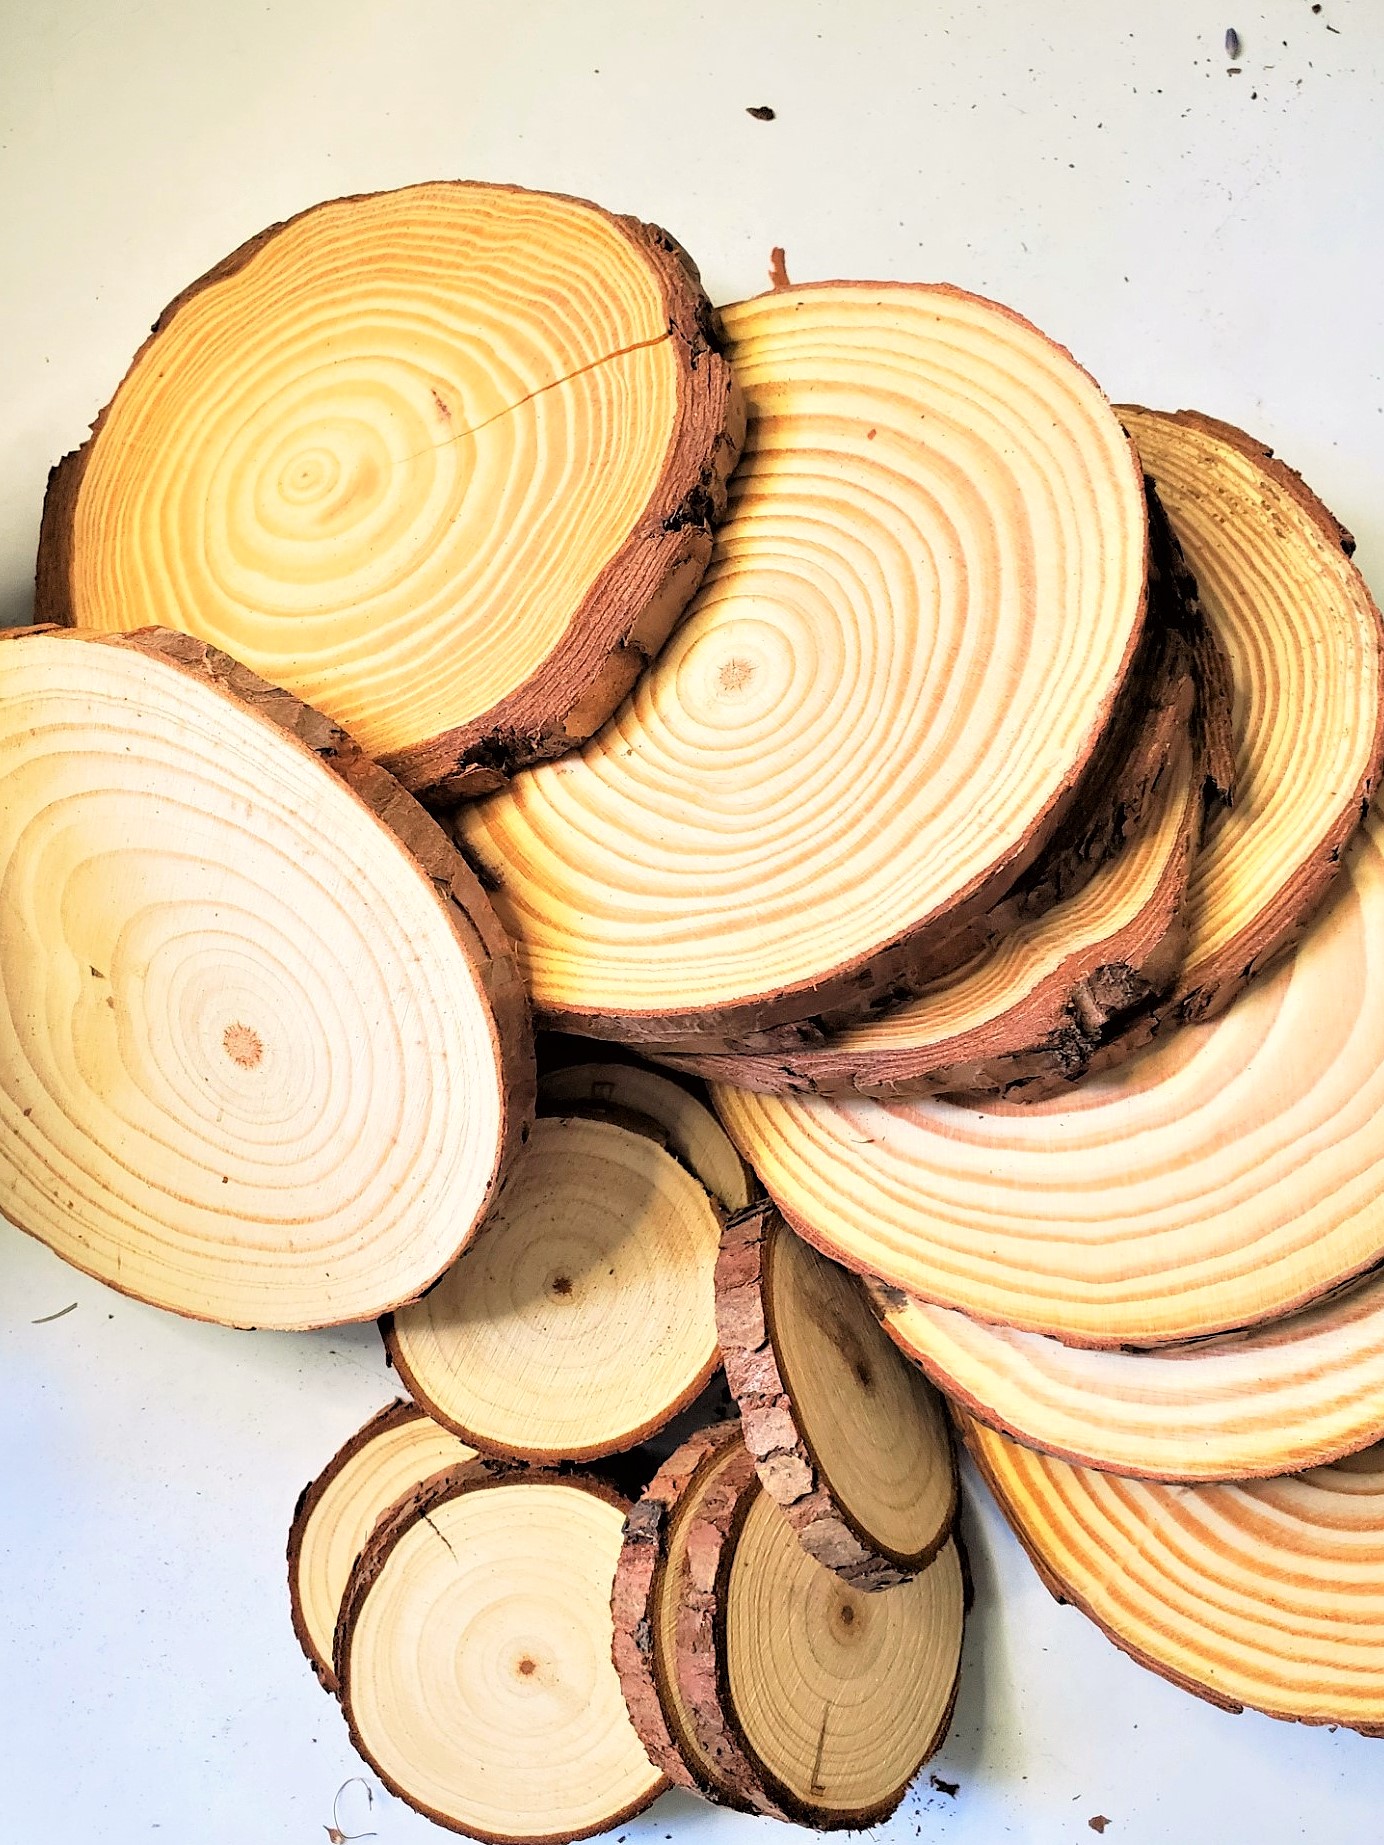
- *10 wood slices 4-4.7
- *11 small wood slices 30 pieces
- *sponge brush
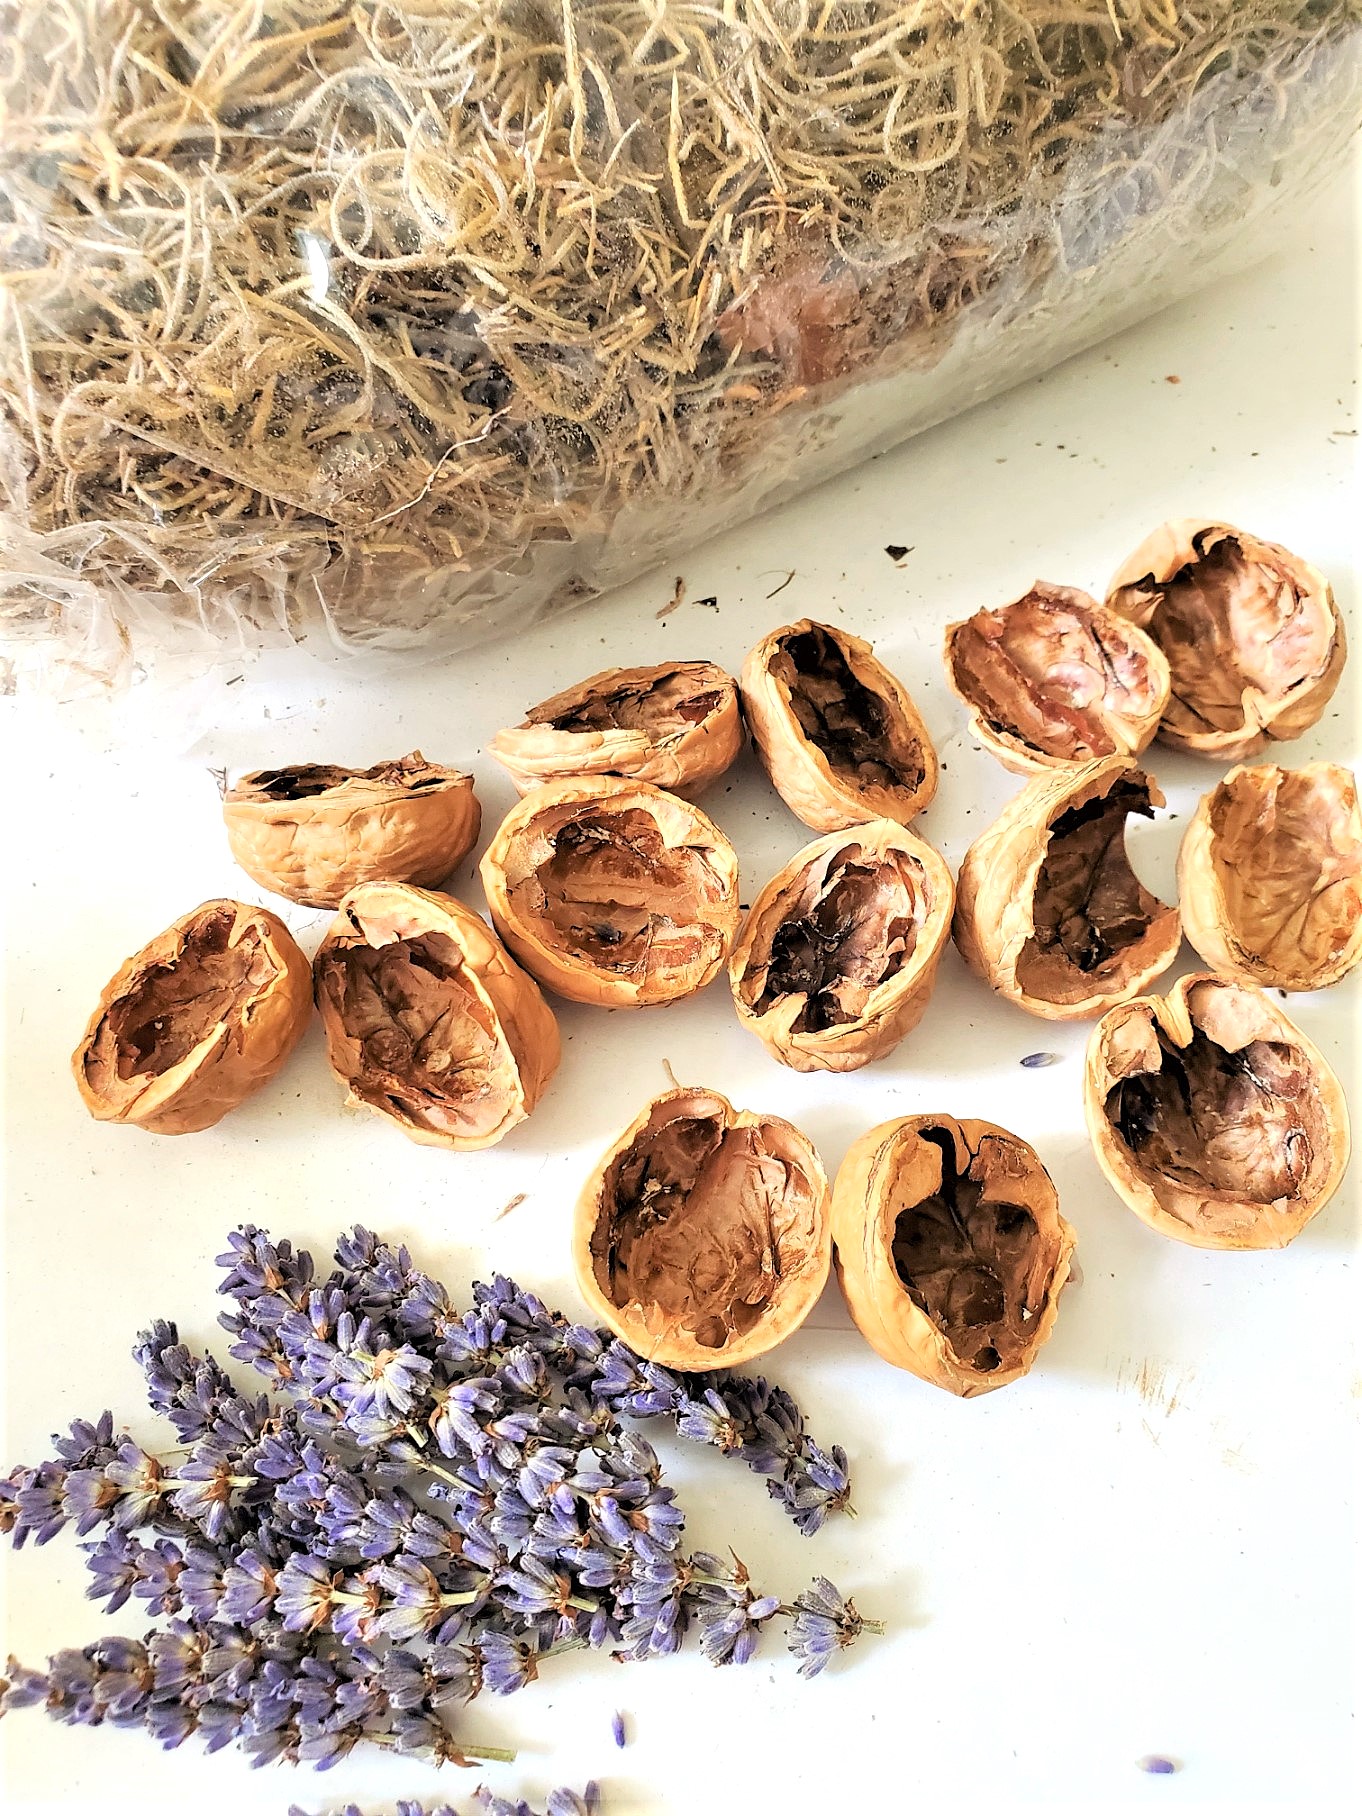
- *walnut shell halves – (optional)
- *Spanish moss
- *dried lavender heads or artificial flowers
- *dried orange slices
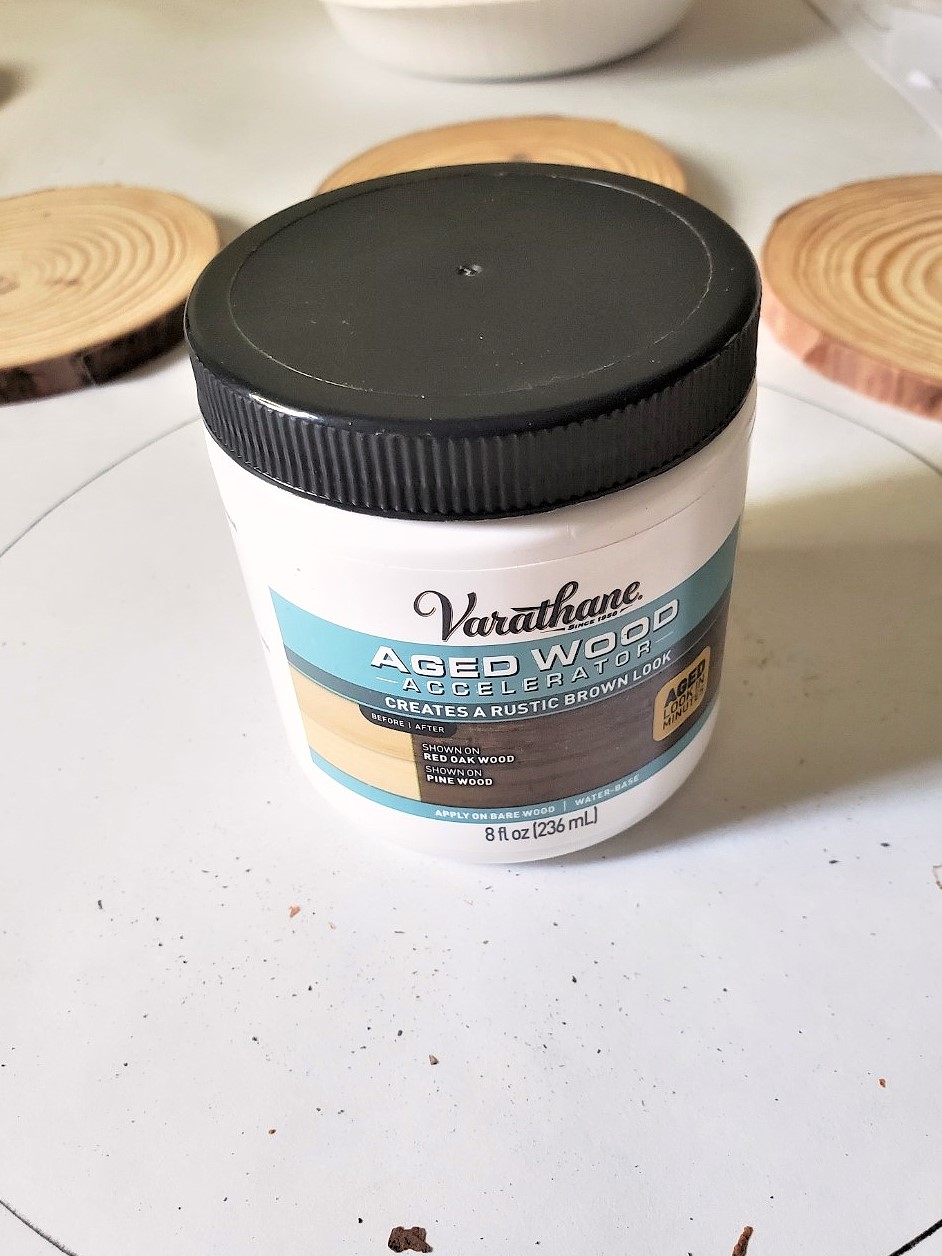
- *Varathane aged wood accelerator or stain if it’s on hand
Aging Wood
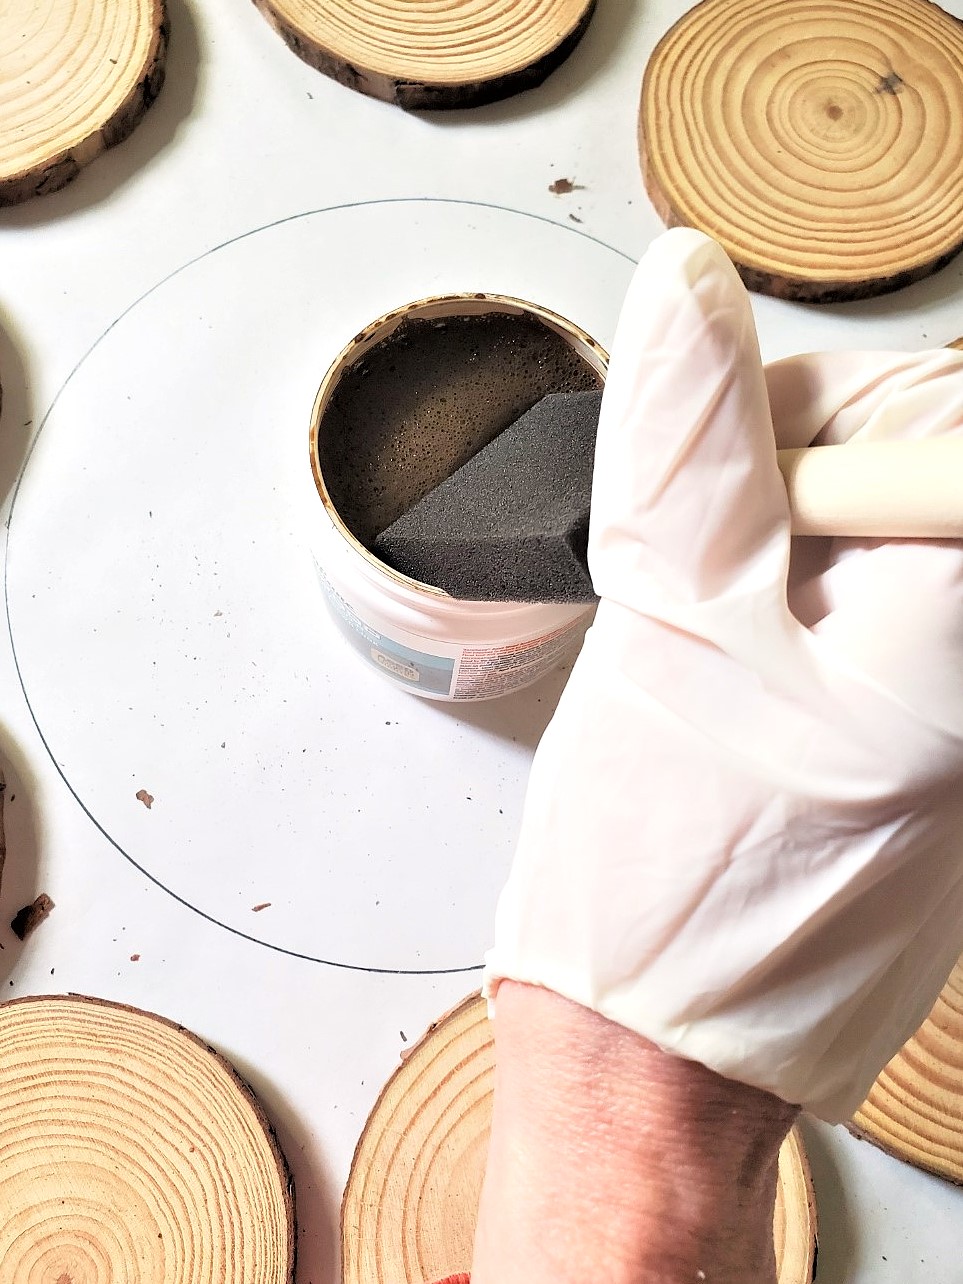
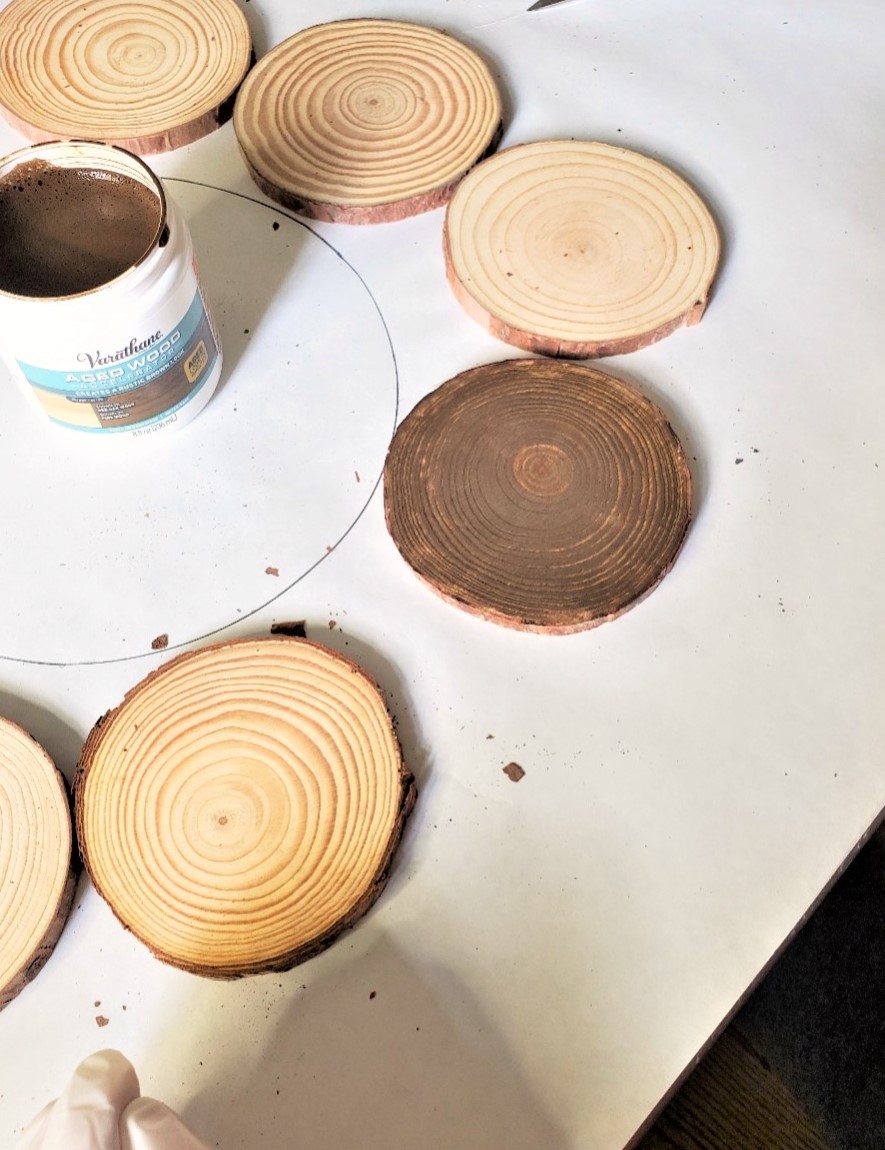
Step 2: Aging the Wood Rounds With Varathane Wood Accelerator
On a flat surface, add a Varathane wood accelerator. This can be found in craft stores, Amazon, Home Depot, or Walmart. Follow the instructions on the wood accelerator and stir well. A little bit goes a long way. Using a foam brush, apply a single coat onto the wood slices. Allow them to dry for approximately an hour. Use a circular motion for smooth coverage.
Repeat steps until all the pieces have a coat of the wood accelerator.
Tip: If you have stain or dark brown matte craft paint will work to cover the wood slices. Before I glued the wood rounds I added them to be sure they were spread evenly around the wreath.
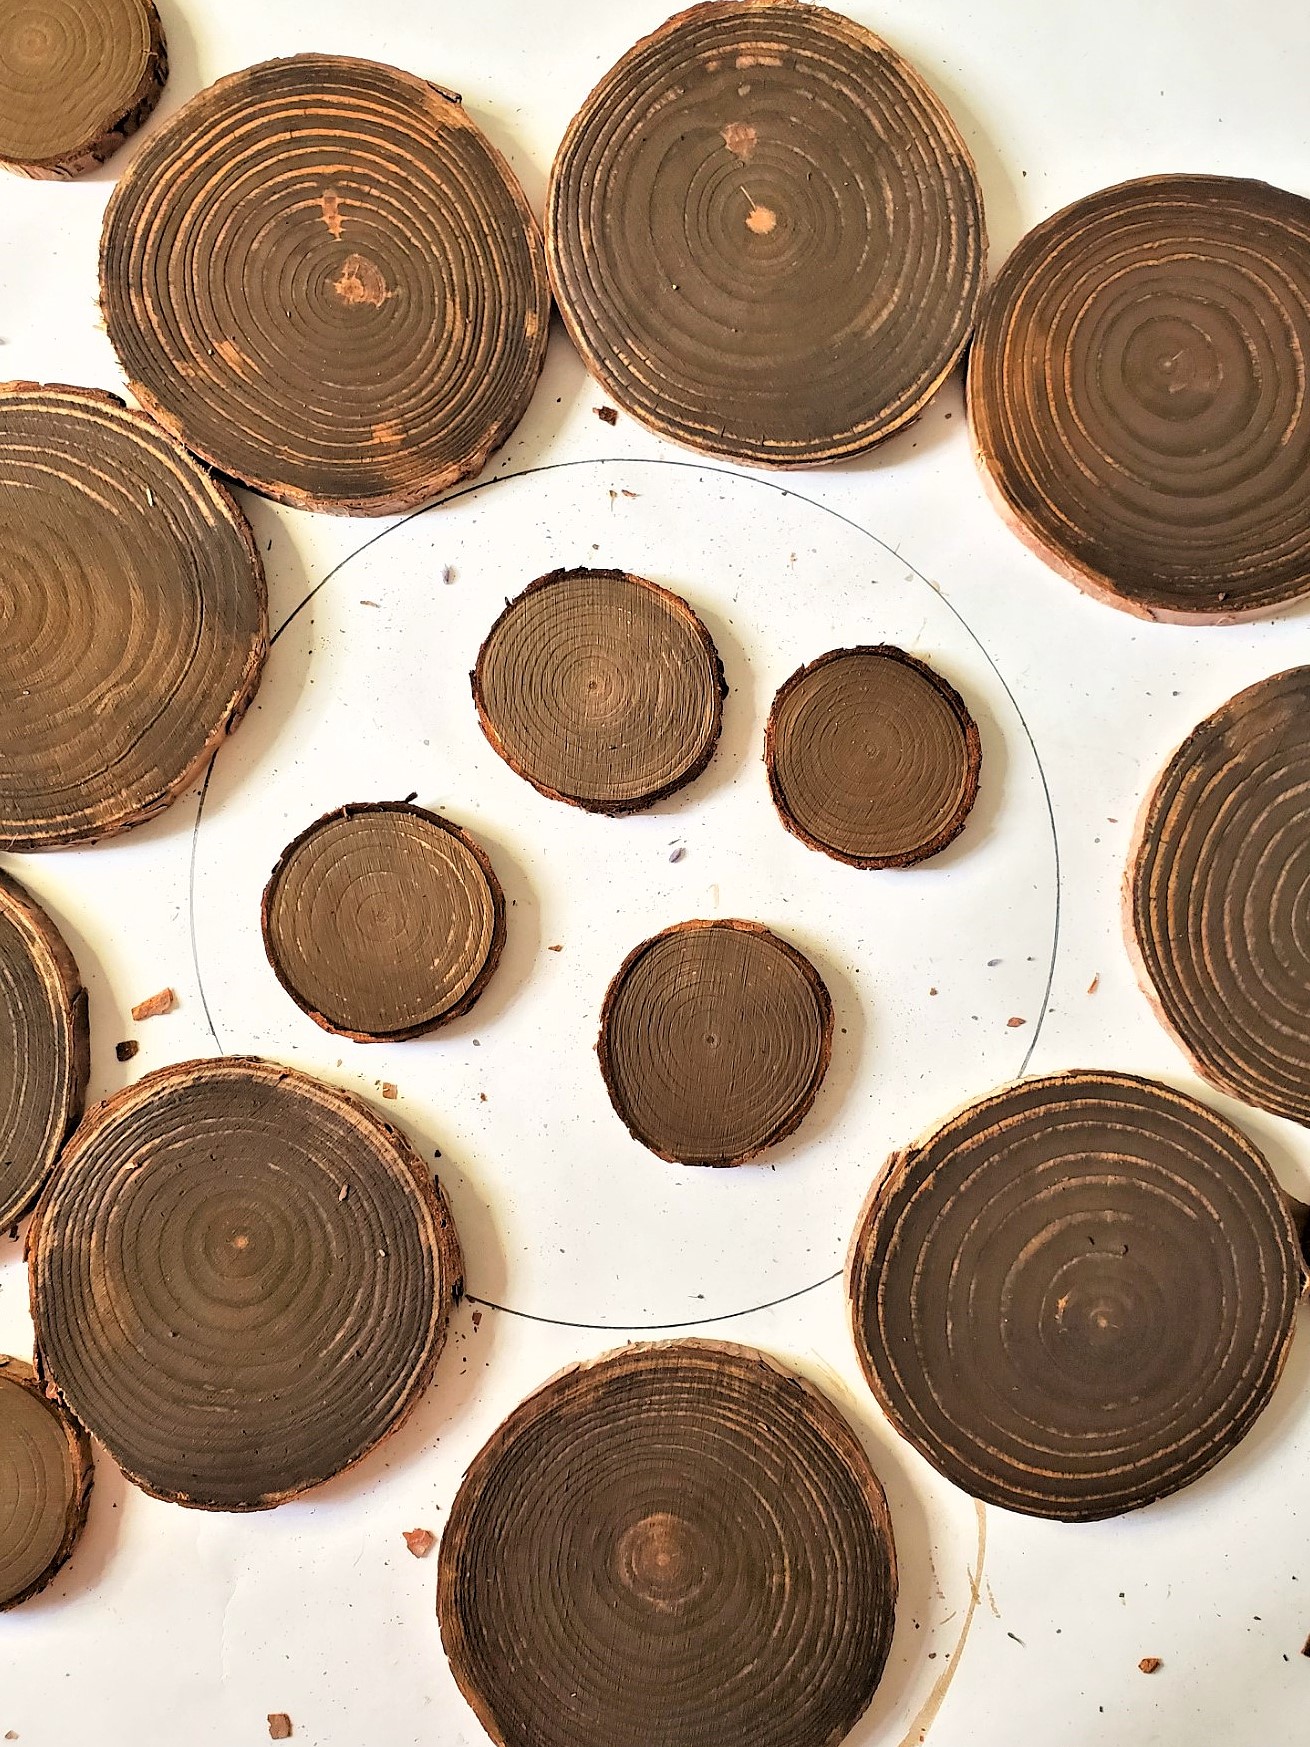
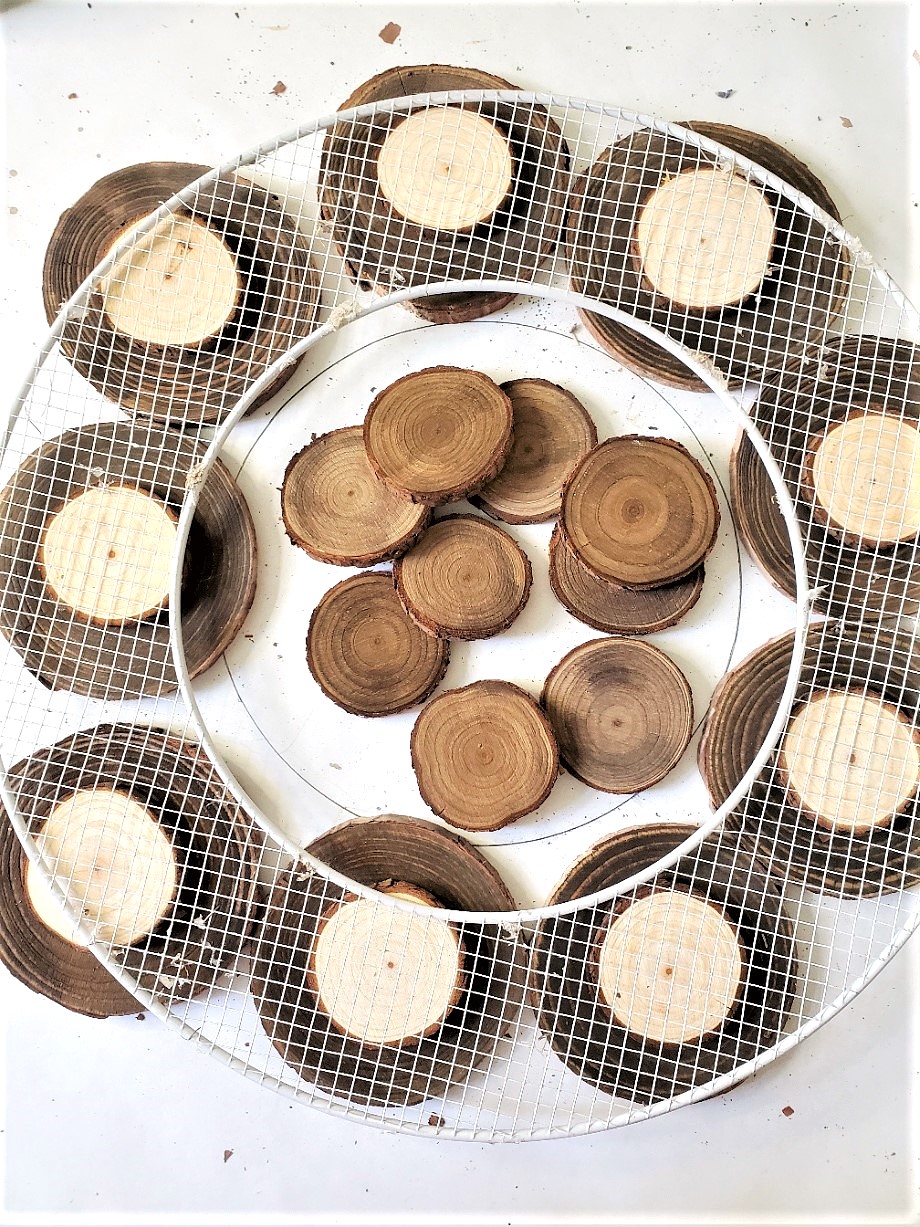
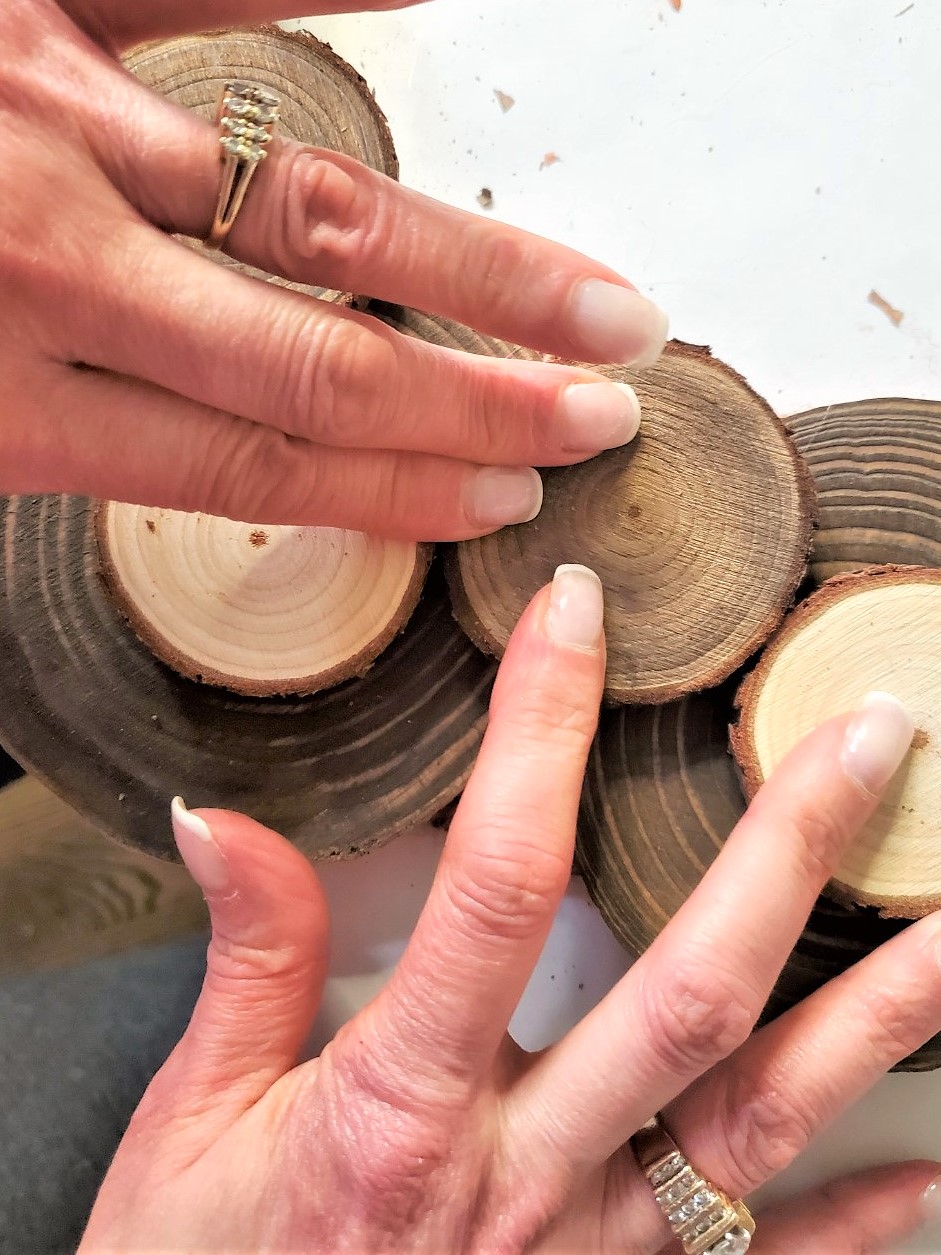
Adding Wood Rounds
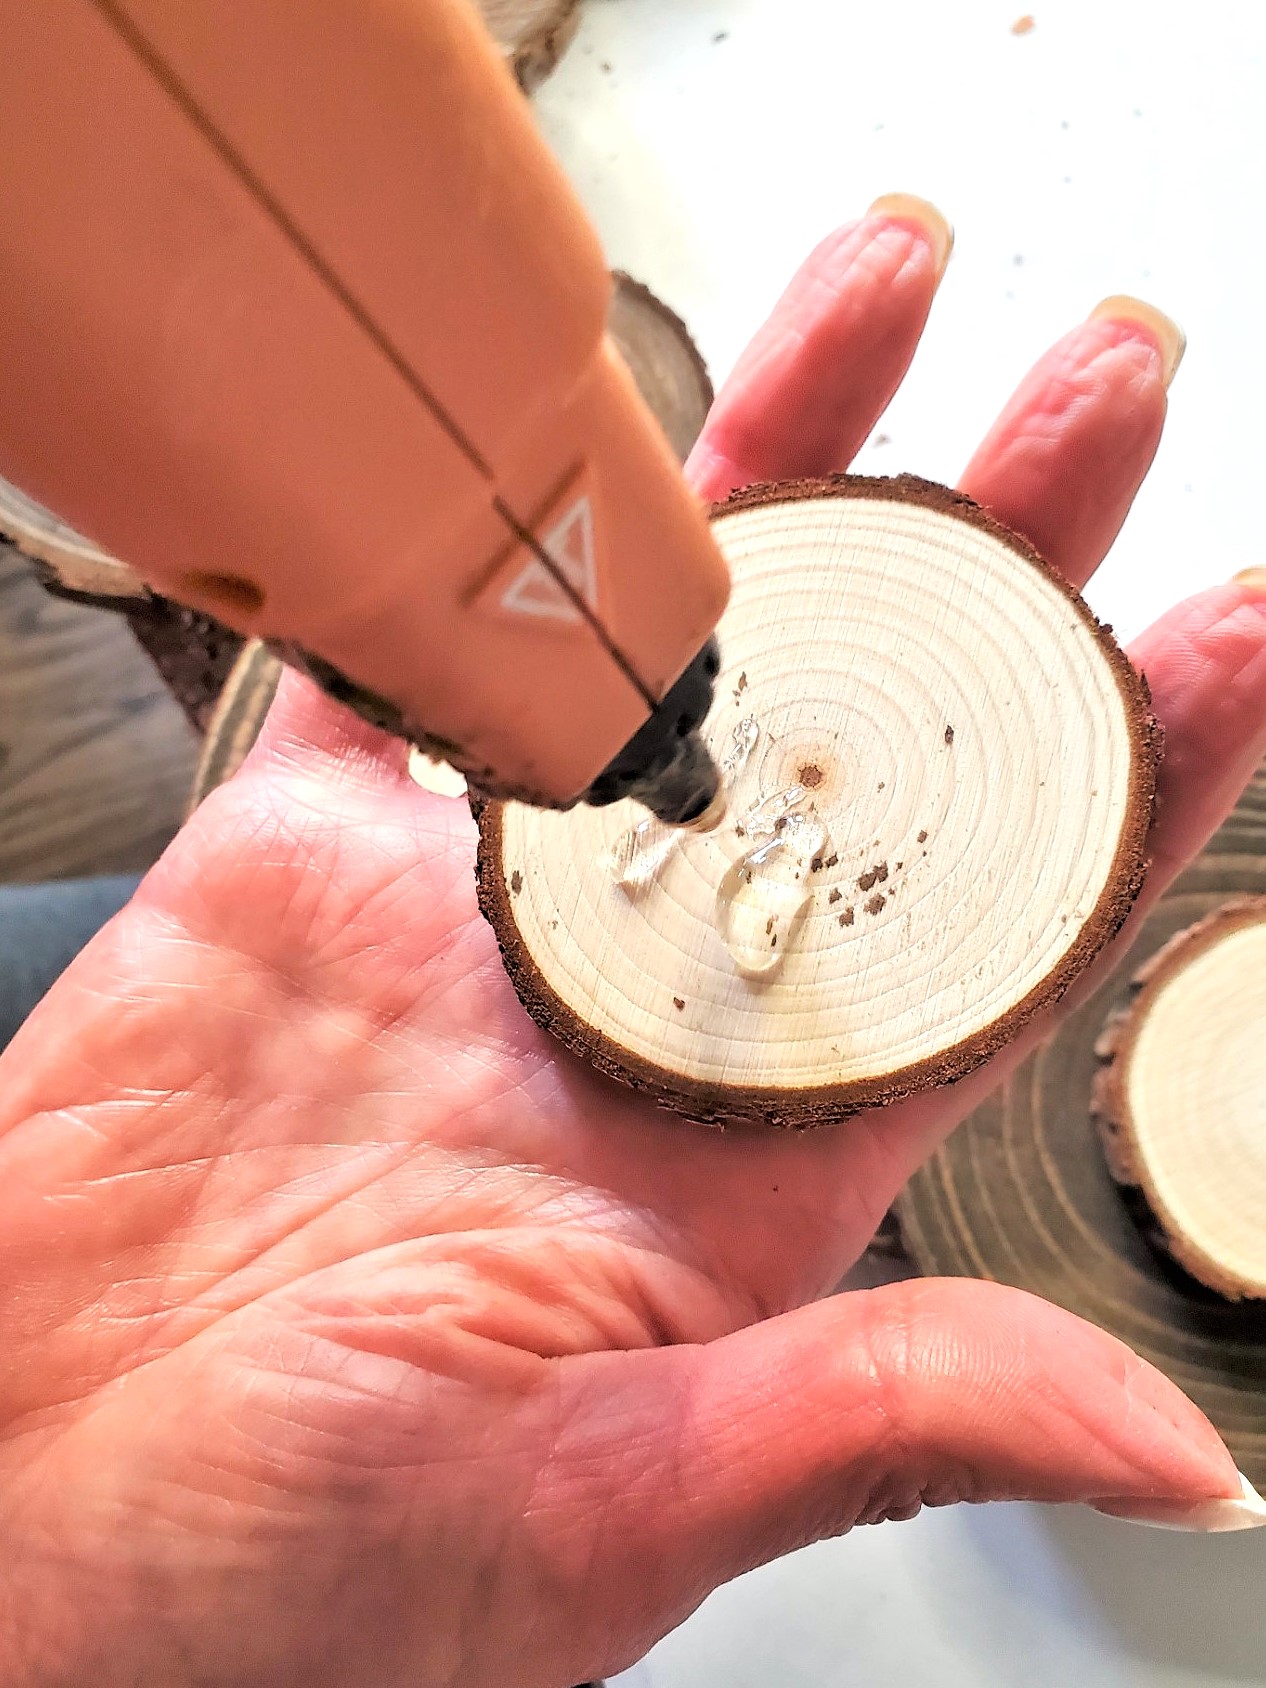
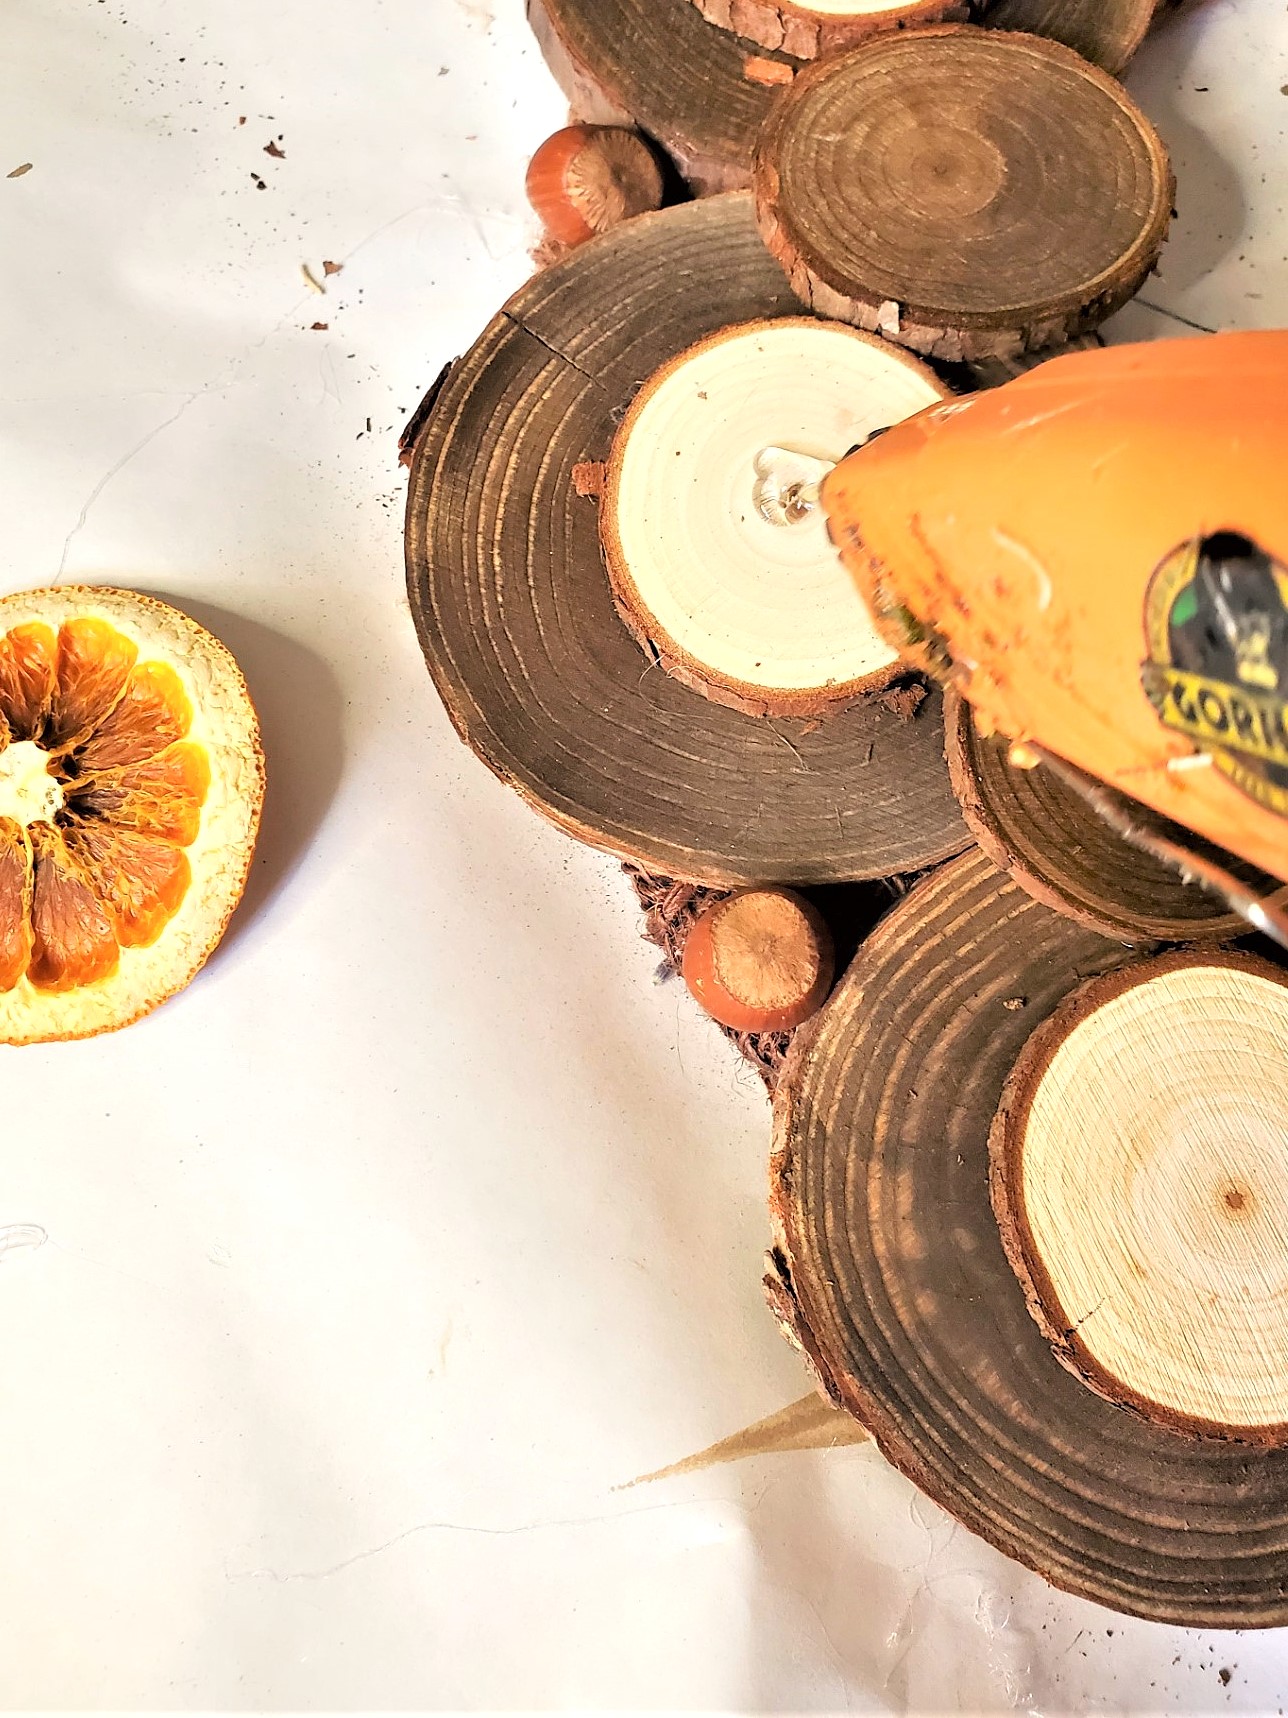
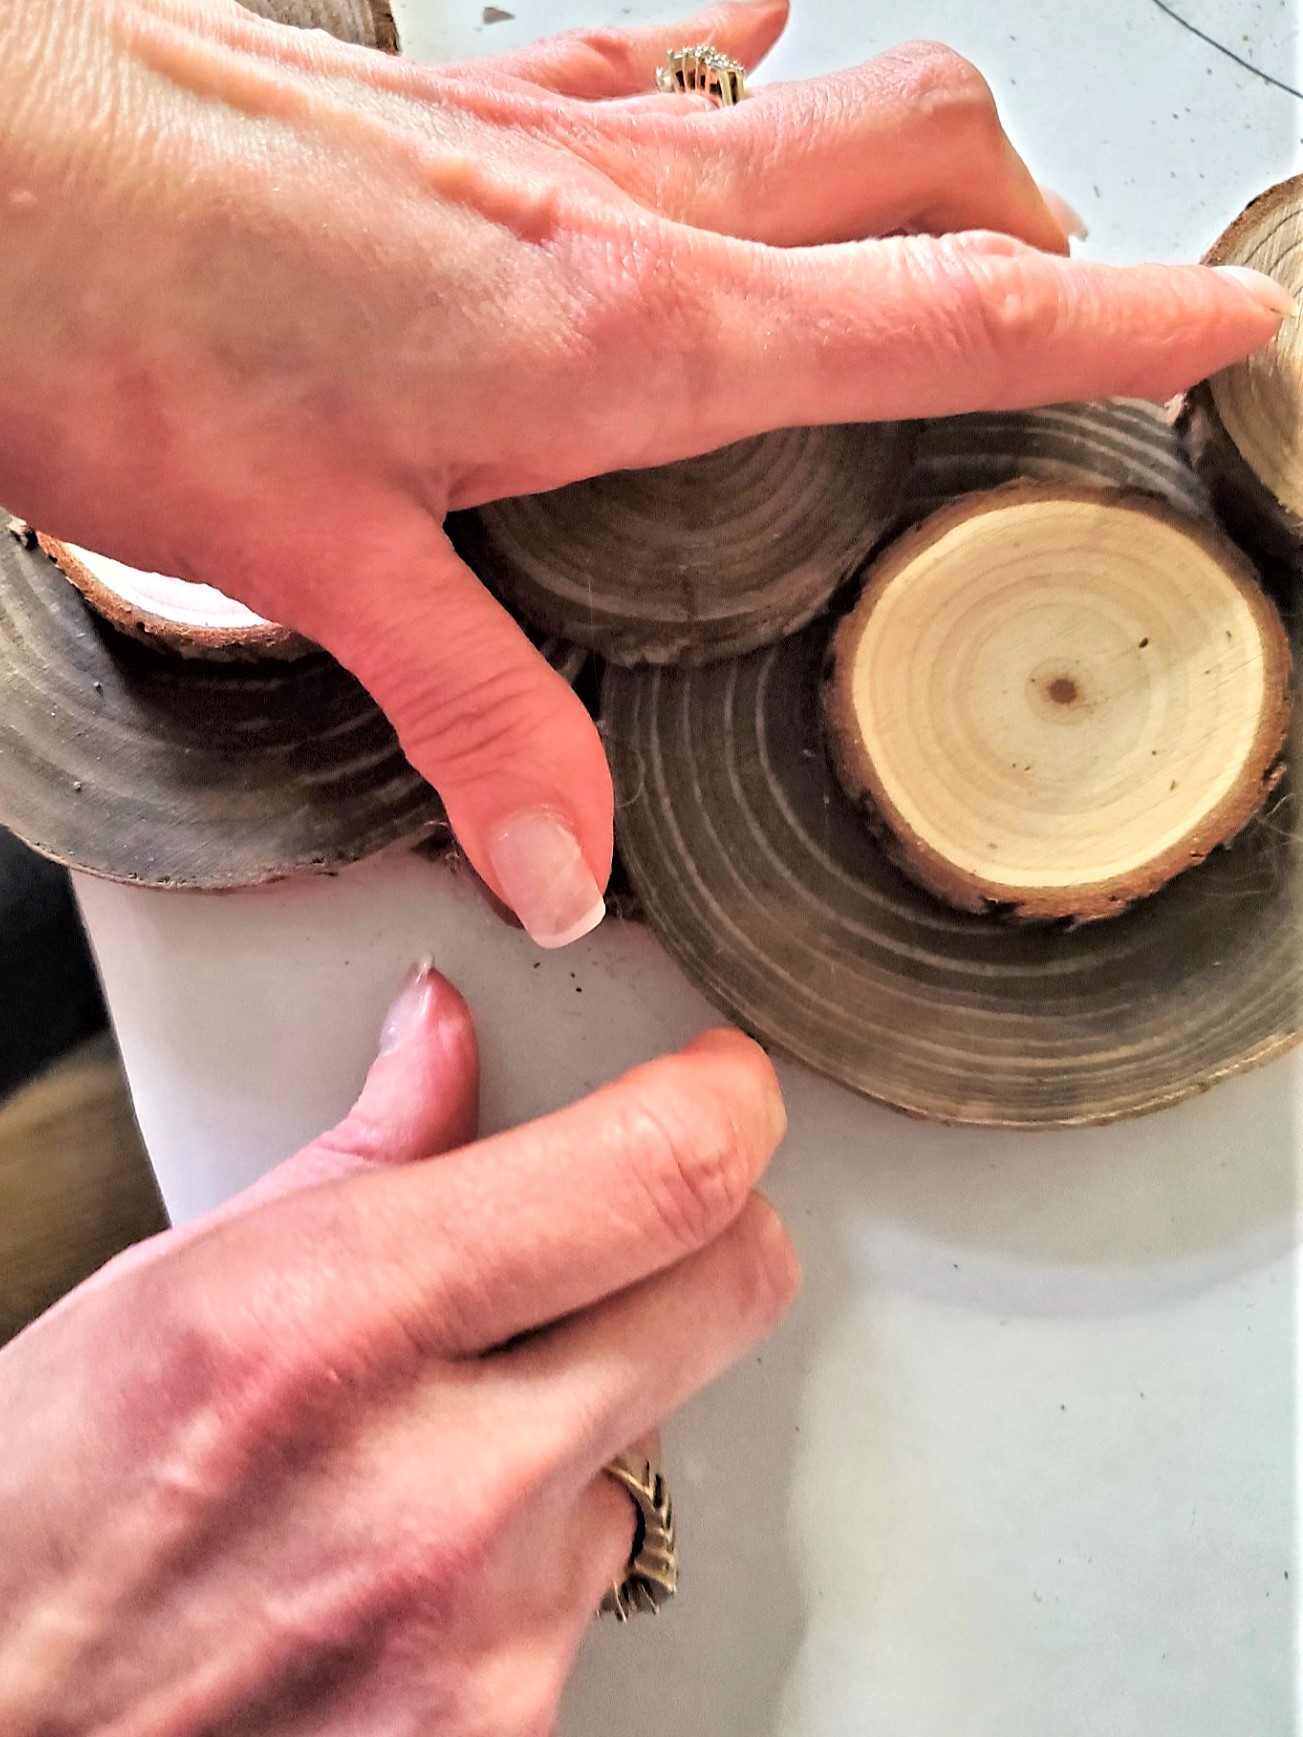
Step 3: Adding the Wood Step-by-Step-Instructions
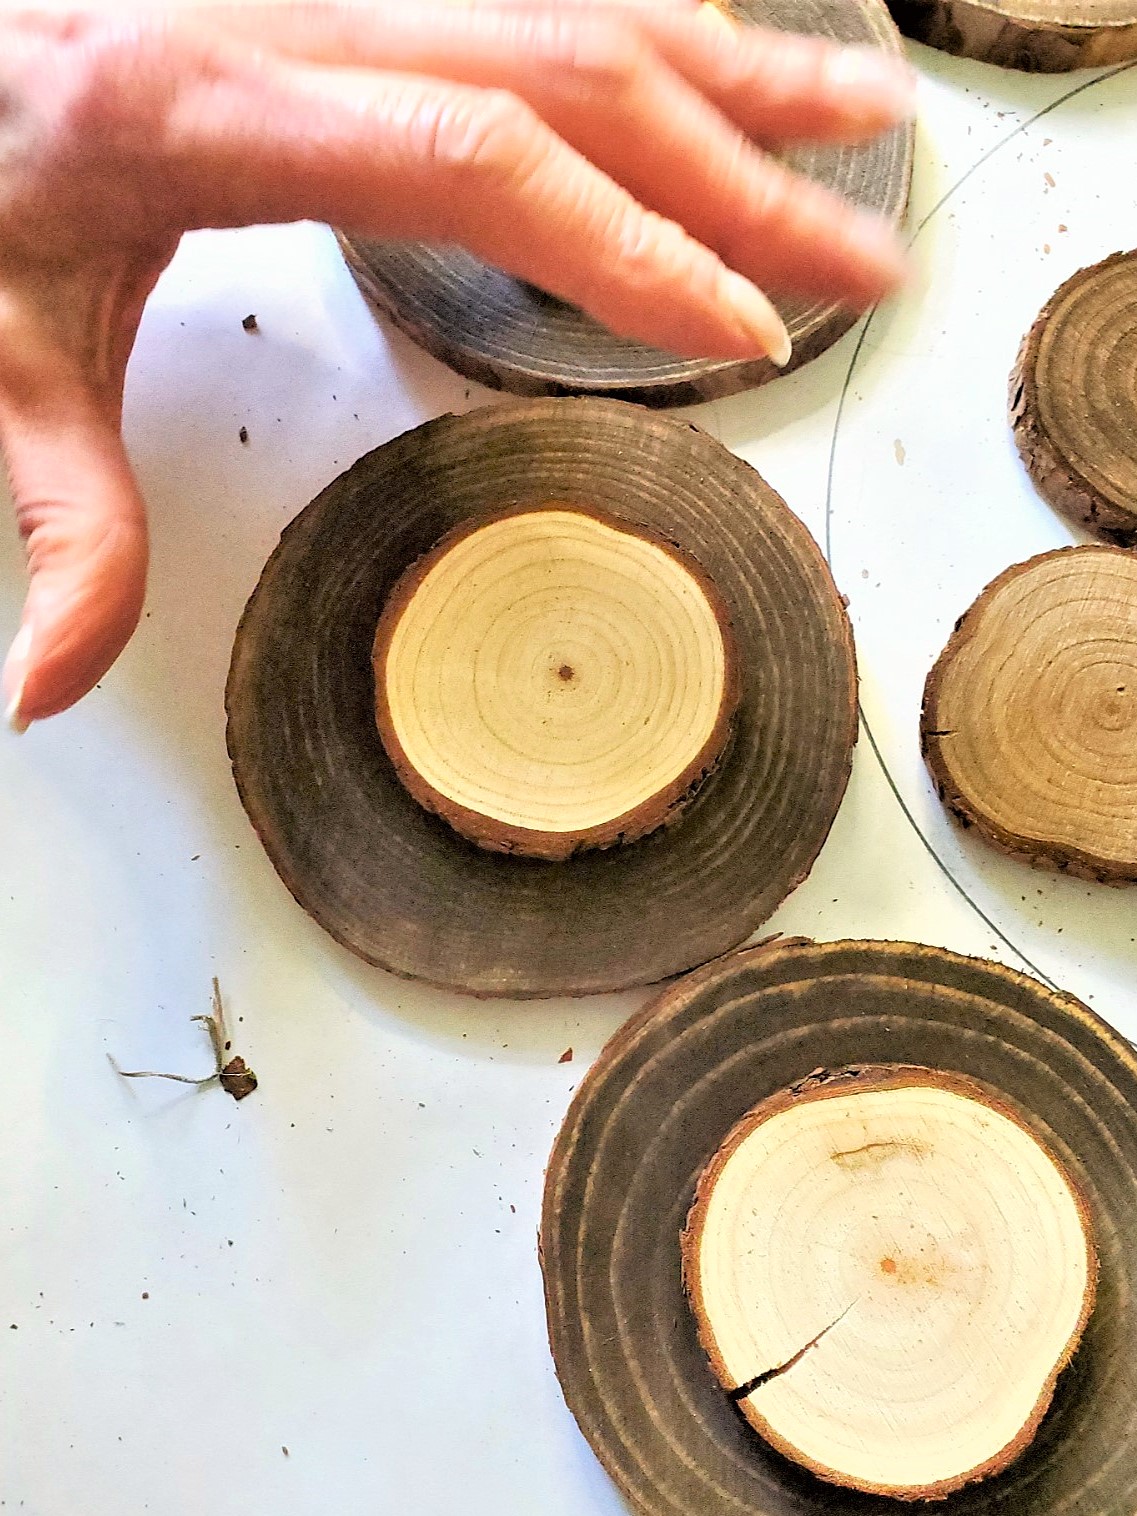
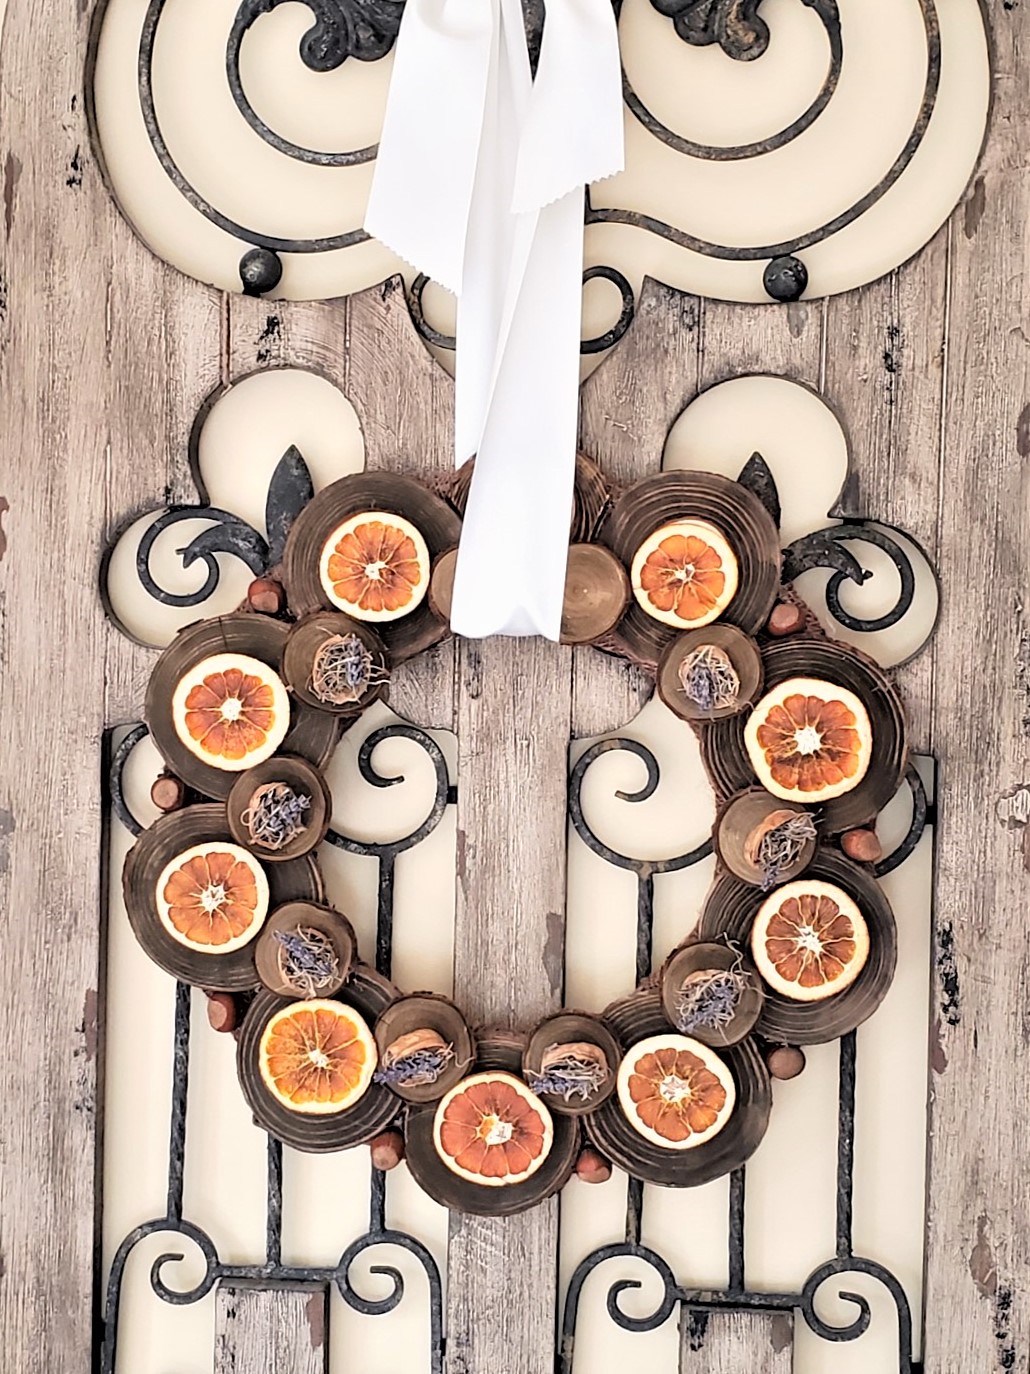
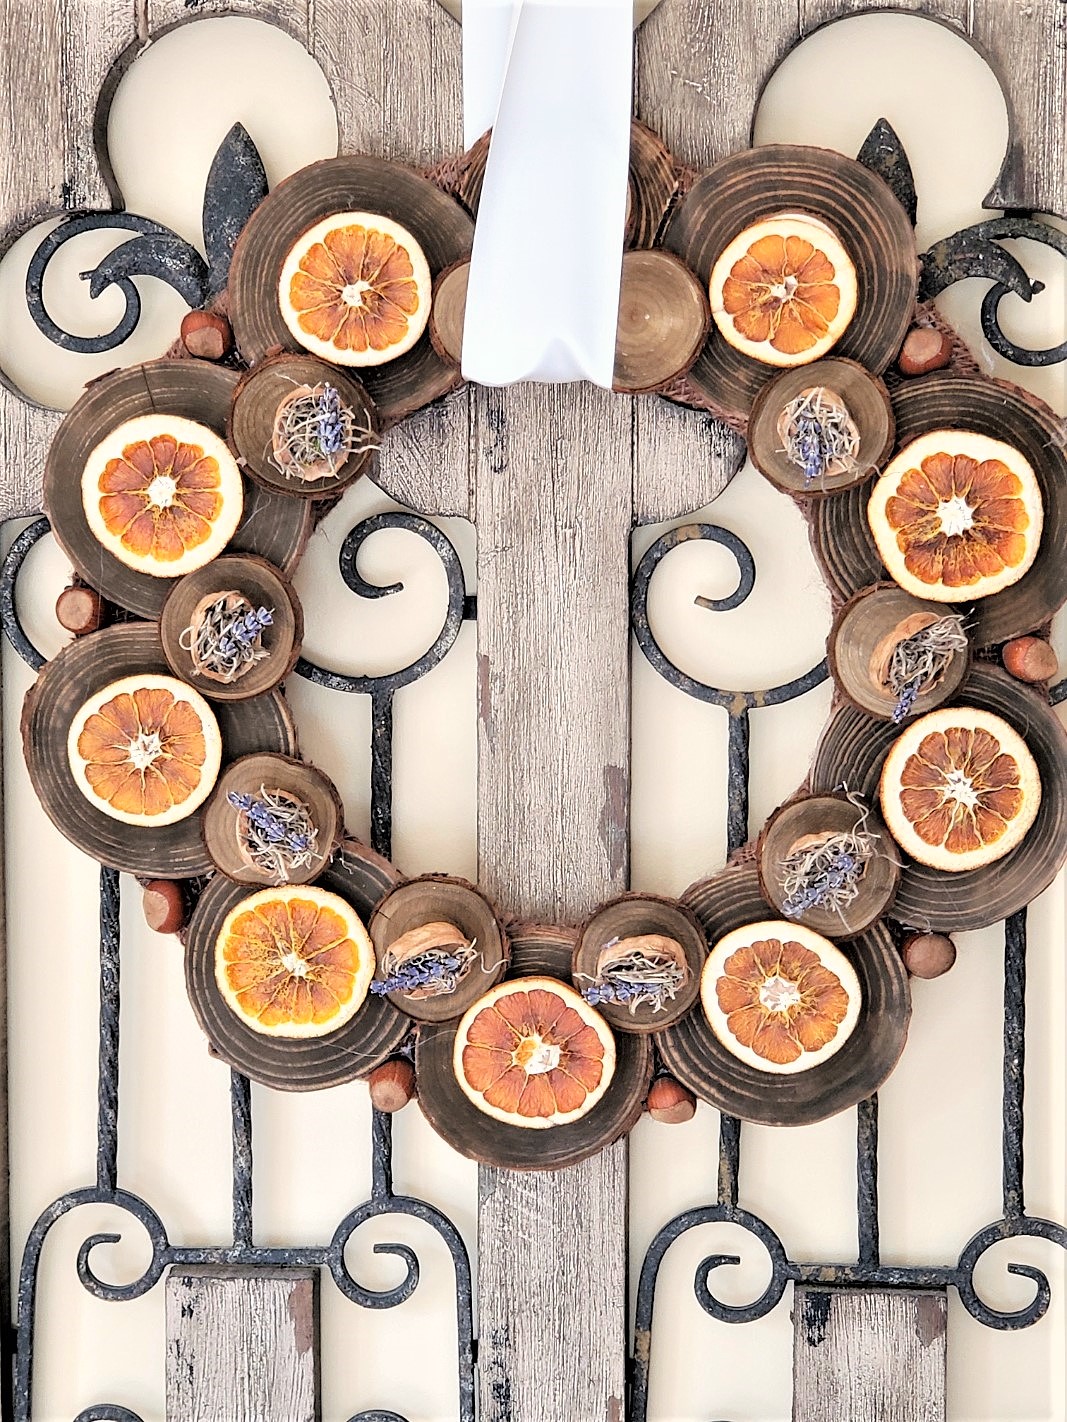
Let’s start by adding the wood slices to the outside of the wire frame. Apply hot glue to the back of the wood slice. Add glue at the top and bottom and carefully add it onto the frame. Repeat steps for each wood slice, ensuring they are securely attached.
The top edge of the wood slices should rest on the outer ring of the wire frame. The bottom edge of the wood sliced should be positioned on the inner ring. Begin gluing the smaller-sized rounds and overlap the larger ones. This adds an extra layer of depth to this farmhouse style wreath. This step is fast covering the outside of the wire frame.
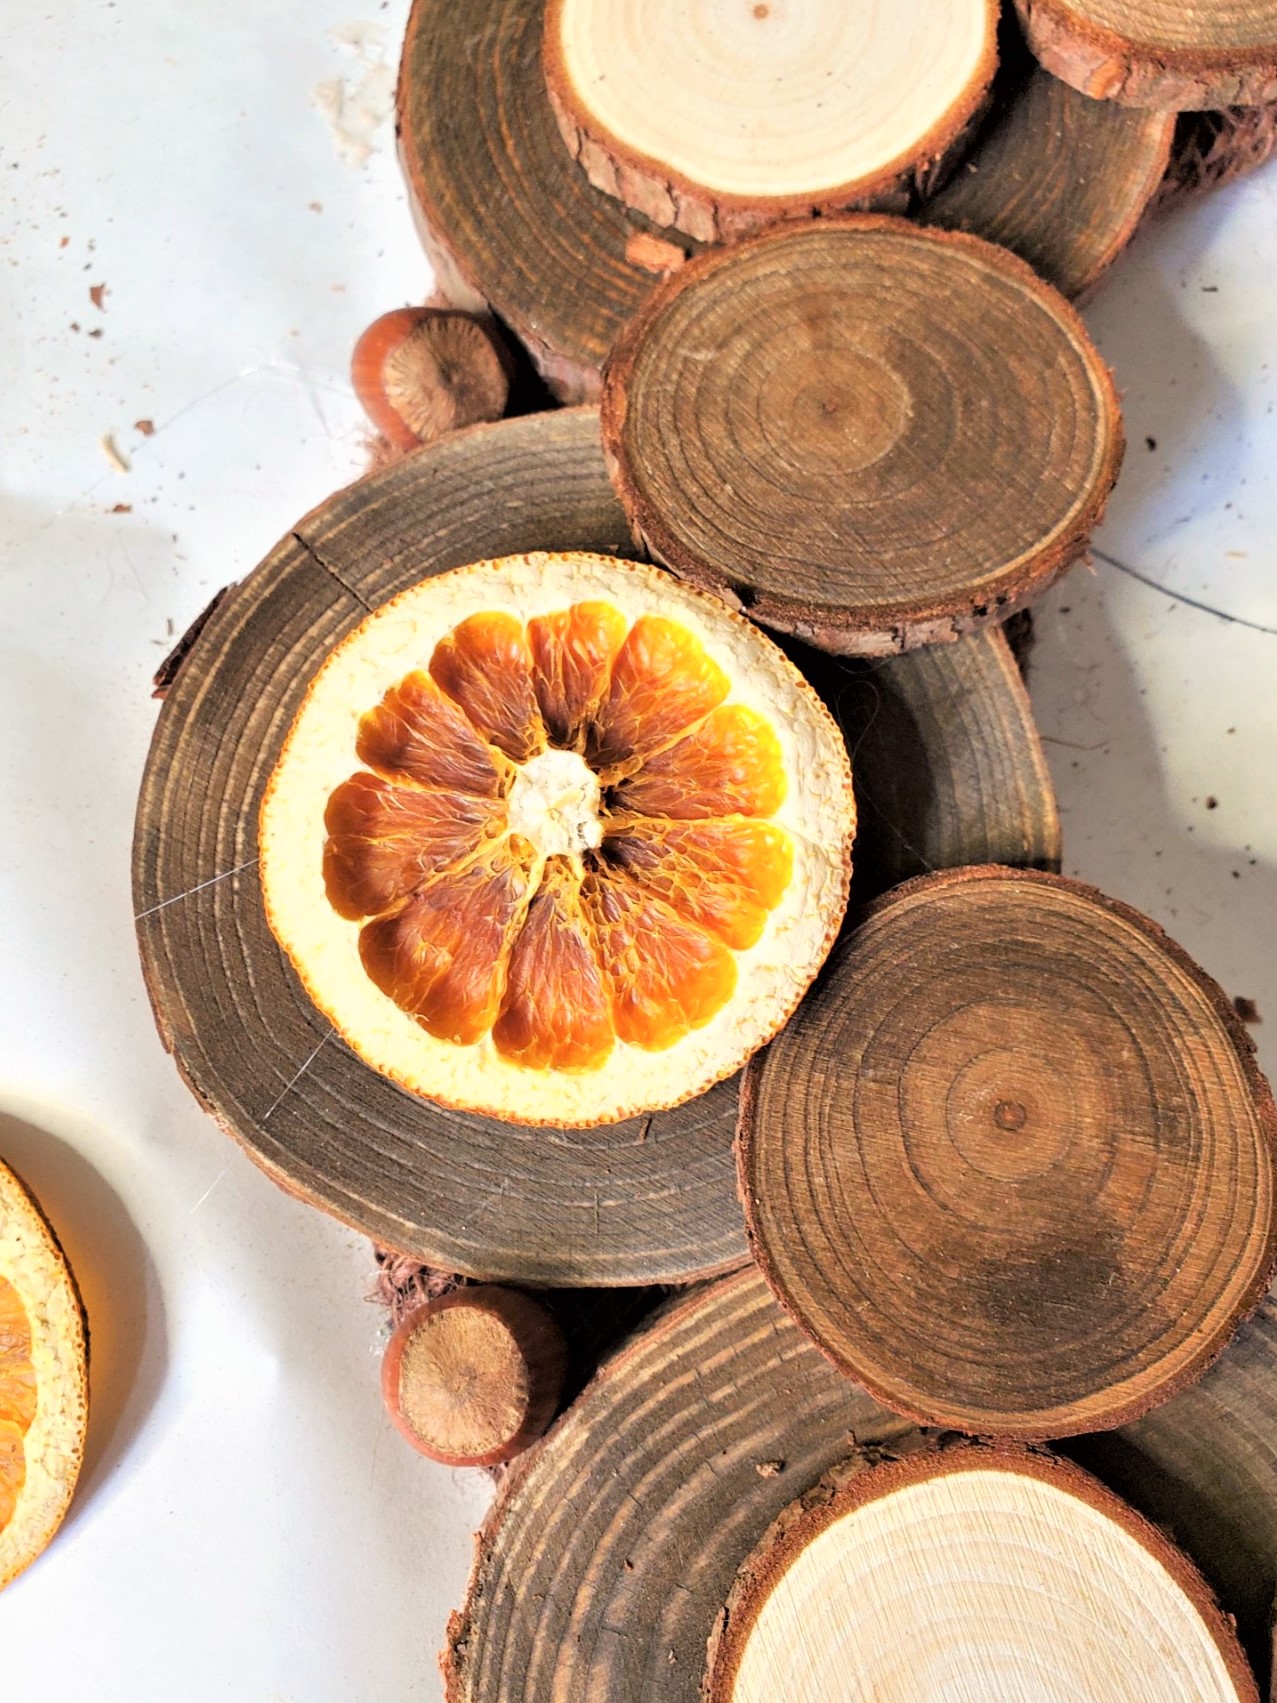
This is a great place to add and glue the unstained wood rounds into the center of the larger wood pieces using hot glue. Using hot glue, attach the smaller stained wood slices to the inner ring of the wreath.
Note: Above, you may notice that the three small rounds are touching each other.
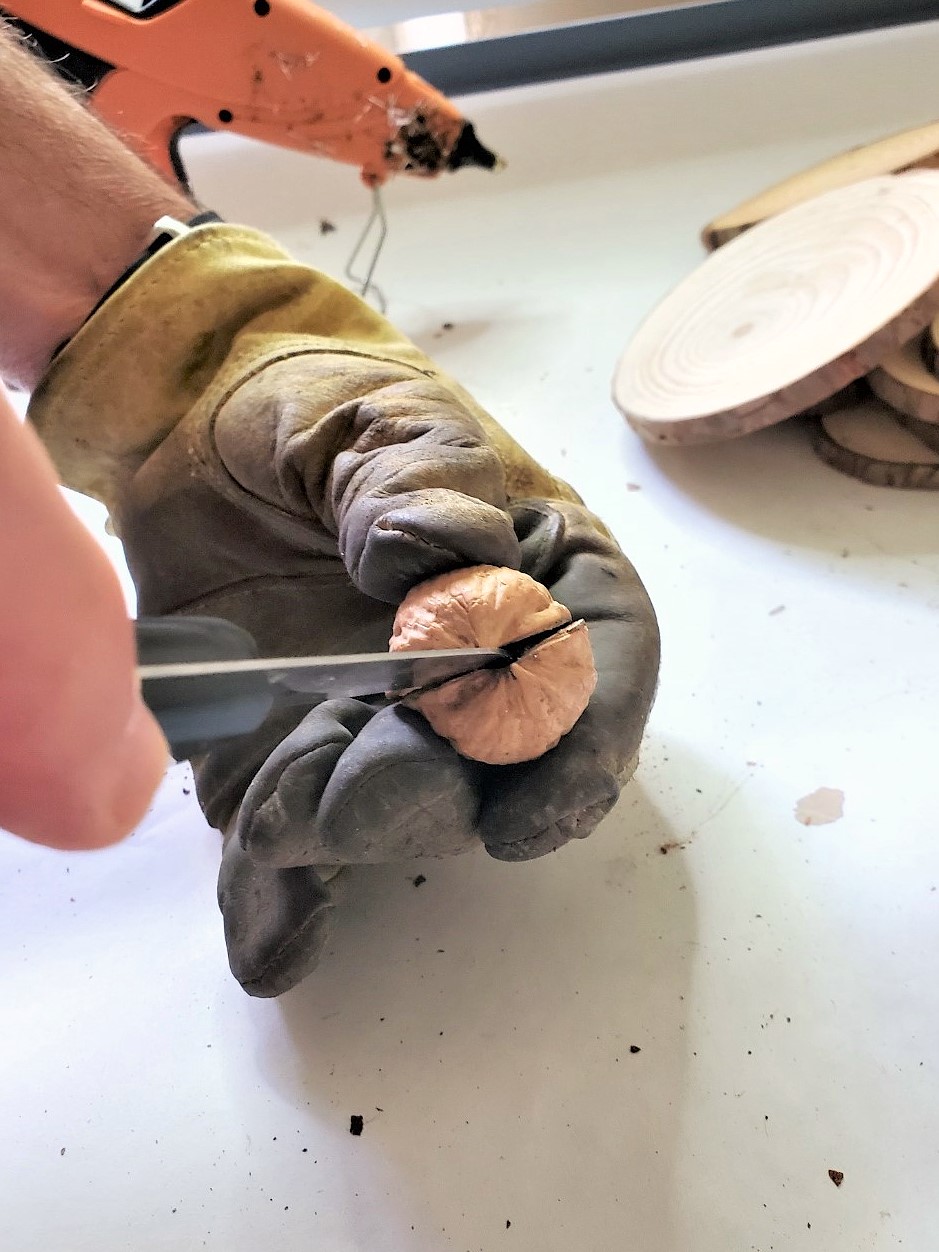
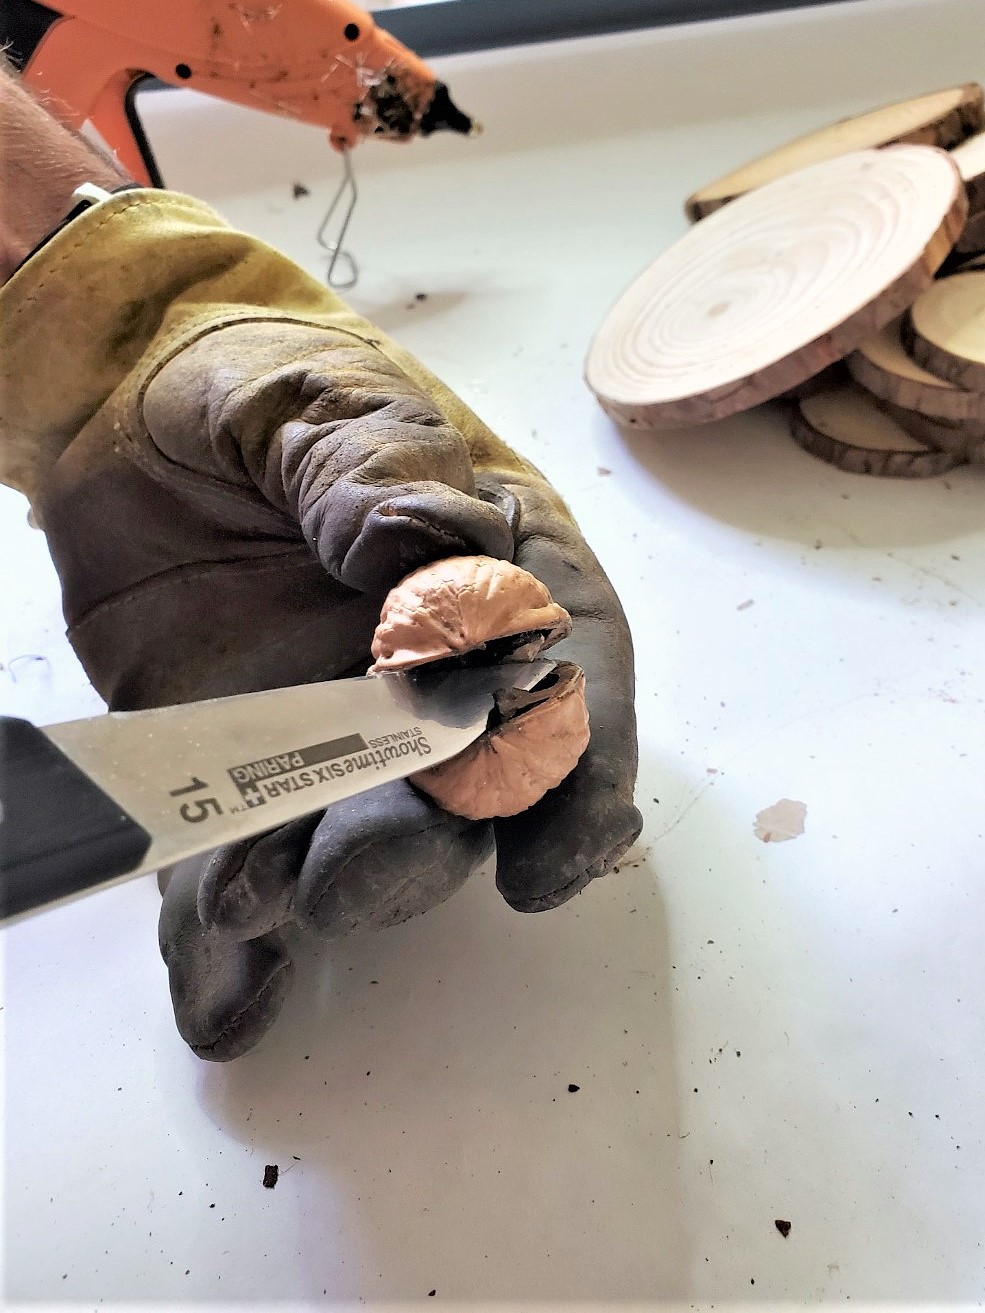
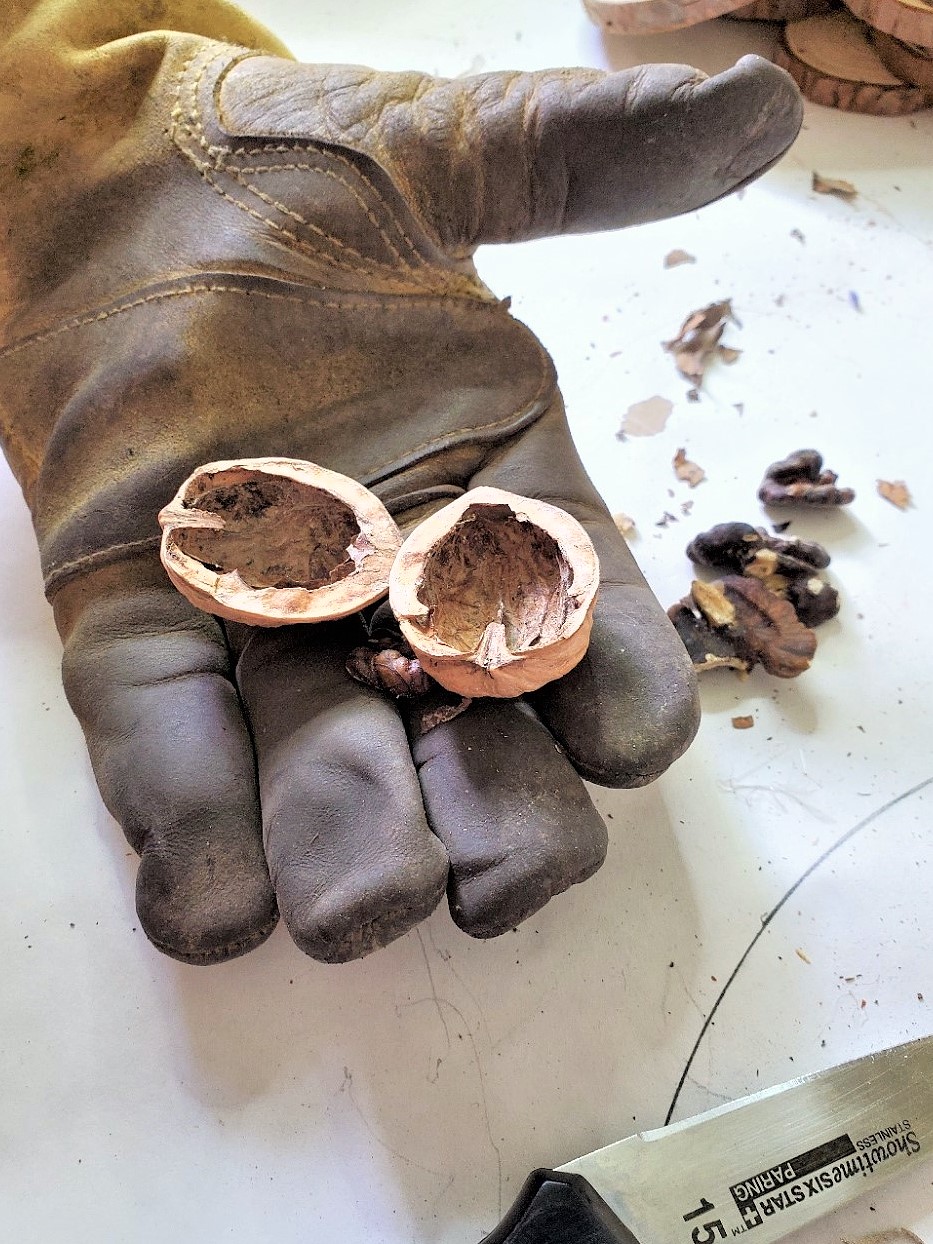
Splitting and Filling Shells
Step 4: Add Charm and Natural Elegance to a Farmhouse Wreath
Here’s my fun twist for my farmhouse style wreath, this step is optional, but they are the best parts. These add charm and natural elements, making this a gorgeous wreath, for fall. This also works as a Christmas wreath too!
Tip: Splitting Walnut Shells
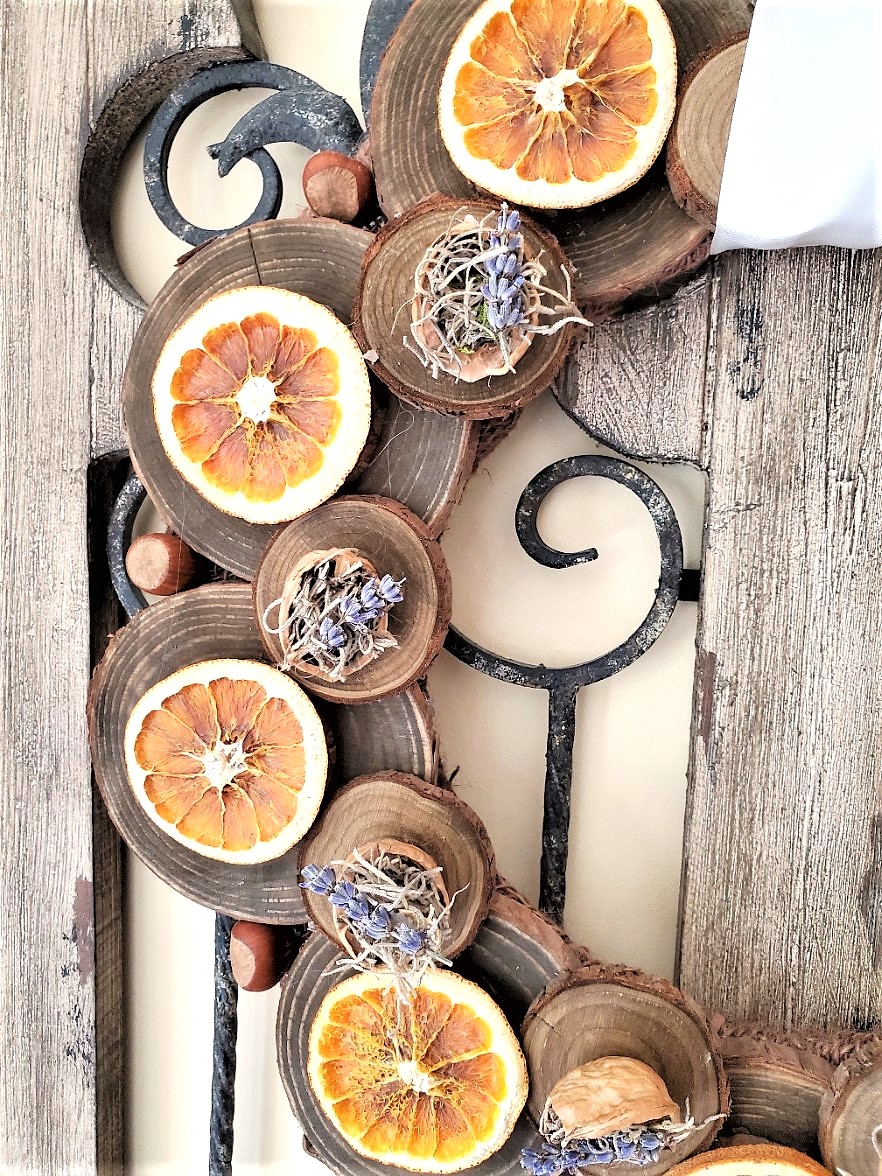
Exercise caution as you carefully use a paring knife to slide it through the crease of each walnut and split it in half. It is highly recommended to wear a pair of thick gloves to ensure the safety of your fingers. I had my husband, handle this process. With my MS we didn’t think it was a safe option. Some of the shells may have cracked edges, but that’s the best part about nature. Nothing is perfect and the moss will conceal any broken edges.

Attaching Walnuts
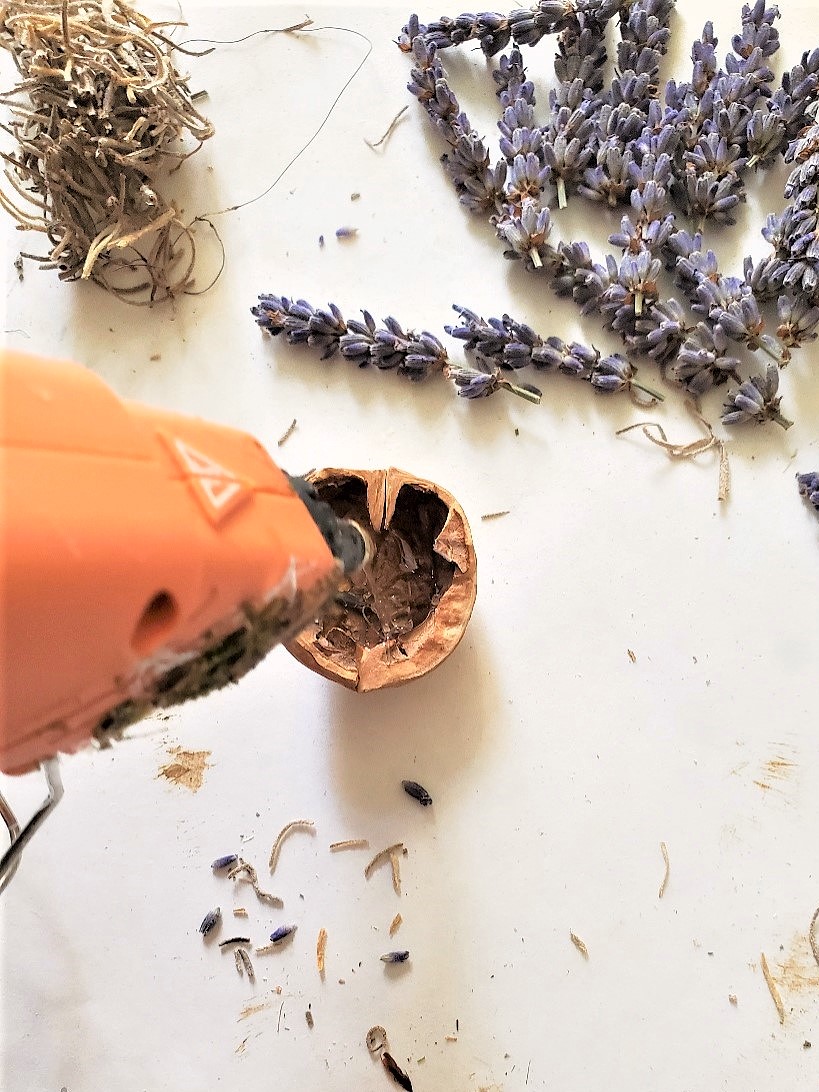
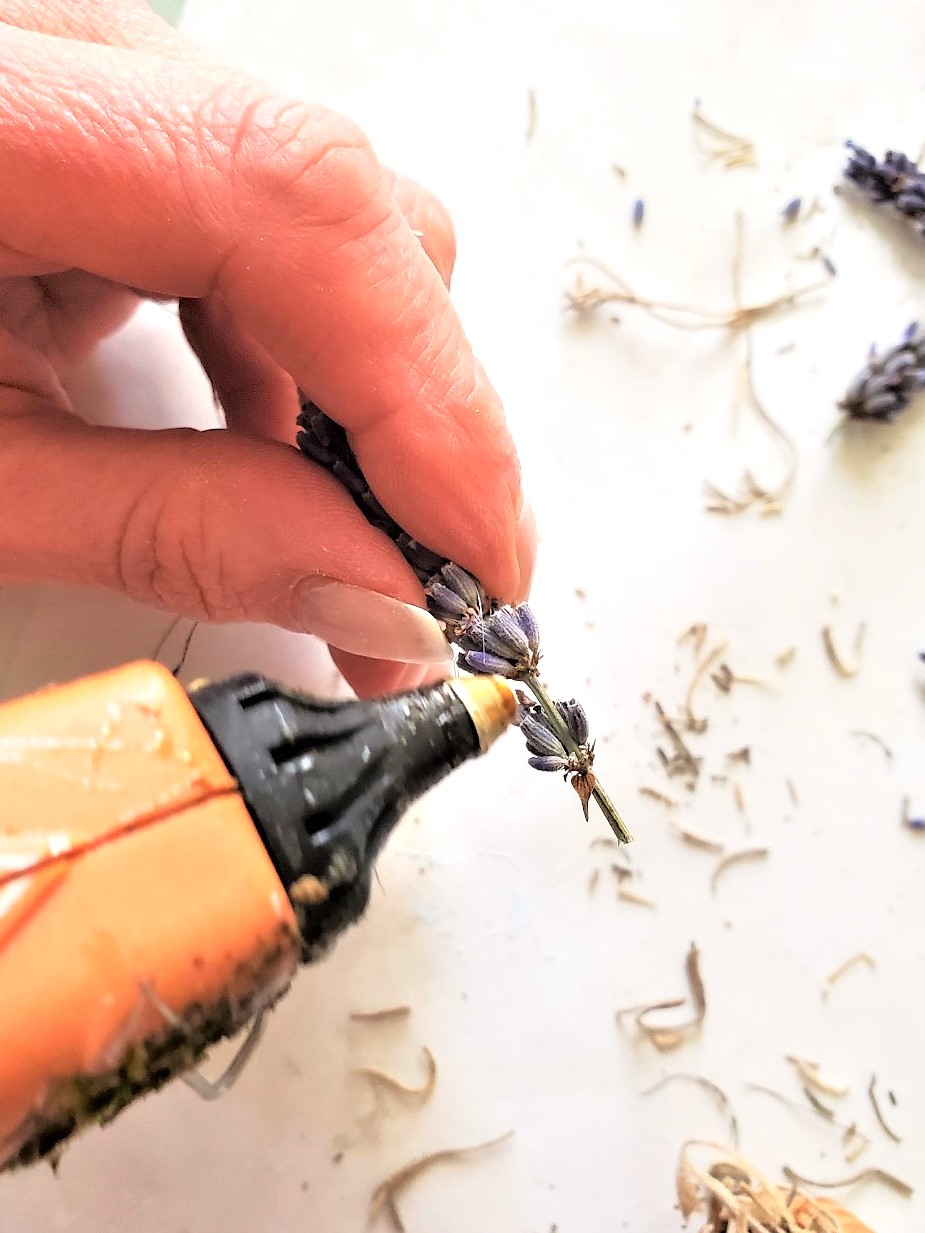
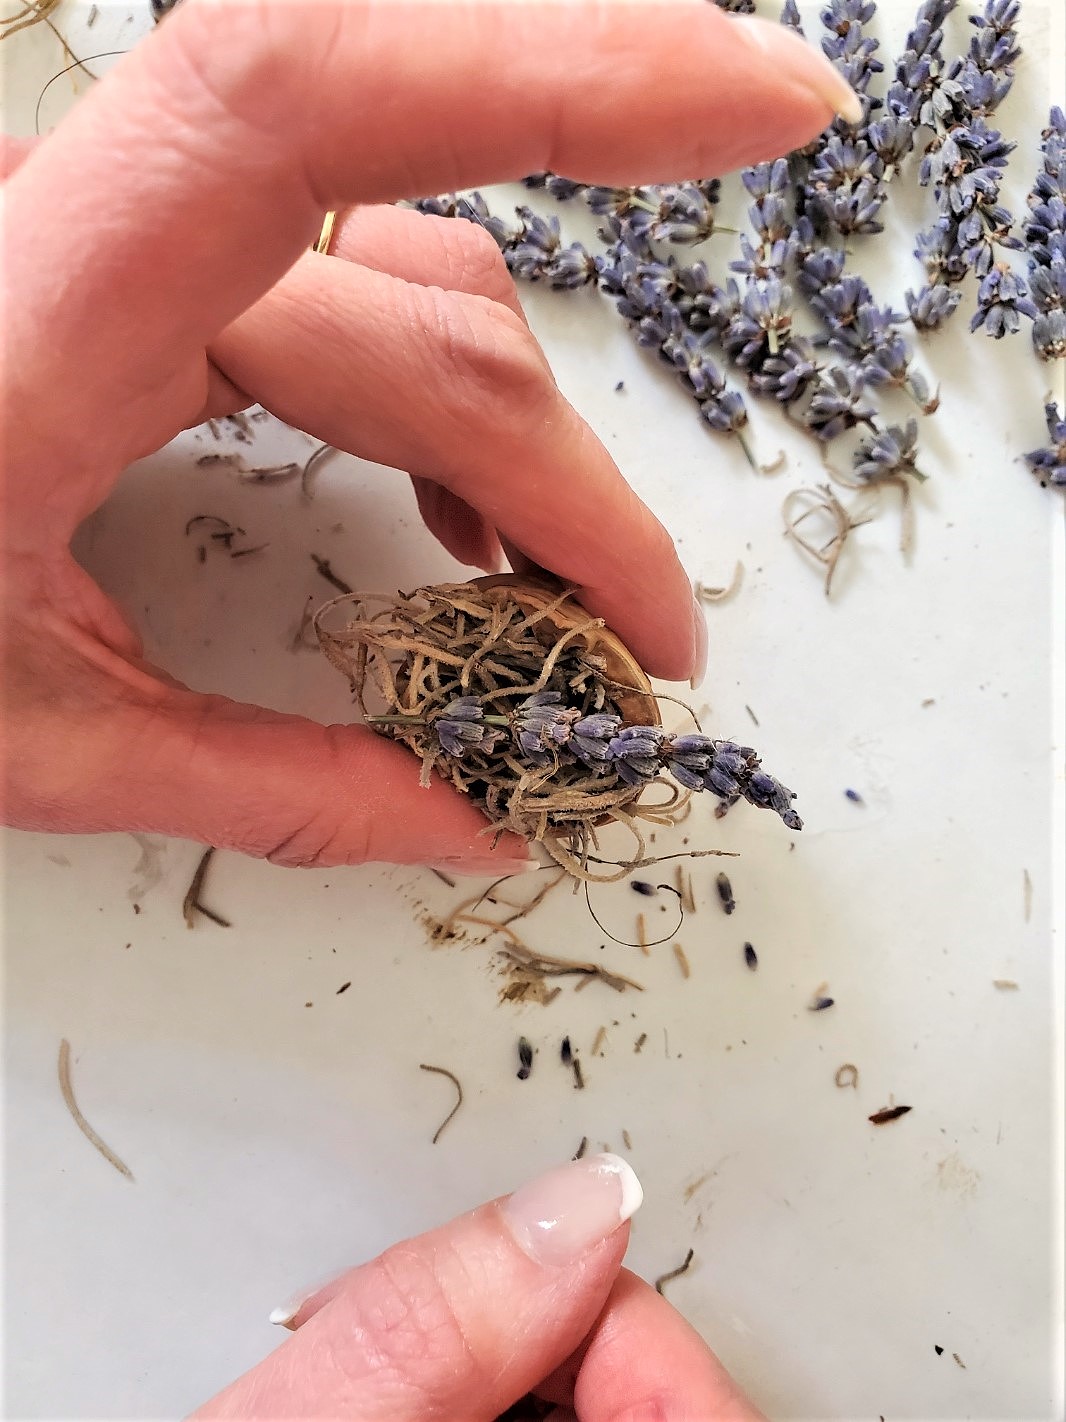
Step 5: Elevate Your Wreath: Tips for Gluing Walnut Shells
When attaching the walnut shells, make sure to apply glue to the sides of the shells. This will ensure that they are prominently visible in the wreath. By avoiding glue on the bottom of the shells, they can be positioned at an angle, allowing the lavender to be more prominently displayed and appreciated within the arrangement.
Tip: If walnut shells aren’t an option no problem, I have a great idea. Add small pinecones, acorn caps, small cinnamon sticks, dried flower petals, artificial flowers, or dried lavender on the wood slices. These different ways can bring a touch of nature to your fall wreath, allowing you to customize it to suit your style.

Orange Slices
Step 6: Rustic Beauty: Dried Orange Slices Transform Seasonal Wreaths
As a lover of dried oranges, I enjoy incorporating them into seasonal wreaths. It’s a perfect seasonal and holiday decoration! I enjoy drying oranges during the cooler months and using them in different ways to embellish decorative pieces such as bowls, compotes, and centerpieces. These are a great idea to add a fun twist to acorns, pinecones, hazelnuts, and walnuts in their shells. These natural elements create charm, warmth, and rustic beauty in any space.
I made an easy garland and added it to our china cabinet last year.
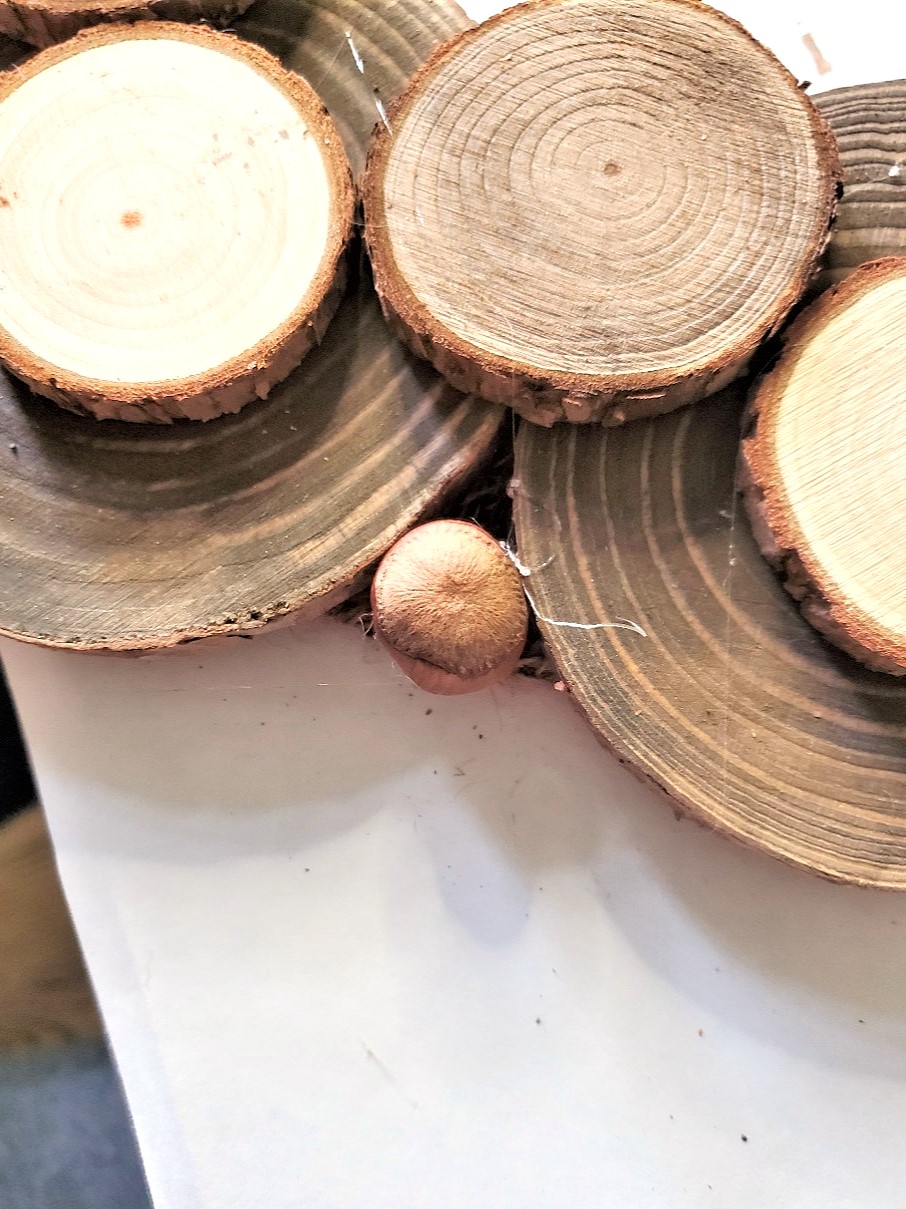
Add Nuts
Step 7: A Fun Twist: Hot Glue Nuts for a Rustic Touch
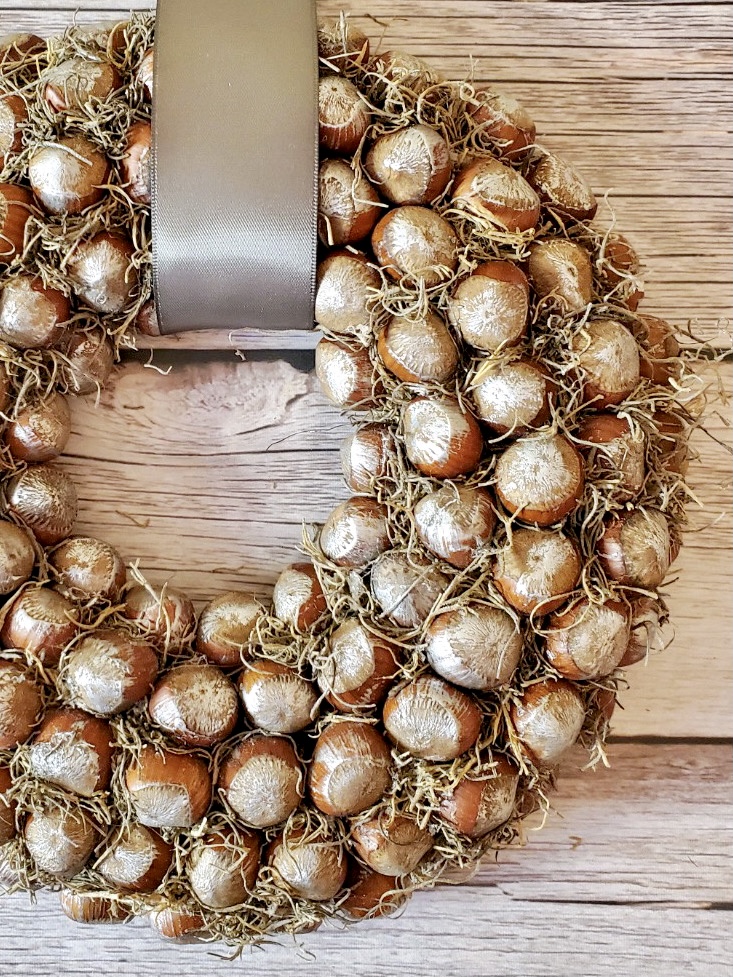
To enhance the rustic and natural character of any holiday decoration, there’s an easy step you can take. As a finishing touch, I added hazelnuts in their shells leftover from one of my DIY wreaths. Use the hot glue gun and add a dot of glue to the bottom of the nut. Add them to the empty spaces between the larger wood slices on the outside of the wire frame and hold to set. If you don’t want to add hazelnuts, Substitute them with small pine cones, acorns, or even stained wooden beads. These alternatives will still contribute to the overall charm of the wreath.
Enhance a Basic Wreath with Nature: Nuts and Dried Fruits for the Front Door
Tip: I enjoy adding nuts in the shell for any special occasion, especially as a holiday decoration. They are available at the food store and on sale for seasonal decorations from fall through winter. The extra cost is worth it because they last in their shells for years and years. NO, you can’t eat them but this is an easy step when decorating each year. Every year I use pine cones in different sizes I cleaned and preserved. I add preserved acorns that are a decade old, dried artichokes and dried oranges too. These come with no extra cost and are the best parts of using nature!
Dried Fruit
Elevate Holiday Decor: Gorgeous Wreaths with Dried Fruit, Ornaments, and Simple Materials
Tip: Dried fruit not only adds beauty to a Christmas wreath hanging on the front door. Use floral wire, fishing line, or green piper cleaners to connect evergreen boughs. Instead of a plain greenery wreath, add Christmas ornaments, magnolia leaves, or orange slices and hang it on top of the door to greet guests. Orange slices are easy to make. They are a versatile holiday decoration and last a long time.
Ornaments
Create Ornaments with Dried Fruit, Ribbons, and Natural Accents
Follow these step-by-step instructions to make Christmas ornaments. Add jute, narrow buffalo plaid ribbon, or fabric scraps. Add the end of the ribbon through the small hole in the center of the orange slice, tie a knot and you have Christmas ornaments! I found some pre-made dried orange and apple slices that are already finished, saving you time and effort. Here’s a cute idea for the apple slices, with their green skin and pine cones, they will add beauty to any basic wreath or greenery wreath such as a eucalyptus with little to no extra cost.
Last and Final Step
Hang a Wreath or Make a Gorgeous Wreath Centerpiece
In the last step, I added two small-sized wood circles. Here’s a cute idea, use this for any special occasion as a centerpiece. A great idea is to continue the wood round pattern for a finished look if used as a centerpiece. Imagine this wreath as a centerpiece on a dining or coffee table with a flameless candle in the center!
Tip: I recommend using a flameless candle. They provide a cozy ambiance during the fall and winter months. I have a collection of these candles and enjoy incorporating them in different ways in my seasonal decor.
Best Parts About This Tutorial
Timeless Elegance a Versatile Wreath for Every Color Palette
The best part about this step-by-step tutorial for this basic wreath is it works with any decorating style such as French Country, French Country Farmhouse, Country, or Farmhouse style. I hope you found this guide on how to decorate a wire wreath frame enjoyable and informative. Visit Dollar Tree or the craft store and buy wreath supplies and an 18 inch wire wreath frame to create a fall wreath for your front door.
Remember, you can make wreaths your own by, making a burlap wreath, a greenery wreath with evergreen boughs, berries, or Christmas ornaments for the upcoming holiday season. Take one step at a time and one DIY at a time because I will be cheering you on with each project.
As an Amazon Associate, Black Dog Salvage Furniture Paint affiliate, and other Affiliate links I earn from qualifying purchases Use Code: C-L20 when visiting Black Dog Salvage Furniture Paint and RECEIVE 20% OFF!! I earn a small commission from qualifying purchases through affiliate links. The price will be the same whether you use the affiliate links or go directly to the website. All opinions are my own. (Check our full disclosure Policy)
PLEASE SHARE THIS ON: FACEBOOK, PINTEREST, INSTAGRAM, THREADS, TIKTOK, AND X THIS HELPS THE BLOG TO GROW. THANK YOU!

POSTS OF INTEREST


CLICK ON THE IMAGE TO GO DIRECTLY TO THE STORE!
https://rstyle.me/+p83cCd2yqZuHL6vyaHPh5g https://rstyle.me/+Ro4xl7FBTK9IJpw51gntqQ https://rstyle.me/+0rZIqg9iCoNq6h4qD3d6mg https://rstyle.me/+bmdWRiiOyQ6XgT59ZJMogg https://rstyle.me/+yk4z3nAKEhJR8ftfWi7DrQ
Decorate A Wire Wreath Frame
Materials
- 1 16 inch wire wreath frame
- 1 hot glue gun and glue sticks
- 10 pieces wood slices 4-4.7
- 11 pieces small wood slices 30 pieces
- 1 sponge brush
- 1 bag walnut shell halves optional
- 1 bunch Spanish moss optional
- 1 bunch dried lavender heads or fake flowers
- dried orange slices
- 1 can Varathane aged wood accelerator or stain if it’s on hand
Notes
How to Decorate a Wire Wreath Frame
Step 1: Step-by-Step Tutorial Wrapping a Wire Wreath Form
The first step is to wrap a 16 inch wire wreath form with burlap ribbon. This step is important when using metal frames. This provides a foundation when using a hot glue gun to add artificial flowers or fresh flowers to cover the entire wreath form.
Wrap burlap ribbon around the entire wreath. Once you reach the end, add a bit of glue and hold to set.
Step 2: Aging the Wood Rounds With Varathane Wood Accelerator
On a flat surface, add a Varathane wood accelerator. This can be found in craft stores, Amazon, Home Depot, or Walmart. Follow the instructions on the wood accelerator and stir well. A little bit goes a long way. Using a foam brush, apply a single coat onto the wood slices. Allow them to dry for approximately an hour. Use a circular motion for smooth coverage.
Repeat steps until all the pieces have a coat of the wood accelerator.
Tip: If you have stain or dark brown matte craft paint will work to cover the wood slices. Before I glued the wood rounds I added them to be sure they were spread evenly around the wreath.
Step 3: Adding the Wood Step-by-Step-Instructions
Let’s start by adding the wood slices to the outside of the wire frame. Apply hot glue to the back of the wood slice. Add glue at the top and bottom and carefully add it onto the frame. Repeat steps for each wood slice, ensuring they are securely attached.
The top edge of the wood slices should rest on the outer ring of the wire frame. The bottom edge of the wood sliced should be positioned on the inner ring. Begin gluing the smaller-sized rounds and overlap the larger ones. This adds an extra layer of depth to this farmhouse style wreath. This step is fast covering the outside of the wire frame.
This is a great place to add and glue the unstained wood rounds into the center of the larger wood pieces using hot glue. Using hot glue, attach the smaller stained wood slices to the inner ring of the wreath.
Note: Above, you may notice that the three small rounds are touching each other.
Step 4: Add Charm and Natural Elegance to a Farmhouse Wreath
Here’s my fun twist for my farmhouse style wreath, this step is optional, but they are the best parts. These add charm and natural elements, making this a gorgeous wreath, for fall. This also works as a Christmas wreath too!Tip: Splitting Walnut Shells
Exercise caution as you carefully use a paring knife to slide it through the crease of each walnut and split it in half. It is highly recommended to wear a pair of thick gloves to ensure the safety of your fingers. I had my husband, handle this process. With my MS we didn’t think it was a safe option. Some of the shells may have cracked edges, but that’s the best part about nature. Nothing is perfect and the moss will conceal any broken edges.
Step 5: Elevate Your Wreath: Tips for Gluing Walnut Shells
When attaching the walnut shells, make sure to apply glue to the sides of the shells. This will ensure that they are prominently visible in the wreath. By avoiding glue on the bottom of the shells, they can be positioned at an angle, allowing the lavender to be more prominently displayed and appreciated within the arrangement. Tip: If walnut shells aren’t an option no problem, I have a great idea. Add small pinecones, acorn caps, small cinnamon sticks, dried flower petals, artificial flowers, or dried lavender on the wood slices. These different ways can bring a touch of nature to your fall wreath, allowing you to customize it to suit your style.Step 6: Rustic Beauty: Dried Orange Slices Transform Seasonal Wreaths
Step 7: A Fun Twist: Hot Glue Nuts for a Rustic Touch
To enhance the rustic and natural character of any holiday decoration, there’s an easy step you can take. As a finishing touch, I added hazelnuts in their shells leftover from one of my DIY wreaths. Use the hot glue gun and add a dot of glue to the bottom of the nut. Add them to the empty spaces between the larger wood slices on the outside of the wire frame and hold to set. If you don’t want to add hazelnuts, Substitute them with small pine cones, acorns, or even stained wooden beads. These alternatives will still contribute to the overall charm of the wreath.
Hang a Wreath or Make a Gorgeous Wreath Centerpiece
In the last step, I added two small-sized wood circles. Here’s a cute idea, use this for any special occasion as a centerpiece. A great idea is to continue the wood round pattern for a finished look if used as a centerpiece. Imagine this wreath as a centerpiece on a dining or coffee table with a flameless candle in the center! Tip: I recommend using a flameless candle. They provide a cozy ambiance during the fall and winter months. I have a collection of these candles and enjoy incorporating them in different ways in my seasonal decor.
Happy crafting!!


It looks great Cindy. Happy Wednesday. Have a good rest of the week. xoxo
I have been thinking of making a new pinecone wreath since my old one is pretty shabby. I love your idea of mixing in nuts to fill in spaces. Do you seal your finished wreath? I also have a good supply of dried orange slices and may use them for an addition to fall foliage and bittersweet wreath(faux) I am revamping. Thanks for all your great ideas. Enjoy fall when it finally arrives next month.
Very pretty, Cindy! I need a new wreath for fall. Thanks for the inspiration.
Very pretty Cindy and creative! beautiful job! Susan
Such a great idea, Cindy. I love how you layered the wood slices. And, anything with orange slices is fantastic! Missy
I love the creativity of this beautiful fall wreath! Thanks so much for linking up this week!
LOVE this wreath Cindy!! I’m so excited to be featuring it in Fabulous Friday Link Party. Thanks so much for always sharing such great content.
Love this wood slice wreath – you are so creative Cindy! Pinned 😊
This is such a unique and creative wreath! I love all of the natural elements you incorporated! It’s just beautiful! Blessings, Donna
Thanks so much! I love natural elements!
Your wreath turned out beautiful! It’s so versatile & unique. You could easily use it from August thru December. I found you over on Wonderful Wednesdays at Ducks ‘n a Row. If you get a chance, I’d love for you to come by & share your posts on Crafty Creators Link Party. It’s open Thursdays at 6am CST through Mondays at 11:59pm. I found you on Wonderful Wednesdays & I’m sure my readers would love to fine you too! Hope to see you there!
Niki | LifeasaLEOWife.com
Such a beautiful way to get ready for the fall season, Cindy! I love all the different layers you added and how you accented with the oranges and the lavender too. It’s really pretty! Hugs, CoCo
Unique and beautiful wreath, Cindy!
I’m featuring you next week! Thanks for sharing with us at the To Grandma’s house we go link party!
What a stunning wreath!! I don’t think I’ve ever seen anything like that before. I love the layered wood pieces and the colors from the oranges and lavender are gorgeous. This is a beautiful wreath to use any time of the year!
Thank you so much! Thus is so easy
Great tutorial. Thanks.
Thank you
I love how you used natural elements like wood slices, walnut shells, and dried orange slices – such a beautiful, rustic touch. I’m definitely going to try this for fall (or maybe even for Christmas!) because it looks like something anyone could hang up and be proud of. The idea of using a wire wreath frame is so smart and versatile.
I really appreciate how clearly you broke down each step and shared so many creative ideas for using natural elements like dried oranges, walnut shells, and lavender. It makes wreath-making feel so approachable, even for beginners. I also love that you included budget-friendly tips and versatile uses for different seasons. Definitely feeling motivated to try making my own wire wreath now—thank you for the inspiration!