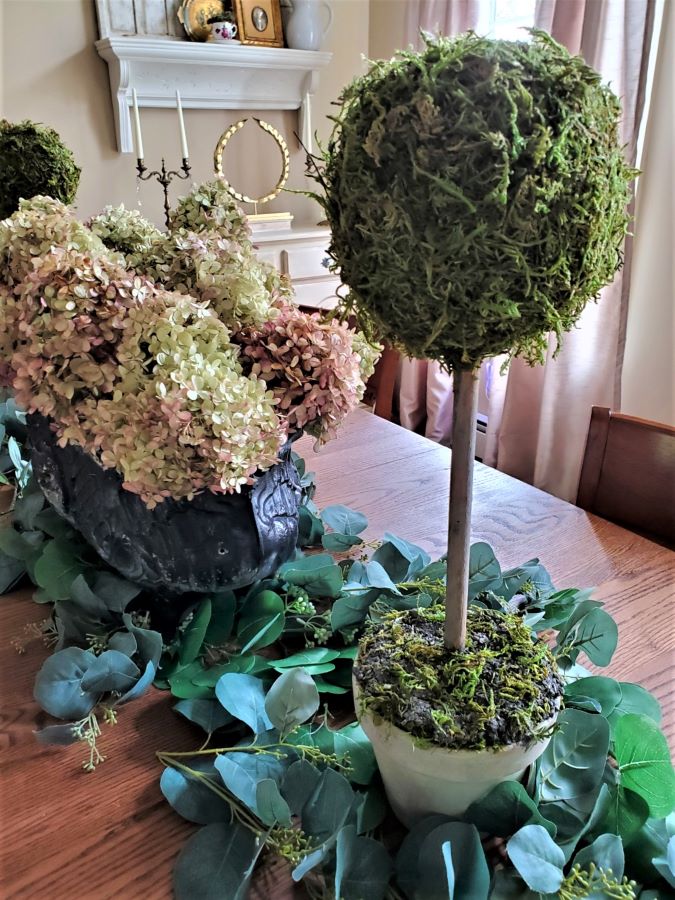
DIY Moss Topiary — Get Started Right Now!
Do you love topiaries? Have you tried growing a topiary tree? Unfortunately, when I tried to grow a real topiary tree. It died. So what’s the next best thing? Purchase topiary forms and reindeer moss for a DIY moss topiary – get started right now! The best part is that I share a step-by-step tutorial that makes these topiaries in flower pots a charming display. Plus, at the bottom of this blog post, I share a DIY card you can take to the craft store or Dollar Tree.
Jump to Printable DIY CarTable of Contents
- 1 DIY Moss Topiary — Get Started Right Now!
- 1.1 Craft Supplies: DIY Topiary
- 1.2 Step 1: Prep Flower Pots for Painting
- 1.3 Step 2: Add Texture to Your Clay Pot
- 1.4 Step 3: Create an Aged Look with Easy Paint Techniques
- 1.5 Step 4: Covering with Moss After Applying Spray Adhesive
- 1.6 Step 5: Add Easy Fake Dirt to the Topiary
- 1.7 Secure your topiary form to the bottom of the pot.
- 1.8 Topiaries for a Centerpiece – Great and Charming Display Ideas
- 1.9 Charming Ways to Style Topiaries for Special Events
- 1.10 Can these topiaries go outside?
- 1.11 How do you attach a moss ball to the stem of a topiary?
- 1.12 Create Your Stunning DIY Topiary
- 2 Pin This to Remember How to Make a Topiary!
- 3 POSTS OF INTEREST!
- 4 DIY Moss Topiary — Get Started Right Now!
- 4.1 Craft Supplies: DIY Topiary
- 4.2
- 4.3 Step 1: Prep Flower Pots for Painting
- 4.4
- 4.5
- 4.6
- 4.7
- 4.8 Step 2: Add Texture to Your Clay Pot
- 4.9
- 4.10
- 4.11 Step 3: Create an Aged Look with Easy Paint Techniques
- 4.12
- 4.13
- 4.14
- 4.15 Step 4: Covering with Moss After Applying Spray Adhesive
- 4.16
- 4.17
- 4.18
- 4.19
- 4.20 Step 5: Add Easy Fake Dirt to the Topiary
- 4.21
- 4.22
- 4.23
- 5 DIY Moss Topiary — Get Started Right Now!
- 5.1 Craft Supplies: DIY Topiary
- 5.2
- 5.3 Step 1: Prep Flower Pots for Painting
- 5.4
- 5.5
- 5.6
- 5.7
- 5.8 Step 2: Add Texture to Your Clay Pot
- 5.9
- 5.10
- 5.11 Step 3: Create an Aged Look with Easy Paint Techniques
- 5.12
- 5.13
- 5.14
- 5.15 Step 4: Covering with Moss After Applying Spray Adhesive
- 5.16
- 5.17
- 5.18
- 5.19
- 5.20 Step 5: Add Easy Fake Dirt to the Topiary
- 5.21
- 5.22
- 5.23
- 6 DIY Moss Topiary — Get Started Right Now!
- 7 DIY Moss Topiary — Get Started Right Now!
- 7.1 Craft Supplies: DIY Topiary
- 7.2
- 7.3 Step 1: Prep Flower Pots for Painting
- 7.4
- 7.5
- 7.6
- 7.7
- 7.8 Step 2: Add Texture to Your Clay Pot
- 7.9
- 7.10
- 7.11 Step 3: Create an Aged Look with Easy Paint Techniques
- 7.12
- 7.13
- 7.14
- 7.15 Step 4: Covering with Moss After Applying Spray Adhesive
- 7.16
- 7.17
- 7.18
- 7.19
- 7.20 Step 5: Add Easy Fake Dirt to the Topiary
- 7.21
- 7.22
- 7.23
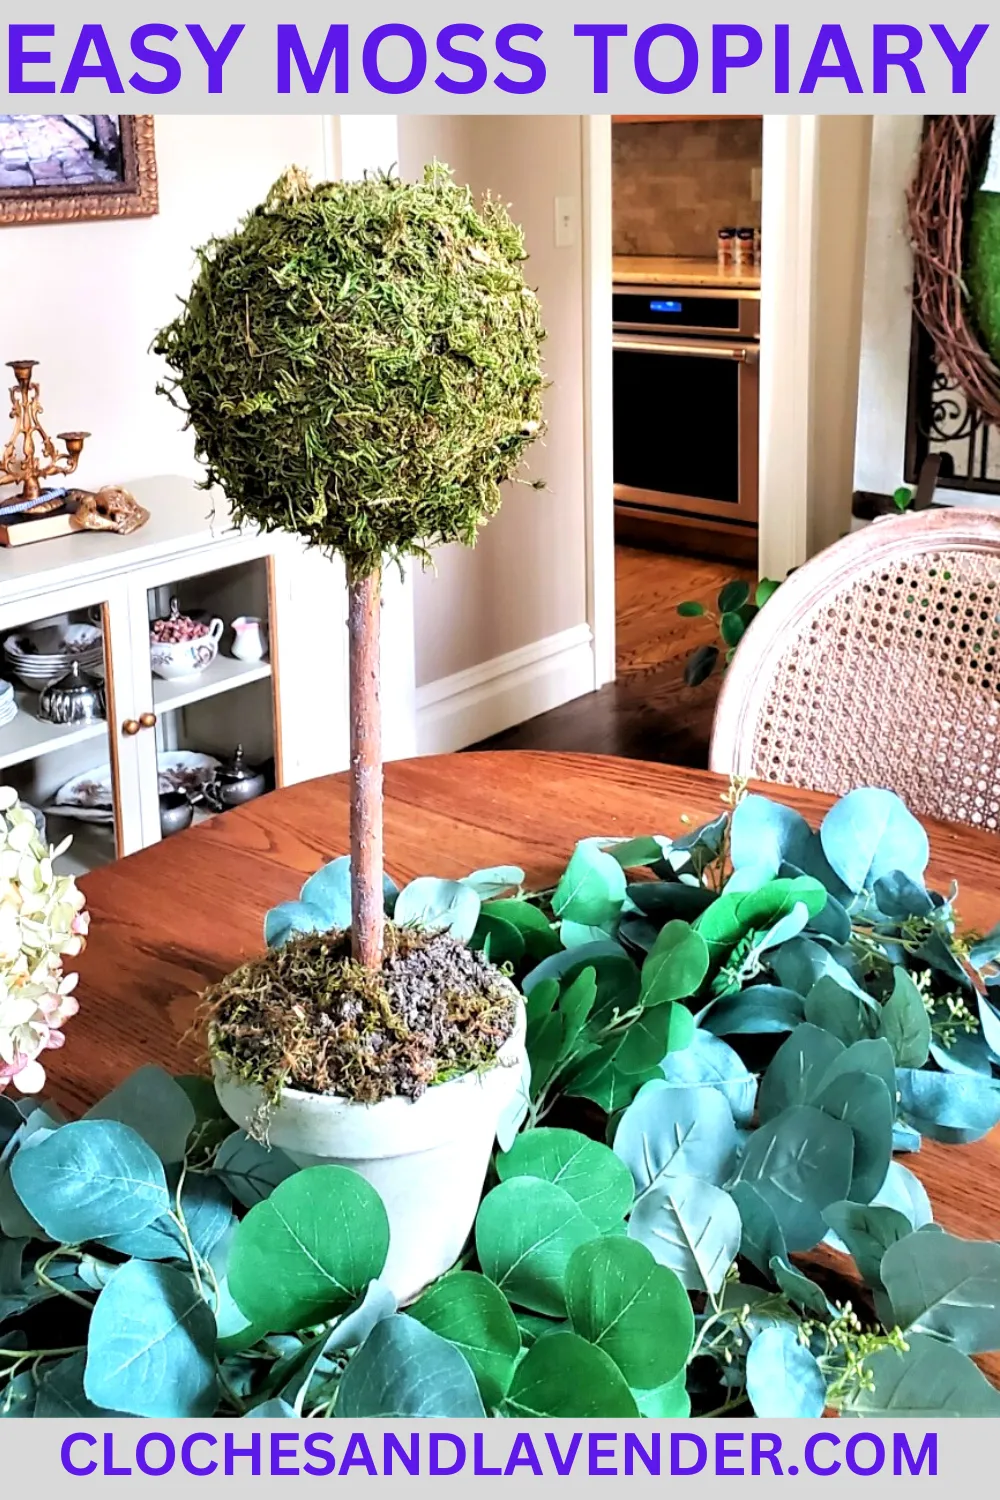
DIY Moss Topiary — Get Started Right Now!
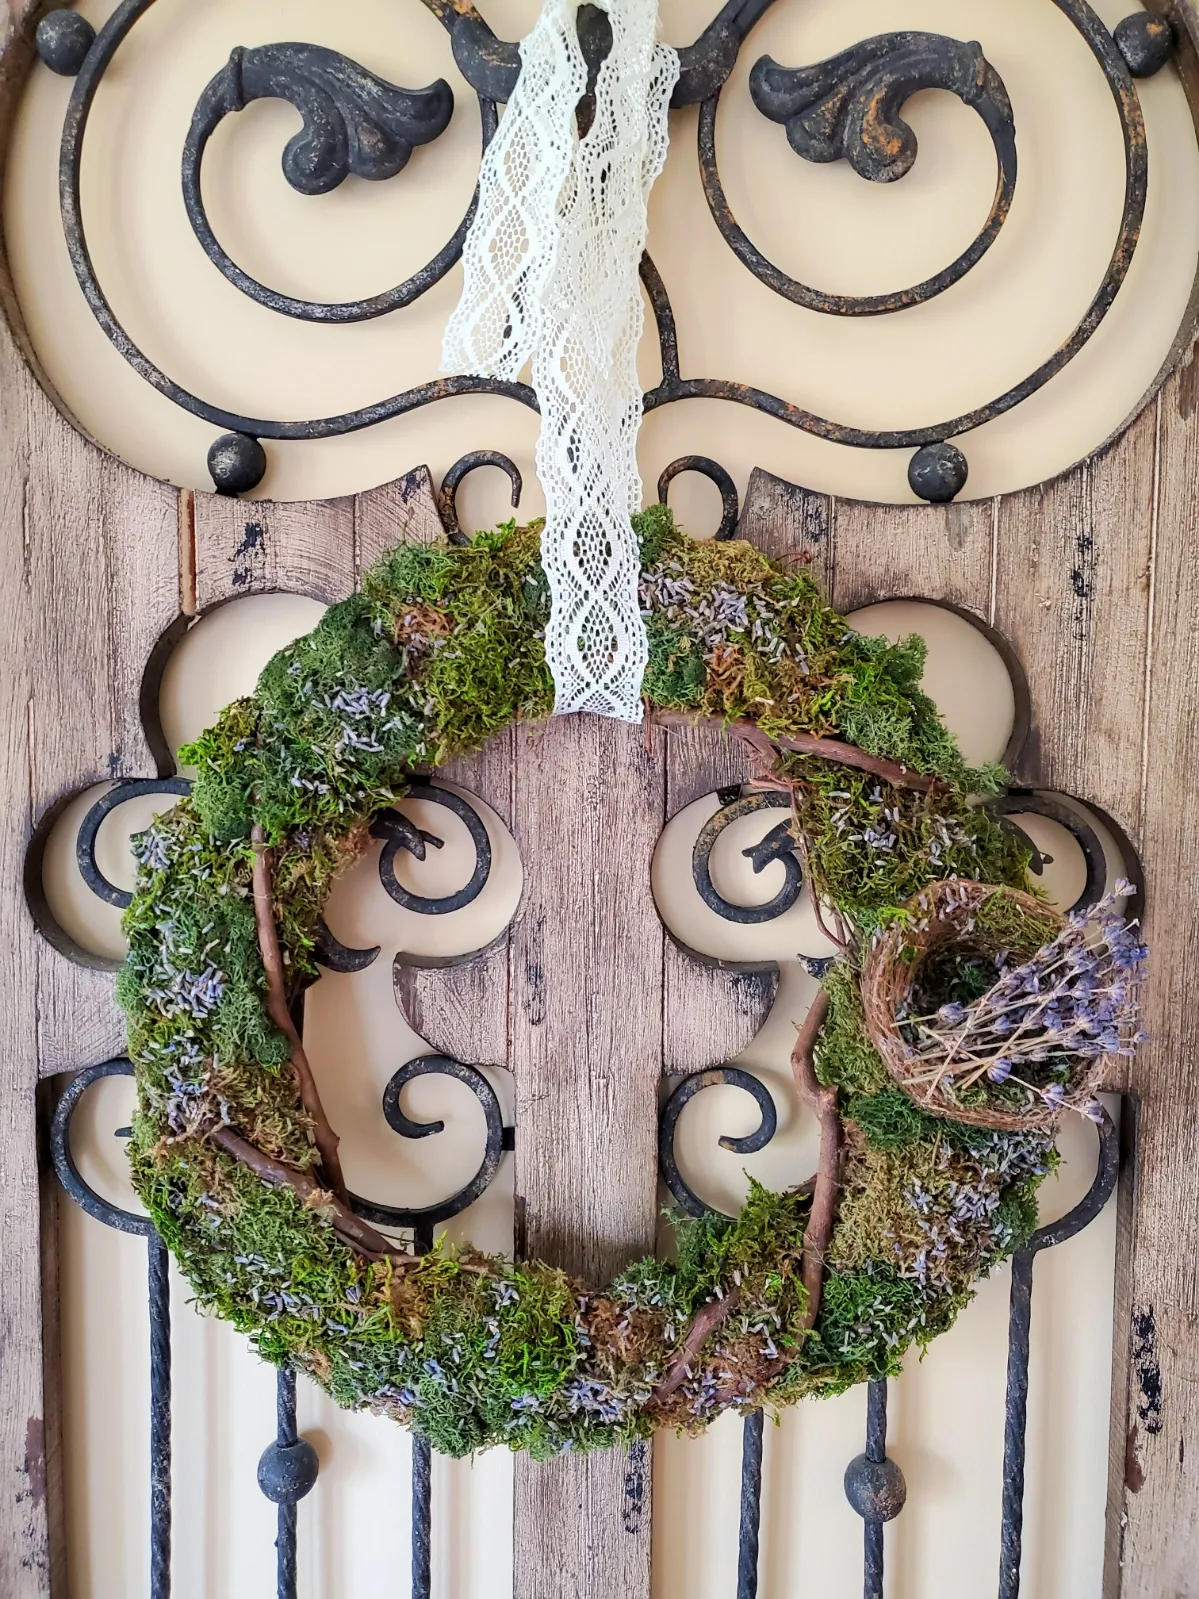
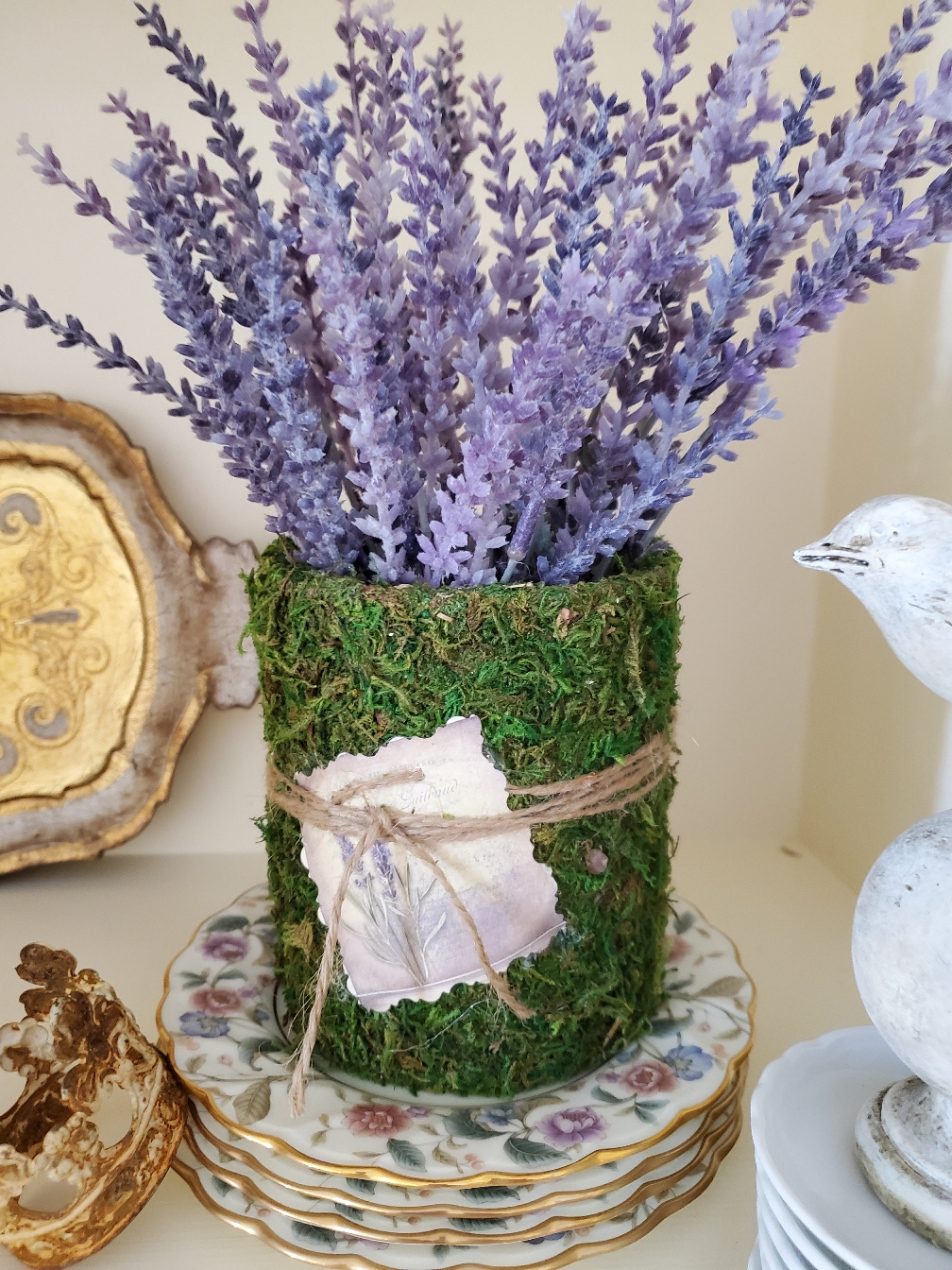
Here at Cloches & Lavender, I enjoy adding natural materials to our home. Visit my DIY & crafts section or any home tour, and you will see pieces with an aged look throughout our home. Natural materials and elements add texture and make a perfect addition to any decor and design style. These are a great way to add pieces to your home that are practically free!
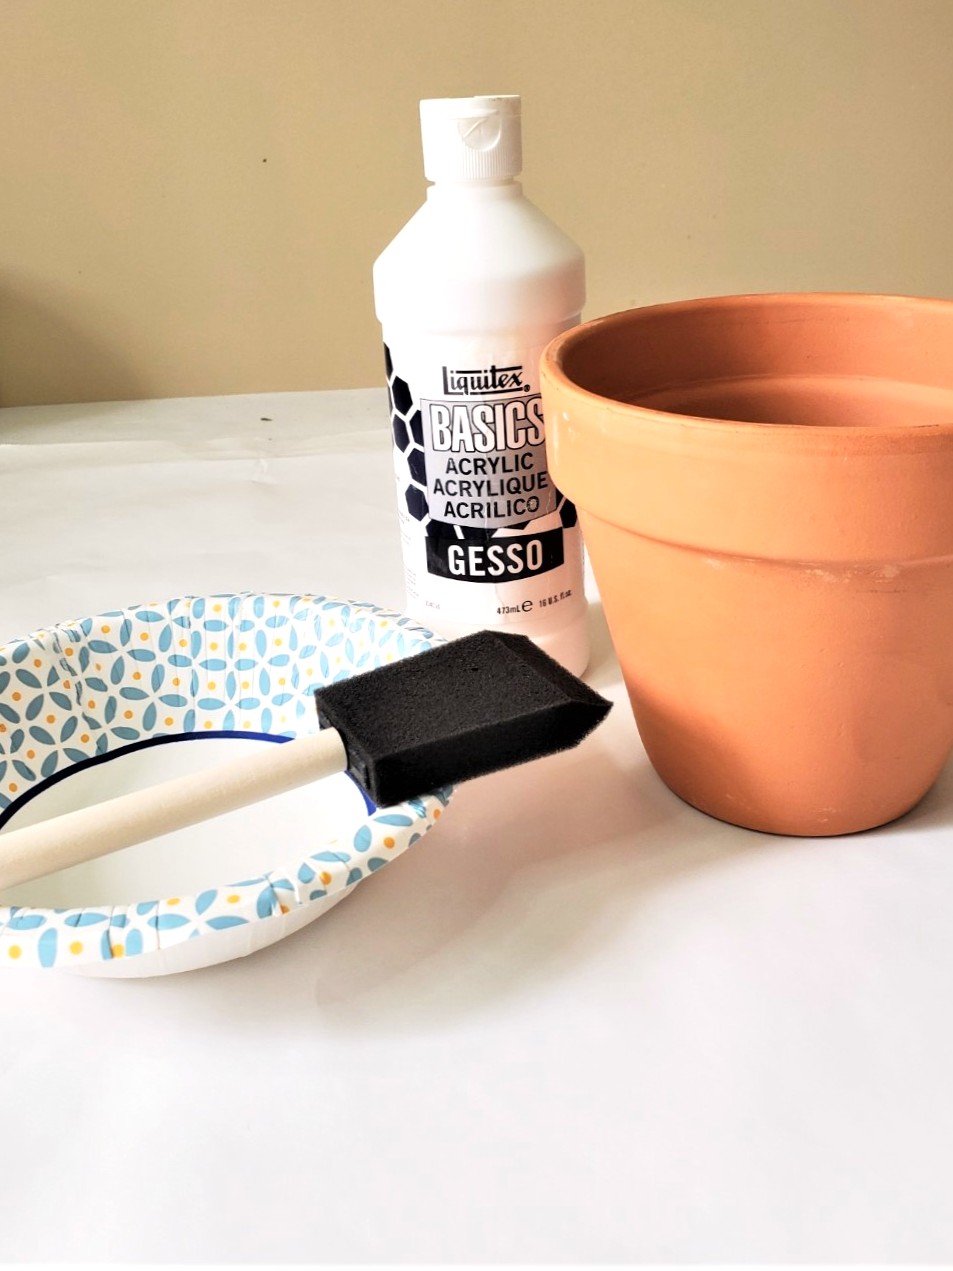
Craft Supplies: DIY Topiary
- Topiary forms, a large foam ball, a large moss ball, or a wire frame
- Wooden dowel or sticks from the yard
- Spray adhesive or hot glue gun – HERE
- Rubber finger protectors (if you use hot glue)
- Reindeer moss or lumpy moss mat with a brown back
- Bag or newspaper
- White acrylic paint or gesso
- 6″³ clay pot
- Avocado acrylic paint
- Brown umber acrylic paint
- Foam brush
- Flat paint brush
- Paper towel or rag
As an Amazon Associate and through other affiliate links, I earn a small commission from qualifying purchases through affiliate links. The price will be the same whether you use the affiliate links or go directly to the website. All opinions are my own. (Check our full disclosure and privacy policy)
Step 1: Prep Flower Pots for Painting
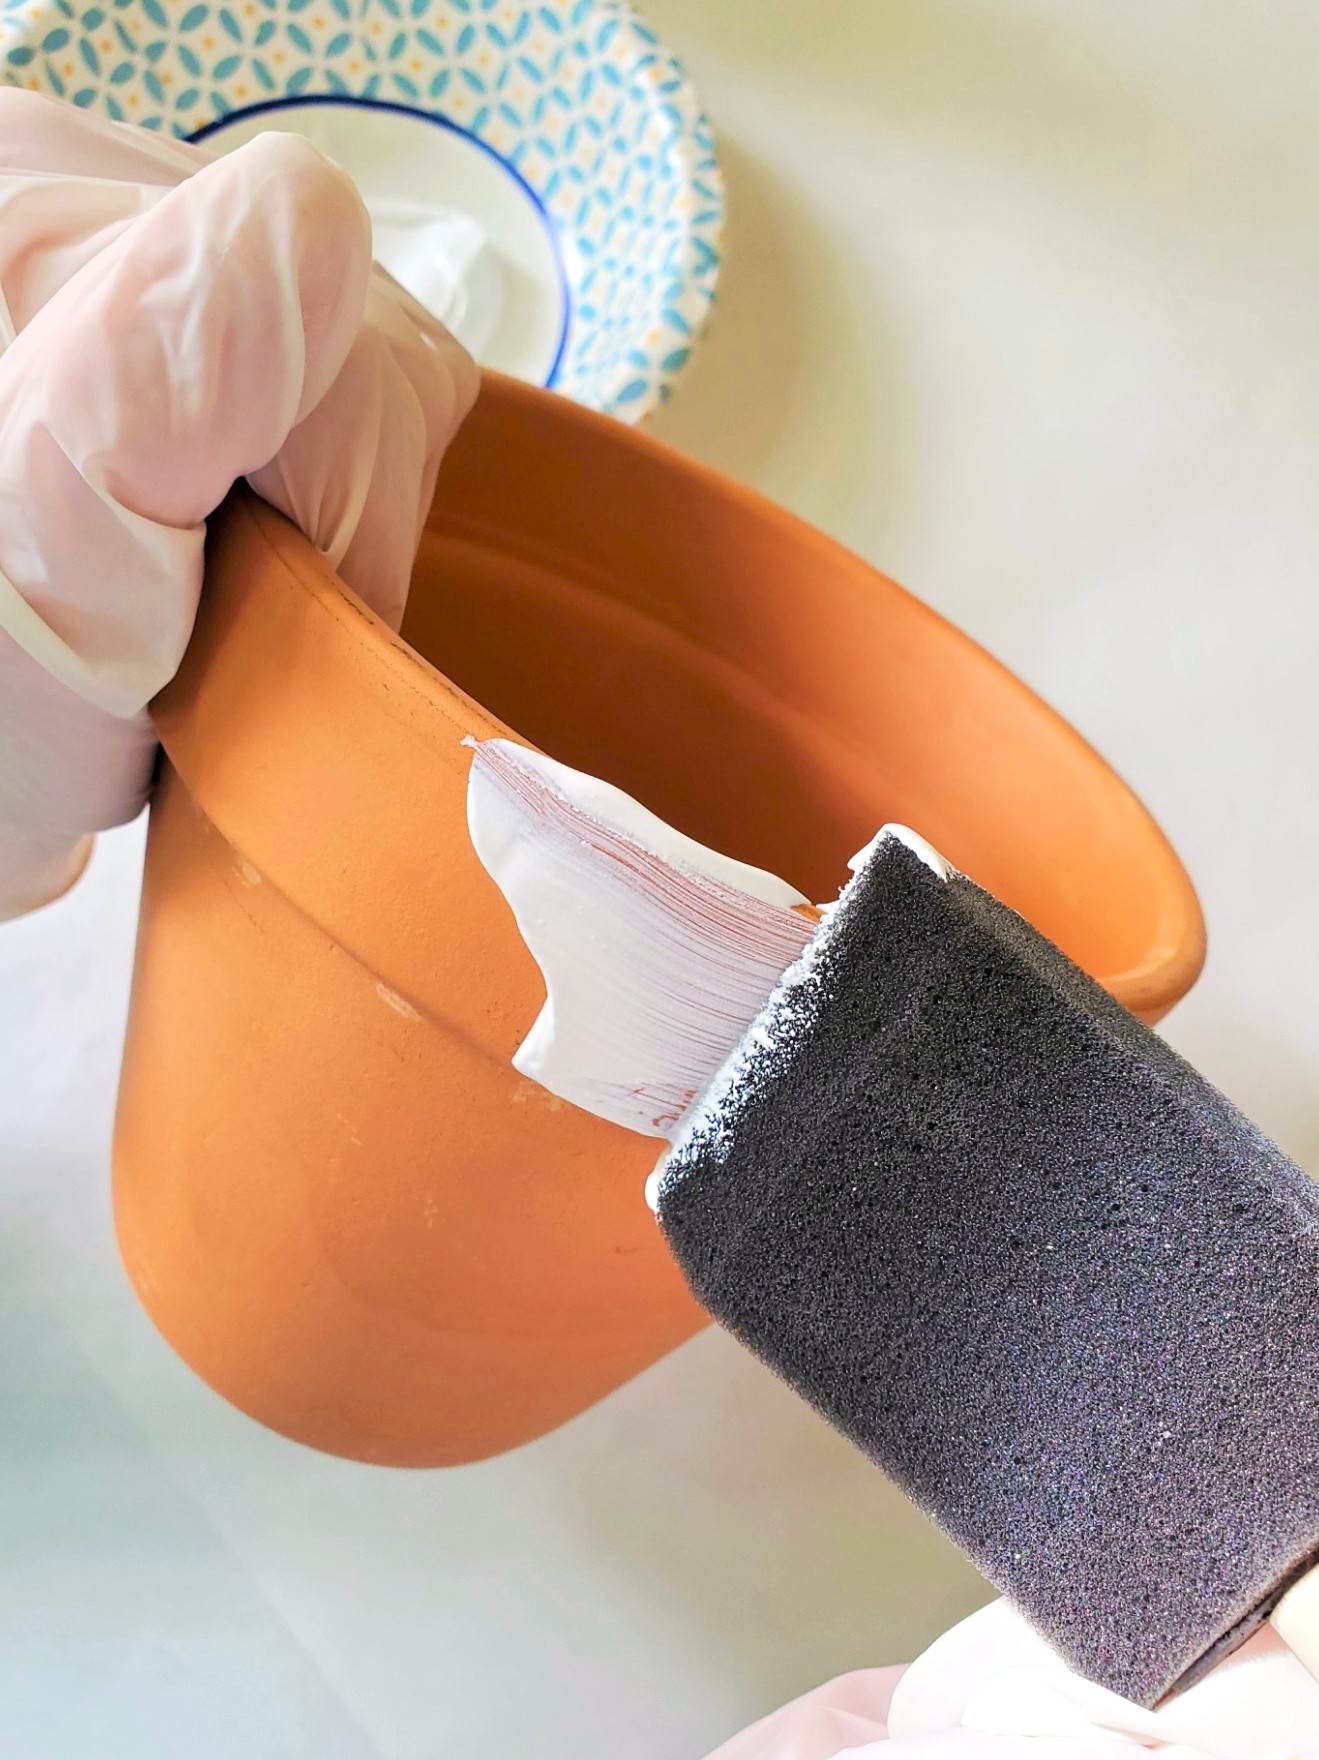
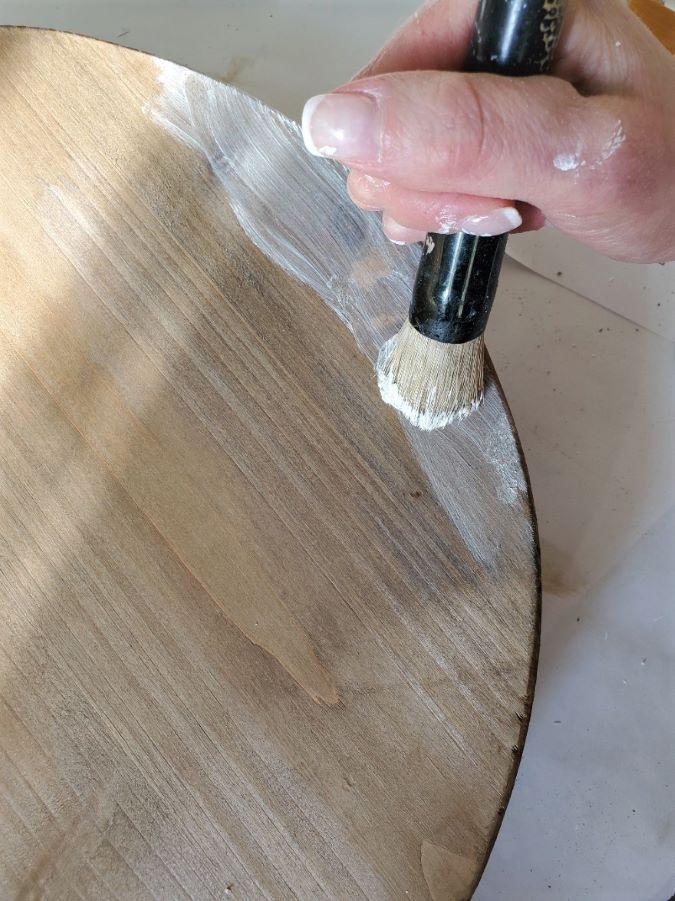
Gather your craft supplies and cover your work surface with paper or plastic. Paint the flower pots with white acrylic paint or gesso, I used gesso for my clay pot.
Cindy’s Crafting Tip: I like using gesso more than craft paint for my flower pots; however, white acrylic paint works. I will share how to add texture and create an aged look to a clay pot. The decorative topiary pot measures 6 inches.
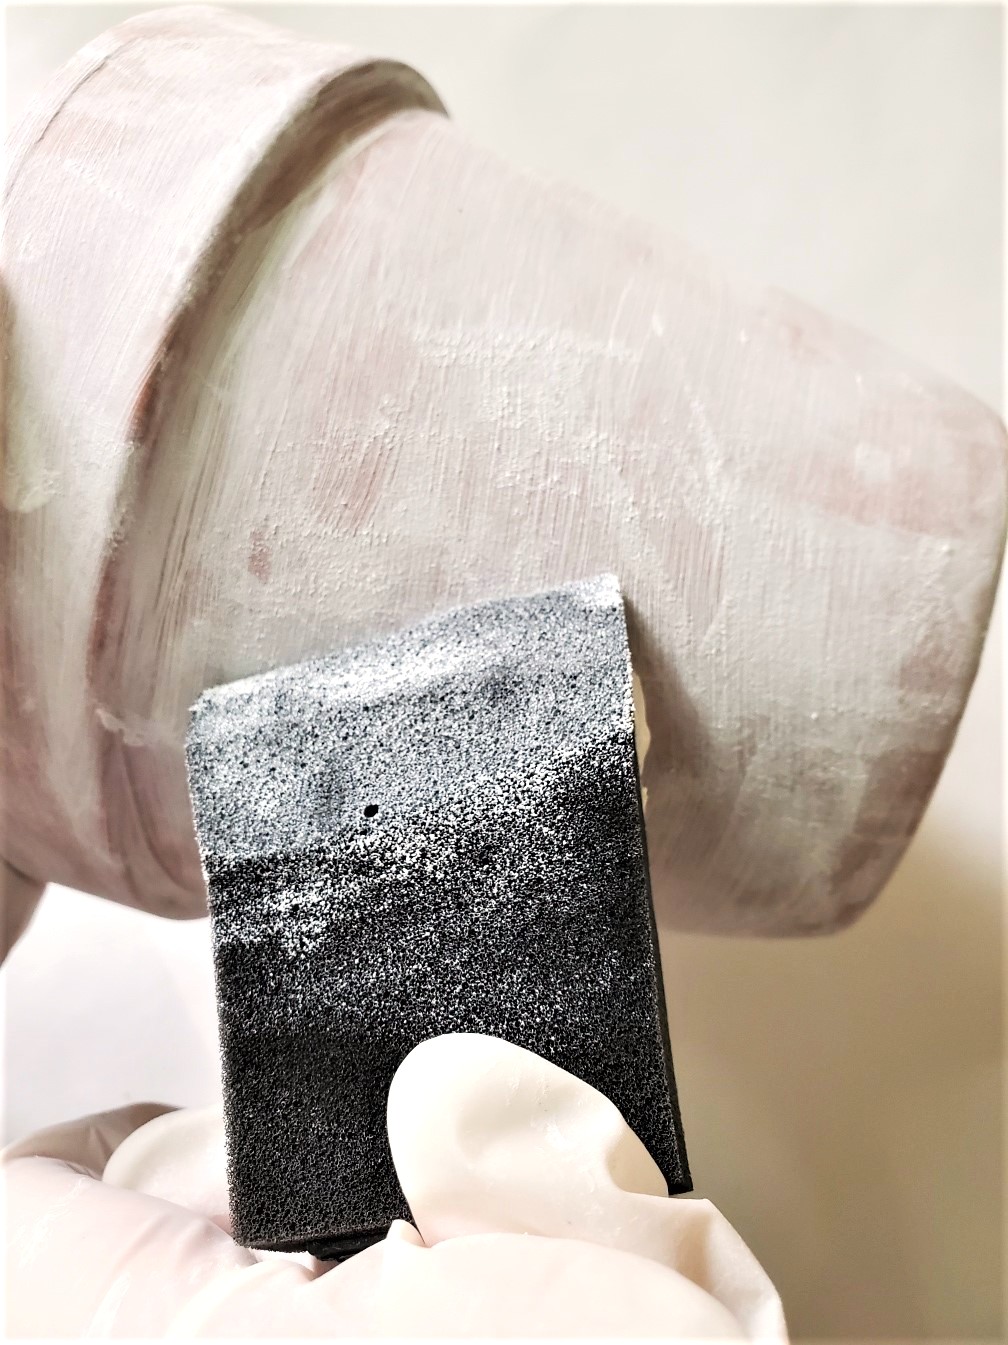
Step 2: Add Texture to Your Clay Pot
Once the gesso dries, I apply another layer using a dry brush technique. This time, I used a foam brush, but if you’re new to this, a cheap brush works well. The dry brush technique adds texture to the flower pots, giving each topiary tree a unique, custom design. Let them dry completely.
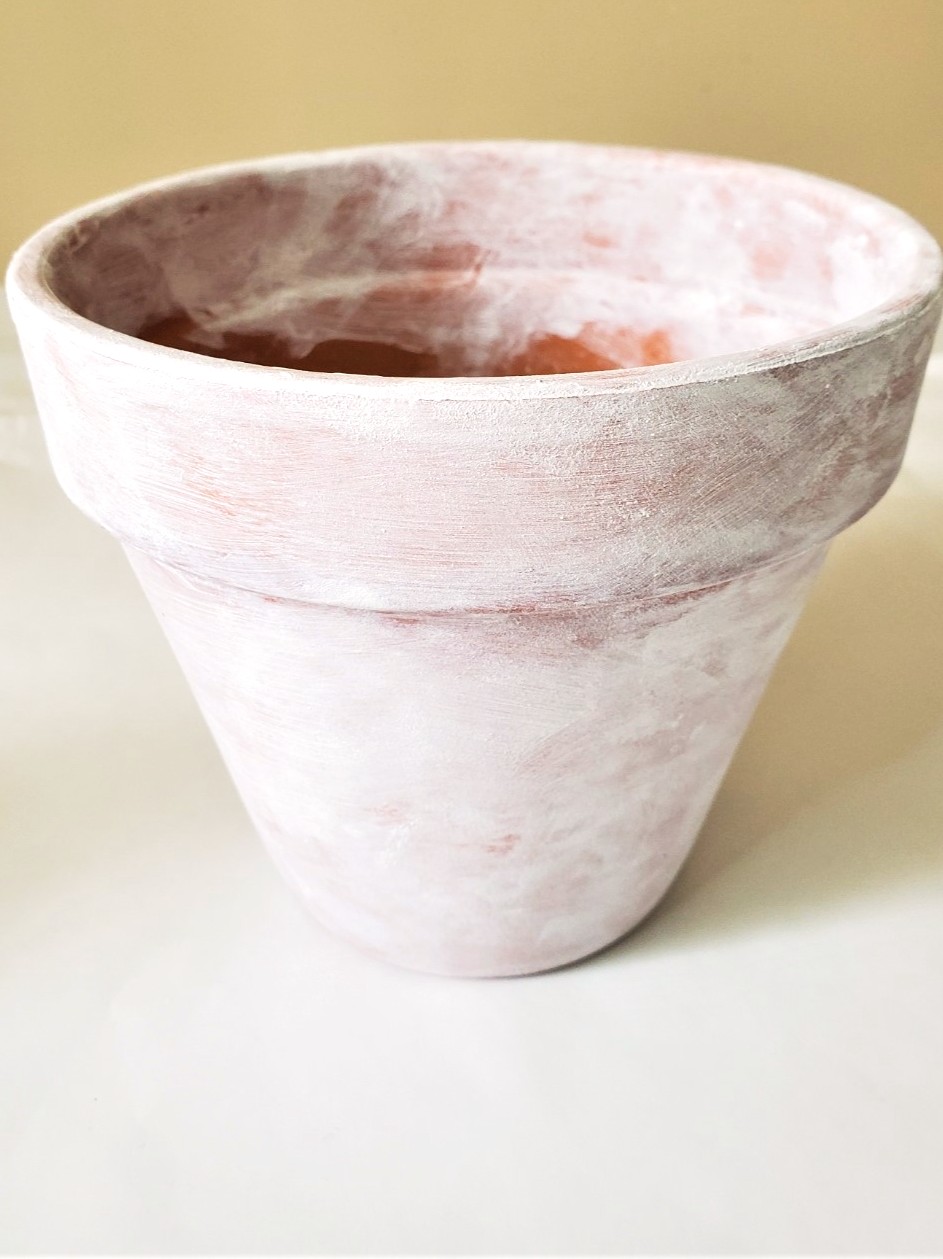
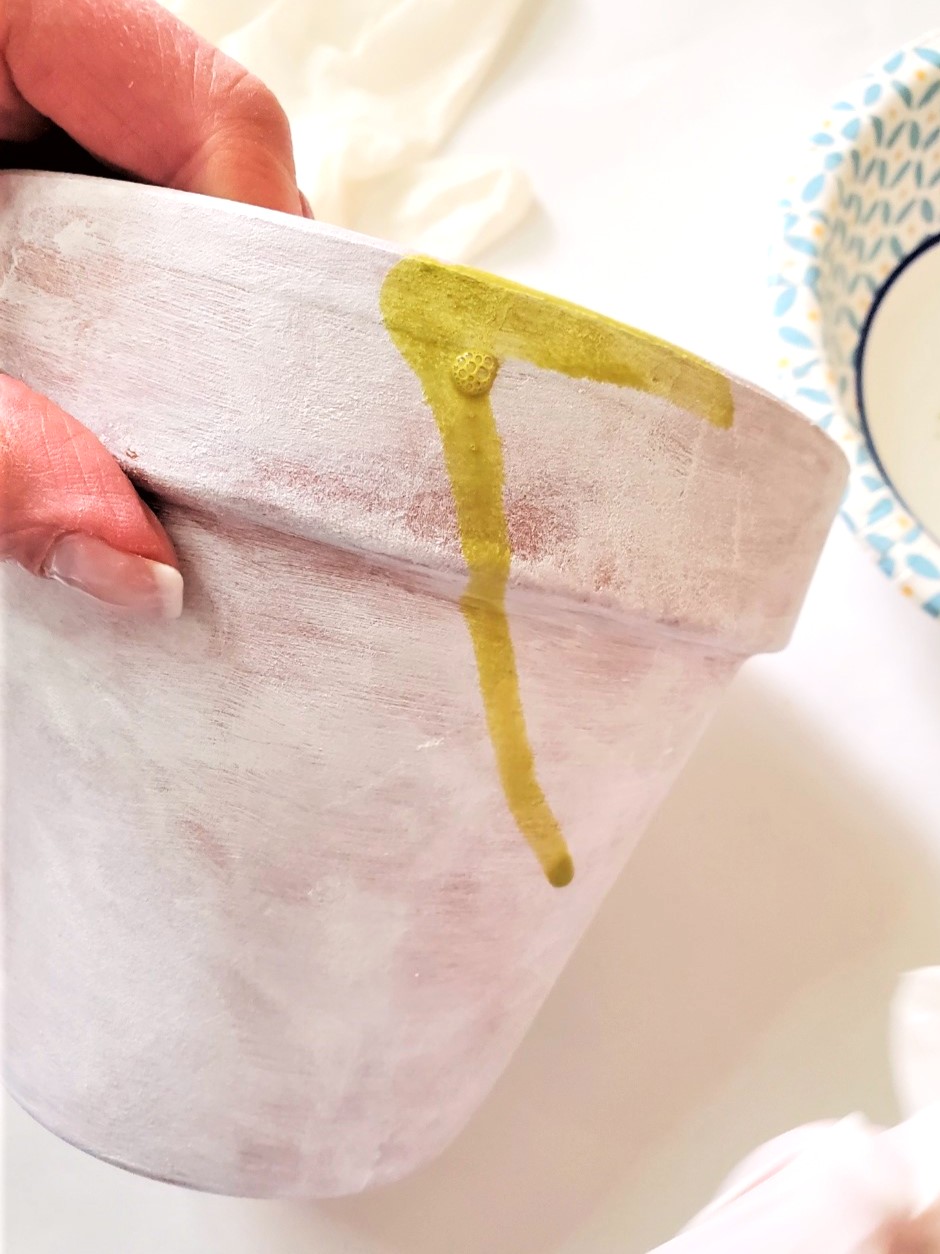
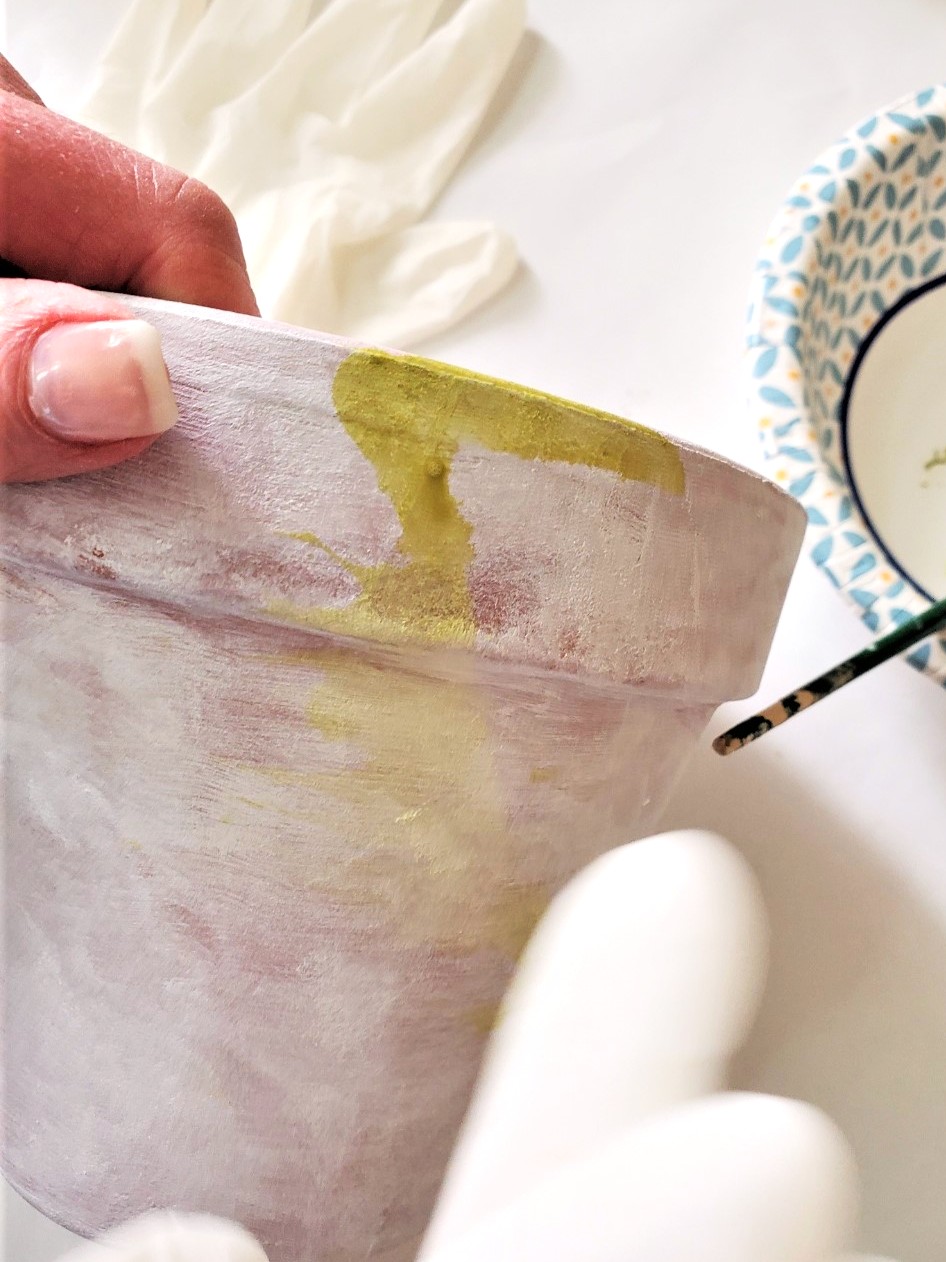
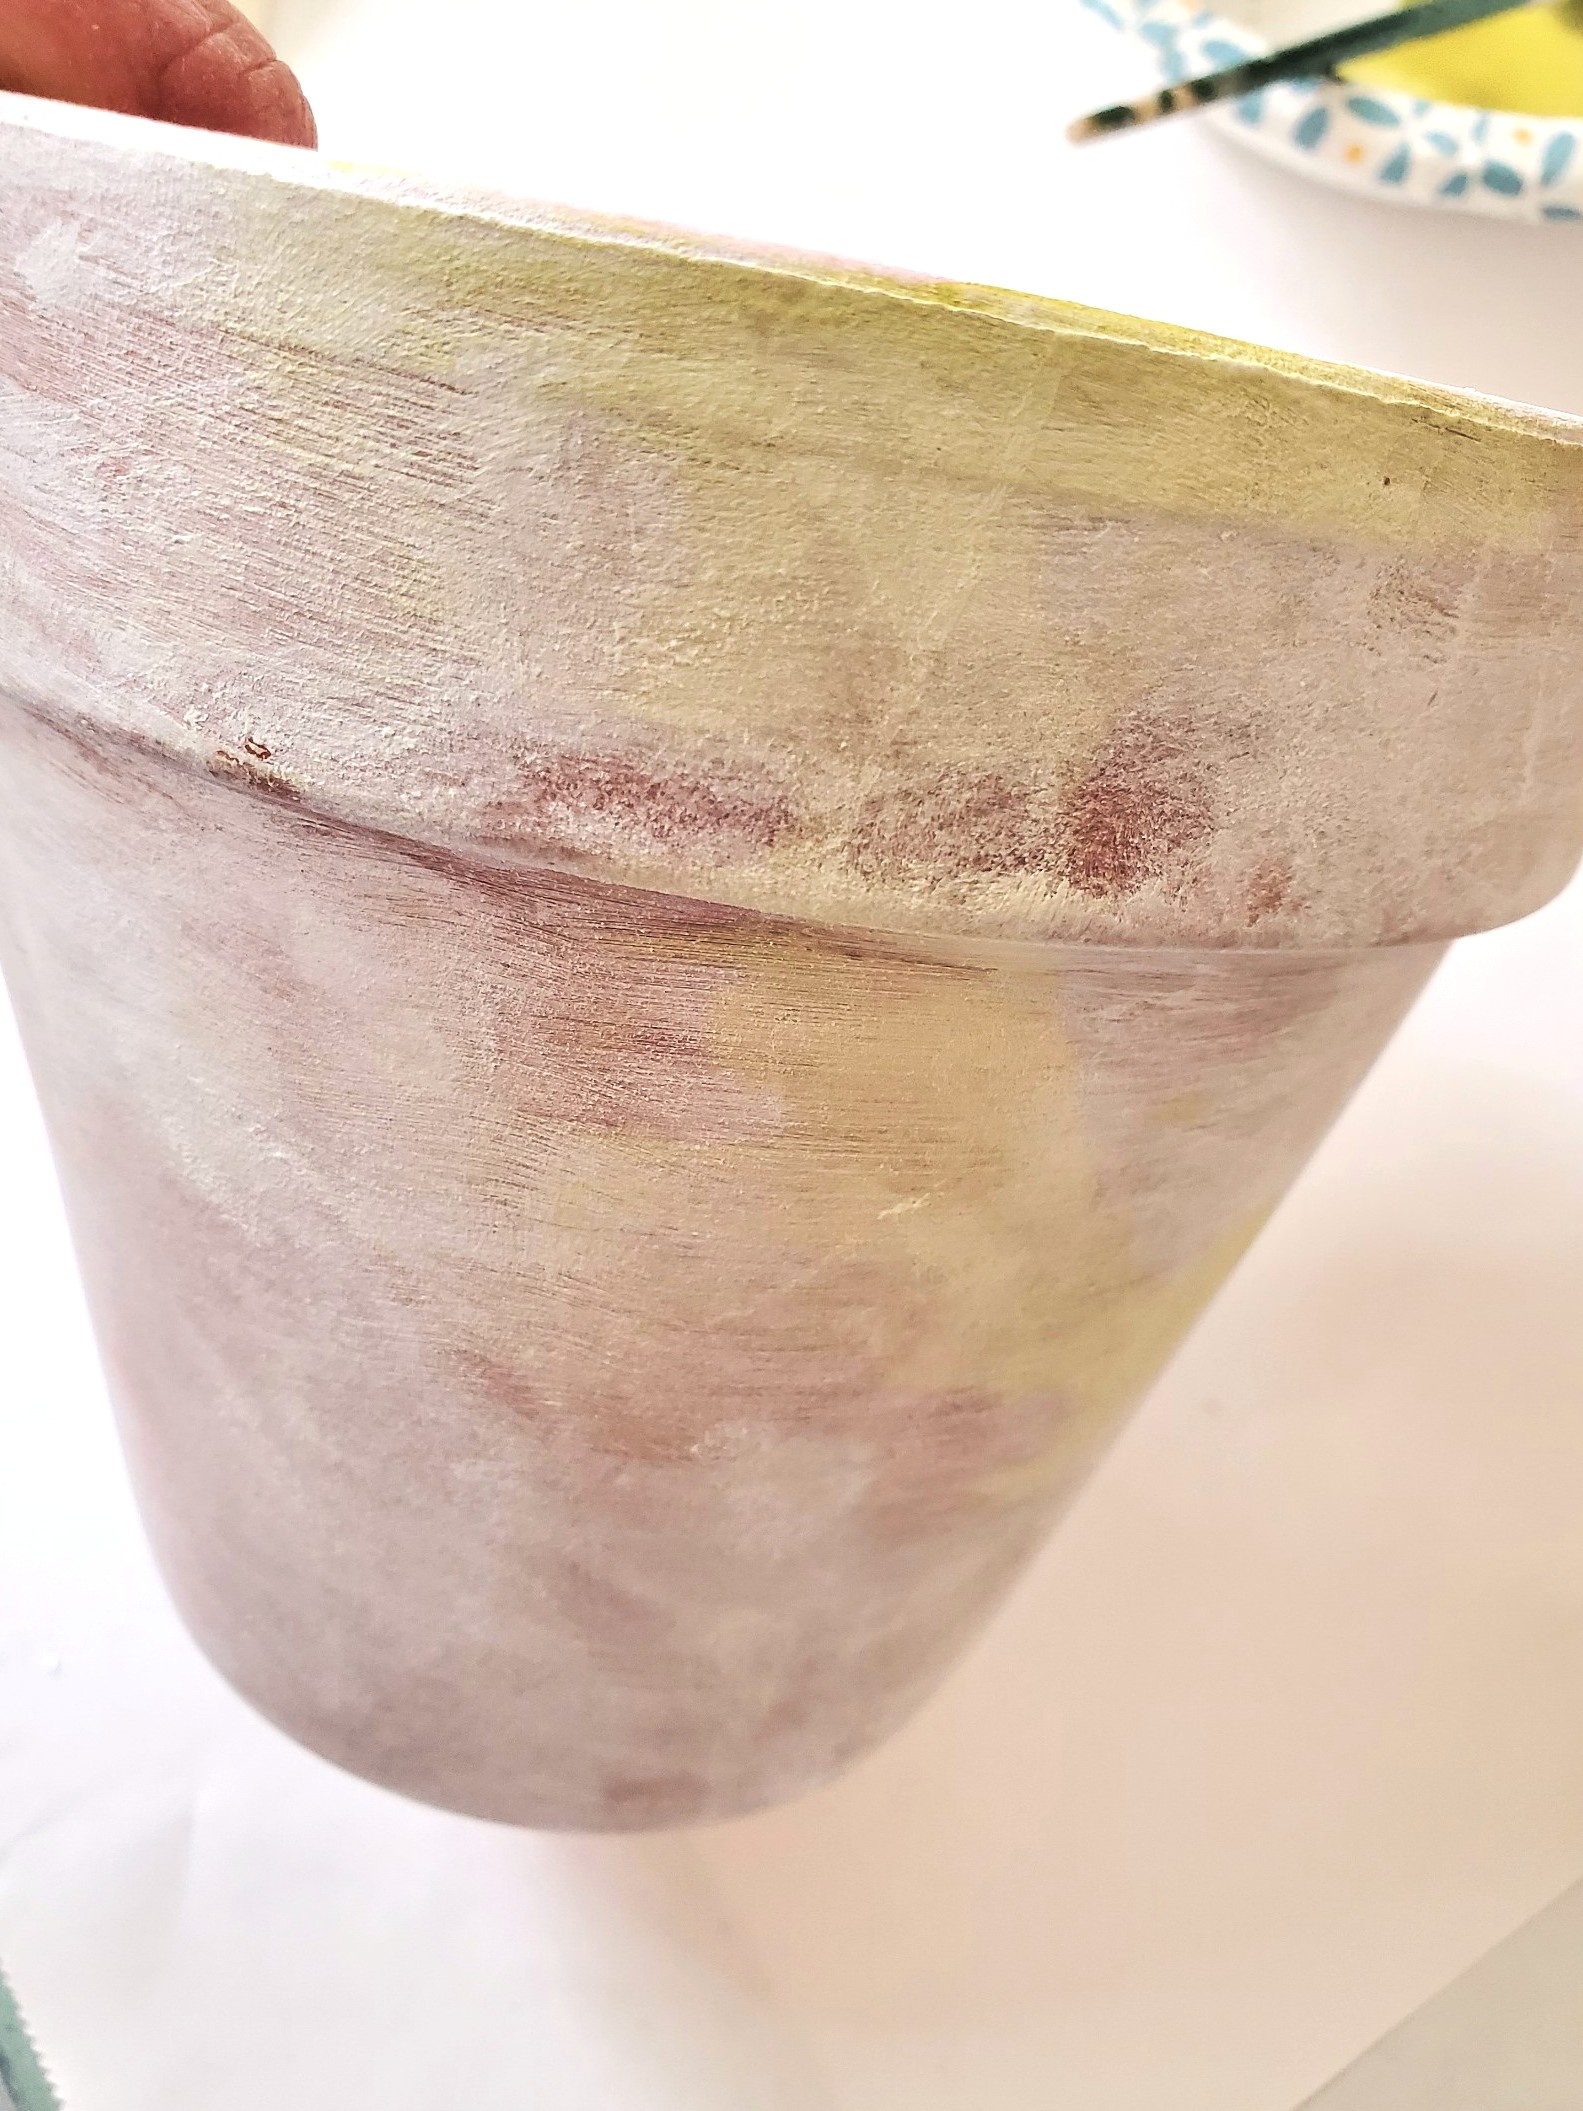
Step 3: Create an Aged Look with Easy Paint Techniques
Mix a bit of water with avocado or moss acrylic paint on a paper plate or bowl. Lightly dip the tip of your paint brush into the paint, then wipe off the excess on a paper towel. Randomly apply the paint to the top of the pot, blending with your finger or a dry paint brush for a natural moss effect. Add a few touches to the body and bottom of the pot as well, letting the paint run slightly before blending with your finger to achieve an aged look.
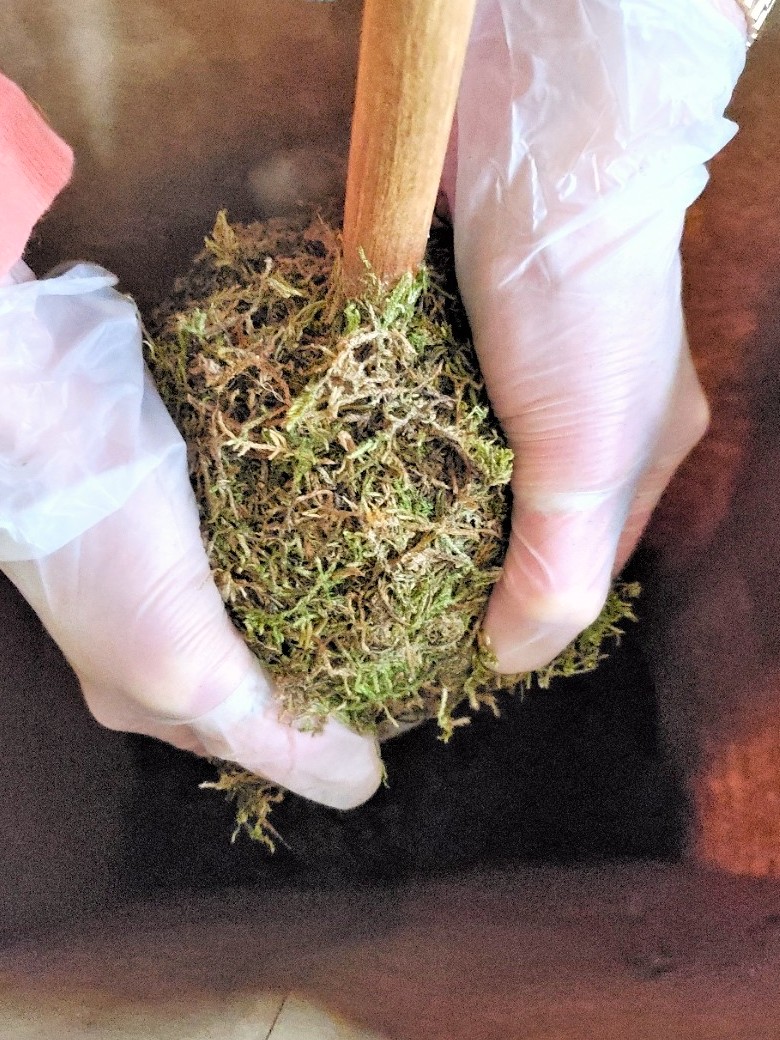
Step 4: Covering with Moss After Applying Spray Adhesive
Begin adding reindeer moss to the top of the topiary forms, this part can get messy! Place the foam ball inside a brown bag, a large plastic bag, or on newspaper to contain the mess. Since I’m using spray adhesive, I recommend doing this step in a well-ventilated area, like an open garage or outside. Spray the foam ball with spray adhesive and let it sit until it gets tacky. Then, press handfuls of reindeer moss onto the surface of the foam ball. If you notice bare spots, lightly spray more adhesive spray and repeat until the topiary forms are covered in moss.
Cindy’s Crafting Tip: I recommend wearing rubber gloves during this step because it’s sticky from the adhesive spray. If you don’t want to add adesive spray, add bits of moss at a time and use your glue gun. Wear silicone finger protectors to avoid burns.

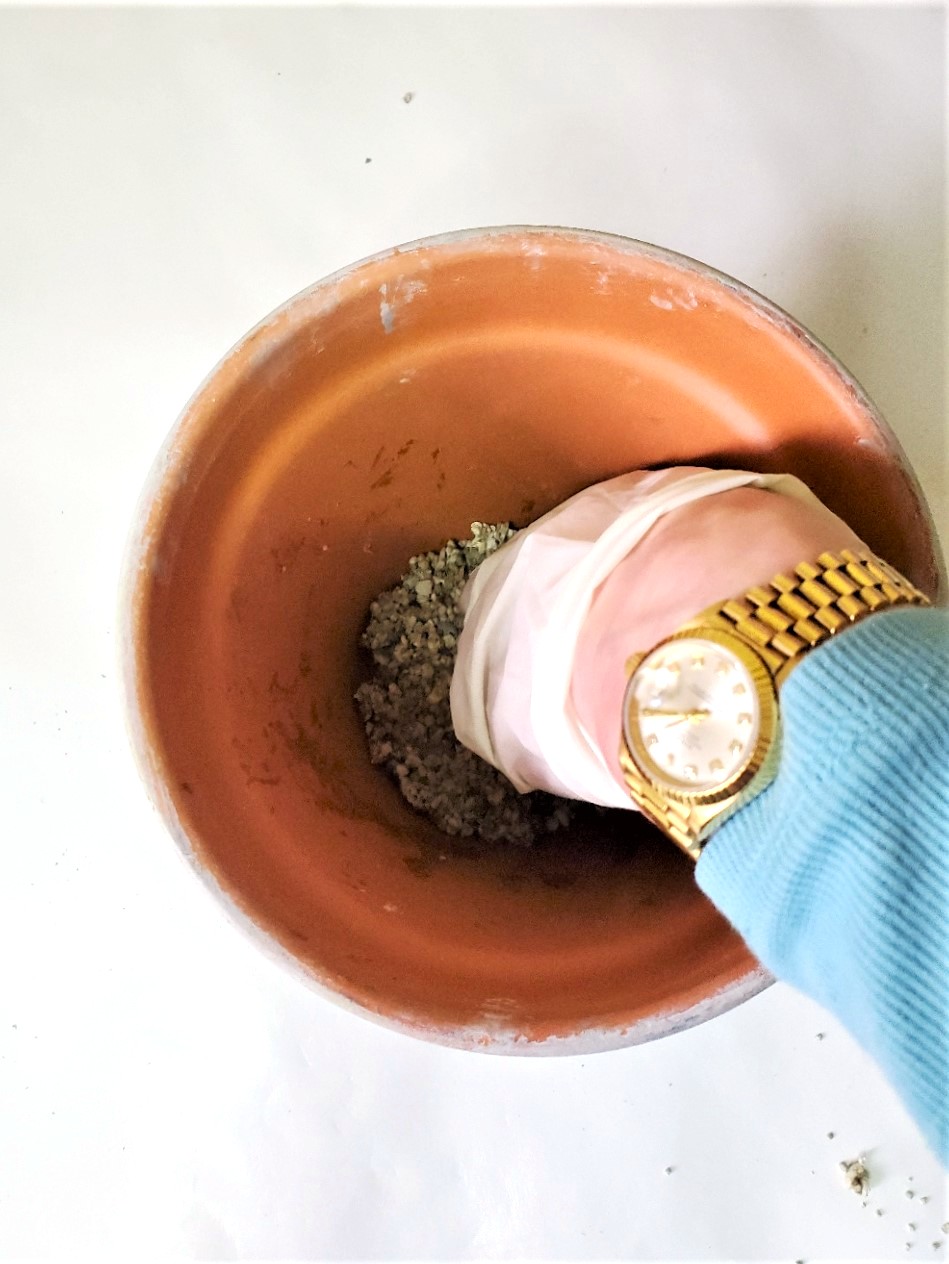
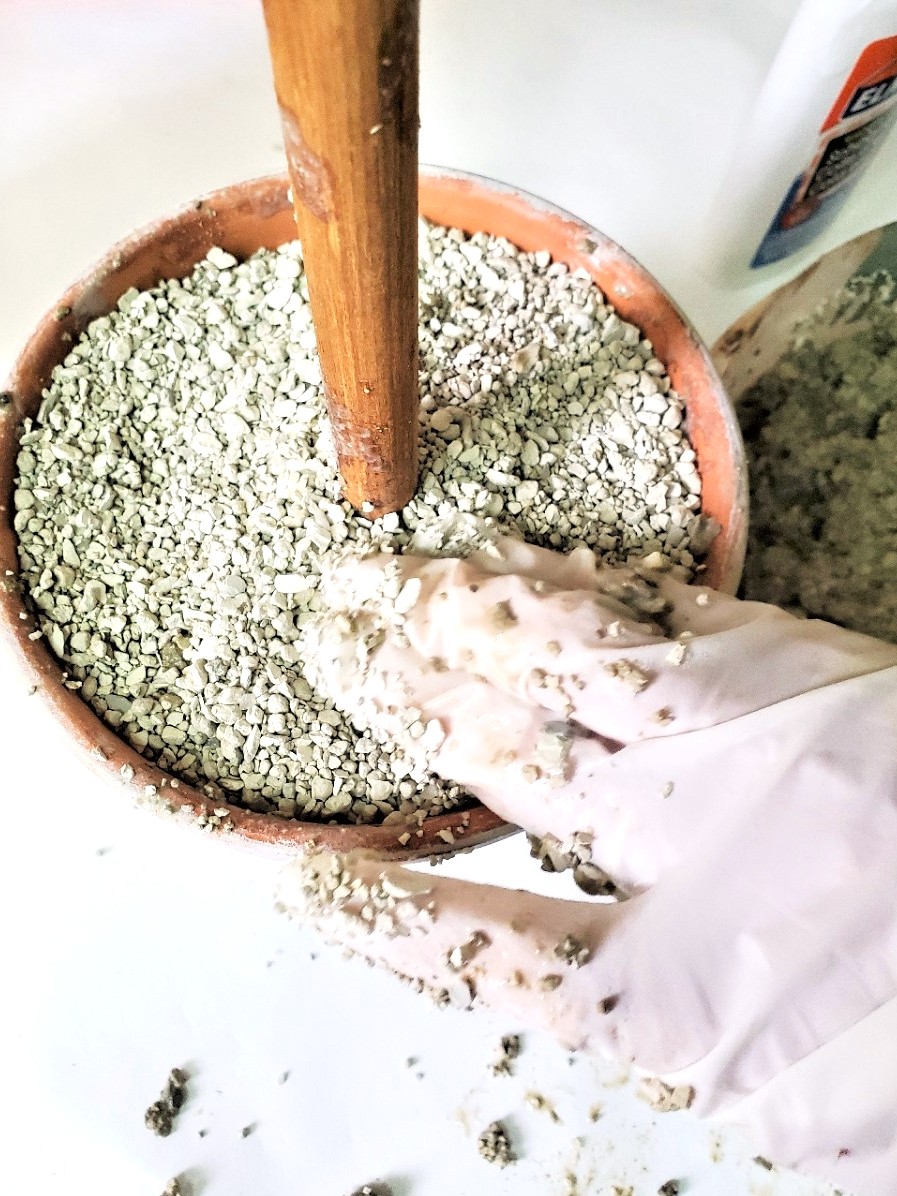
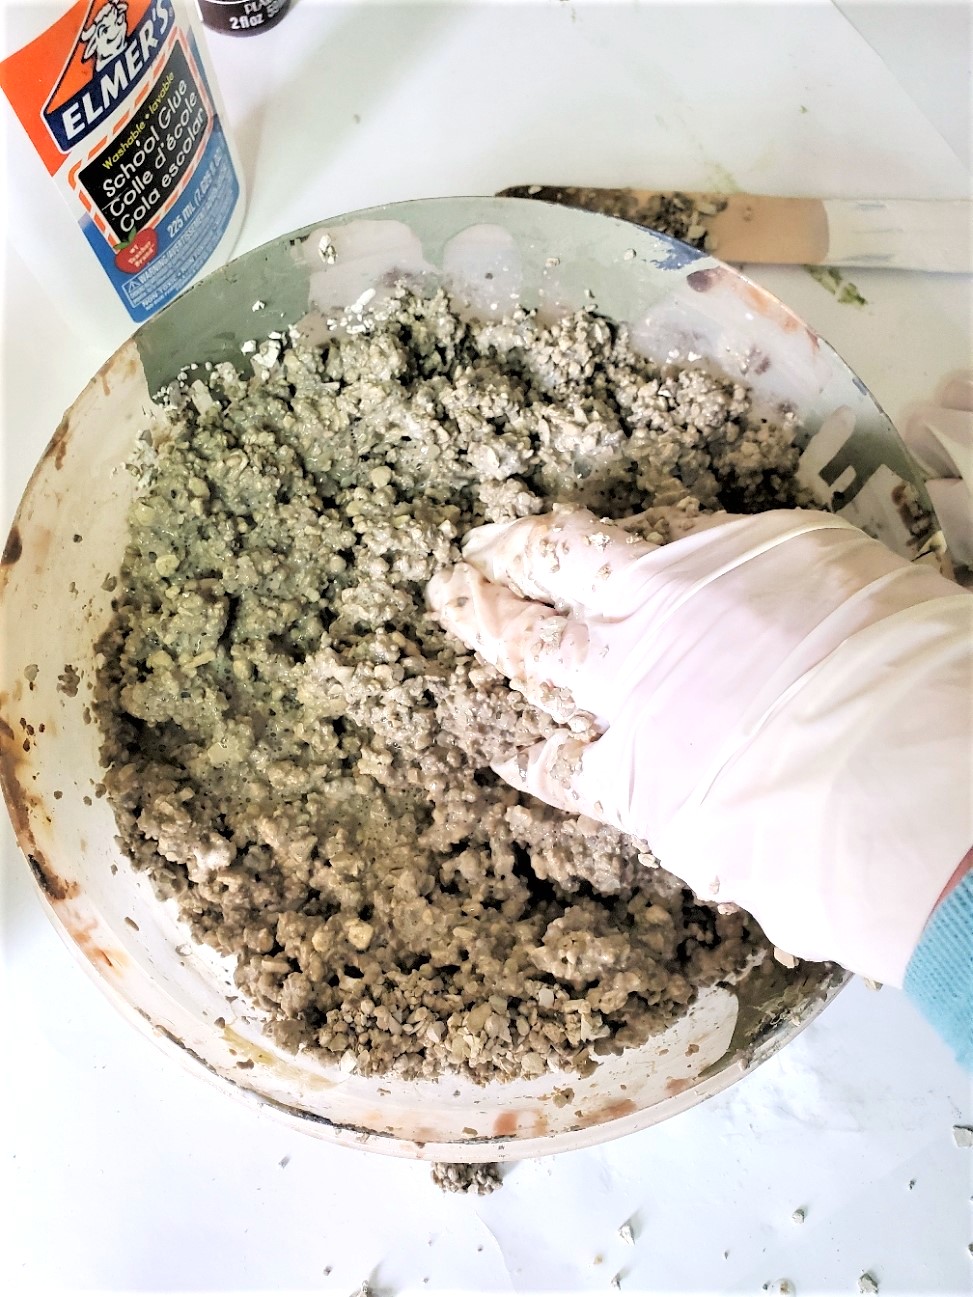
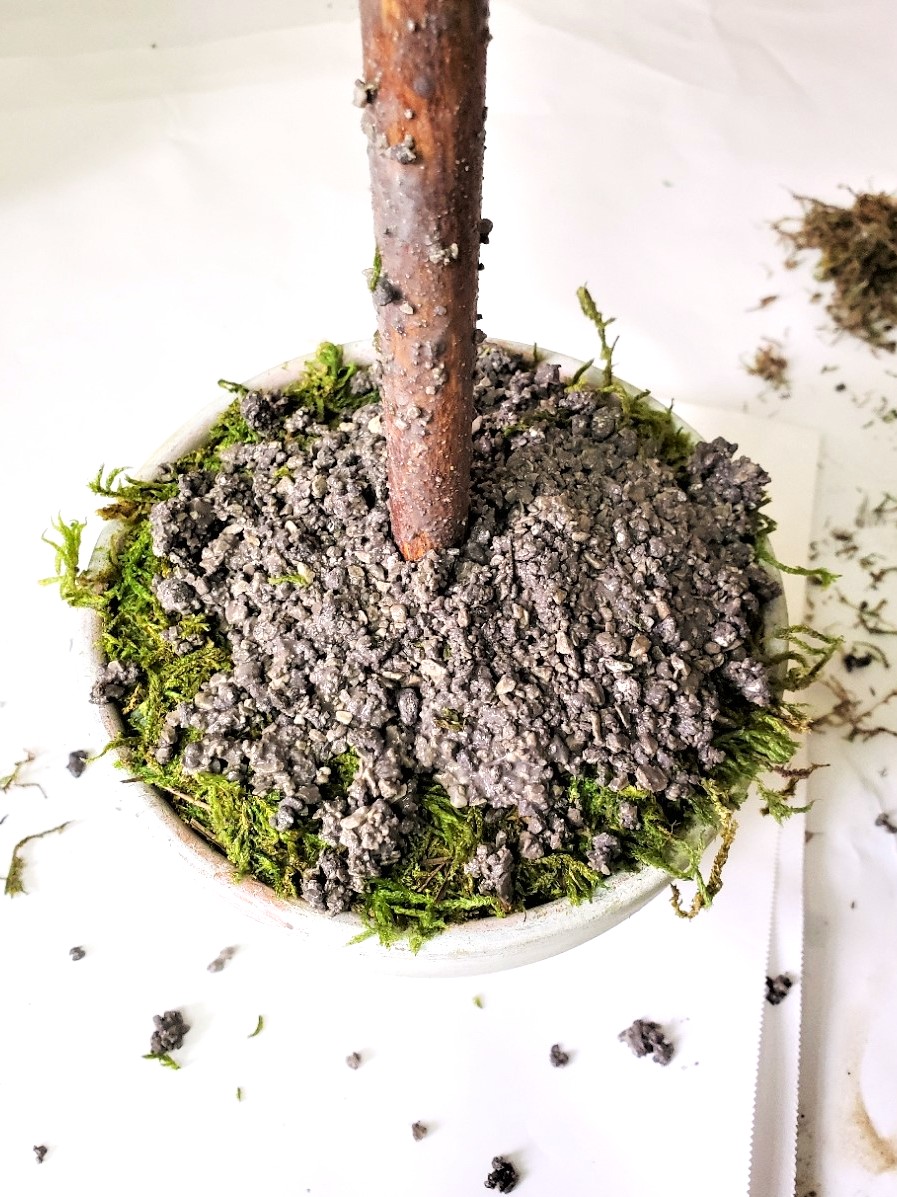
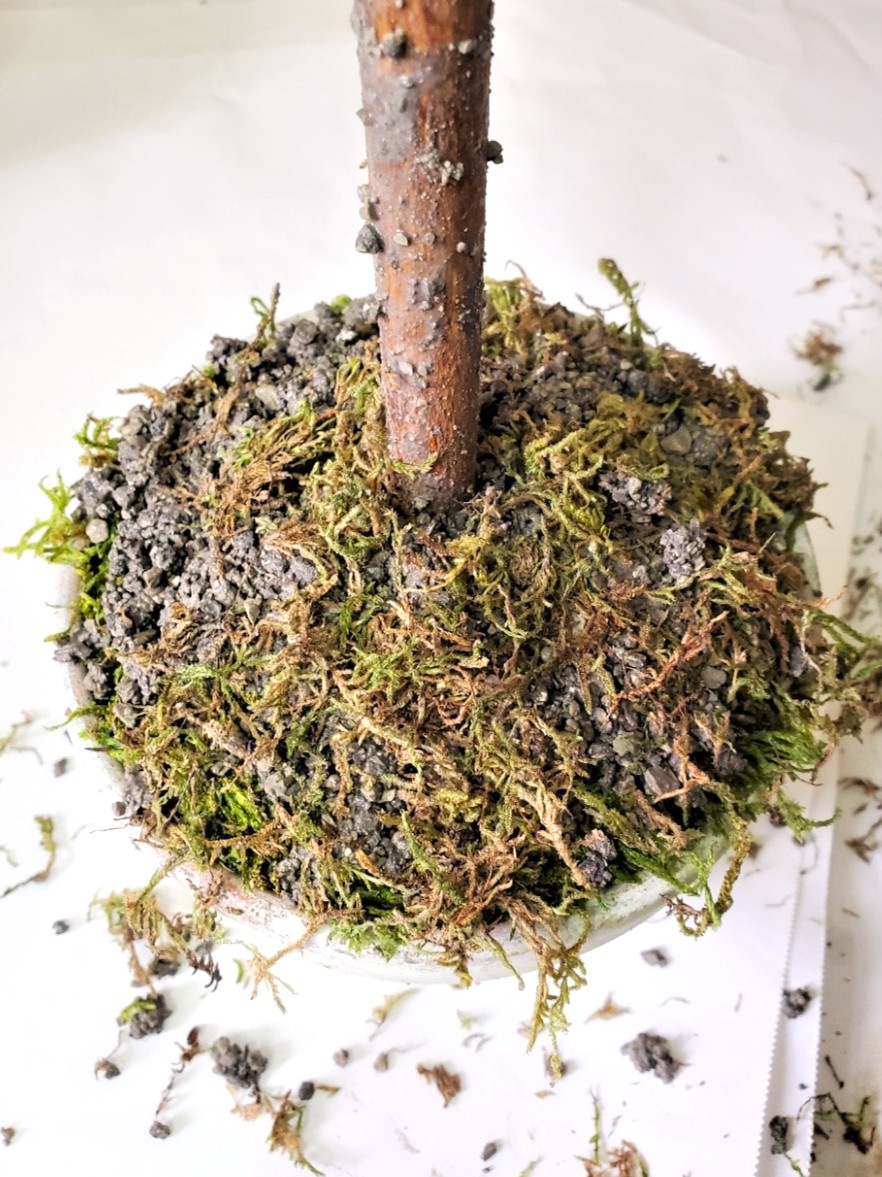
Step 5: Add Easy Fake Dirt to the Topiary
Here, I share how to add fake dirt to artificial plants or a small artificial tree. This is a perfect addition to your topiary tree, and it takes minutes to make! First, for stability, I added non-clumping kitty litter to the bottom of the pot. I also add glue with moss once the dirt is dry. See my note if adding your topiary tree directly into a clay pot.
Cindy’s Crafting Note: I added a bit of the fake dirt to the stem of the topiary to add detail. This optional.

Secure your topiary form to the bottom of the pot.
“‹To secure a topiary form to the bottom of the pot, follow these easy steps:
- Add a stable base: Fill the bottom of the pot with floral foam or small rocks for weight and stability.
- Insert the topiary stem: Push the stem of your topiary forms into foam or fake dirt before it sets. If using rocks, wedge the stem tightly between them.
- Reinforce with glue: For extra security, add hot glue around the base of the stem where it meets the foam or inside the pot.
- Cover the top of the pot with Spanish moss or decorative fillers: Once the topiary is secure, add Spanish moss and pebbles to the top of the pot.
Now that your topiary form is secure, you can personalize your unique topiary pot with decorative fillers and moss to create a custom design that perfectly complements your space.
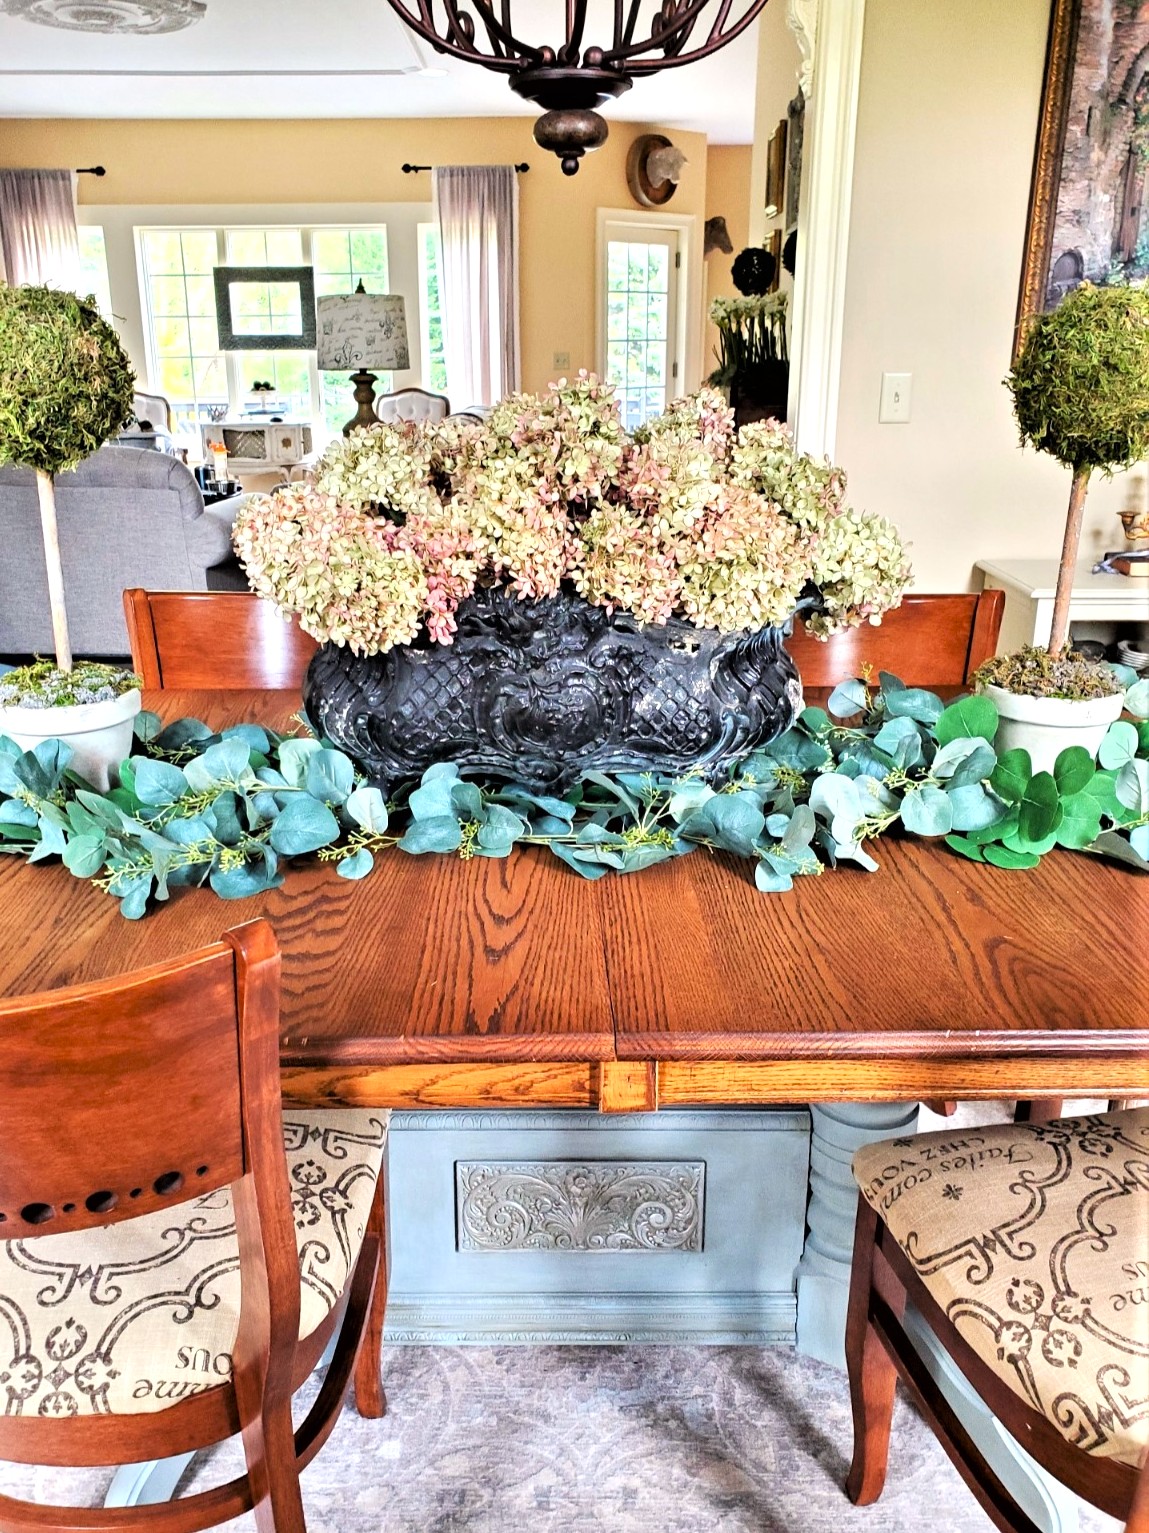
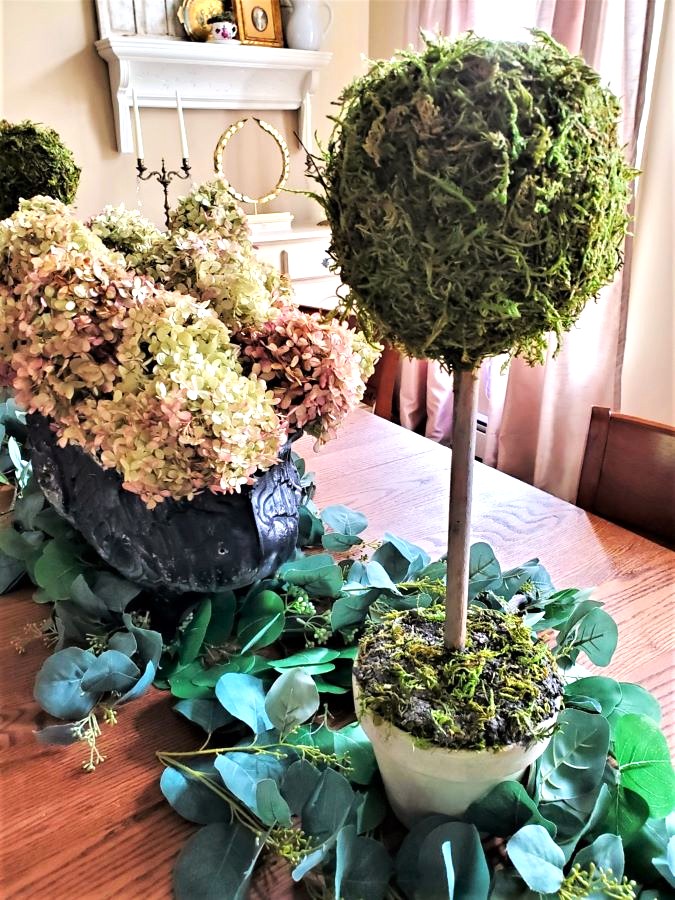
Topiaries for a Centerpiece – Great and Charming Display Ideas
Topiaries are a stunning way to bring a beautiful touch of nature to any space, and the right pot can make all the difference! I love how adding a unique topiary pot can instantly transform a gardening crate. just like I shared when styling these artificial plants. Whether you’re going for a rustic farmhouse style or looking to add a bit of life to special events, these topiaries add a perfect pop of natural color. They are a perfect addition to fresh flowers in mason jars or upcycled coffee cans for a gardening party, baby shower, or even a country wedding. The possibilities are endless f using topiaries for charming centerpieces or tabletop displays!
- Create a Focal Point: Adding a unique topiary pot makes a perfect addition to a gardening crate. It creates a beautiful focal point as a centerpiece for styling these artificial plants in 5 different ways.
- Incorporate with Fresh Flower Arrangements: This DIY topiary is a perfect addition to small fresh flower arrangements. Add flowers or artificial plants in mason jars, upcycled coffee cans, or glass jars for gardening parties, baby showers, or even country weddings. Their perfect pop of natural color adds a bit of life to any home decor and design style.
- Create a Cozy Vibe for Gatherings: Place topiaries on a rustic wooden tray alongside candles and fairy lights for an elegant, cozy vibe at dinner parties or gatherings.

Charming Ways to Style Topiaries for Special Events
- Farmhouse Style Centerpiece: Incorporate them into a farmhouse style centerpiece by pairing them with small lanterns, vintage books, small fresh flower arrangements, and additional fresh or faux greenery. Silver dollar eucalyptus with their silvery leaves is a pretty combination.
- Spring Table: Create a charming display with topiaries in vintage teacups or decorative tins, perfect for a spring table, Mother’s Day, or summer celebrations.
- Succulents Wire Frame Topiary: Succulents are a great idea for a wire frame topiary. To achieve moist sphagnum moss, soak it for one hour. Pack the wire frame with moist sphagnum moss. When you think it’s packed, add more. You want the frame full and can’t see it. You should be able to feel it under the layer of moist sphagnum moss. Poke a hole with a screwdriver or needle-nose pliers. Add the succulent and secure a “U” shaped florist pin. Fill in with more wet moss. (You can get the details at Cornell Living sculpture.)
No matter how you style them, topiaries are a timeless way to bring charm and life into any setting. Whether you’re looking to add a rustic touch to your decor or create a centerpiece – great for a special occasion this artificial tree can be dressed up in many fun and unique ways.
Cindy’s Crafting Note: I added green moss to the top of the fake dirt while it was wet. Tis adds to the real look of the topiary.
Can these topiaries go outside?
No, these topiaries are for indoor use only and should be kept out of direct sunlight.
Cindy’s Craft Tip: Spray your finished topiary with Mod Podge matte spray sealer (HERE). This helps with fading and keeps the moss in place.
How do you attach a moss ball to the stem of a topiary?
Attach the moss ball to the stem of your topiary by following these easy steps:
- If the stem has a hole at the top, gently push the base of the moss ball into the hole. You can secure it with hot glue around the edges to ensure it stays in place.
- If there’s no hole, apply hot glue or adhesive spray to the top of the stem, then press the ball onto the adhesive, holding it to set.
- Reinforce the topiary: If you want extra security, you can use green floral wire to wrap around the top of the stem and the moss ball. Tuck the wire under the moss for a custom design look.
Add these natural materials: Give the unique topiary pot a clean, polished finish with natural materials such as Spanish moss, pebbles, or decorative fillers.

Create Your Stunning DIY Topiary
Follow this step-by-step tutorial for this DIY Topiary. It is a fun and easy project that you can make with just a few craft supplies. Add a natural touch and charming display to your home with a DIY moss topiary – get started right now! This charming display is a must-try project to incorporate natural materials and elegance into any home decor style, and check to see how to make fake dirt too!
Follow us on Pinterest, Instagram, and Facebook

Pin This to Remember How to Make a Topiary!
POSTS OF INTEREST!

DIY Moss Topiary — Get Started Right Now!
Craft Supplies: DIY Topiary
-
- Paper towel or rag
Step 1: Prep Flower Pots for Painting
Gather your craft supplies and cover your work surface with paper or plastic. Paint the flower pots with white acrylic paint or gesso, I used gesso for my clay pot.
Cindy’s Crafting Tip: I like using gesso more than craft paint for my flower pots; however, white acrylic paint works. I will share how to add texture and create an aged look to a clay pot. The decorative topiary pot measures 6 inches.
Step 2: Add Texture to Your Clay Pot
Once the gesso dries, I apply another layer using a dry brush technique. This time, I used a foam brush, but if you’re new to this, a cheap brush works well. The dry brush technique adds texture to the flower pots, giving each topiary tree a unique, custom design. Let them dry completely.
Step 3: Create an Aged Look with Easy Paint Techniques
Mix a bit of water with avocado or moss acrylic paint on a paper plate or bowl. Lightly dip the tip of your paint brush into the paint, then wipe off the excess on a paper towel. Randomly apply the paint to the top of the pot, blending with your finger or a dry paint brush for a natural moss effect. Add a few touches to the body and bottom of the pot as well, letting the paint run slightly before blending with your finger to achieve an aged look.
Step 4: Covering with Moss After Applying Spray Adhesive
Begin adding reindeer moss to the top of the topiary forms, this part can get messy! Place the foam ball inside a brown bag, a large plastic bag, or on newspaper to contain the mess. Since I’m using spray adhesive, I recommend doing this step in a well-ventilated area, like an open garage or outside. Spray the foam ball with spray adhesive and let it sit until it gets tacky. Then, press handfuls of reindeer moss onto the surface of the foam ball. If you notice bare spots, lightly spray more adhesive spray and repeat until the topiary forms are covered in moss.
Cindy’s Crafting Tip: I recommend wearing rubber gloves during this step because it’s sticky from the adhesive spray. If you don’t want to add adesive spray, add bits of moss at a time and use your glue gun. Wear silicone finger protectors to avoid burns.
Step 5: Add Easy Fake Dirt to the Topiary
Here, I share how to add fake dirt to artificial plants or a small artificial tree. This is a perfect addition to your topiary tree, and takes minutes to make! First, for stability, I added non-clumping kitty litter to the bottom of the pot. I also add glue with moss once the dirt is dry. See my note if adding your topiary tree directly into a clay pot.
Cindy’s Crafting Note: I added a bit of the fake dirt to the stem of the topiary to add detail. This optional.
DIY Moss Topiary — Get Started Right Now!
Craft Supplies: DIY Topiary
-
- Topiary forms, a large foam ball, a large moss ball, or a wire frame
-
- Wooden dowel or sticks from the yard
- Spray Adhesive or hot glue gun
-
- Rubber finger protectors (if you use hot glue)
-
- Reindeer moss or lumpy moss mat with a brown back
-
- Bag or newspaper
-
- White acrylic paint or gesso
-
- 6″³ clay pot
-
- Avocado acrylic paint
-
- Brown umber acrylic paint
-
- Foam brush
-
- Flat paint brush
-
- Paper towel or rag
Step 1: Prep Flower Pots for Painting
Gather your craft supplies and cover your work surface with paper or plastic. Paint the flower pots with white acrylic paint or gesso, I used gesso for my clay pot.
Cindy’s Crafting Tip: I like using gesso more than craft paint for my flower pots; however, white acrylic paint works. I will share how to add texture and create an aged look to a clay pot. The decorative topiary pot measures 6 inches.
Step 2: Add Texture to Your Clay Pot
Once the gesso dries, I apply another layer using a dry brush technique. This time, I used a foam brush, but if you’re new to this, a cheap brush works well. The dry brush technique adds texture to the flower pots, giving each topiary tree a unique, custom design. Let them dry completely.
Step 3: Create an Aged Look with Easy Paint Techniques
Mix a bit of water with avocado or moss acrylic paint on a paper plate or bowl. Lightly dip the tip of your paint brush into the paint, then wipe off the excess on a paper towel. Randomly apply the paint to the top of the pot, blending with your finger or a dry paint brush for a natural moss effect. Add a few touches to the body and bottom of the pot as well, letting the paint run slightly before blending with your finger to achieve an aged look.
Step 4: Covering with Moss After Applying Spray Adhesive
Begin adding reindeer moss to the top of the topiary forms, this part can get messy! Place the foam ball inside a brown bag, a large plastic bag, or on newspaper to contain the mess. Since I’m using spray adhesive, I recommend doing this step in a well-ventilated area, like an open garage or outside. Spray the foam ball with spray adhesive and let it sit until it gets tacky. Then, press handfuls of reindeer moss onto the surface of the foam ball. If you notice bare spots, lightly spray more adhesive spray and repeat until the topiary forms are covered in moss.
Cindy’s Crafting Tip: I recommend wearing rubber gloves during this step because it’s sticky from the adhesive spray. If you don’t want to add adesive spray, add bits of moss at a time and use your glue gun. Wear silicone finger protectors to avoid burns.
Step 5: Add Easy Fake Dirt to the Topiary
Here, I share how to add fake dirt to artificial plants or a small artificial tree. This is a perfect addition to your topiary tree, and takes minutes to make! First, for stability, I added non-clumping kitty litter to the bottom of the pot. I also add glue with moss once the dirt is dry. See my note if adding your topiary tree directly into a clay pot.
Cindy’s Crafting Note: I added a bit of the fake dirt to the stem of the topiary to add detail. This optional.


Thanks Cindy for the information on the Gesso paint. I always wondered how to make those cute clay pots look white washed. Your topiary looks great.
This is awesome! Amazing ideas!
That fake soil is so cool! Thanks for sharing it 🙂
Topiaries like this are my favorite! Quick, easy and oh so pretty. As always, amazing job. They’re beautiful! Hugs, CoCo
Looks so amazing. You have been a busy girl. So happy we are finally having warmer weather.
This is such a nice way to bring outdoors in. A topiary is so classic and pretty. Seattle area and surrounds have some amazing garden centers. Where I grew up in Southern California, many garden stores and farm stands closed over the years.
I love to make topiaries and yours looks great! Pinning for future reference! Thanks, Donna
Very pretty, Cindy and I love that peek into your kitchen!!
Thank you Kim!
Cindy this looks beautiful! I love the soil!
Thanks Elizabeth!
Cat litter! Who’d have thought?! Love it.
Thanks Rachel!
Kitty litter??? I never would have guessed! What a great idea. The finished product is so pretty.
Thanks so much Crystal
I really love this. I’ve been wanting to make one for such a long time. Your detailed instructions make it so easy to follow – no excuses now.
Got for it. So easy and the realistic dirt us a game changer and takes minutes