
Spring Peat Pot Treat Baskets In 15 Minutes!
Hey friends! Do you enjoy a pretty basket? How about giving Mom a garden basket for Mother’s Day, complete with a seed packet filled with her favorite flowers? It’s such a perfect gift to give her a head start on her garden this spring.
Here’s the good news: I’ll show you the easiest way to create charming little baskets for spring or summer parties using peat pot treat baskets in just 15 minutes! With a little acrylic paint, some little pots, and a final touch, these treat baskets are sweet, simple, and ready to wow.
Jump to Printable DIYTable of Contents
- 1 Good News: Spring Peat Pot Treat Baskets in 15 Minutes Awaits!
- 2 EXPLORE & SHOP: PEAT POTS FOR GIFT BASKETS
- 3 Supplies List: Easter Treat Baskets
- 3.1 Step 1: Paint Each Little Basket With Acrylic Paint
- 3.2 Step 2: Graphic Precision – Print and Cut Images for Peat Pot Easter Treat Baskets
- 3.3 Step 3: Decoupage Delight – Enhance Gift Baskets With Mod Podge And A Graphic
- 3.4 Easter Treat Basket with a Charming Wire Handle
- 3.5 Cindy’s Tips Dry Brushing
- 3.6 Cindy’s Mod Podge Tip:
- 4 Discover Other Paper Options: Creative Possibilities
- 5 Finishing Touch Options: Peat Pot Easter Baskets
- 6 Little Peat Pots: Spring Gardens
- 7 Birthday Gift:
- 8 Gardening Gift Basket: Garden Club
- 9 Flower Pot Plastic Cup With Plastic Dome
- 10 DIY Nature-Inspired Baskets Centerpieces
- 11 Spring Baby Shower Surprise: Gift Baskets
- 12 Teacher Appreciation Tokens:
- 13 Personalization Flair:
- 14 Make Peat Pot Baskets In 15 Minutes!
- 15 Final Touch Peat Pot Gift Baskets
- 16 Posts Of Interest
- 17 SPRING PEAT POT TREAT BASKETS IN 15 MINUTES!
- 18 SPRING PEAT POT TREAT BASKETS IN 15 MINUTES!
Good News: Spring Peat Pot Treat Baskets in 15 Minutes Awaits!
The good news each little pot can be finished in three easy steps! These little peat pots are the easiest way to add magic to your celebrations, such as Easter, Mother’s Day, a gardening gift basket, and a birthday gift. First, I’ll spill the beans on how to paint peat pot baskets using white acrylic paint. I’ll show you a great way to pick and cut the FREE graphics. Let’s make these little pots scream spring. And for a final touch, we’ll add Mod Podge, the secret sauce, and share a great way to make a perfect little gift.
What are peat pots?
Peat pots are made of a compostable mix of peat moss and wood. Peat moss is a dead, fibrous material that forms when moss and other living materials decompose in a peat bog. Use peat pots for starting many types of vegetables and flowers. Little peat pots are available at Dollar Tree, dollar stores, Garden Center, Big Lots, and Home Depot. The good news is that these come in larger sizes to pretty baskets.
Do I need to use white acrylic paint?
I used white acrylic paint because I chose a black-and-white graphic. Feel free to experiment with other colors of paint. These little peat pots will work in their natural color, too. There is a wide variety of images available that will look great with the peat pot baskets in their natural color.
Can I use any graphics for these Spring decorations?
Feel free to choose any graphic. Graphics Fairy offers a wide selection of images, and the good news is that they are FREE! These graphics are also high-quality and perfect for these little peat pots.
- Color Choice: Select a color that says spring, and use pastel shades of paint to enhance your peat pot baskets.
- Graphics Fairy: Ensure the graphics coordinate with the spring theme, such as flowers, bunnies, or eggs. Finding free graphics at Graphics Fairy is a great way to share a perfect gift.
- Acrylic Paint: Use a paintbrush when applying paint to peat pot baskets. Using a dry brush technique is a great way to show the natural color.
- Dry Brush Paint: The good news is that dry brushing is a simple process.
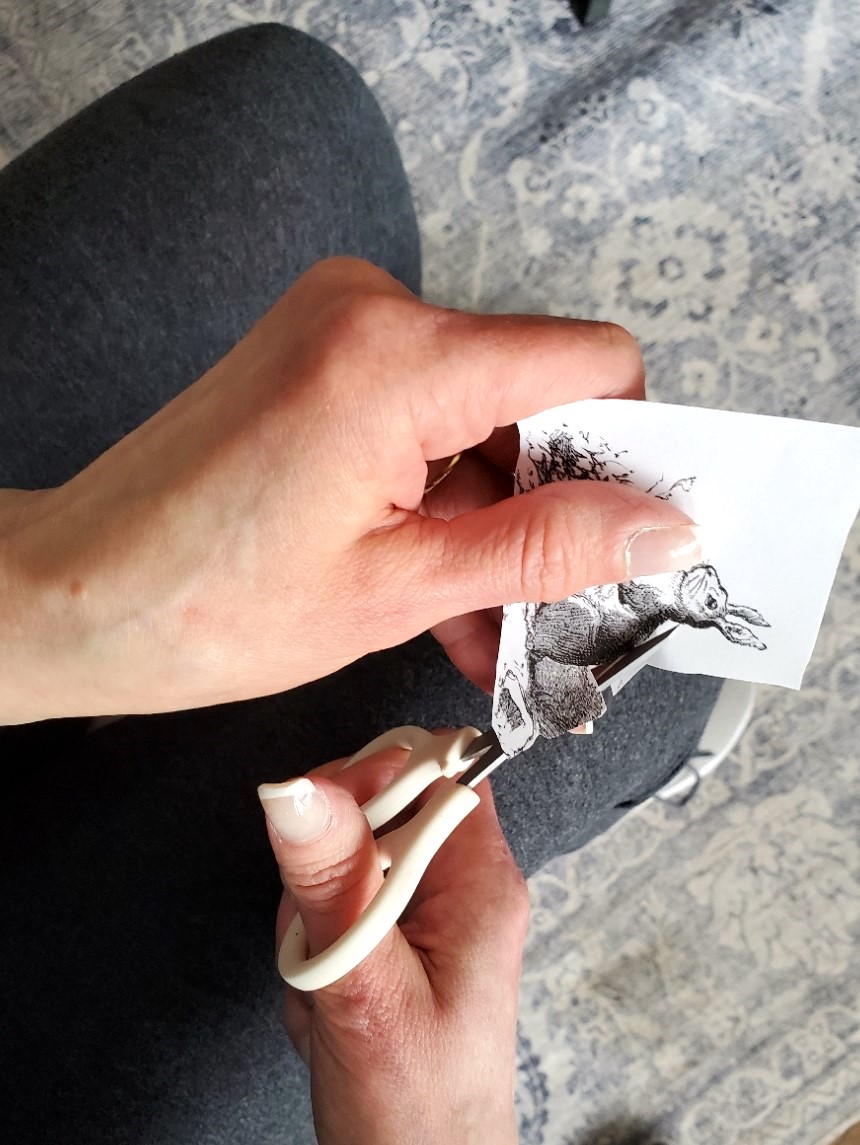
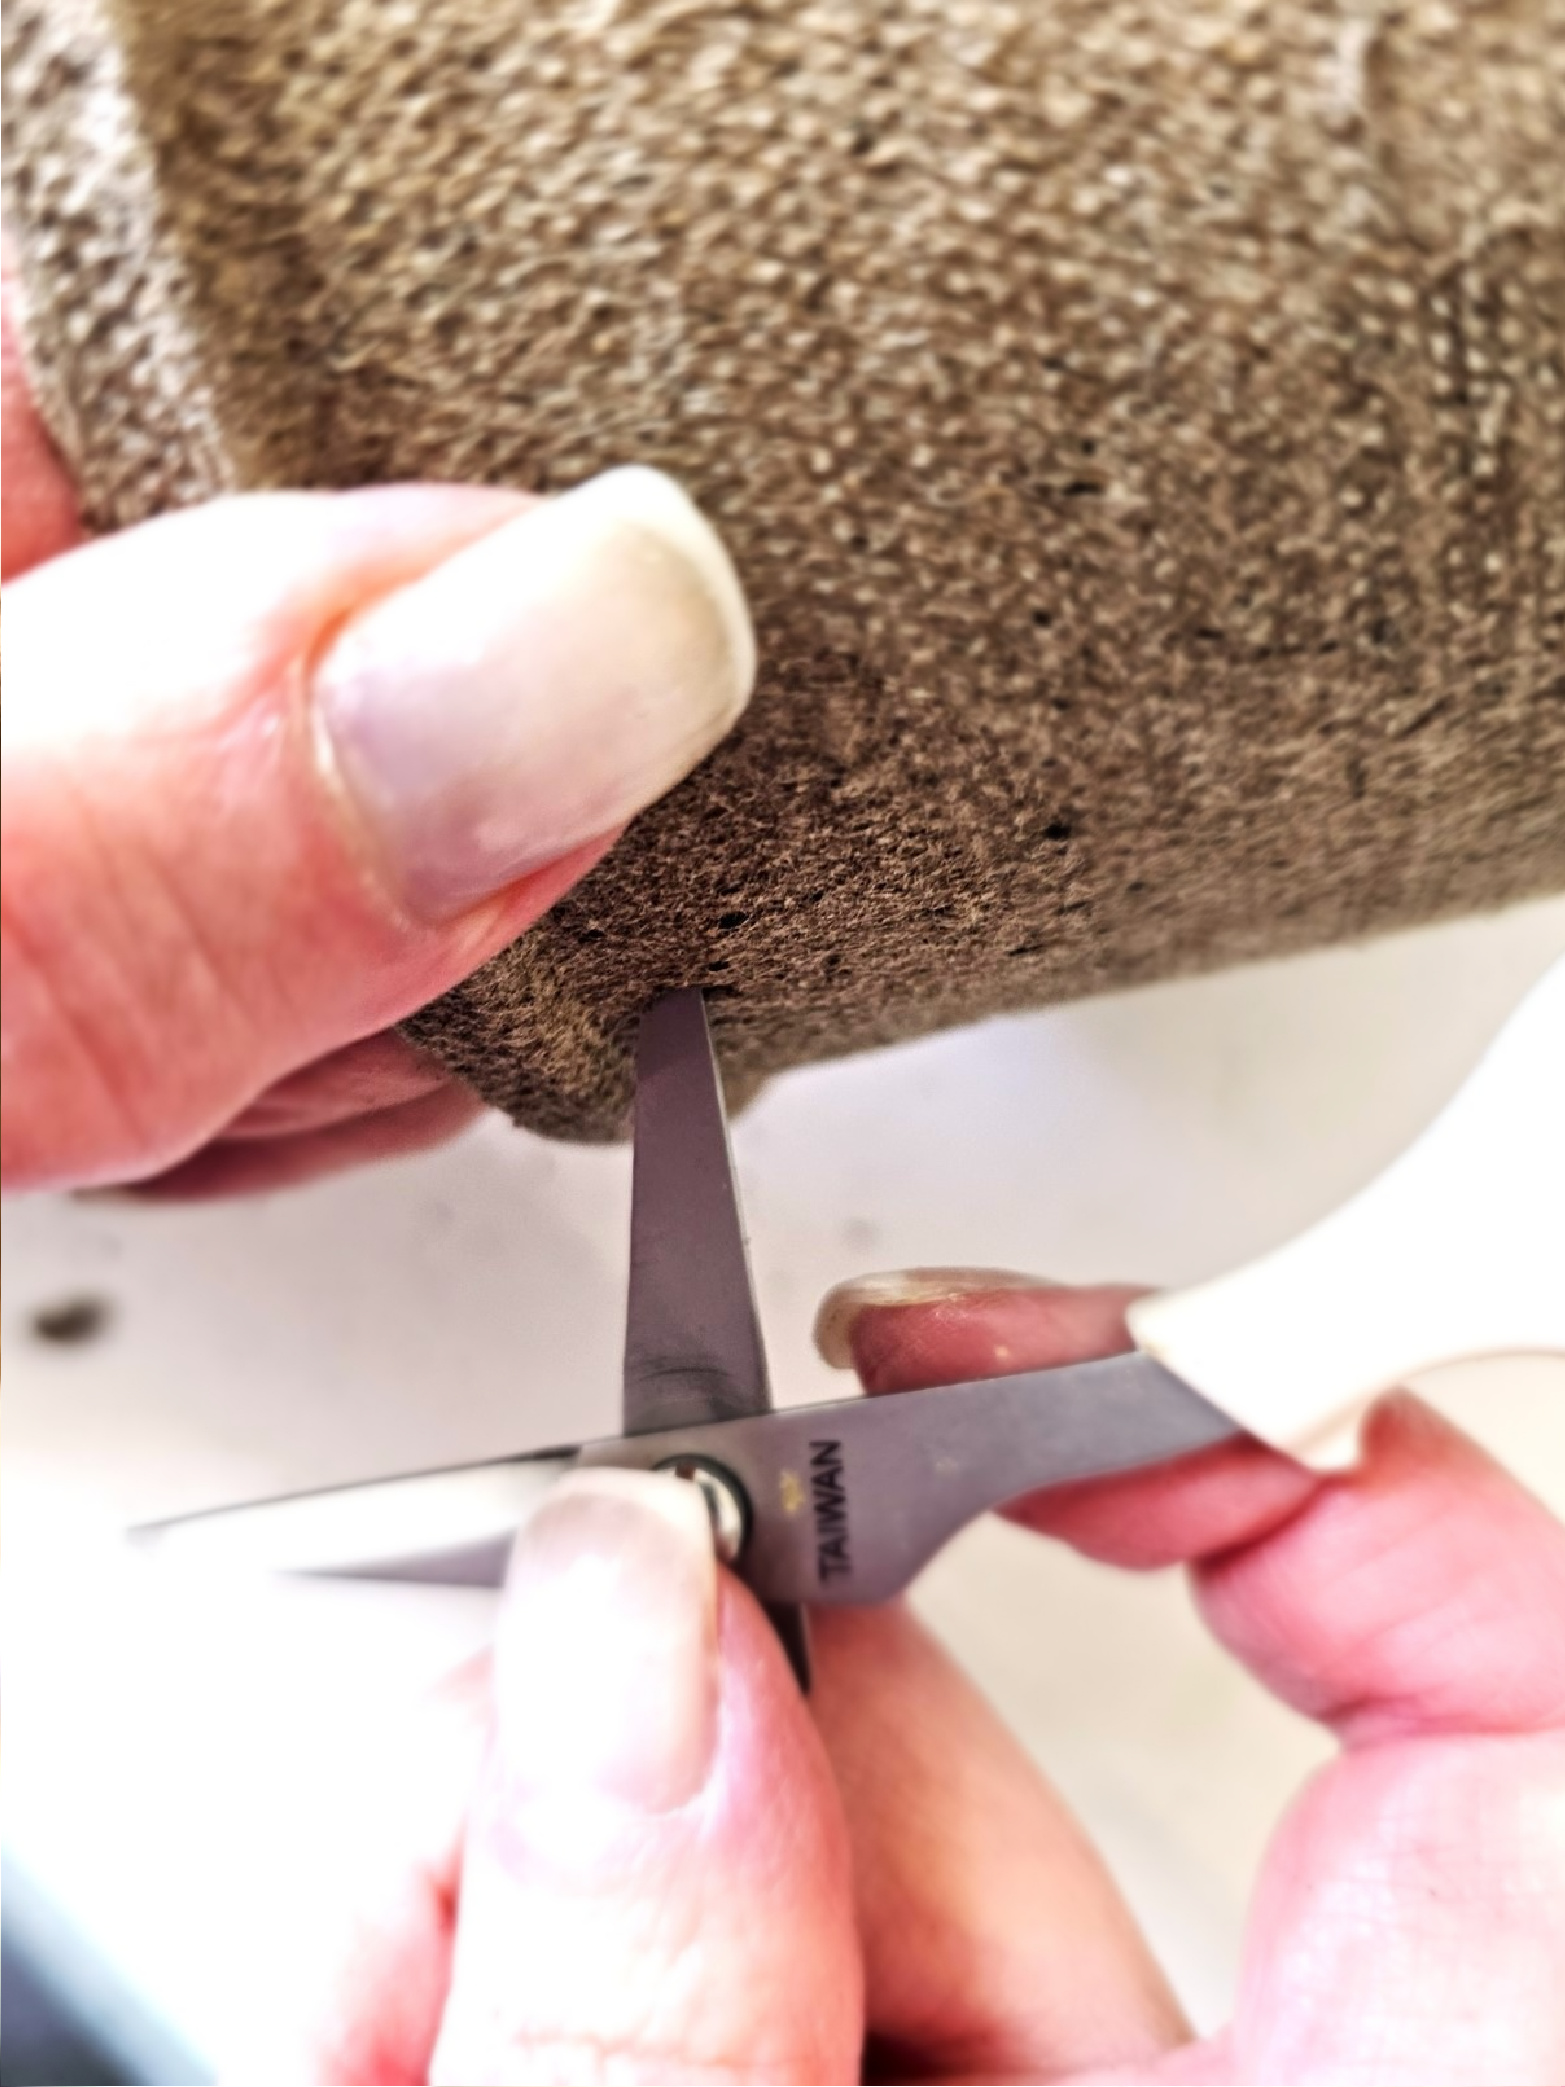
- Graphic Selection and Size: When printing the graphic, be sure the size fits the pot. For this size pot, I printed a 3×5 and a 4×6 image. Use scissors to cut around the image as close to the image as possible. Doing this will make the graphic blend on the side of the peat pot.
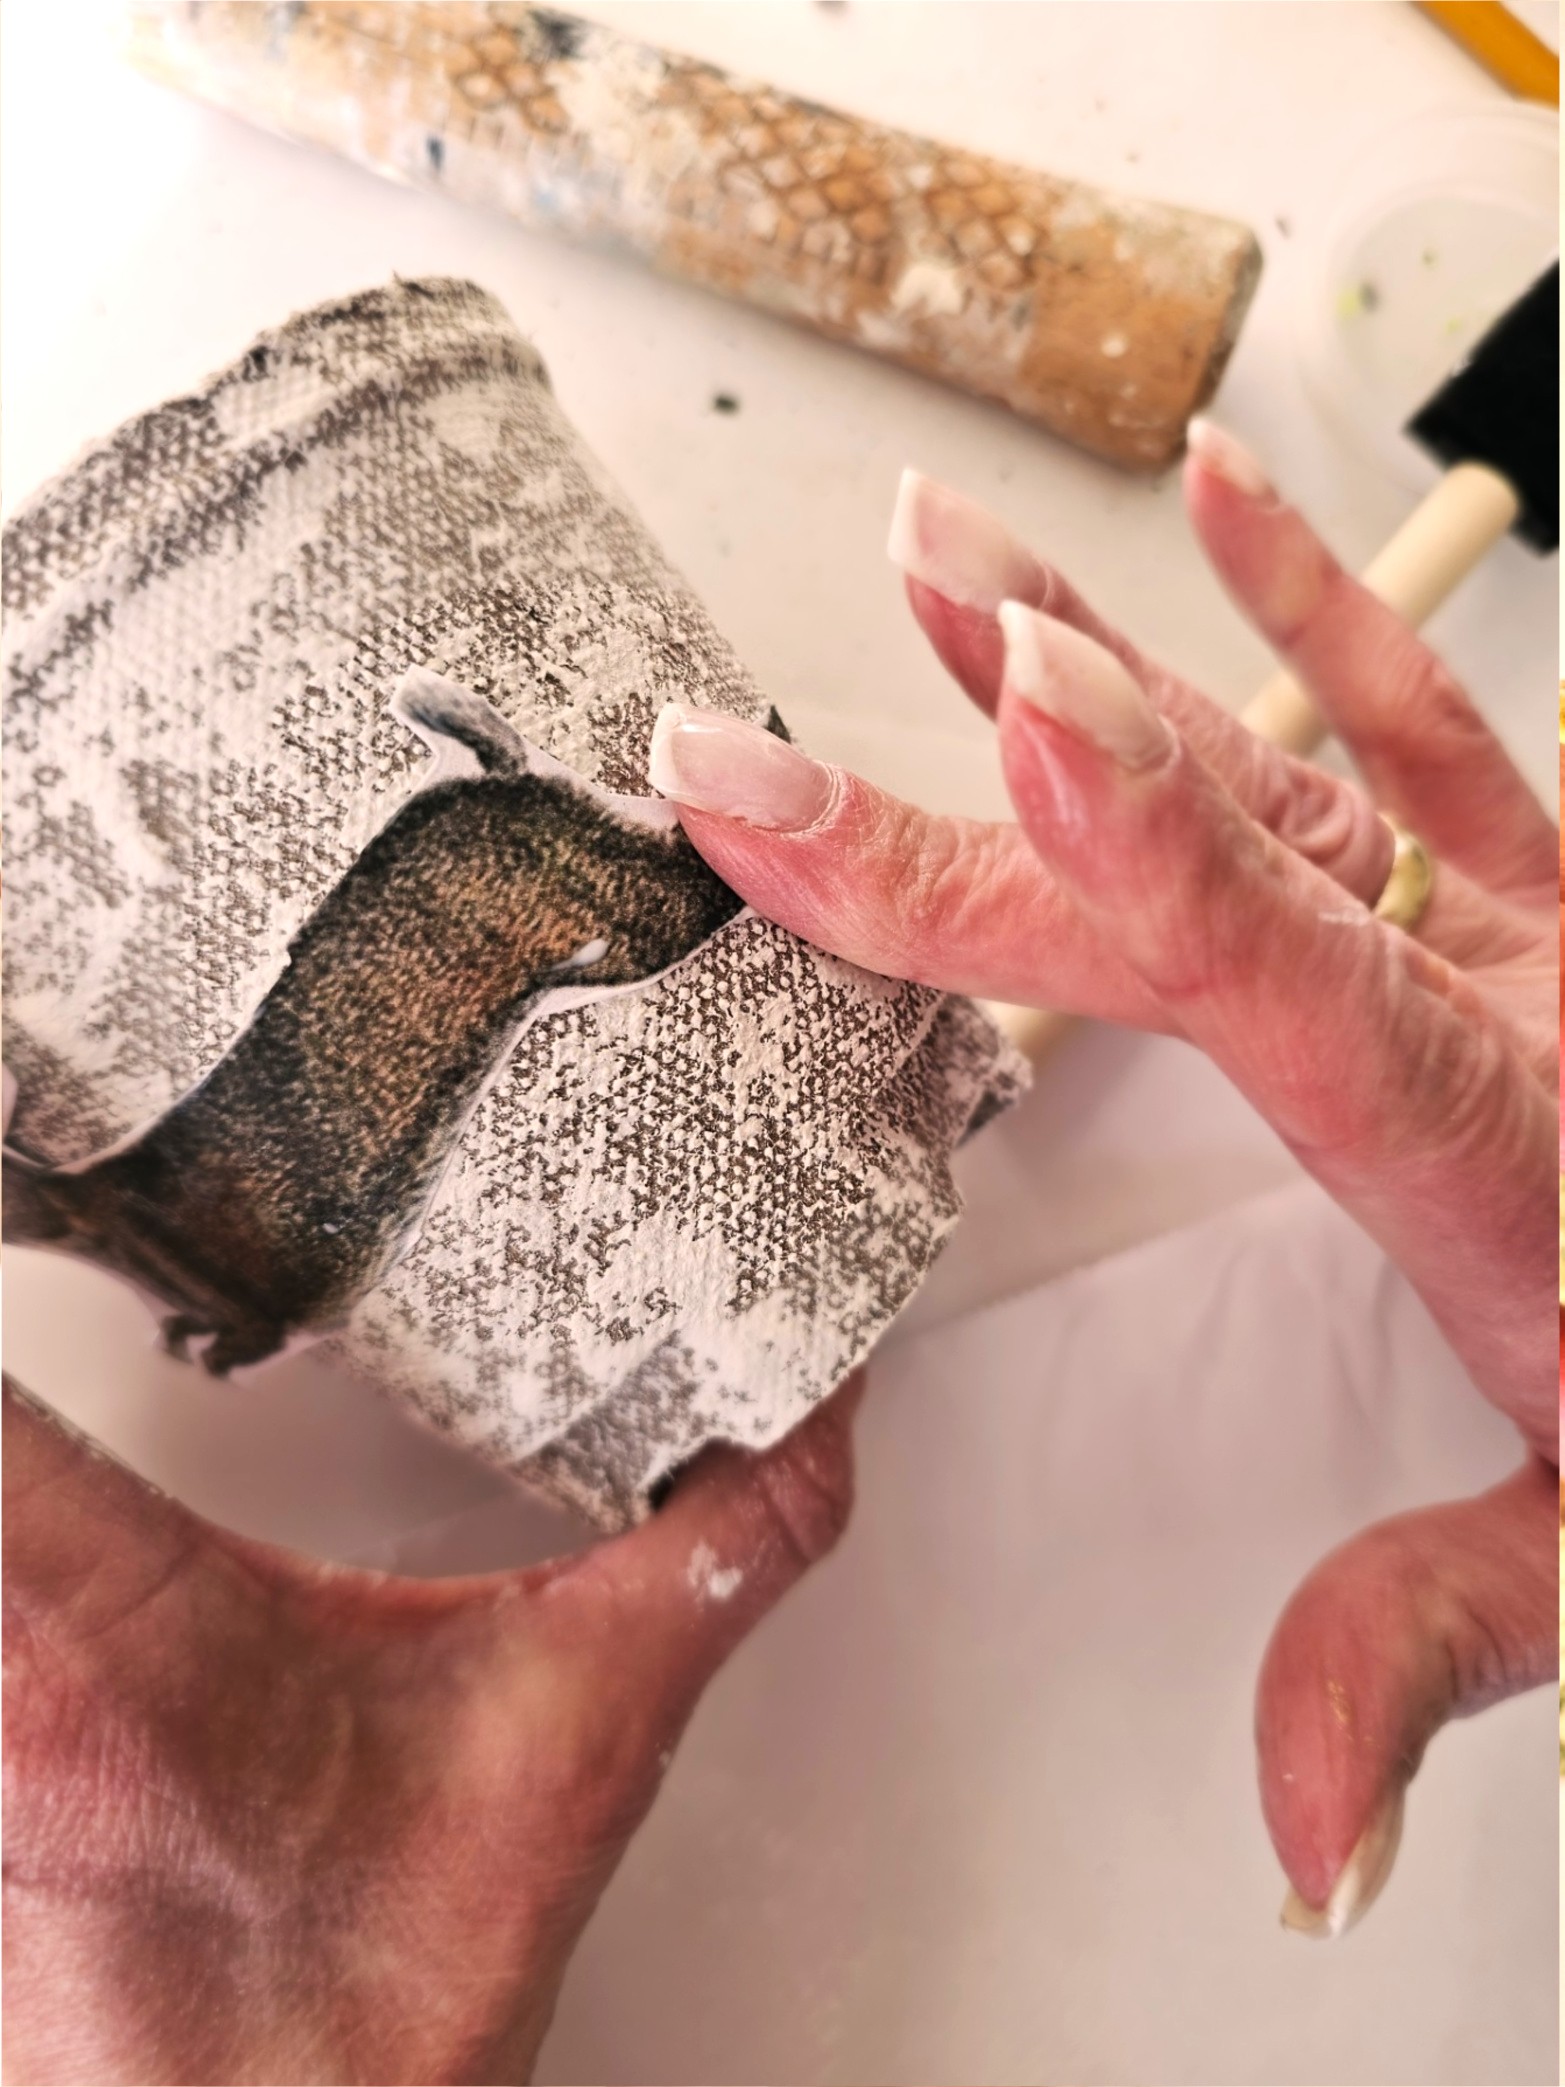
- Mod Podge: I use a foam brush when I add Mod Podge to the graphic. Buy these at the craft store, Dollar Tree, and Dollar stores. A foam brush is also inexpensive, and I throw them away. This also saves a step when cleaning up. When adding graphics to the little basket, use a light tapping motion with your fingertips. This prevents the image from tearing. Add a light second coat of Mod Podge for a polished finish touch.
EXPLORE & SHOP: PEAT POTS FOR GIFT BASKETS
- Home Depot
- Garden centers
- Walmart
- Dollar stores
- Dollar Tree
- Big Lots
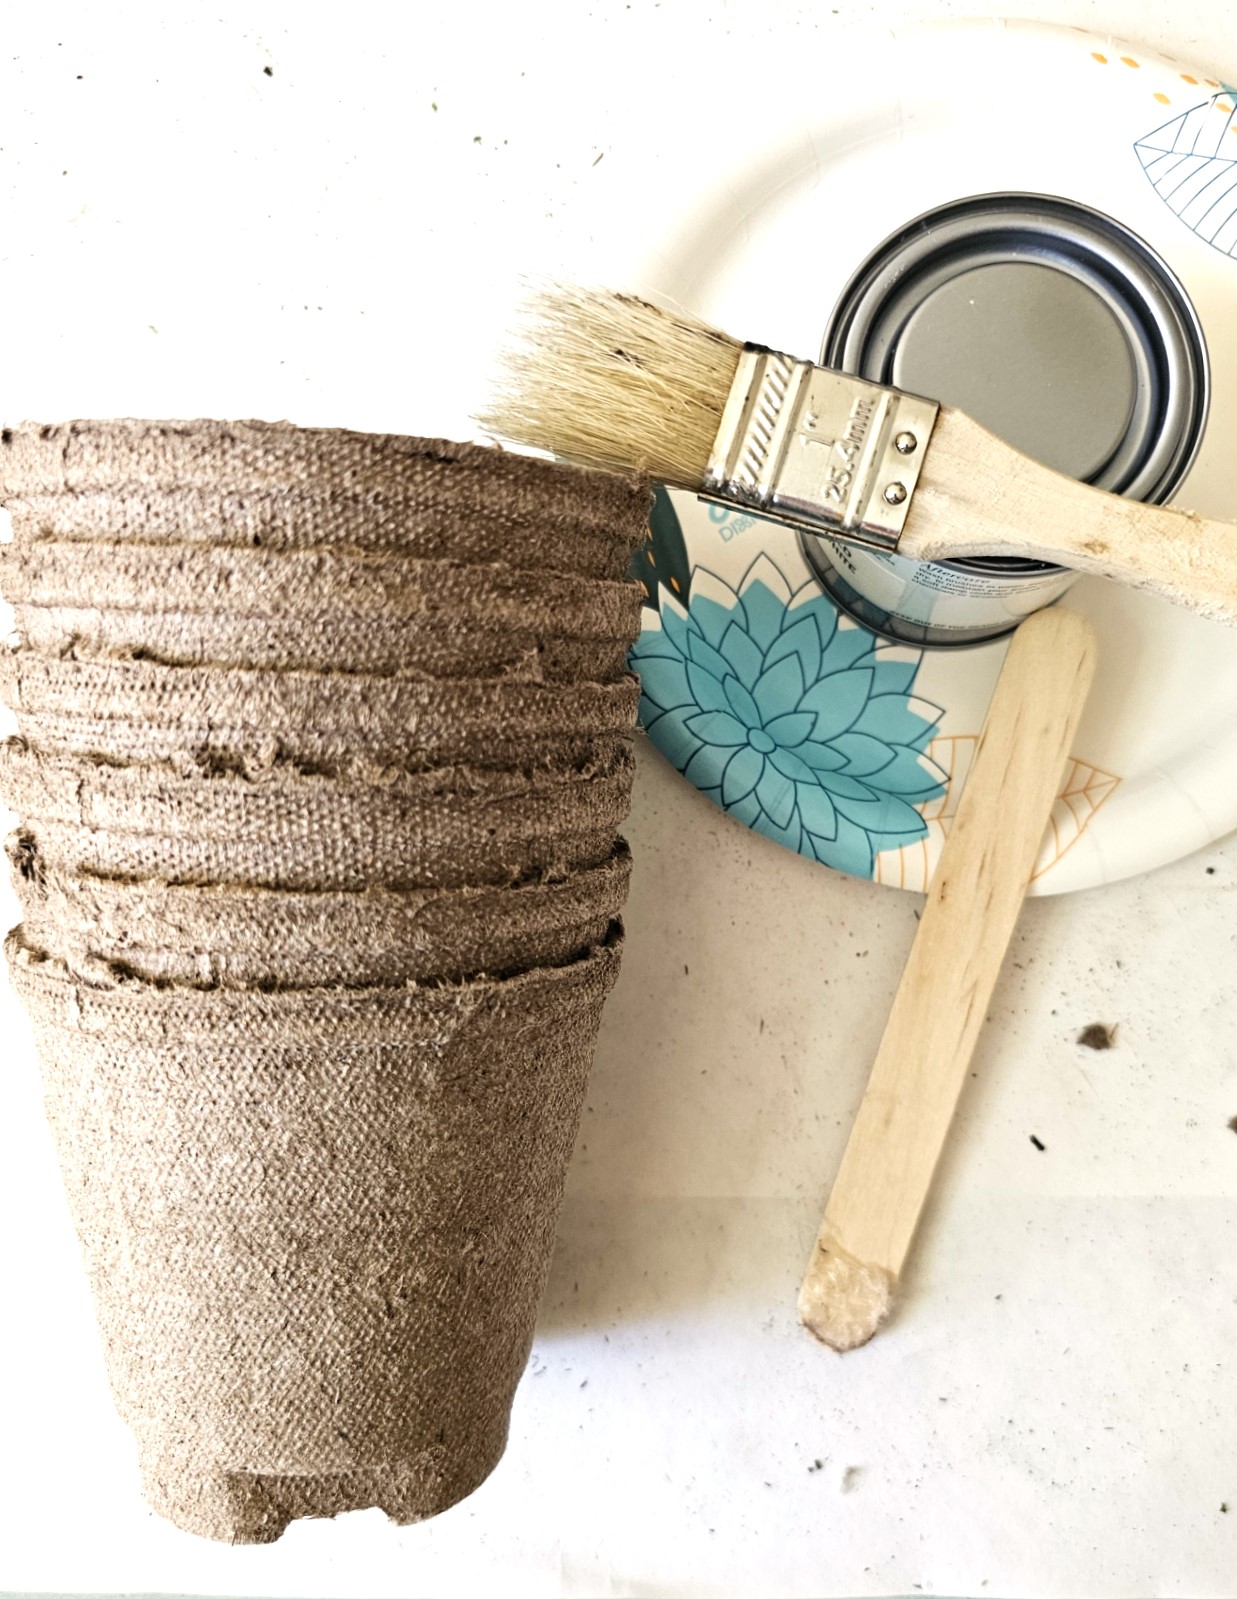
Supplies List: Easter Treat Baskets
- Peat Pots 3″, 4″, and 5″
- White Acrylic Paint
- Scissor
- Paper Towel
- Pinking Shears – optional
- Mod Podge
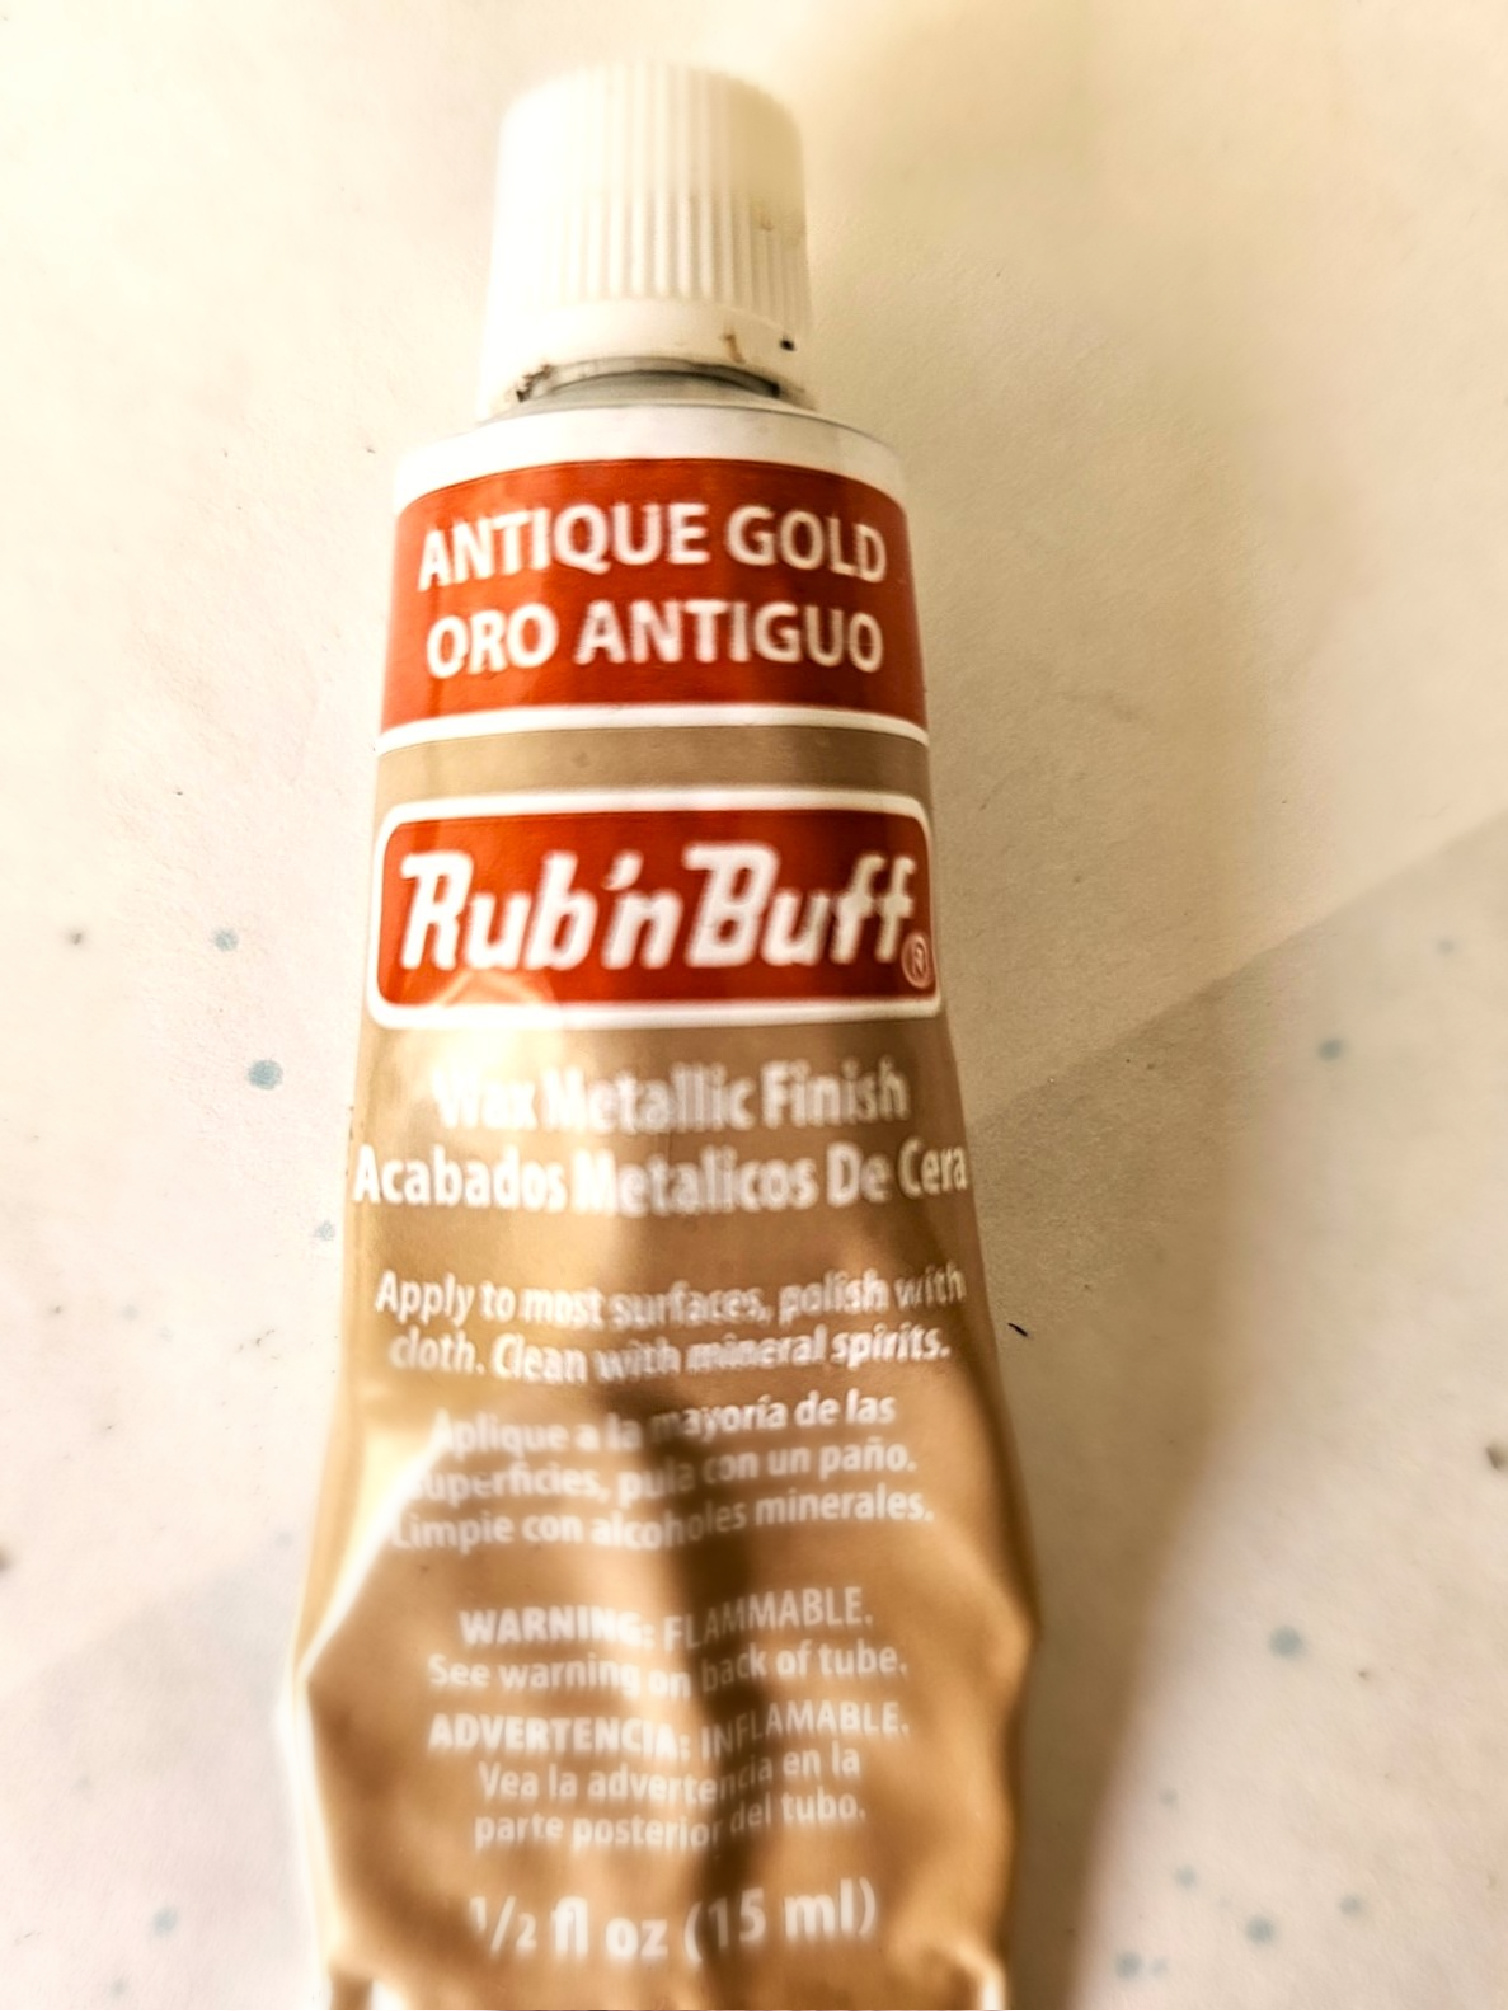
- Rub N Buff – Antique Gold – optional here
- Foam Brush – optional here
- Paintbrush
- Single Hole Punch – optional here
- Paper or Card Stock
- Black Pen – optional
- Pencil
- Heavy Duty Wire
- Image and Printer
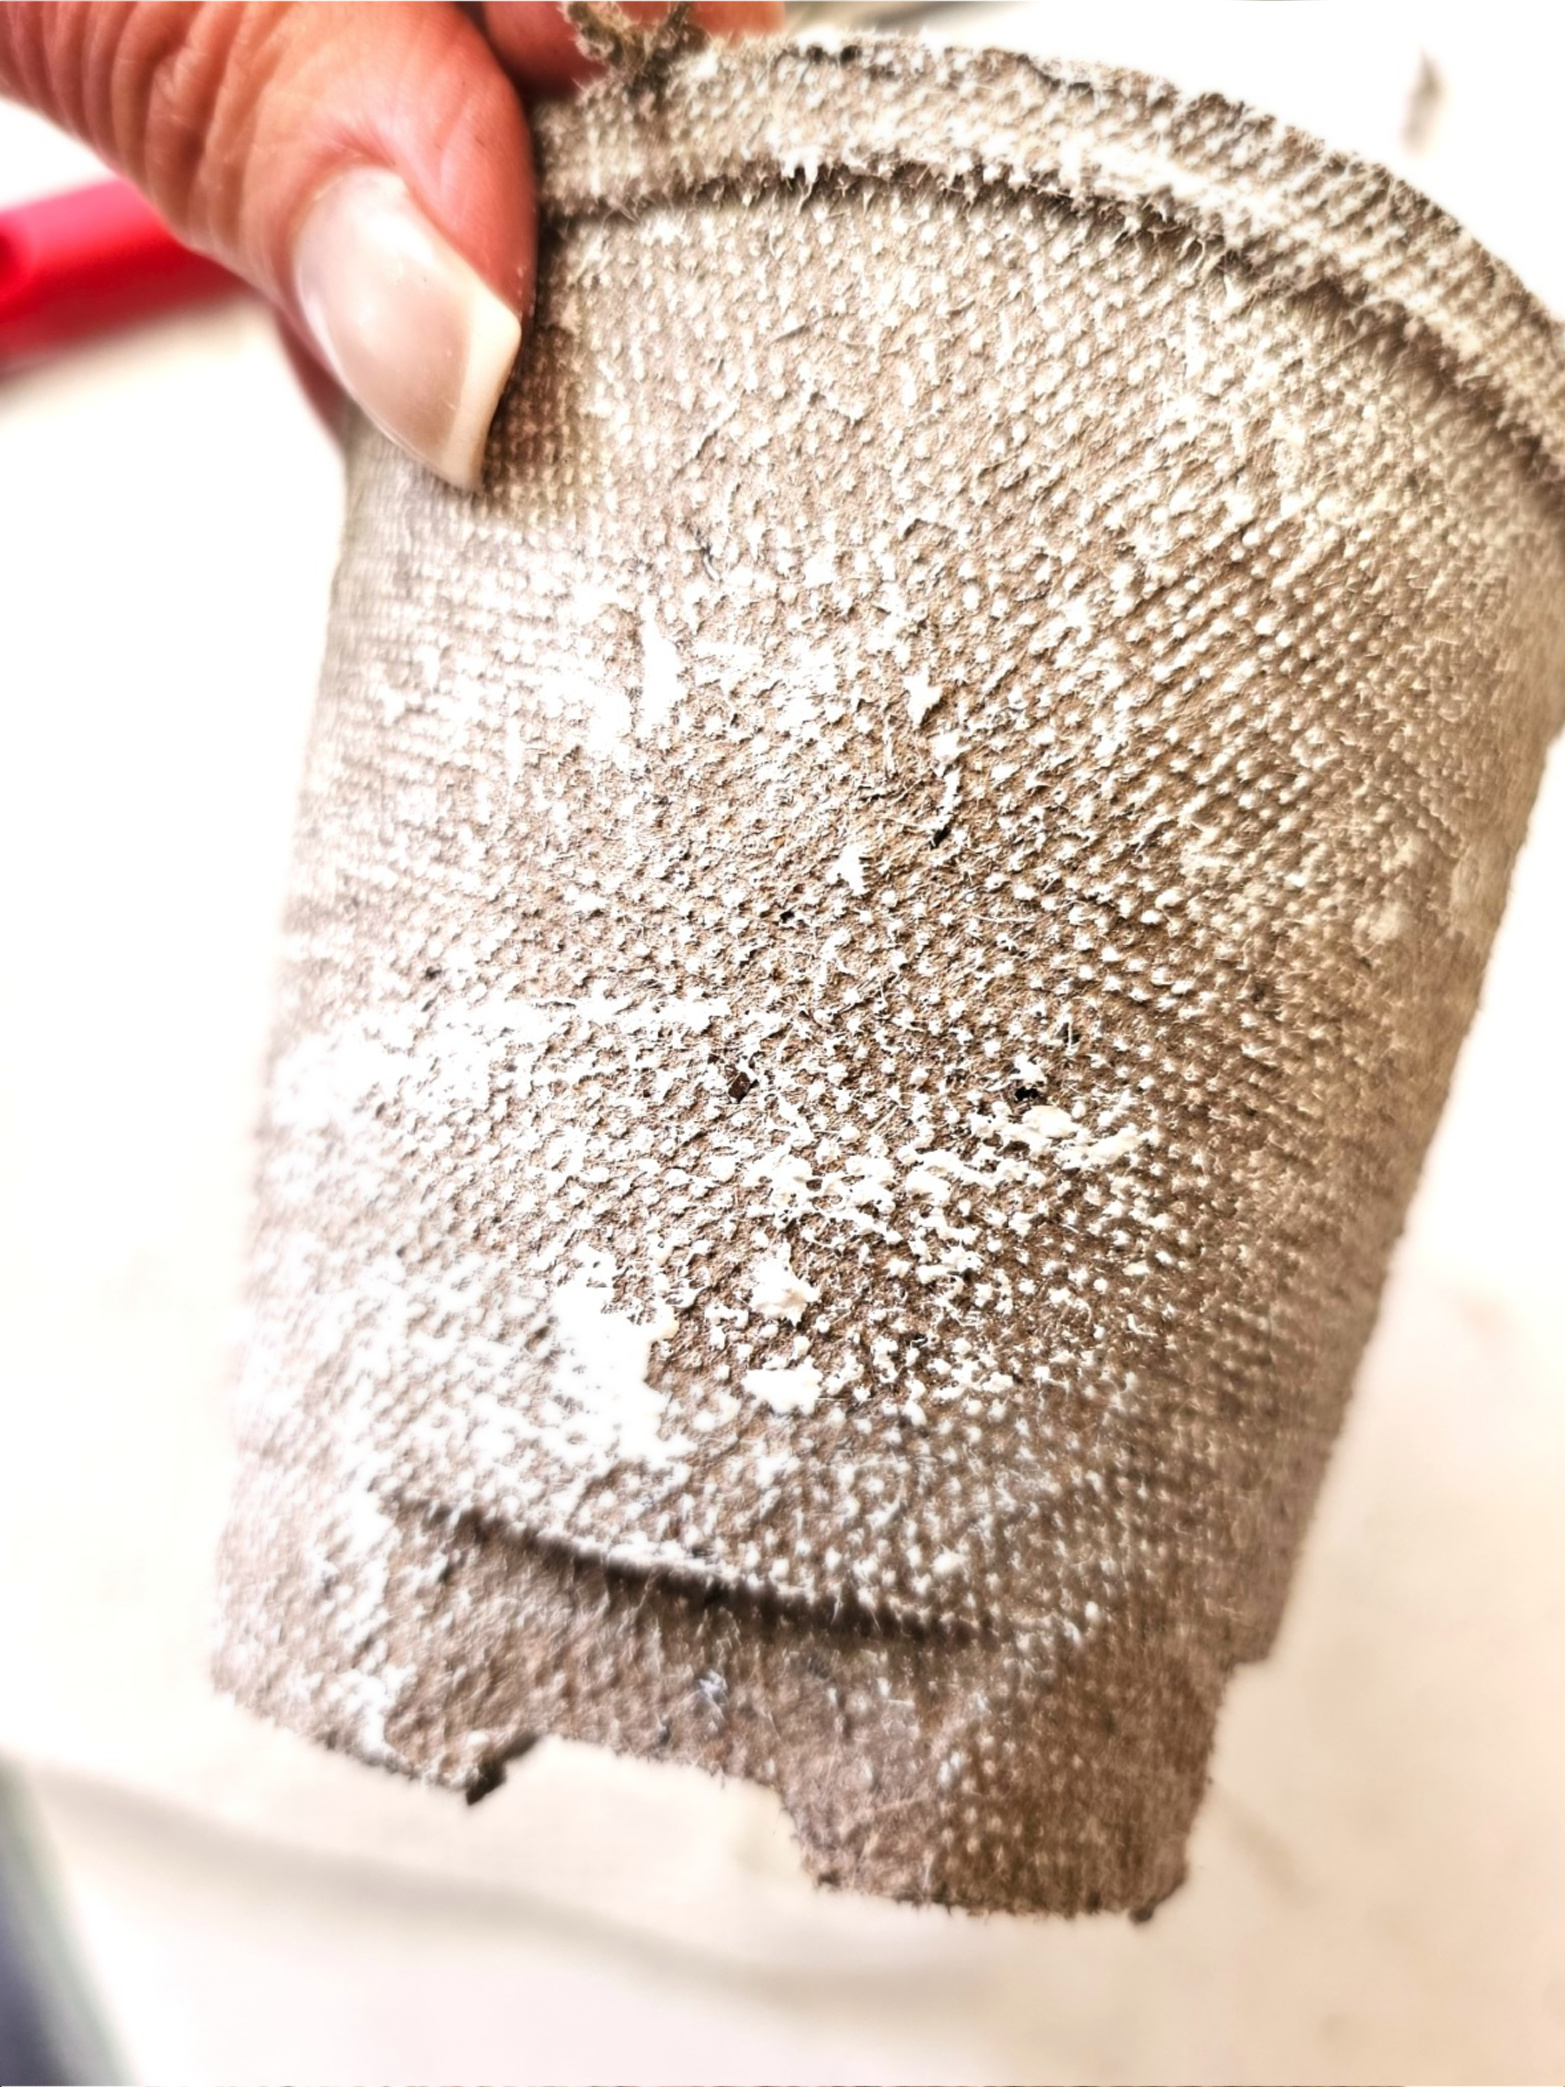
Step 1: Paint Each Little Basket With Acrylic Paint
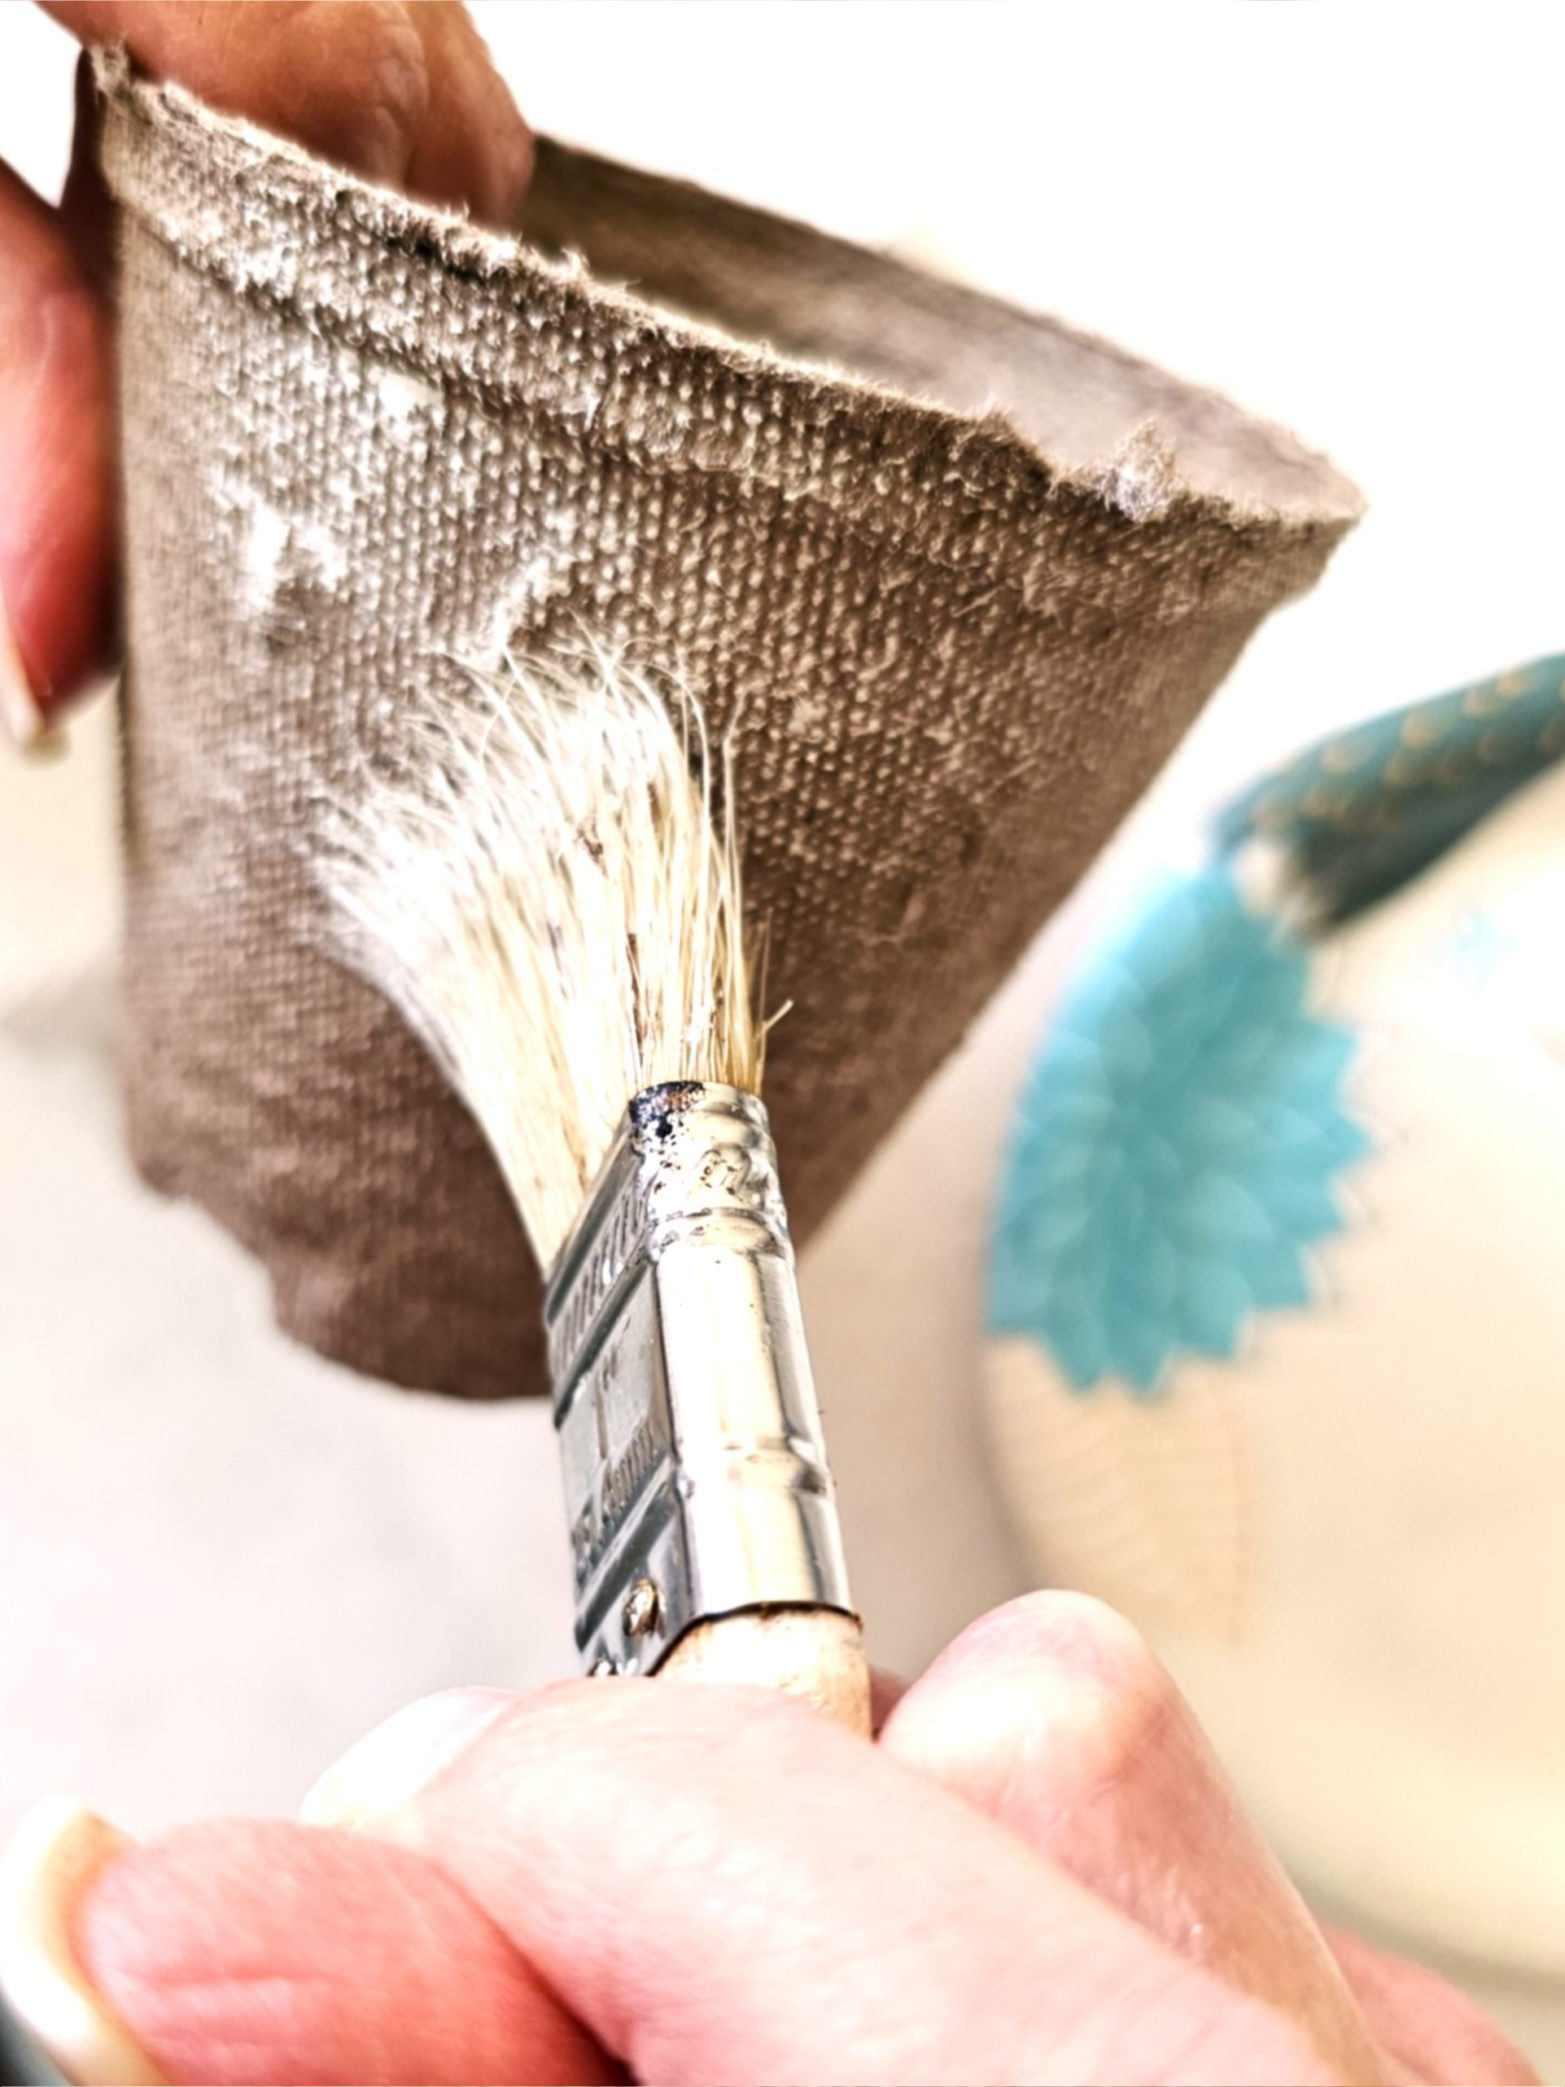
Begin these baskets by painting the little pots with white acrylic paint. Because of the rough texture of the peat pots, use a paintbrush for a smooth finish. The good news is that one coat of paint is all you need to cover each pot. Let the pots dry overnight. This step sets the foundation for these Easter treat baskets.
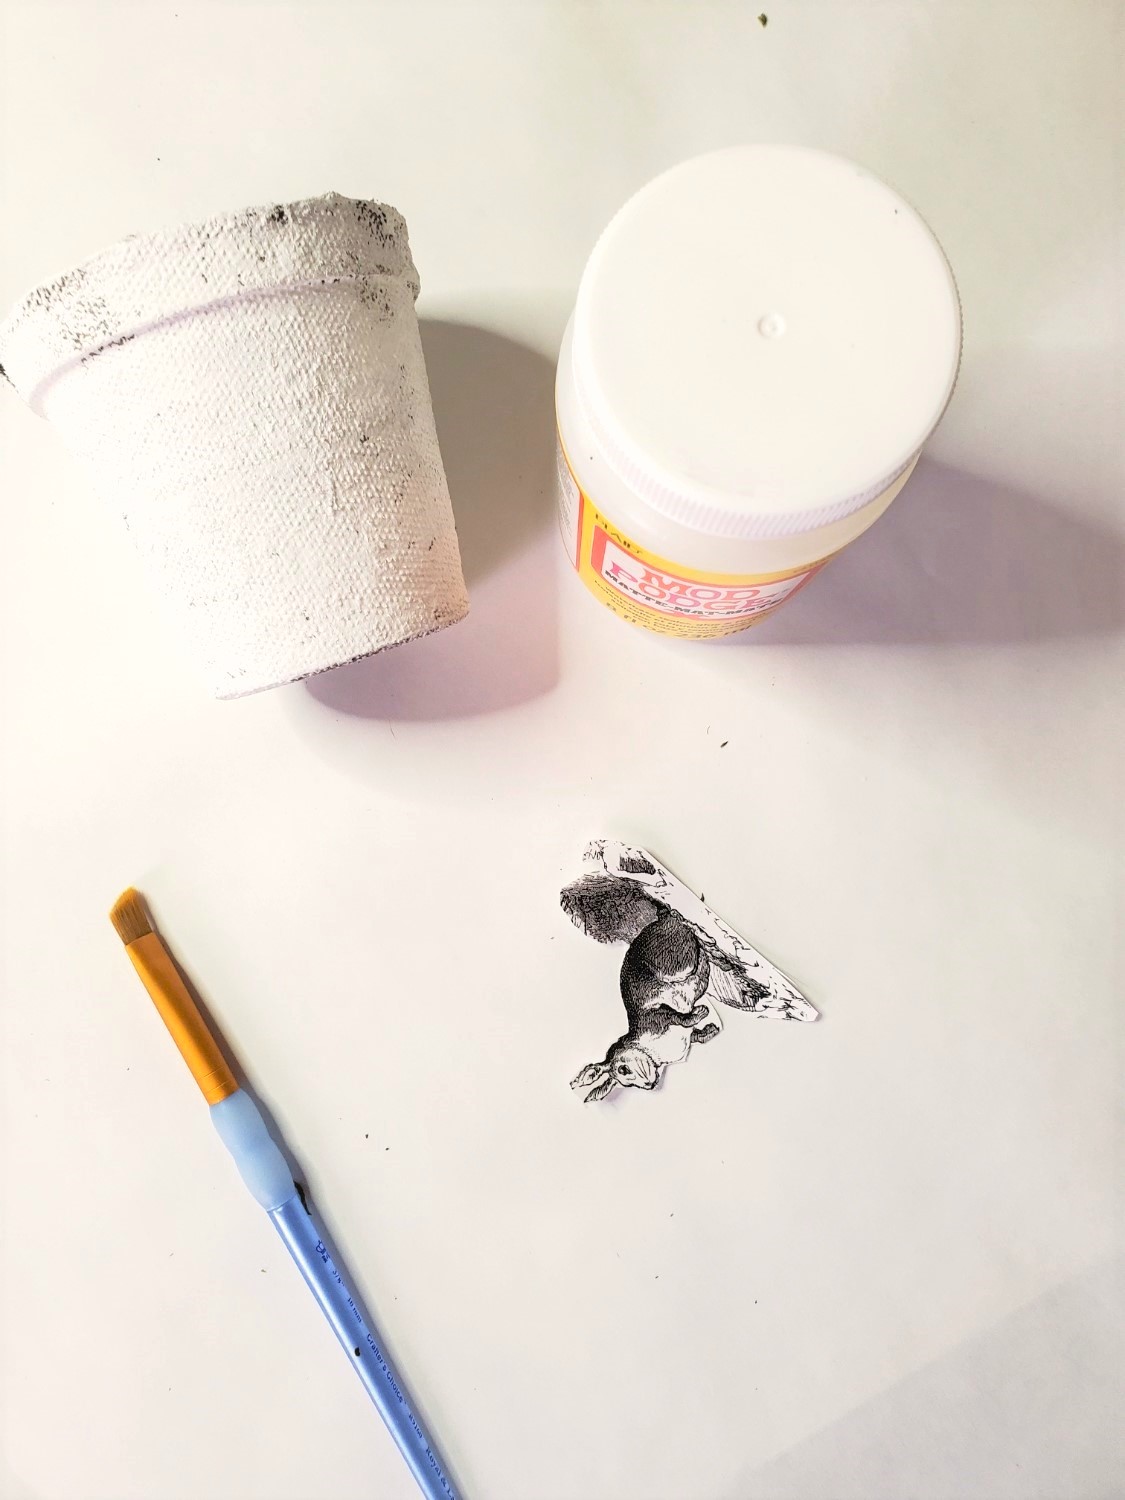
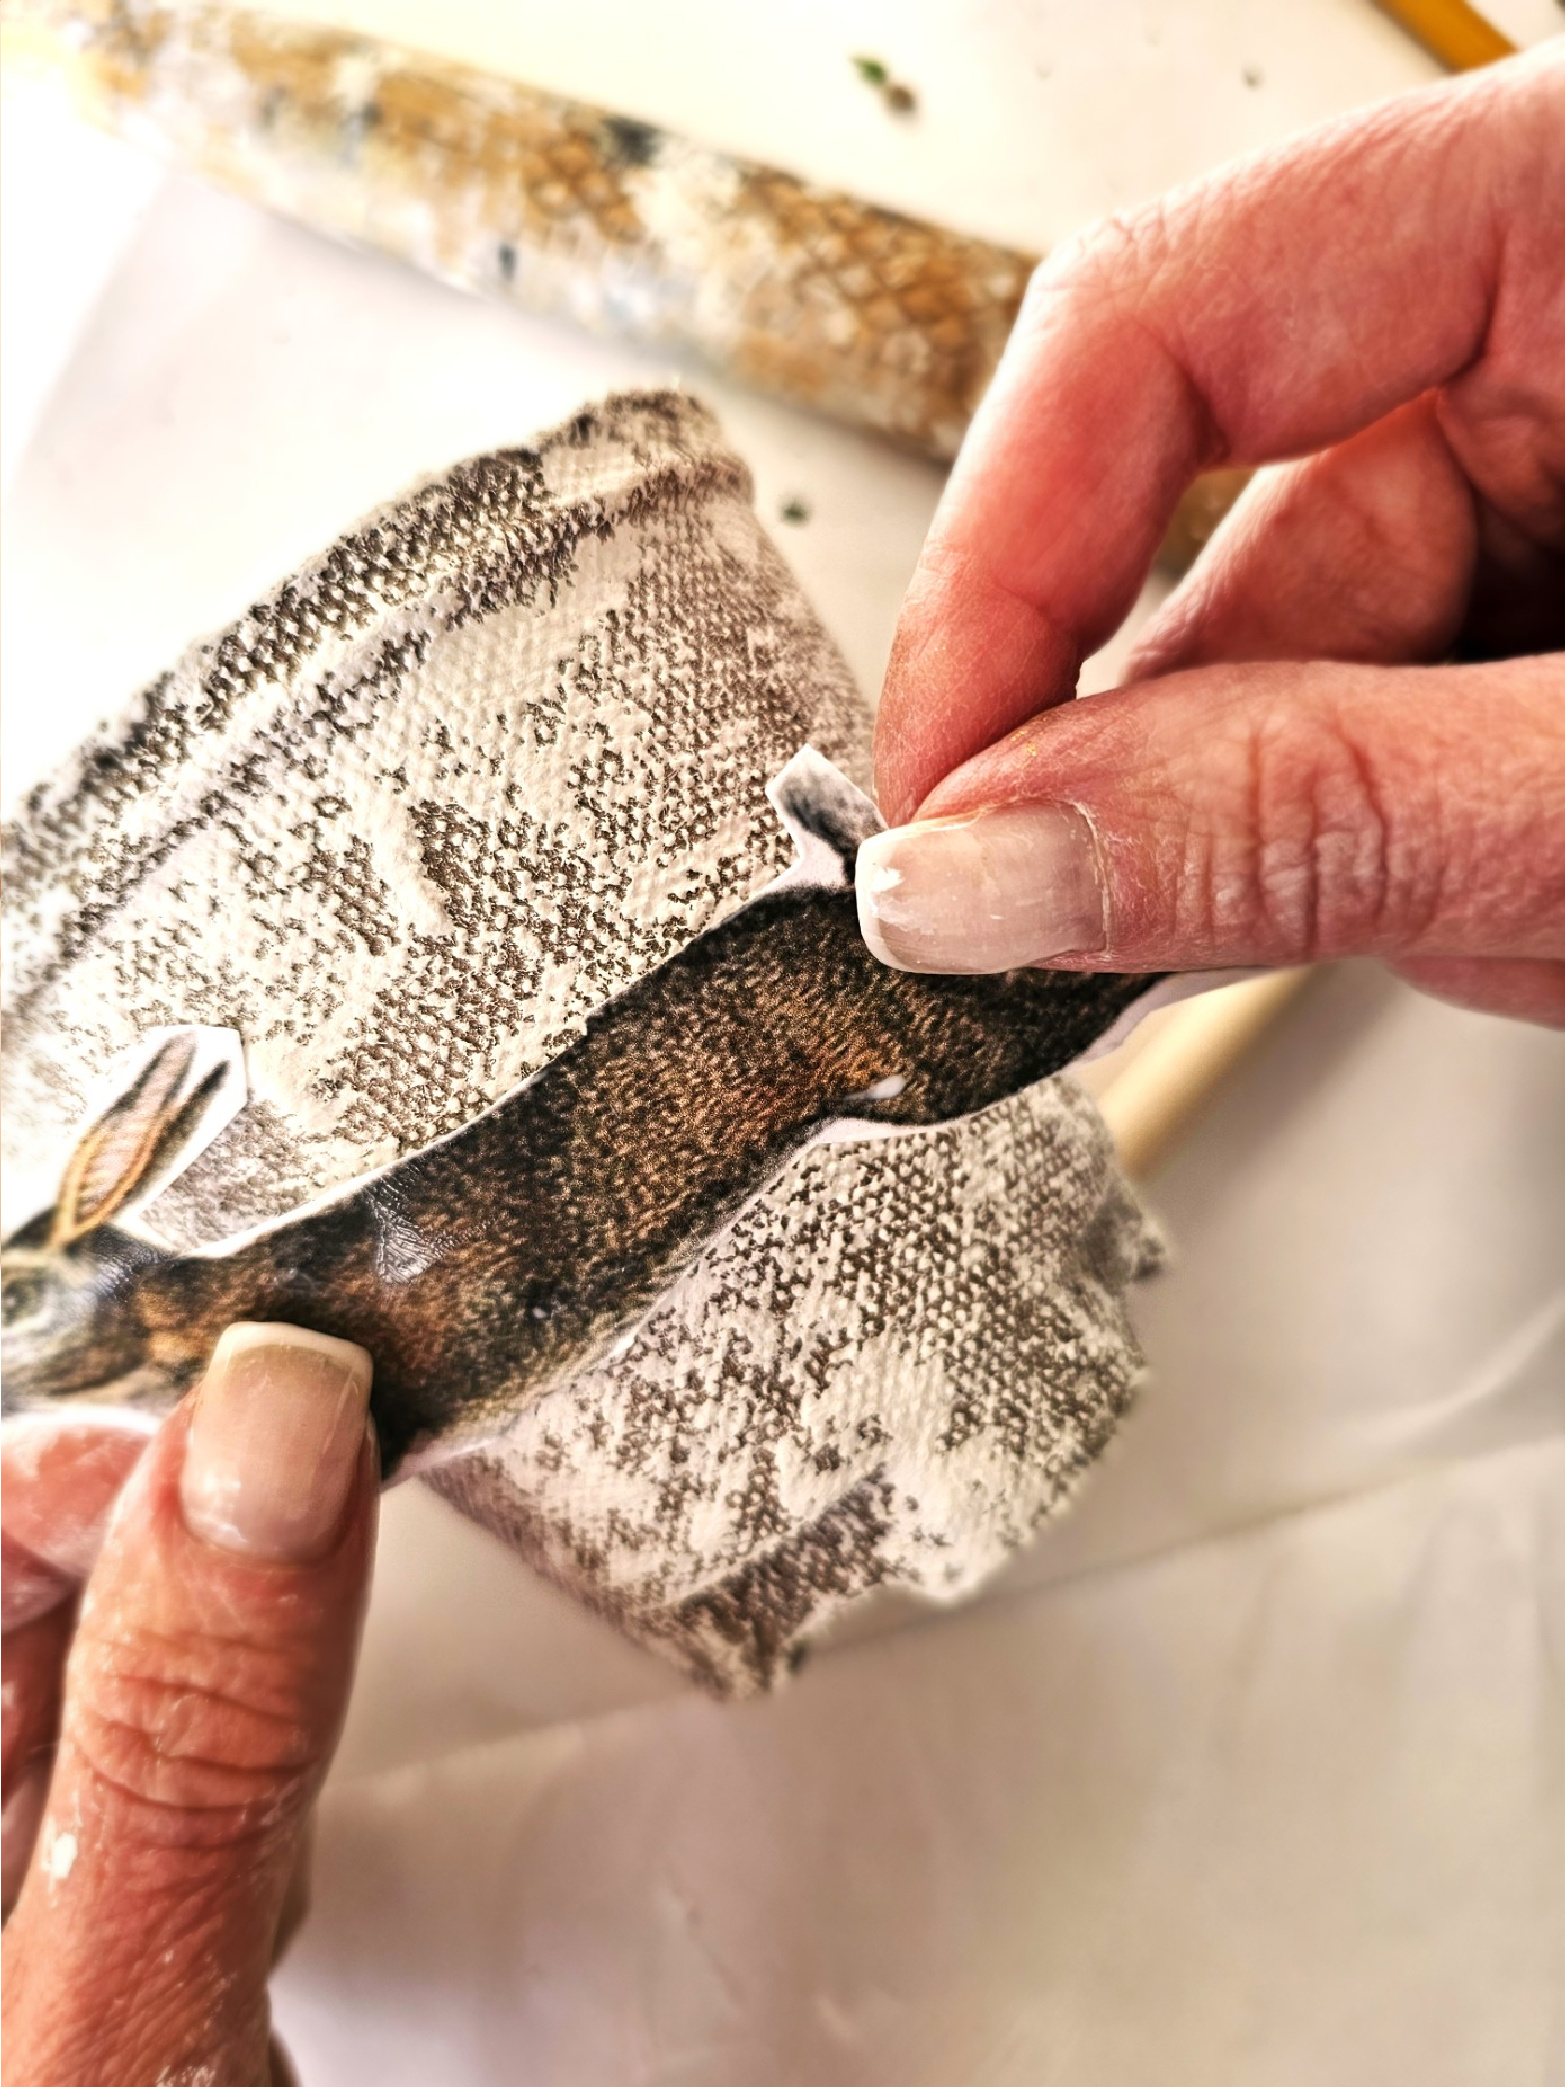
Step 2: Graphic Precision – Print and Cut Images for Peat Pot Easter Treat Baskets
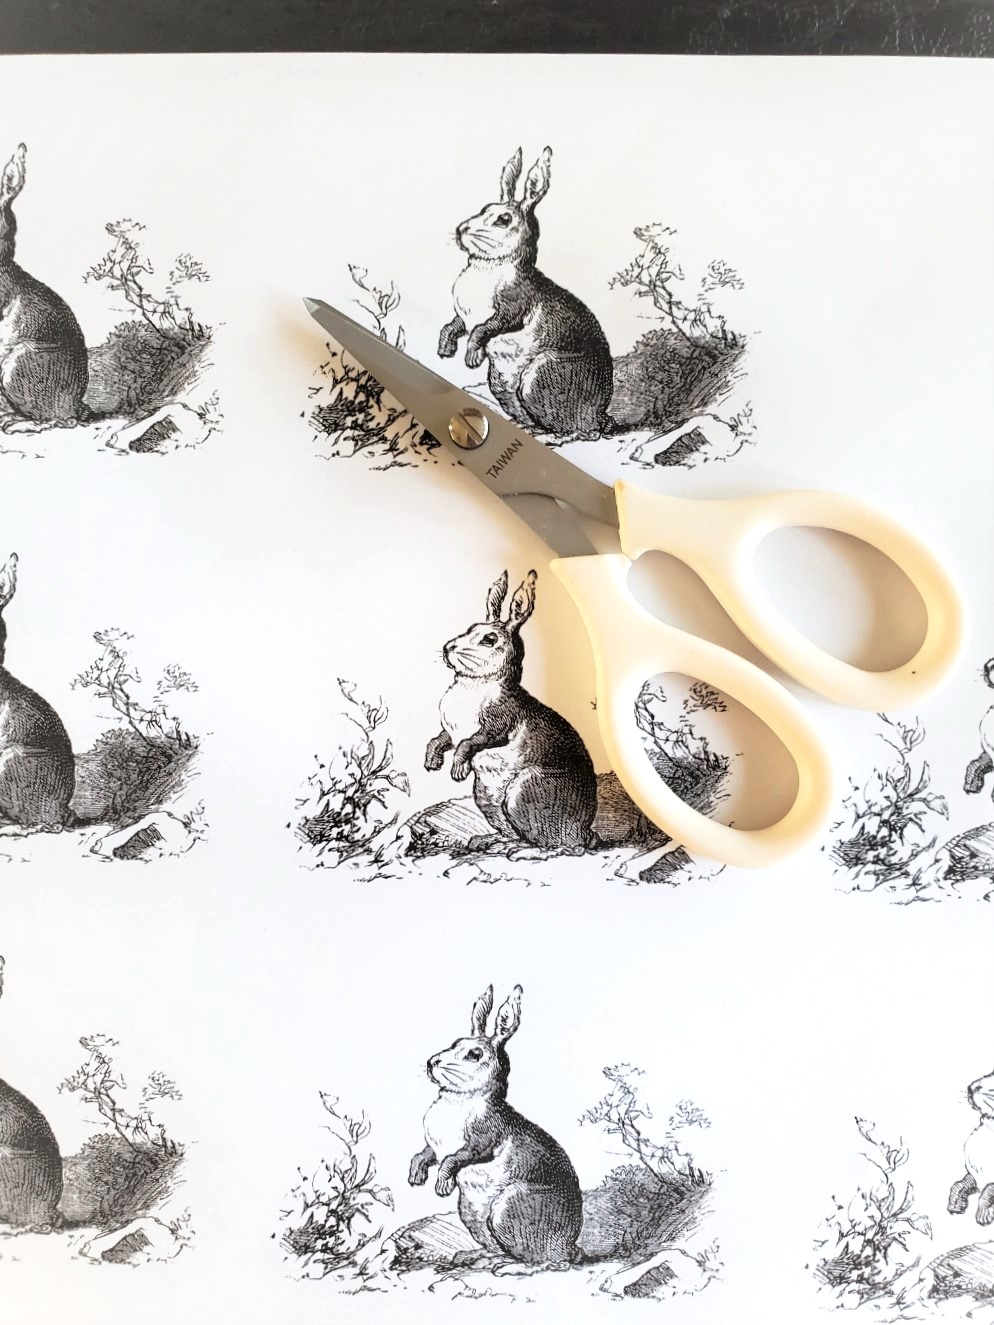
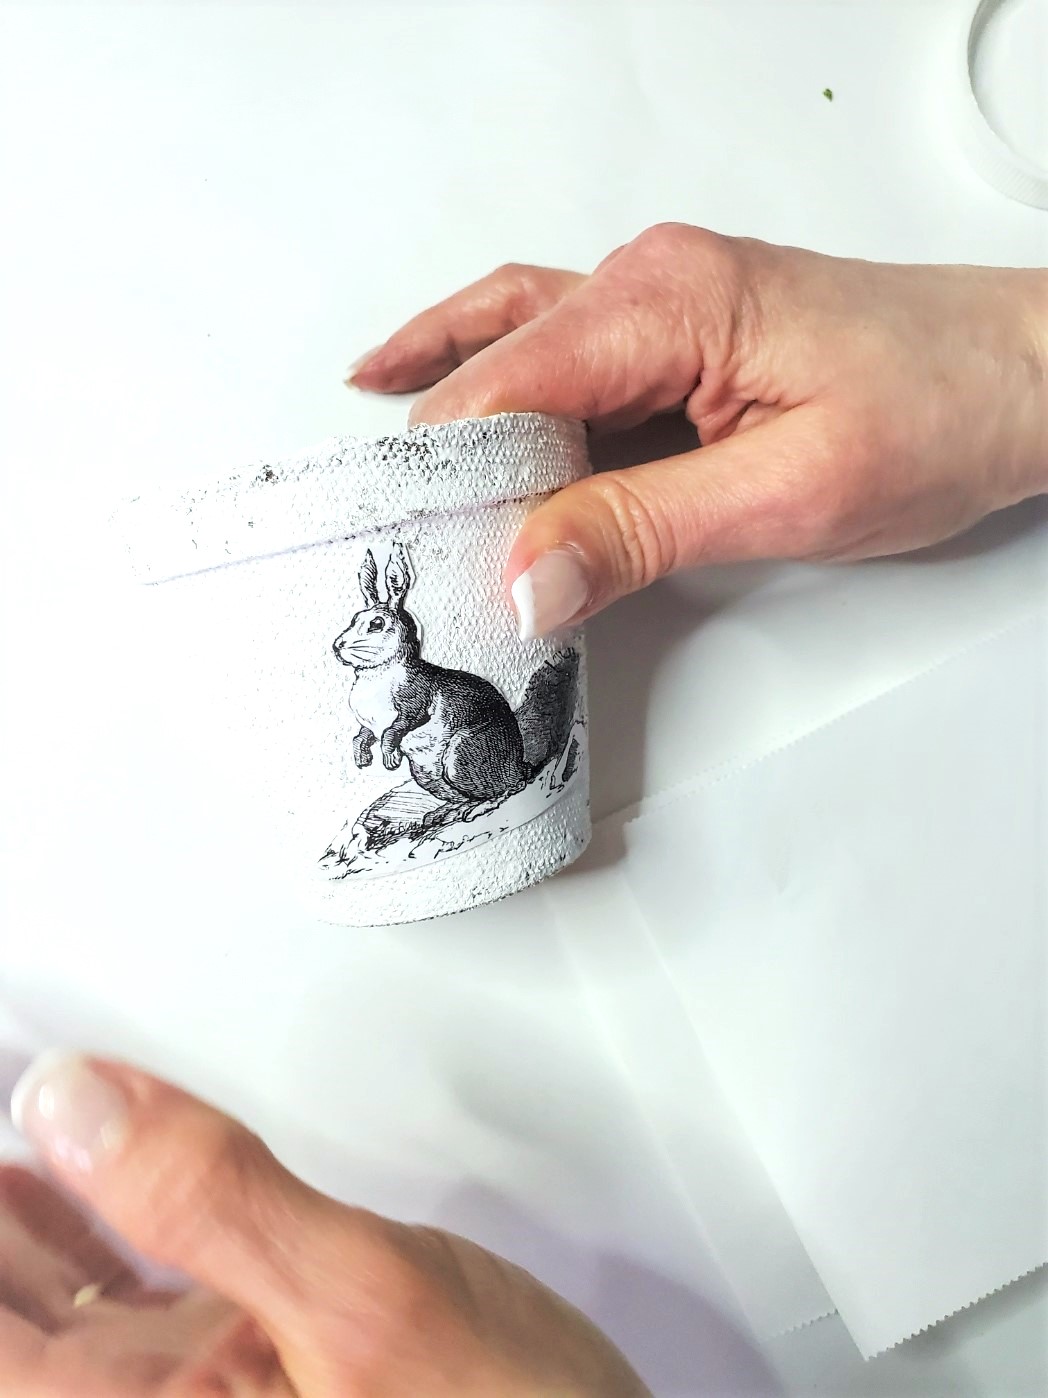
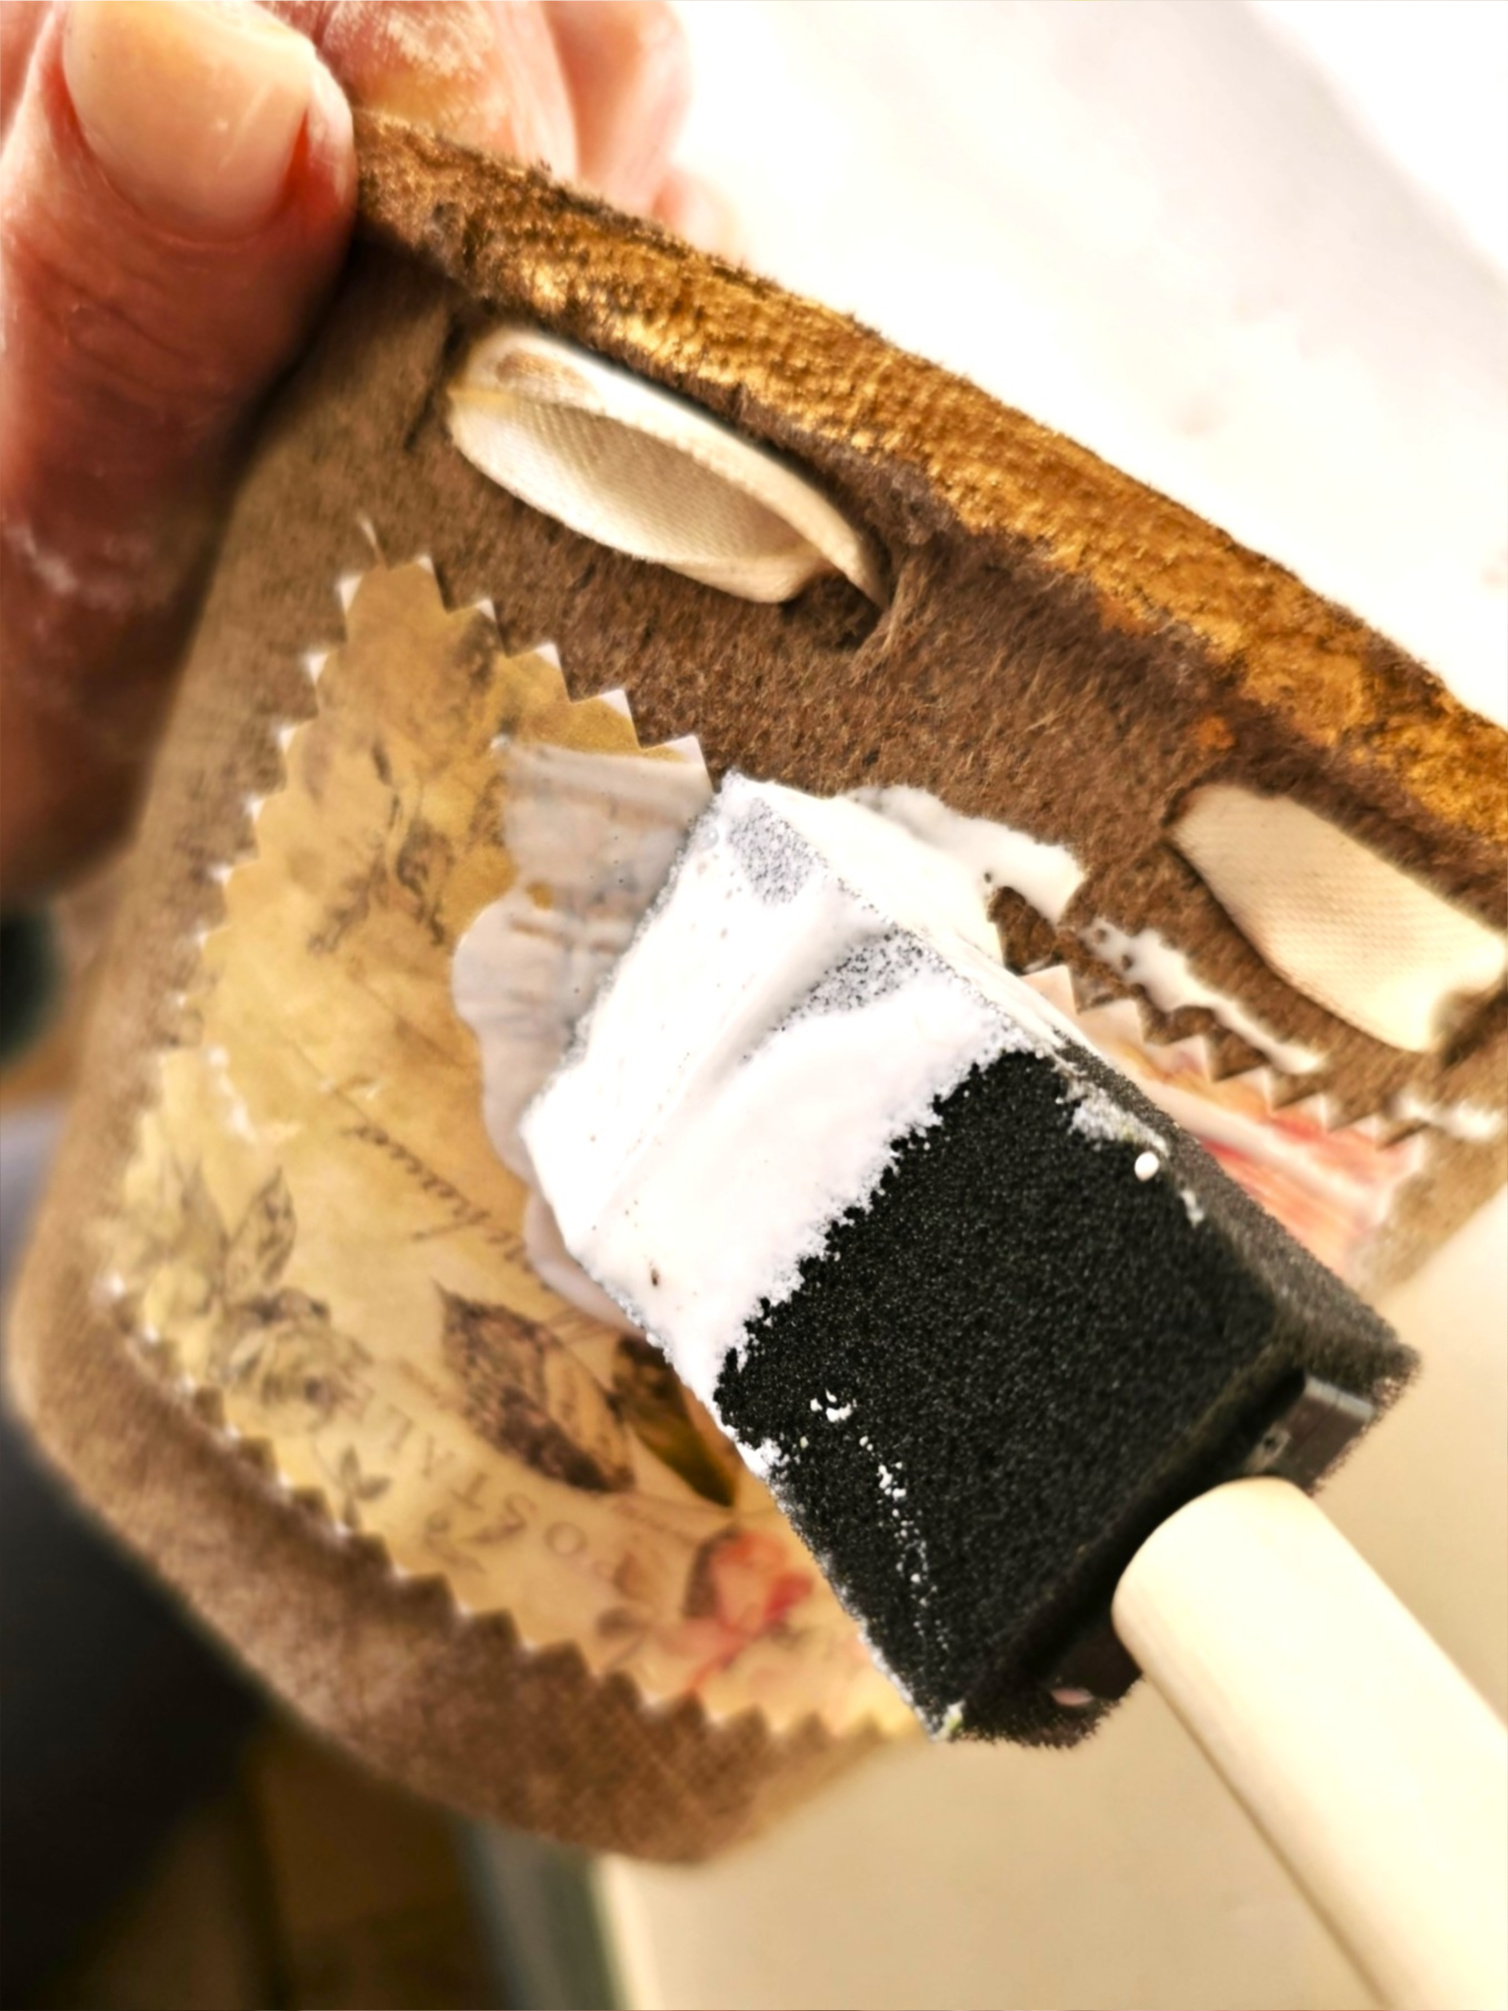
The second step is to print a spring graphic on regular printer paper, card stock, or tissue paper to add to the side of each pot. Use scissors or decoupage scissors to cut around the image as close to the edges as possible. This process ensures that your graphic seamlessly blends on your little pots.
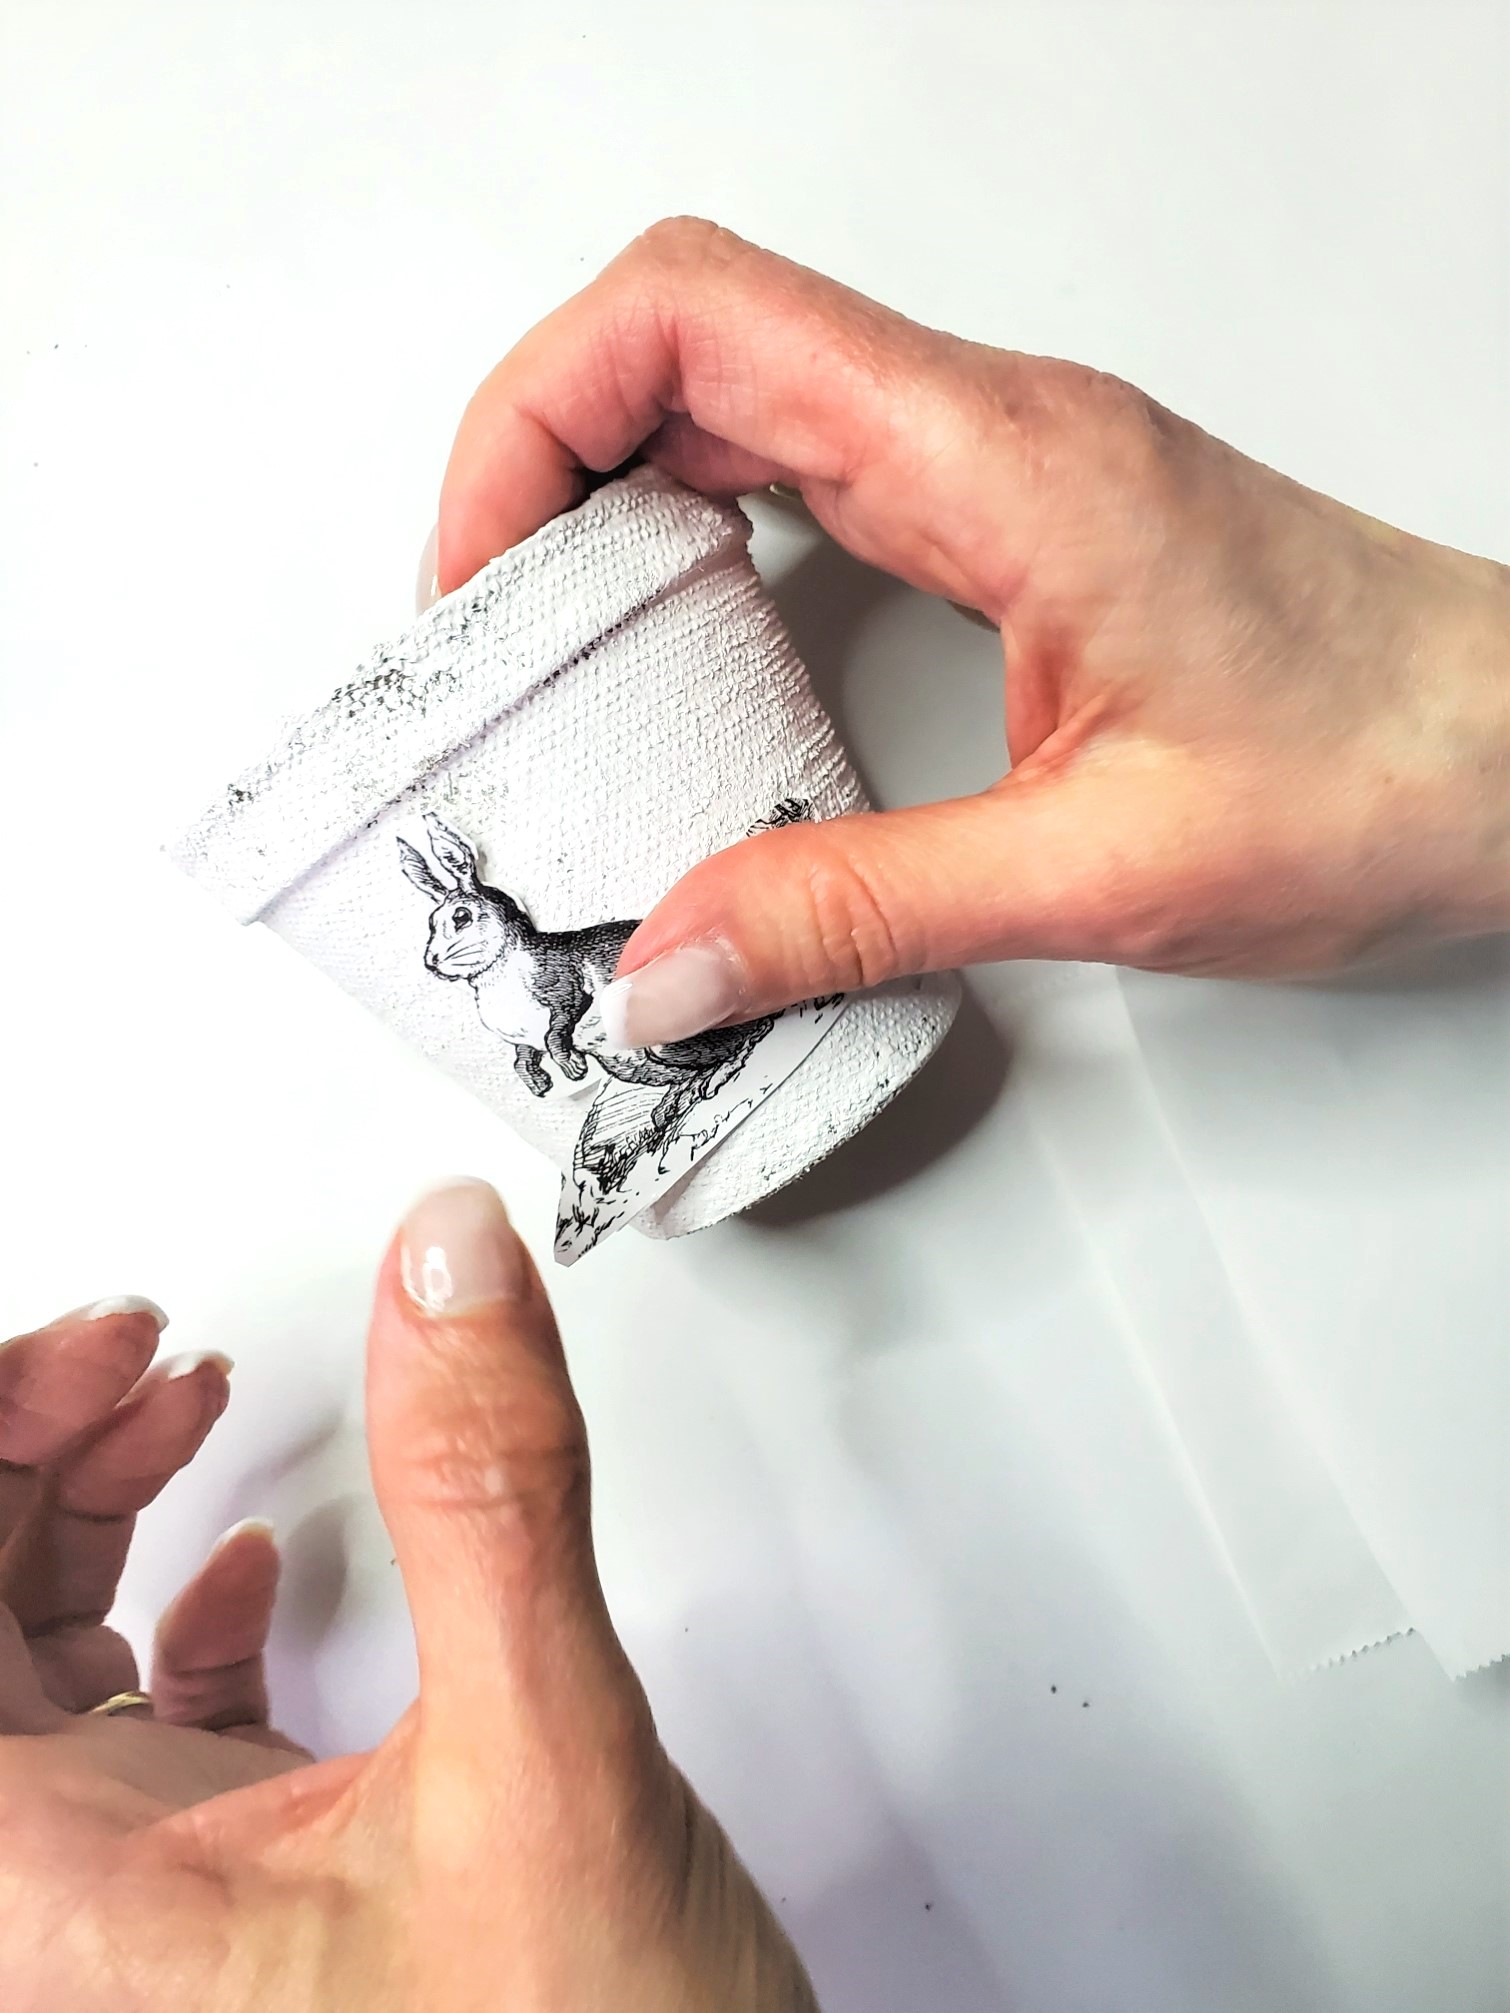
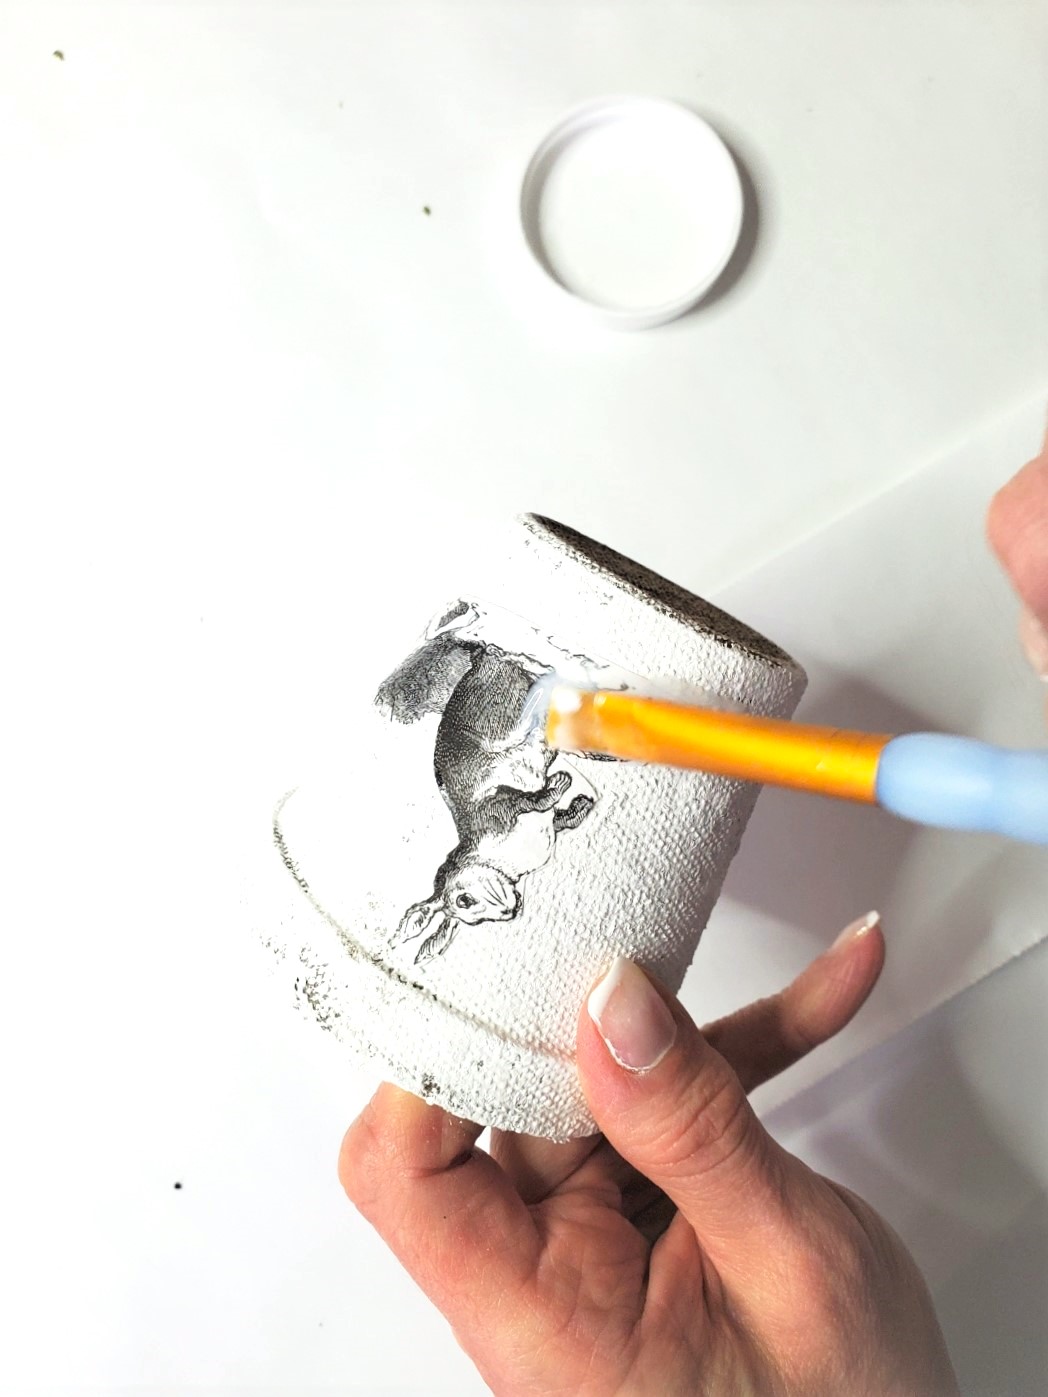
Step 3: Decoupage Delight – Enhance Gift Baskets With Mod Podge And A Graphic
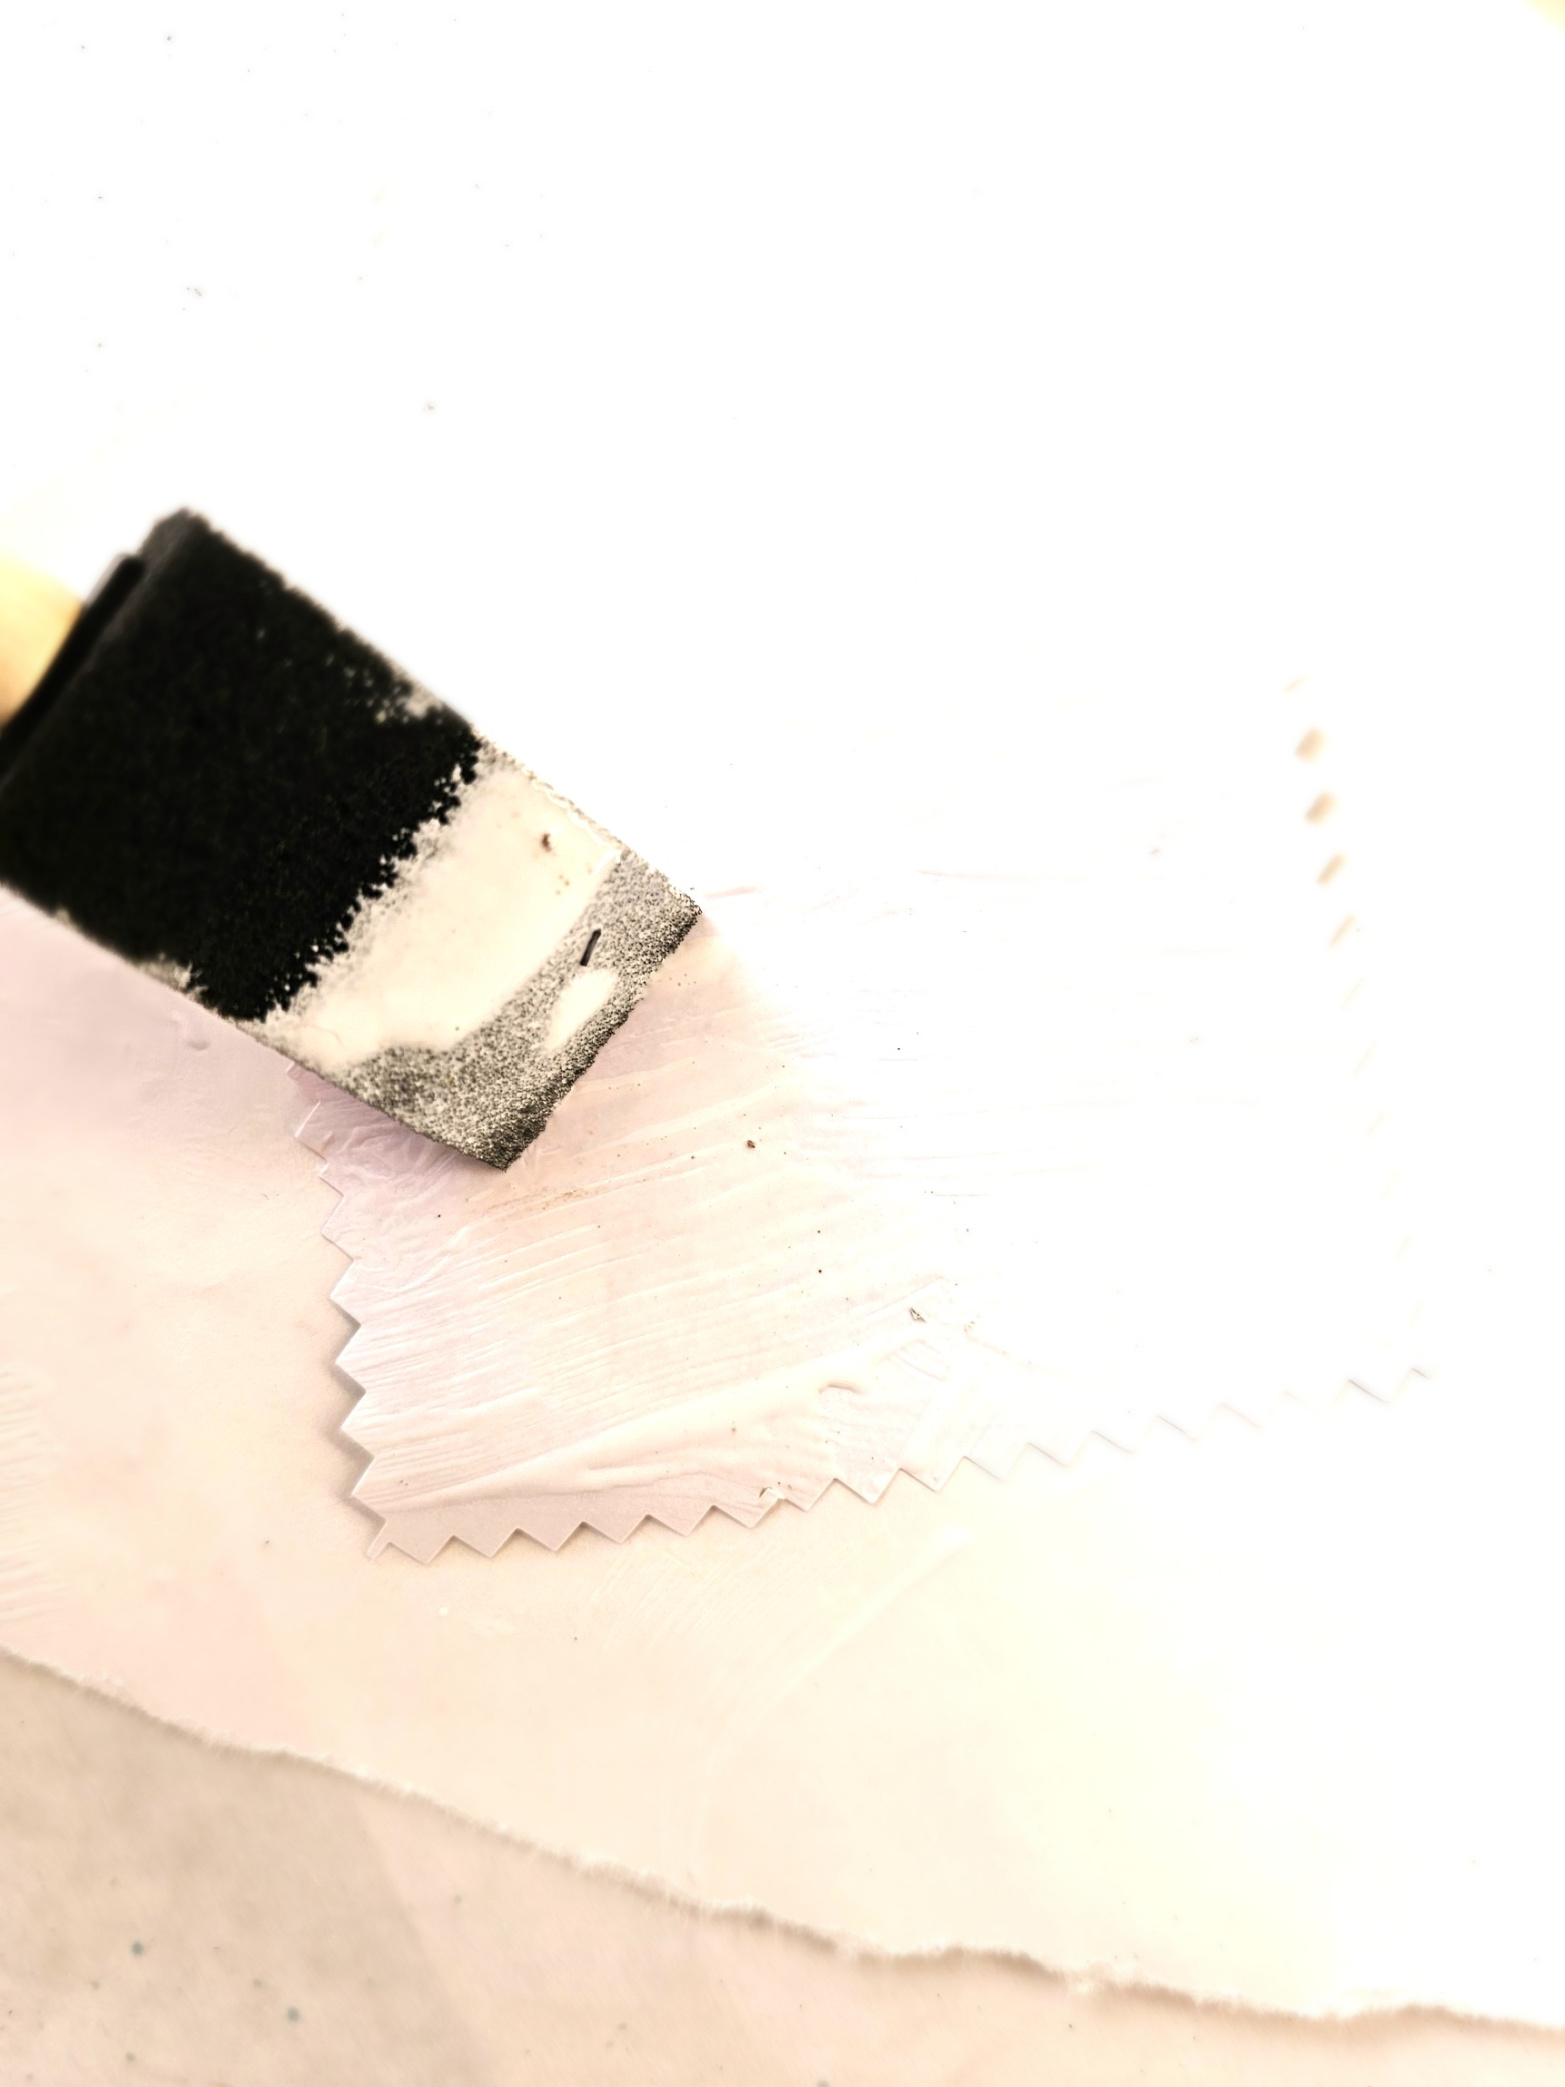
Add personality to your peat pot treat baskets using the Mod Podge for decoupage. Apply a coat of Mod Podge to the back of the cut graphic, paying attention to the edges. Gently place the graphic onto the side of the peat pot. Use a tapping motion to avoid any tears. To achieve a professional and polished look to your spring baskets, add another layer of Mod Podge on top of the graphic. This step not only secures the graphic but also enhances the design.


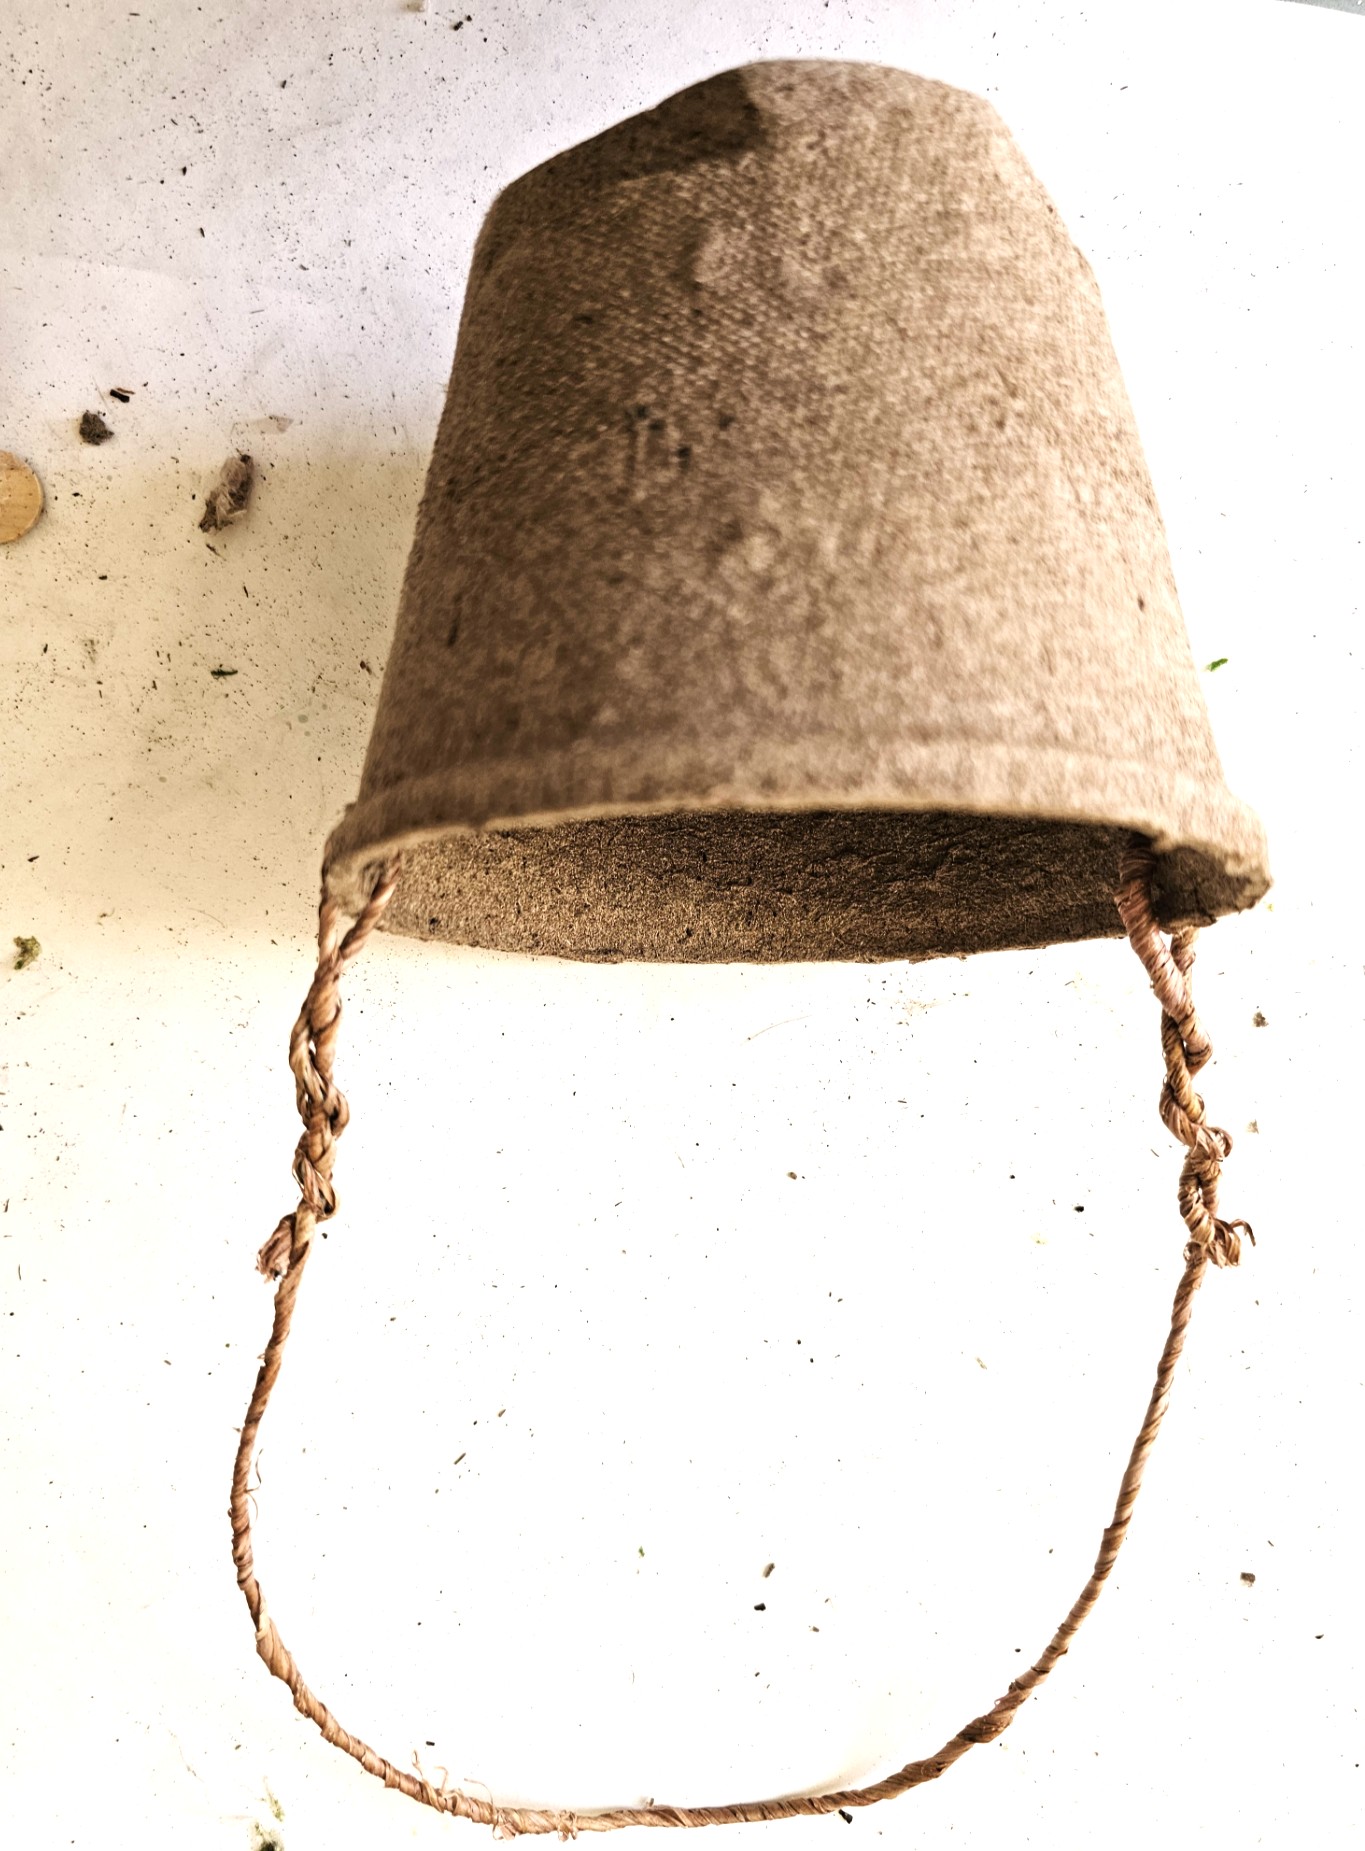
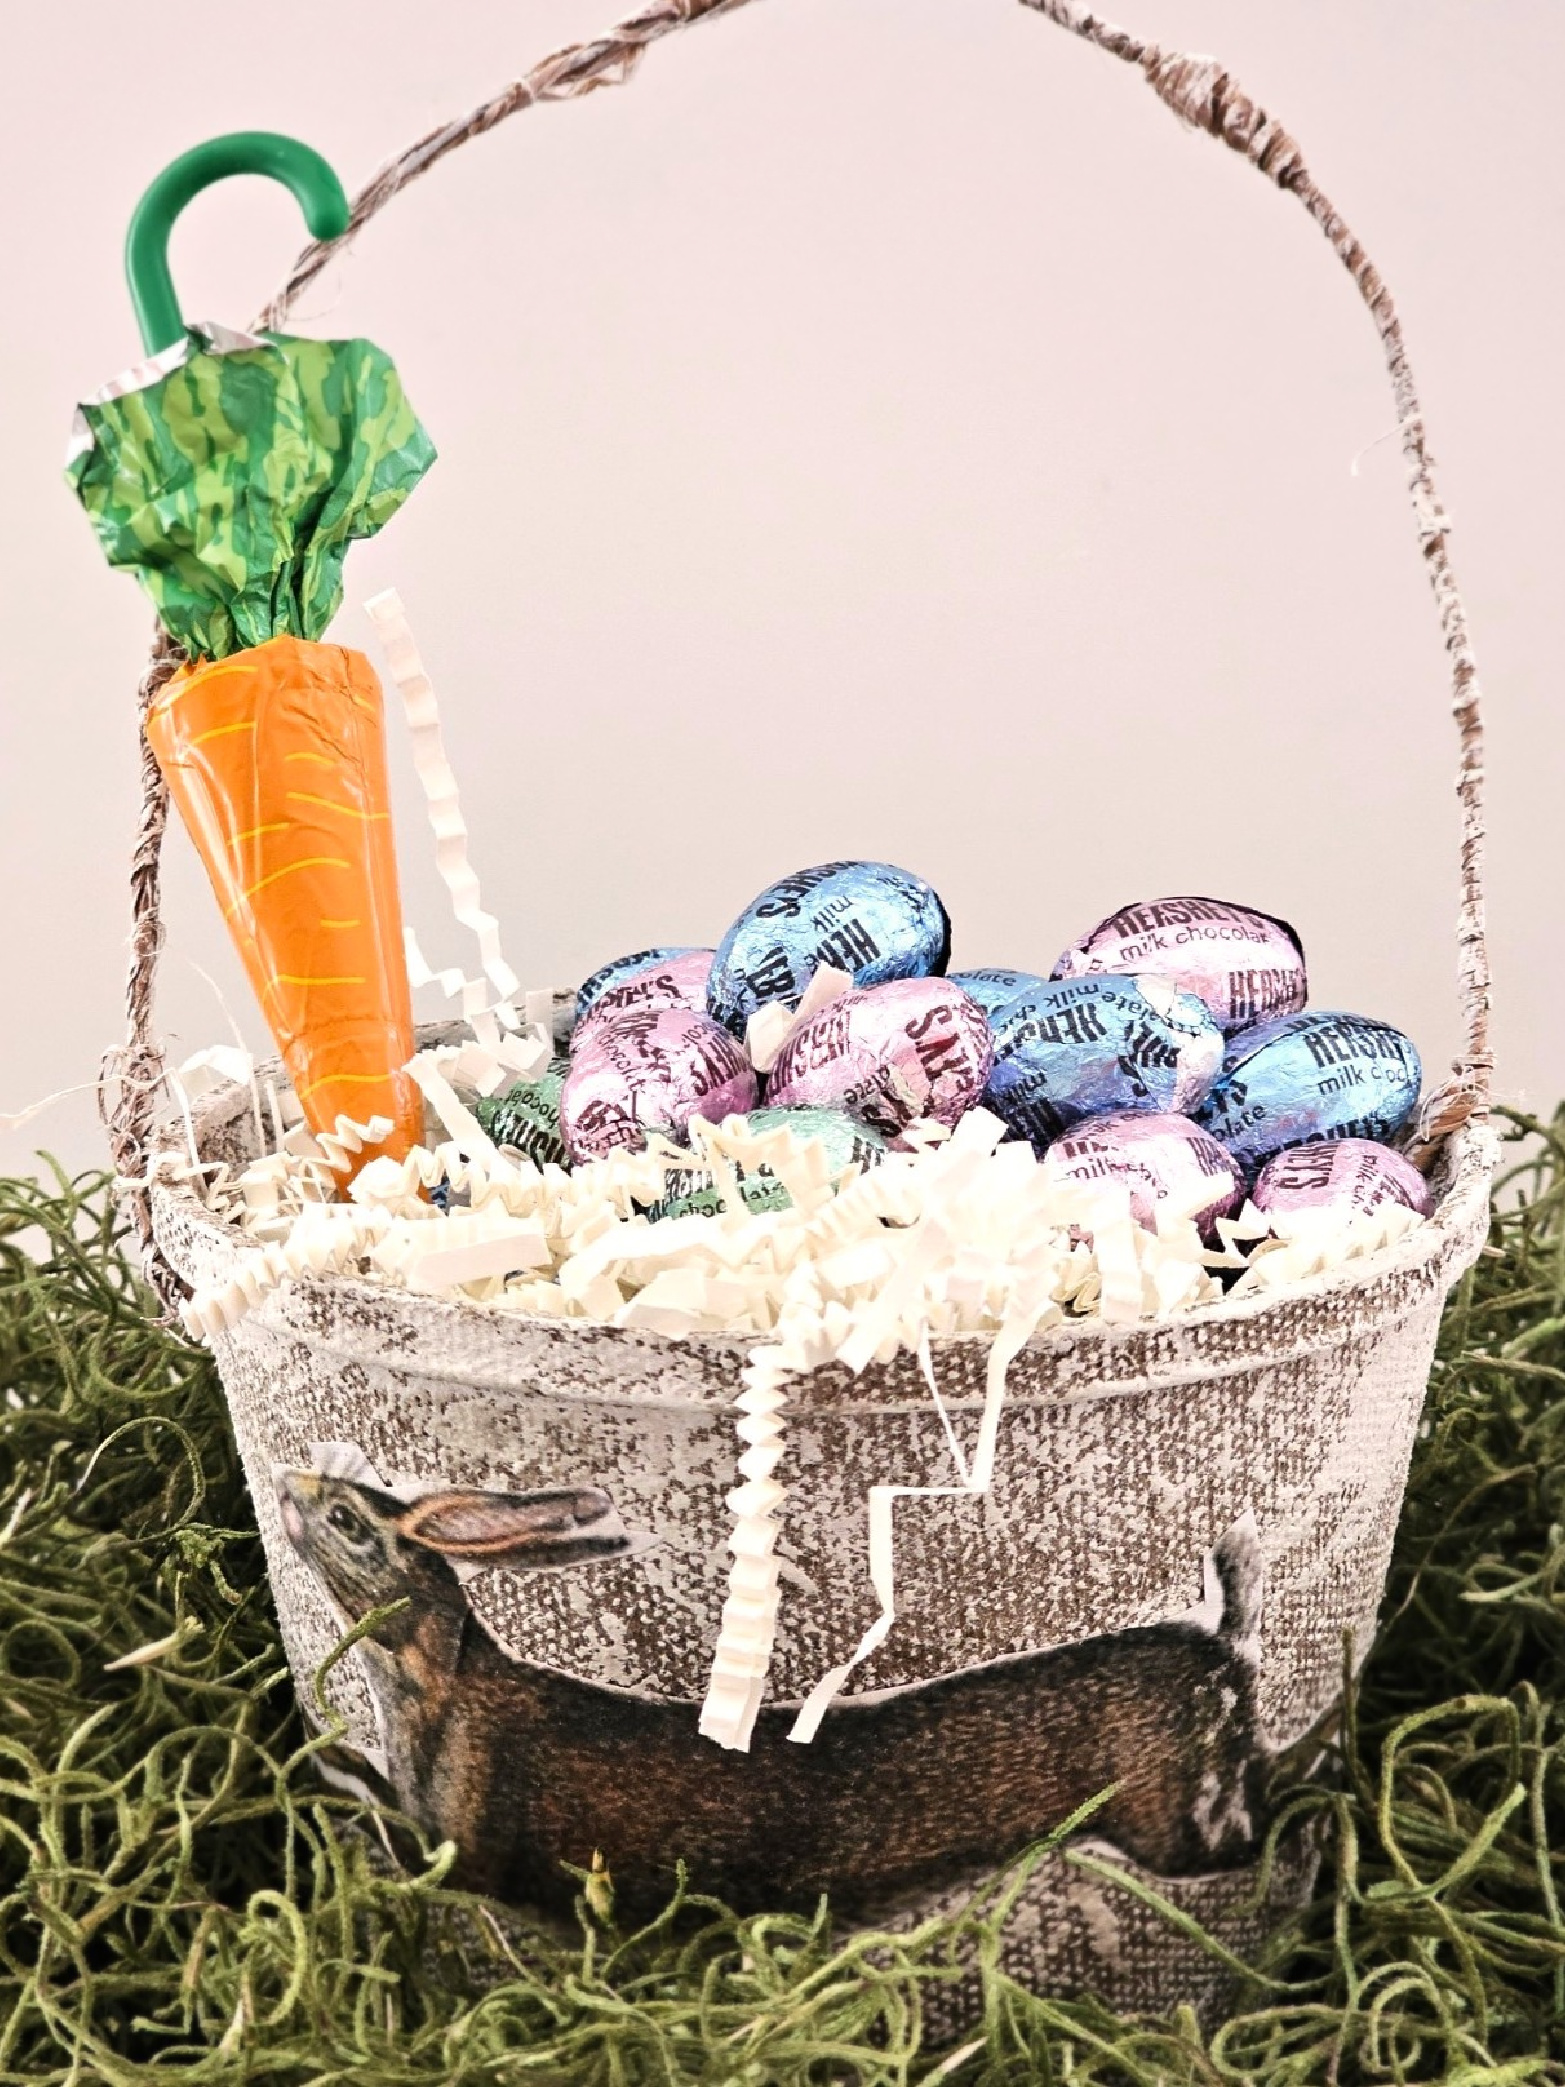
Easter Treat Basket with a Charming Wire Handle
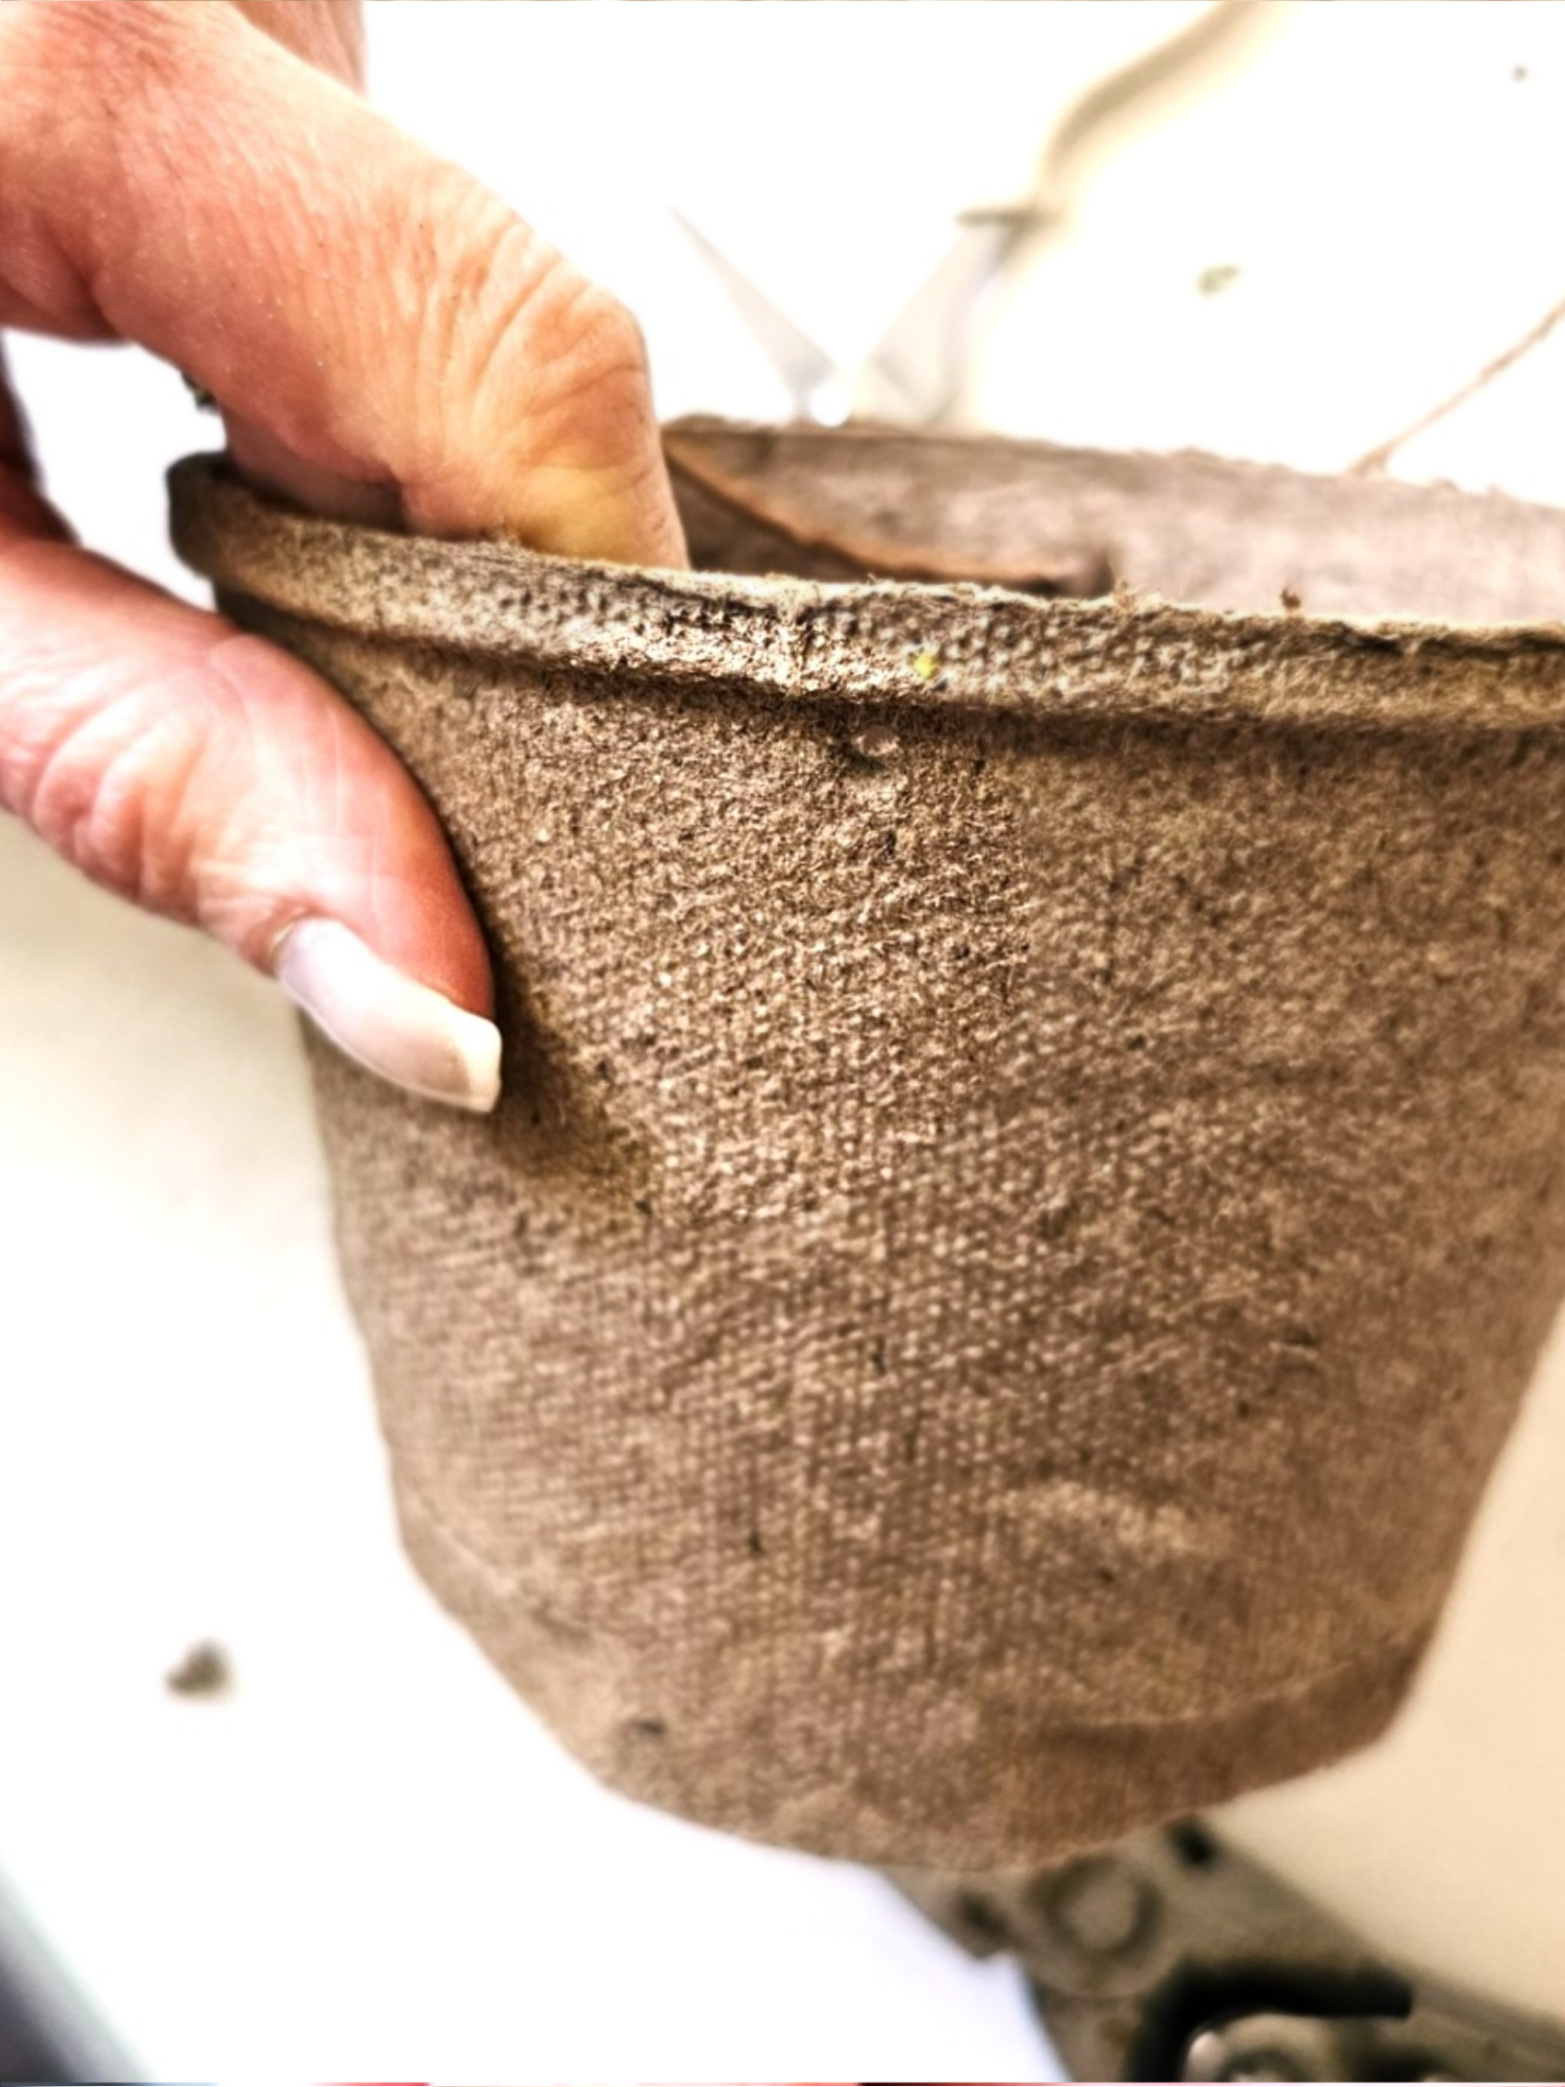
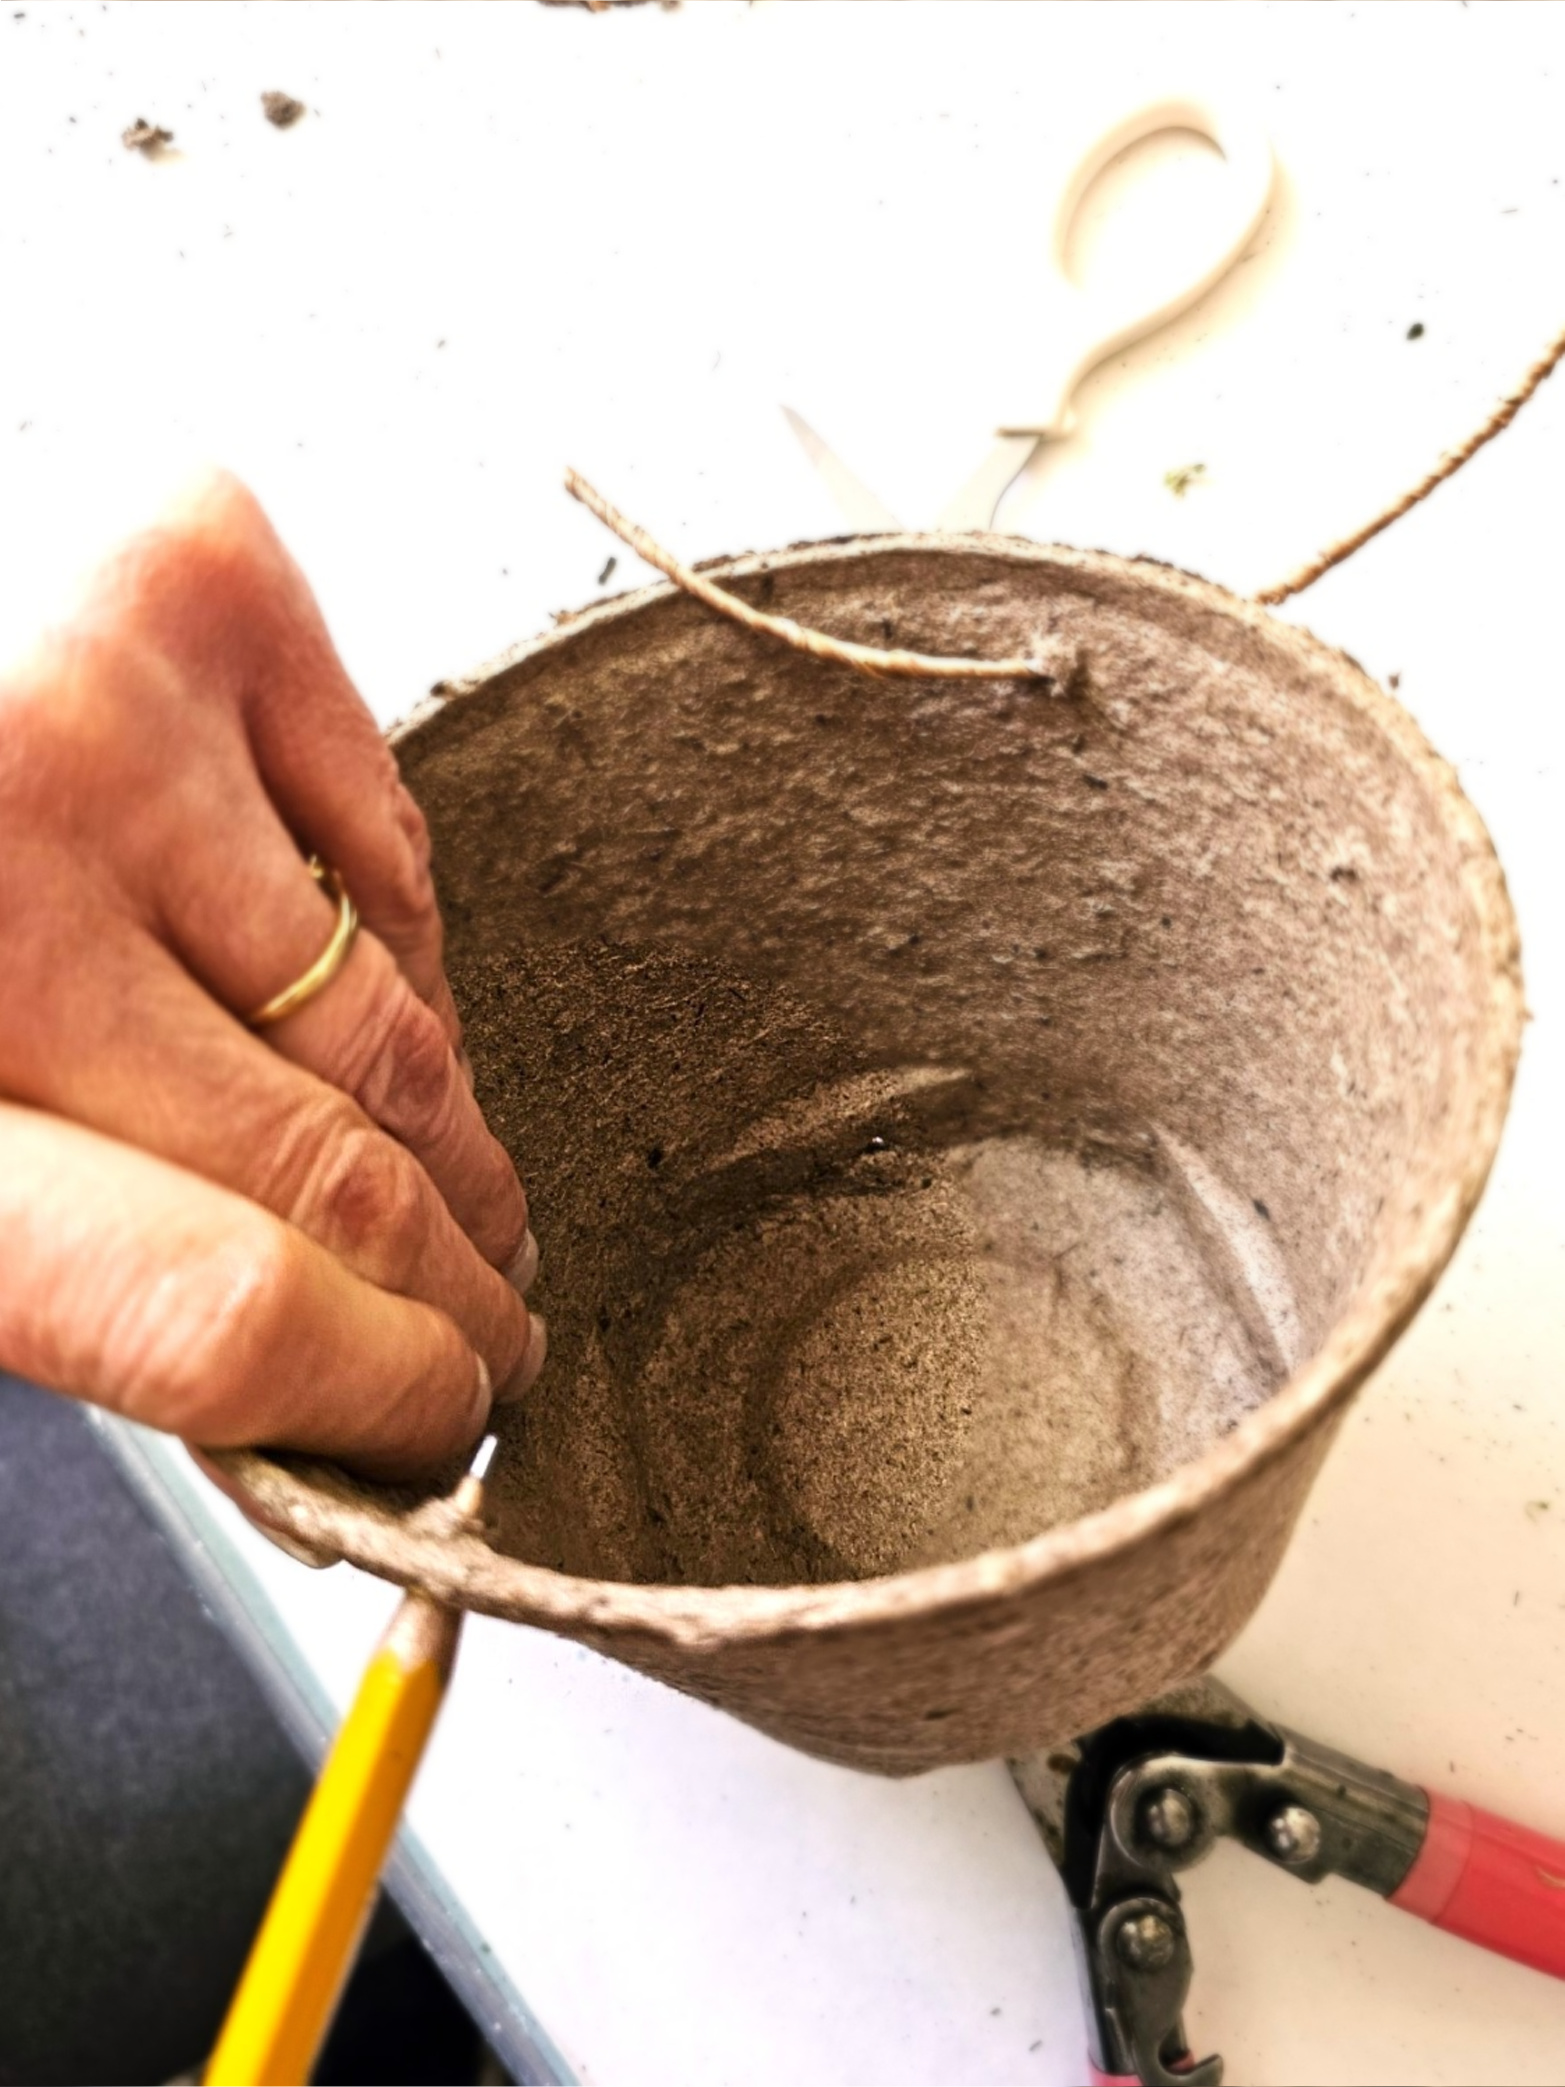
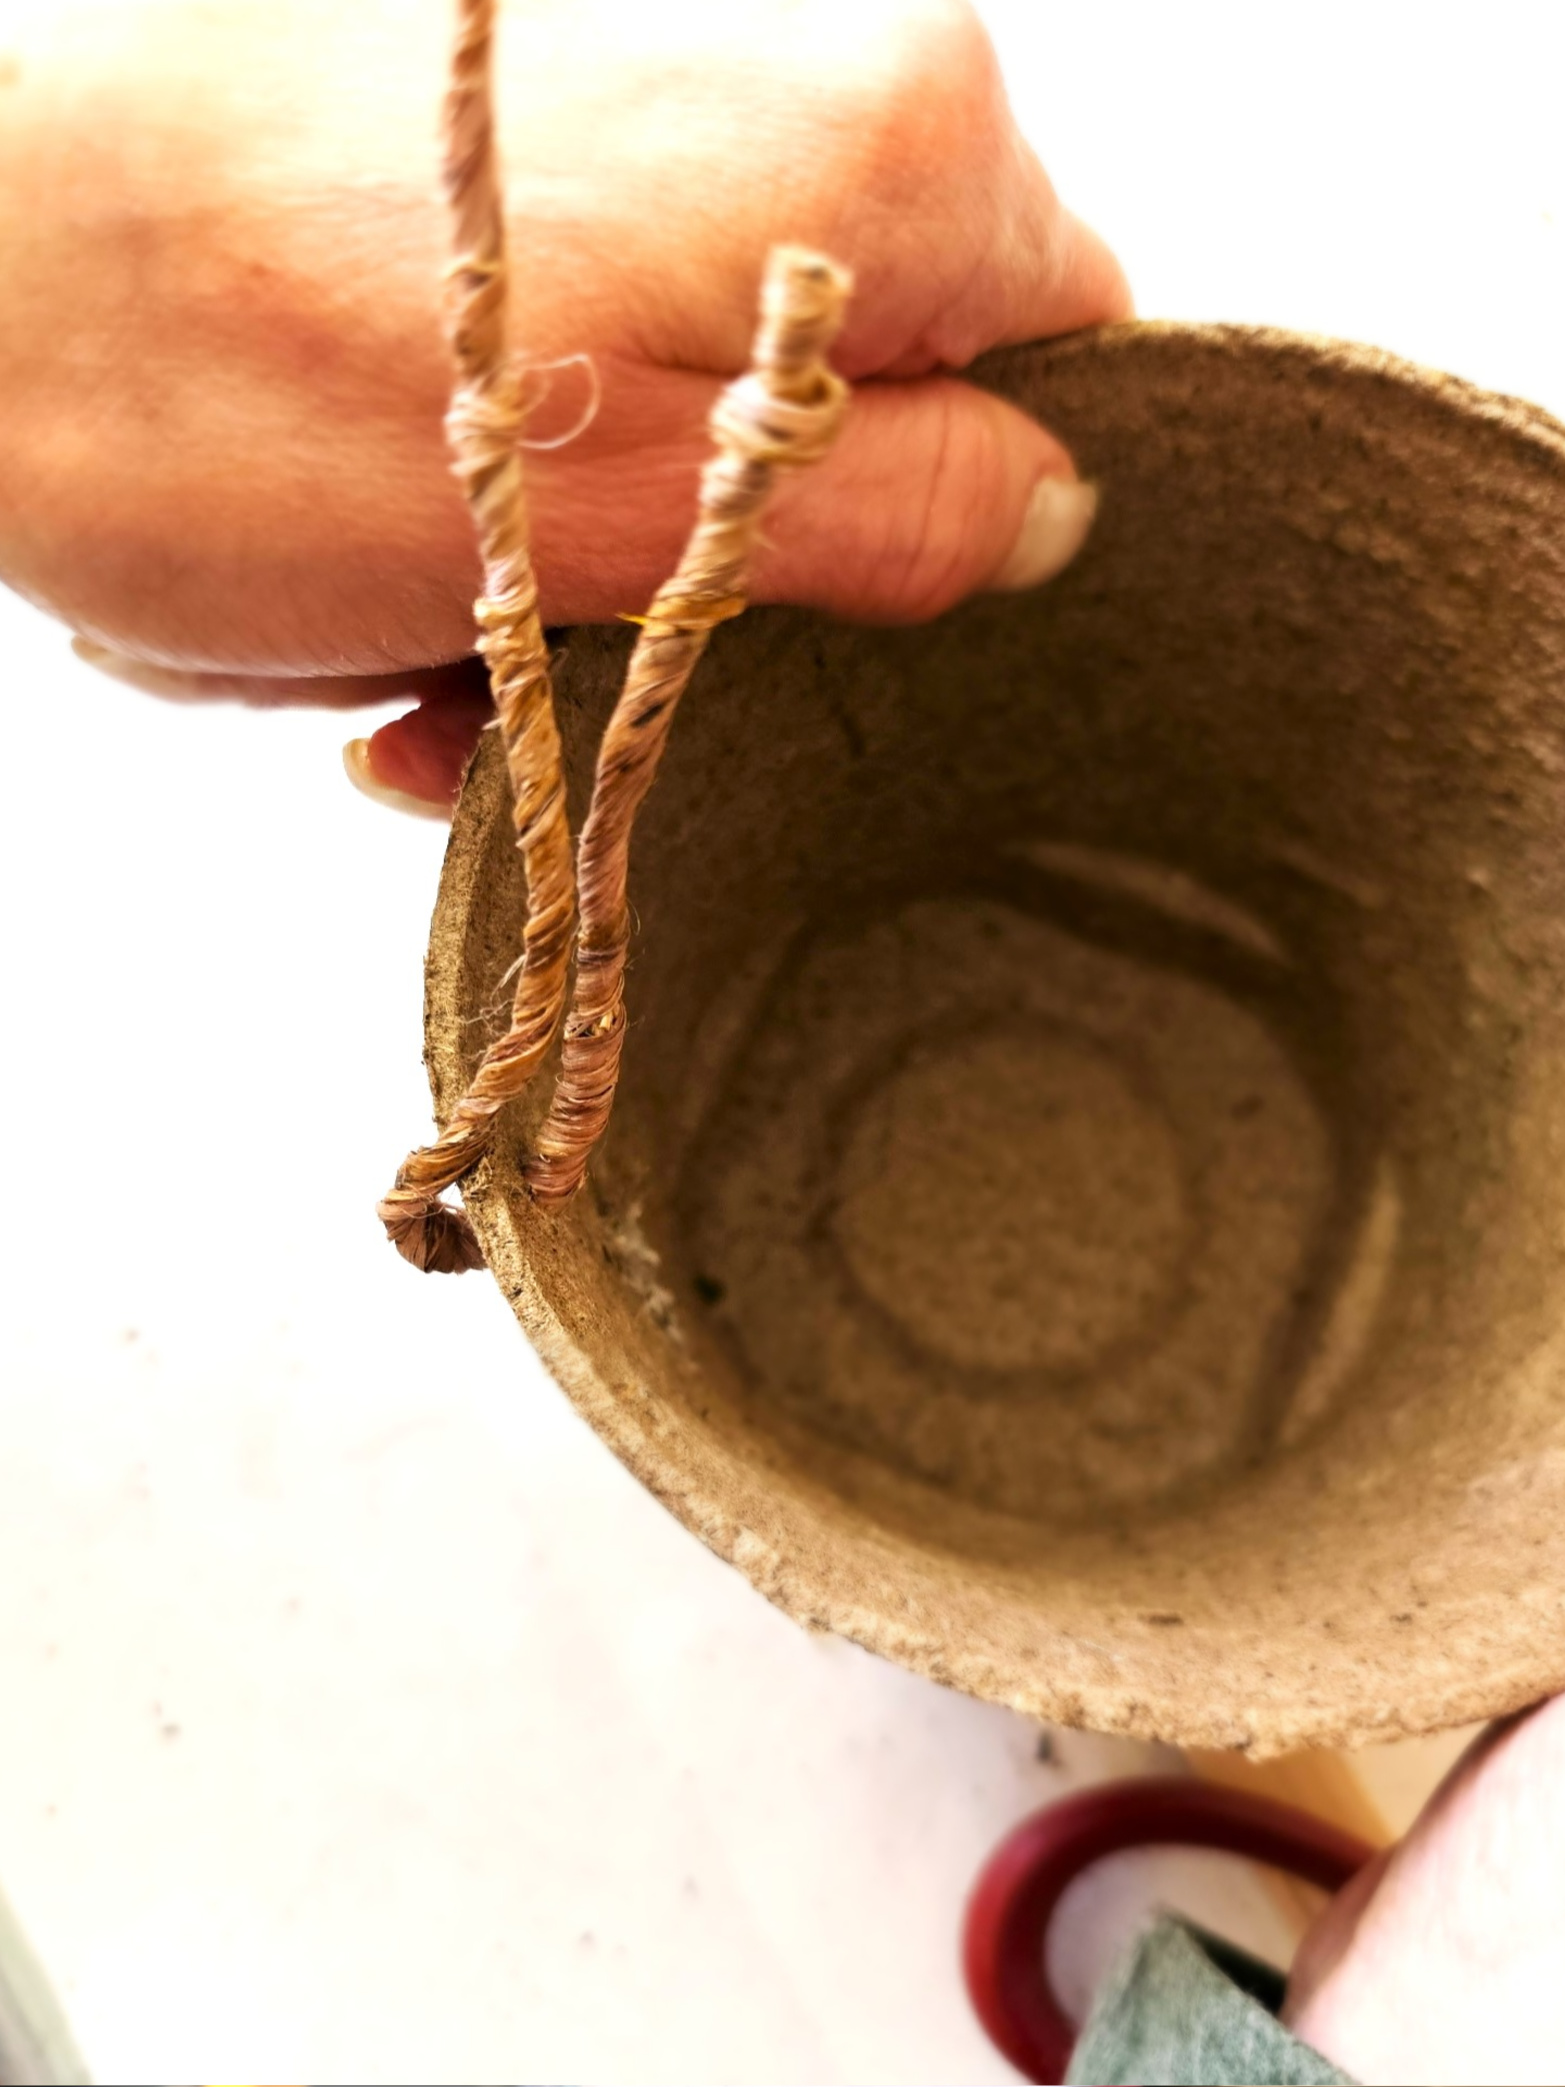
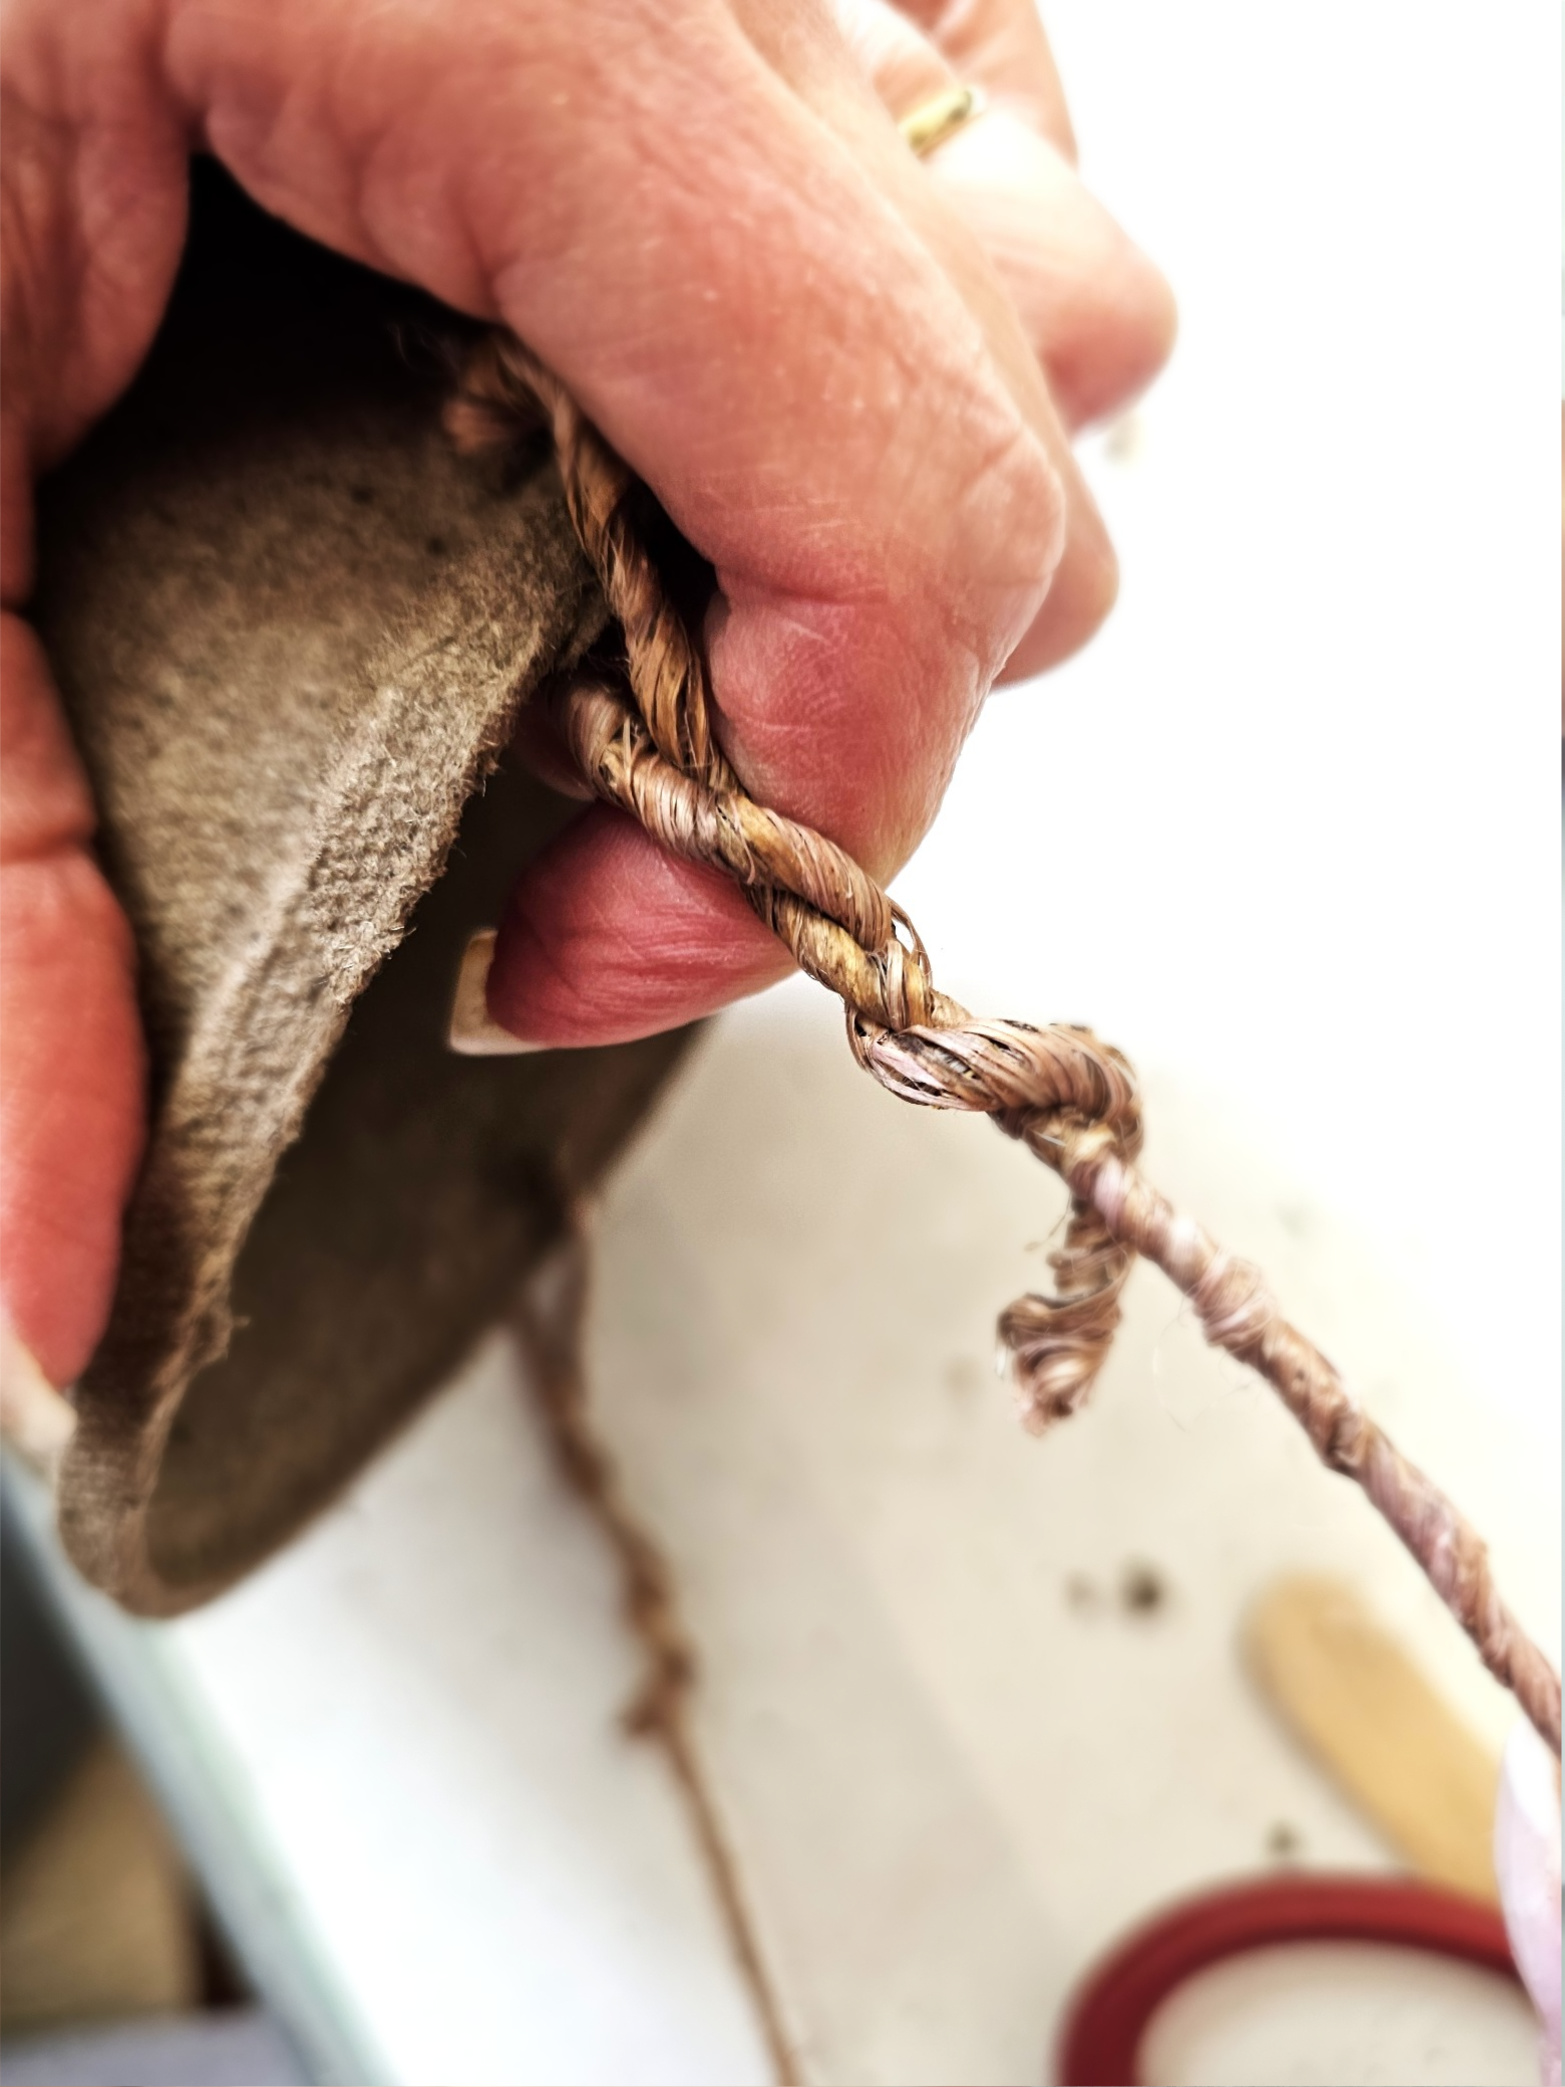
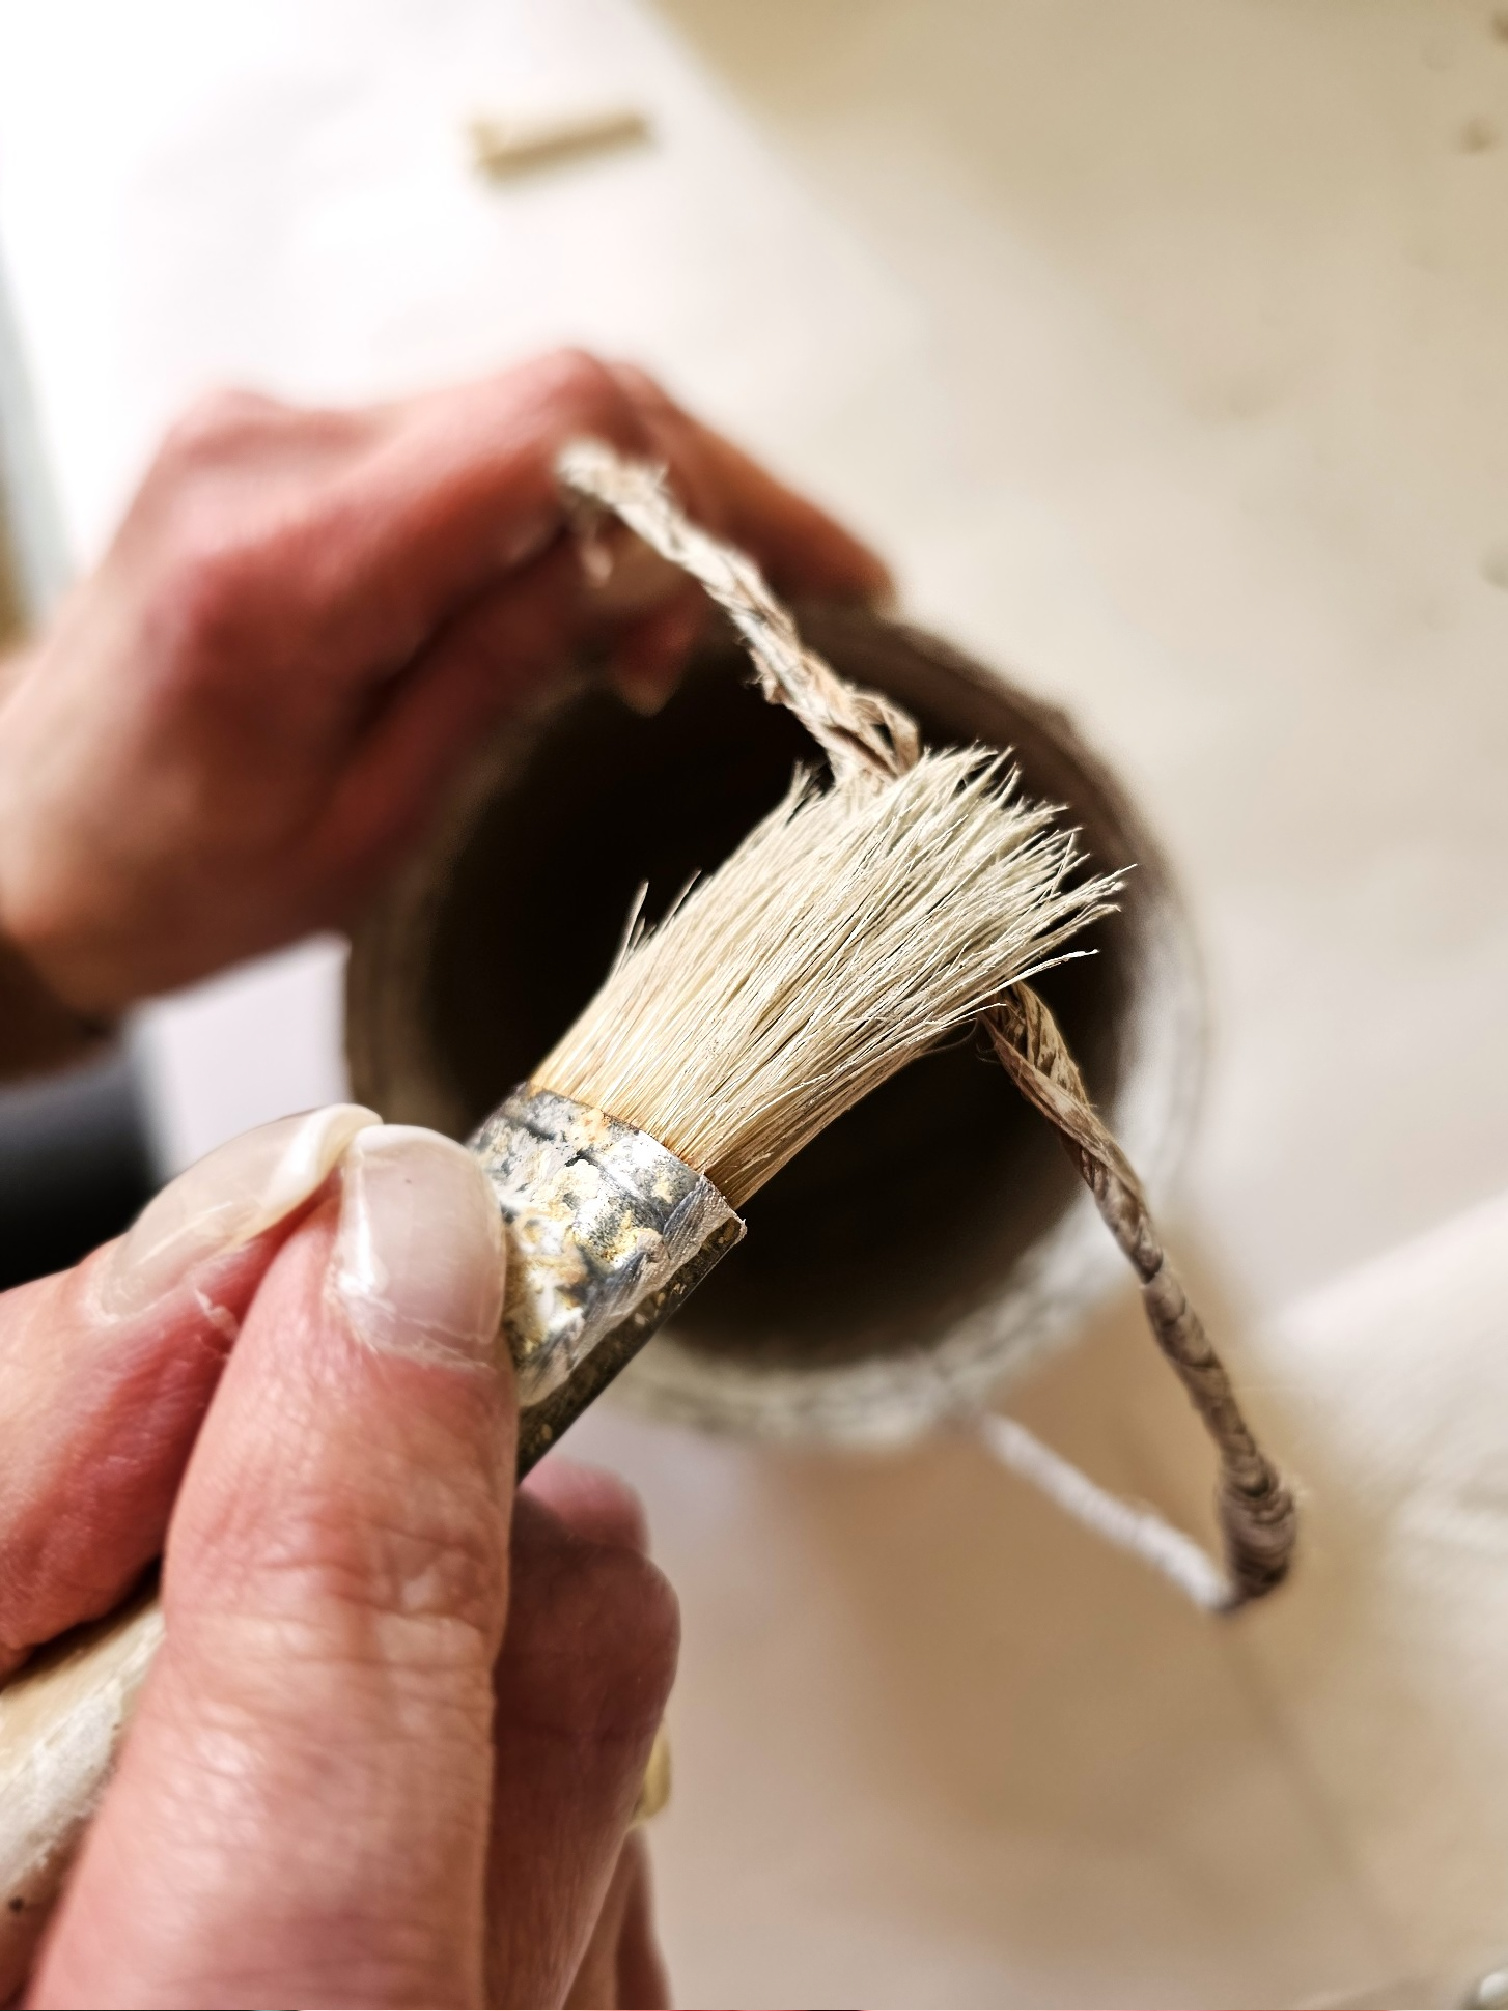
Peat Pot Easter Baskets: Transform your baskets into Easter treat baskets, add a wire handle wrapped with spring ribbon. However, if you leave these in their natural color, leave the wire natural. In my basket, I add a dry brush technique with white paint. Since I added white paint, I added a bit of white to the wire handle too. When adding the wire handle to my treat basket, I made a small hole with the tip of a pair of scissors. I opened the small hole with the tip of a pencil. (No fancy tools are needed to make this wire handle.)
Pro Tip: Add the wire handle through the small holes, bend the wire, and twist the end of the wire to keep it stable. Next, add easter grass, shredded paper, or pastel crepe paper to the bottom of the pot and add assorted Easter candy.
This is also a great way for kids to enjoy an old tradition of hunting for Easter eggs.
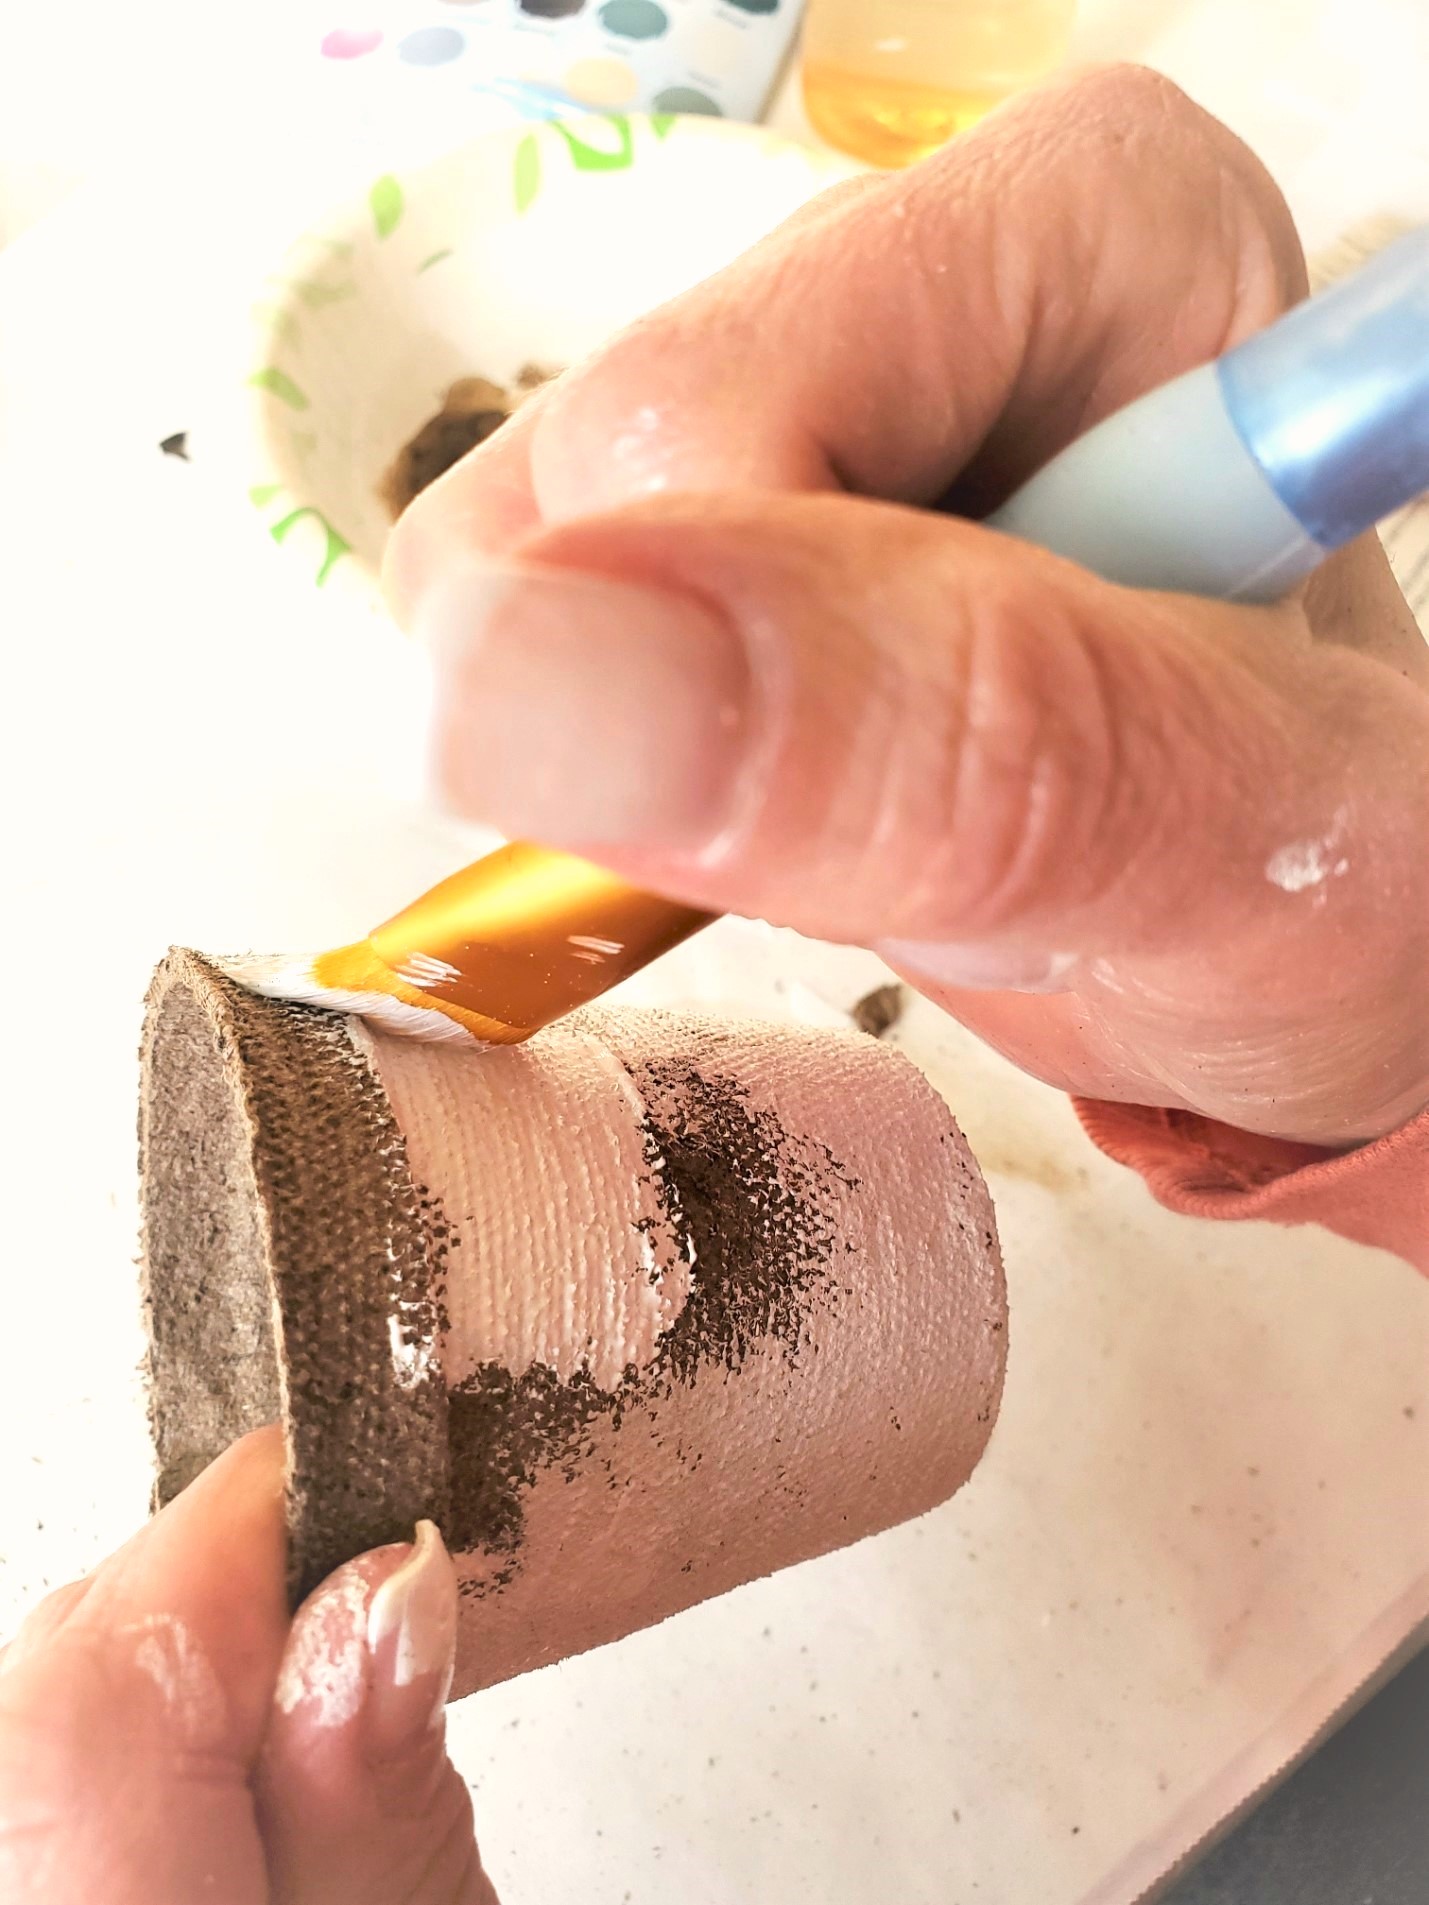
Cindy’s Tips Dry Brushing
Pro Tip: Add a little bit of acrylic paint to a plastic cup or paper plate. Add paint to the tips of a paintbrush. Wipe the excess paint on a paper towel to remove excess paint. Use light strokes when adding the paint. The natural color should show through. Be sure to cover the top edge and the inner edge of the top of the pot for a finished look.
Cindy’s Mod Podge Tip:
Pro Tip: When working with Mod Podge for a large image, plastic wrap or a rubber glove is so handy. This has given me a smooth surface when adding a larger image to the side of the peat pot, trays, and plaques every time.
Discover Other Paper Options: Creative Possibilities
- A spring paper napkin – these have five different choices; however, this is my favorite!
- spring card stock
- spring tissue paper – this is my favorite
Pro Tip: When using a paper napkin, 2-ply napkins are best. Separate the paper napkin and add it in a small area at a time. And, if the napkin tears when adding it to the side of the peat pot, wait for it to dry. Add a second coat of Mod Podge and a piece of a napkin. The side of the pot will become a pretty basket.

Cindy’s Note: I added slices of cut crepe paper to this spring decoration because I had it in my stash. Easter grass would be adorable, don’t you think?
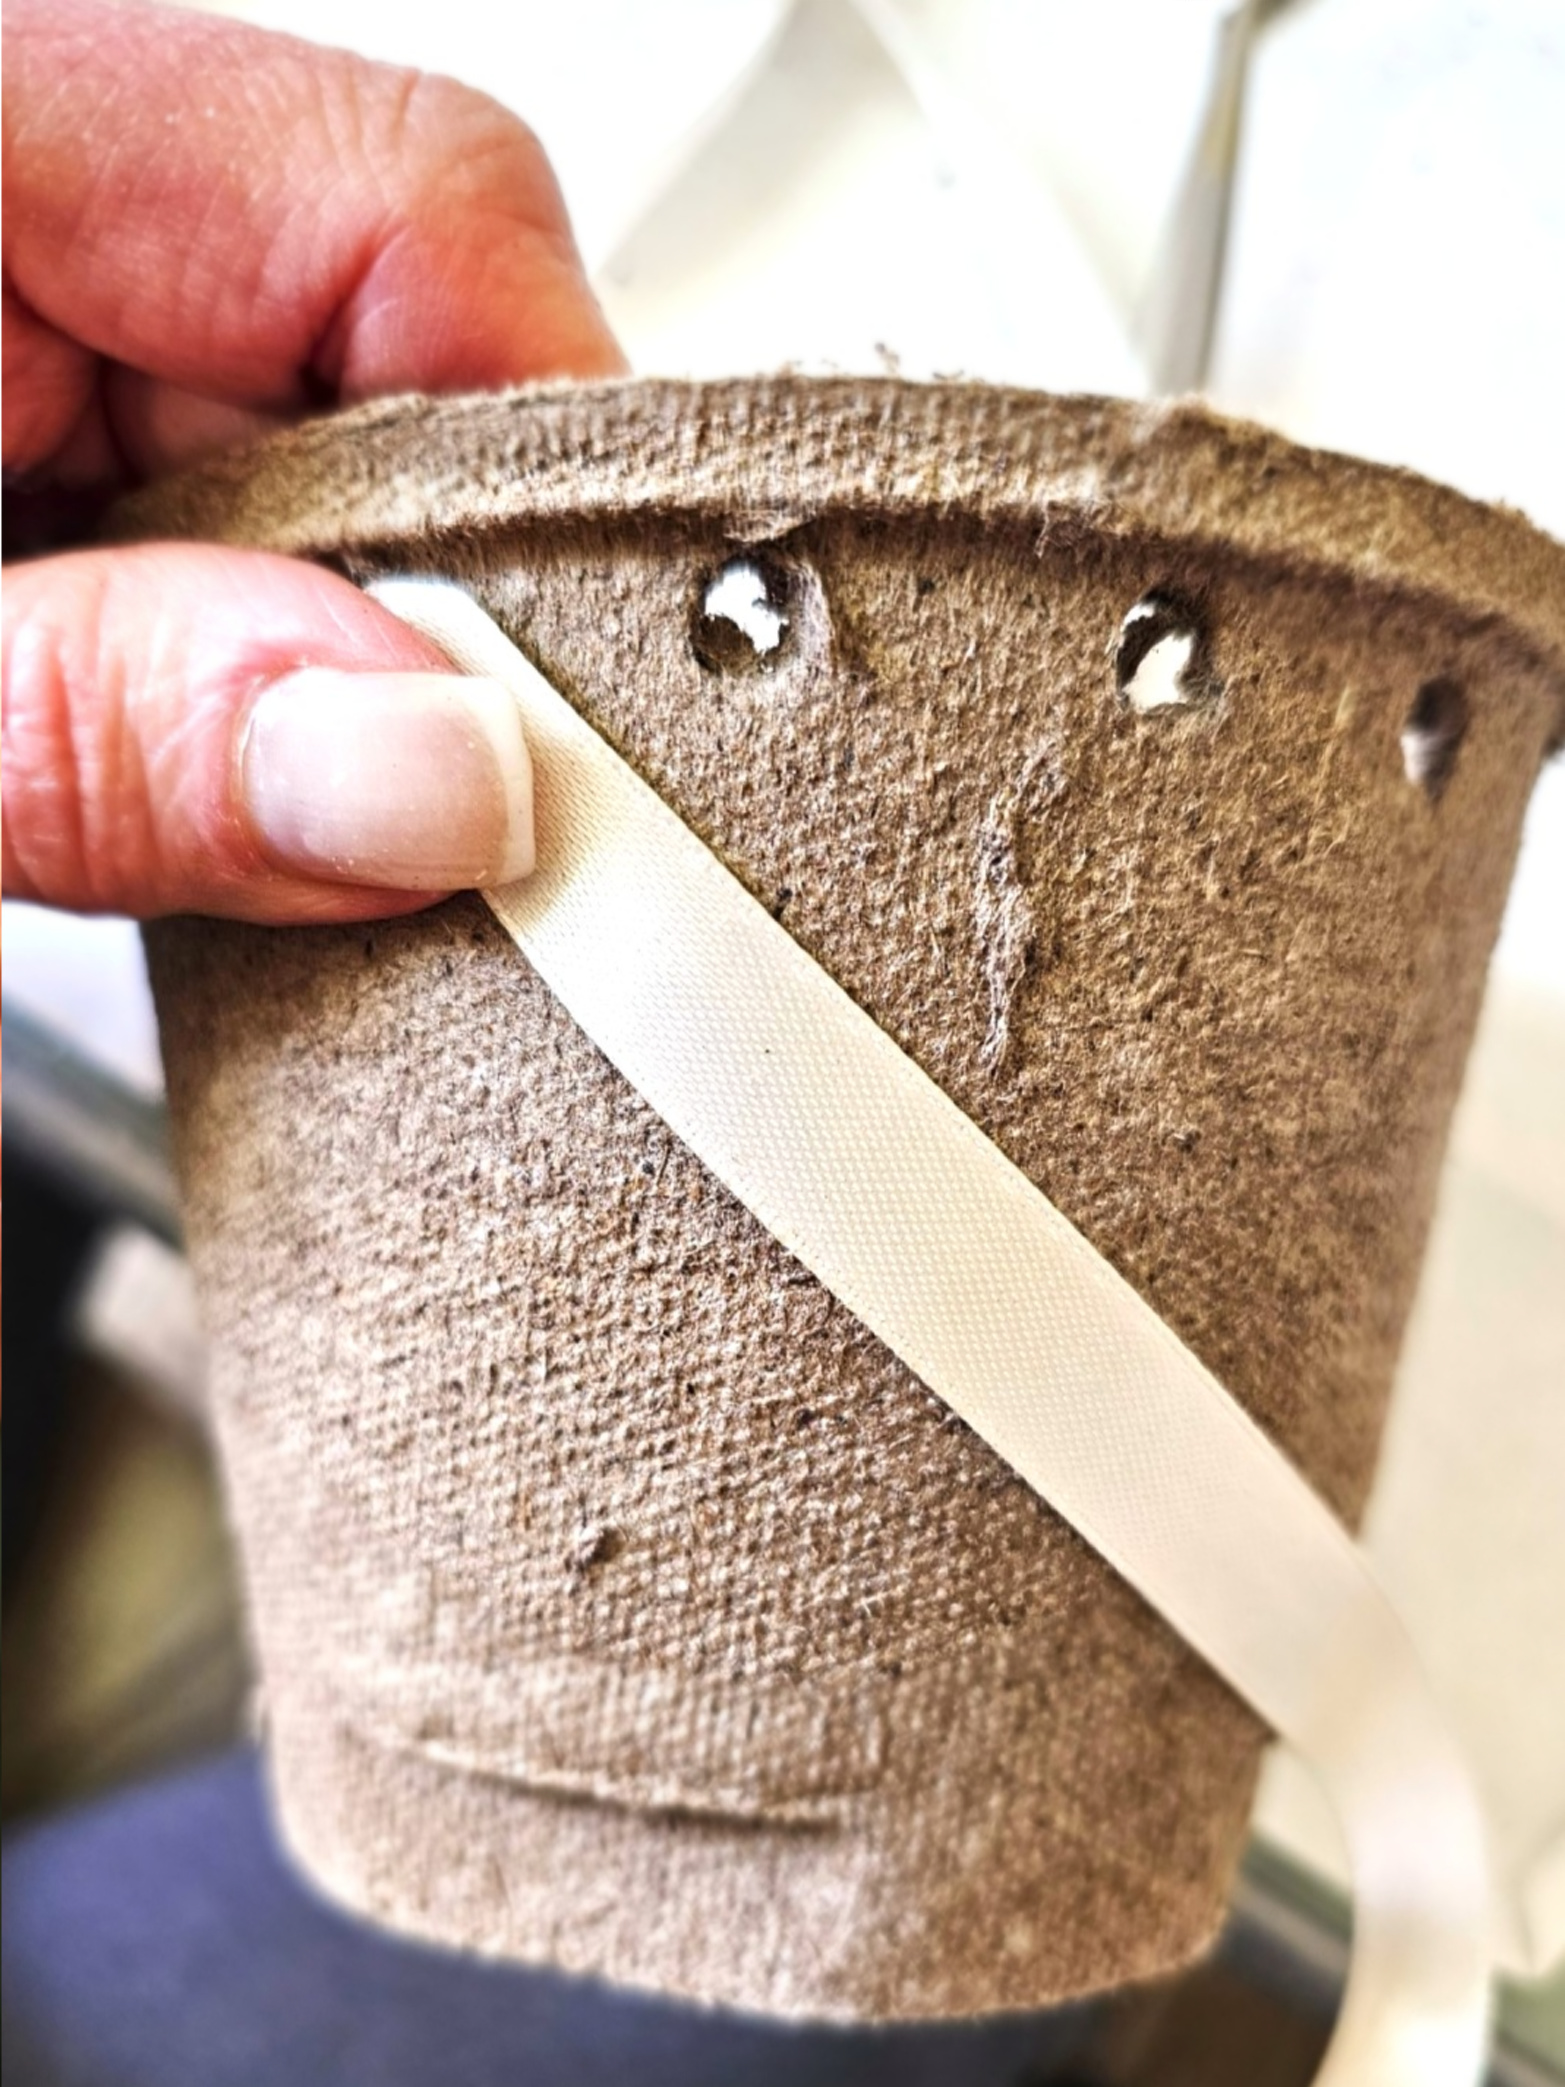
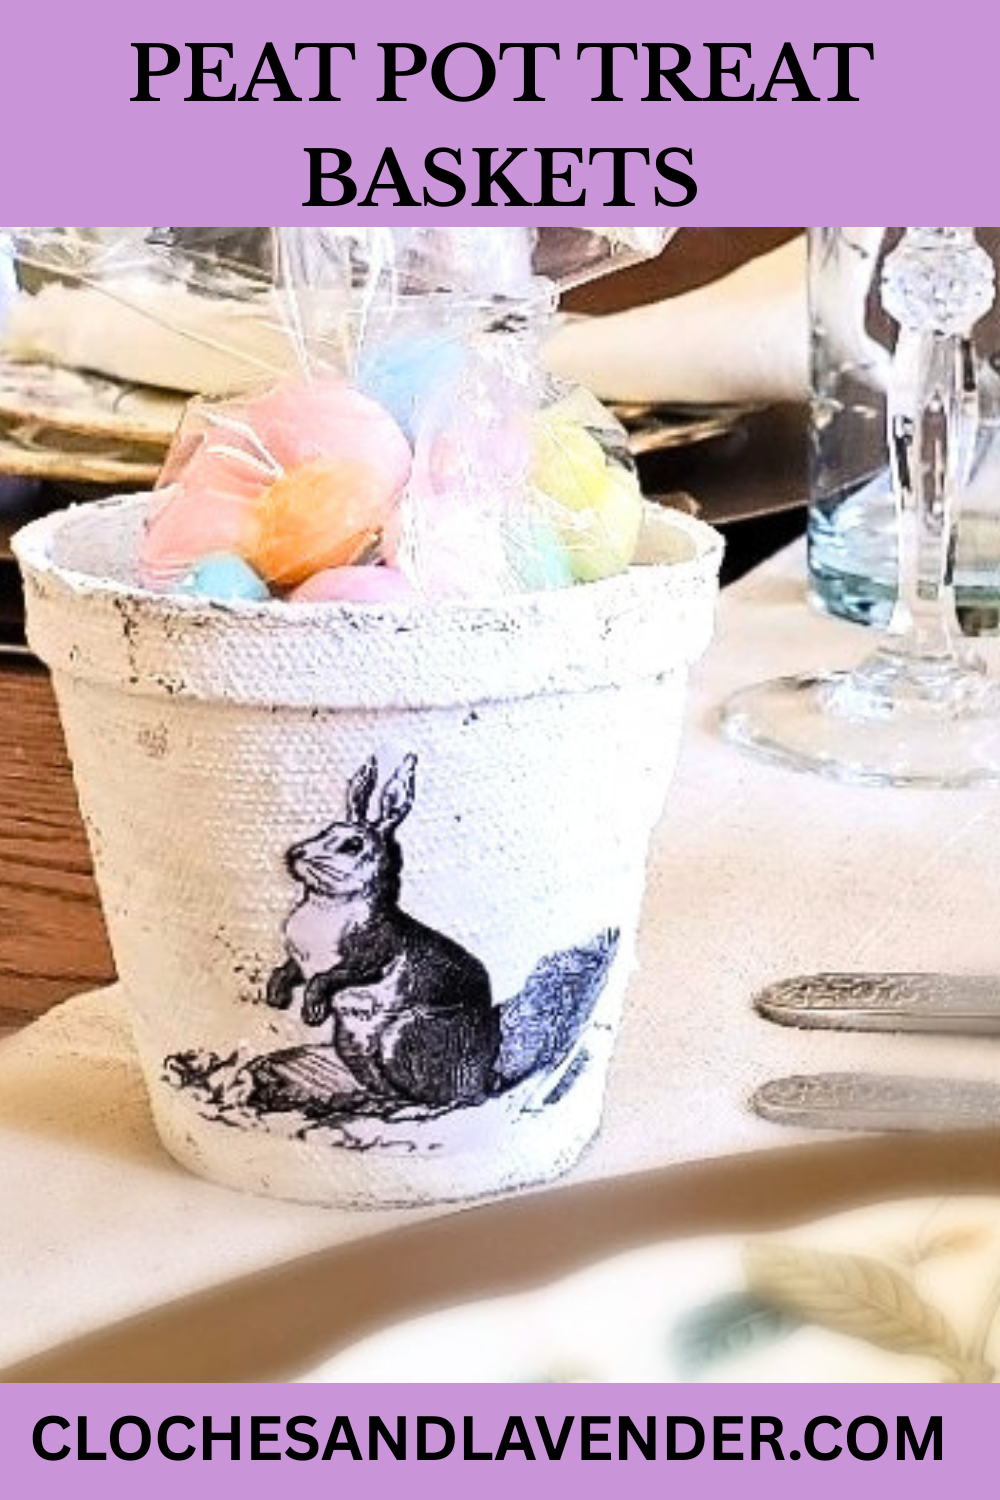
Step 1: A Naturally Elegant Mother’s Day Basket
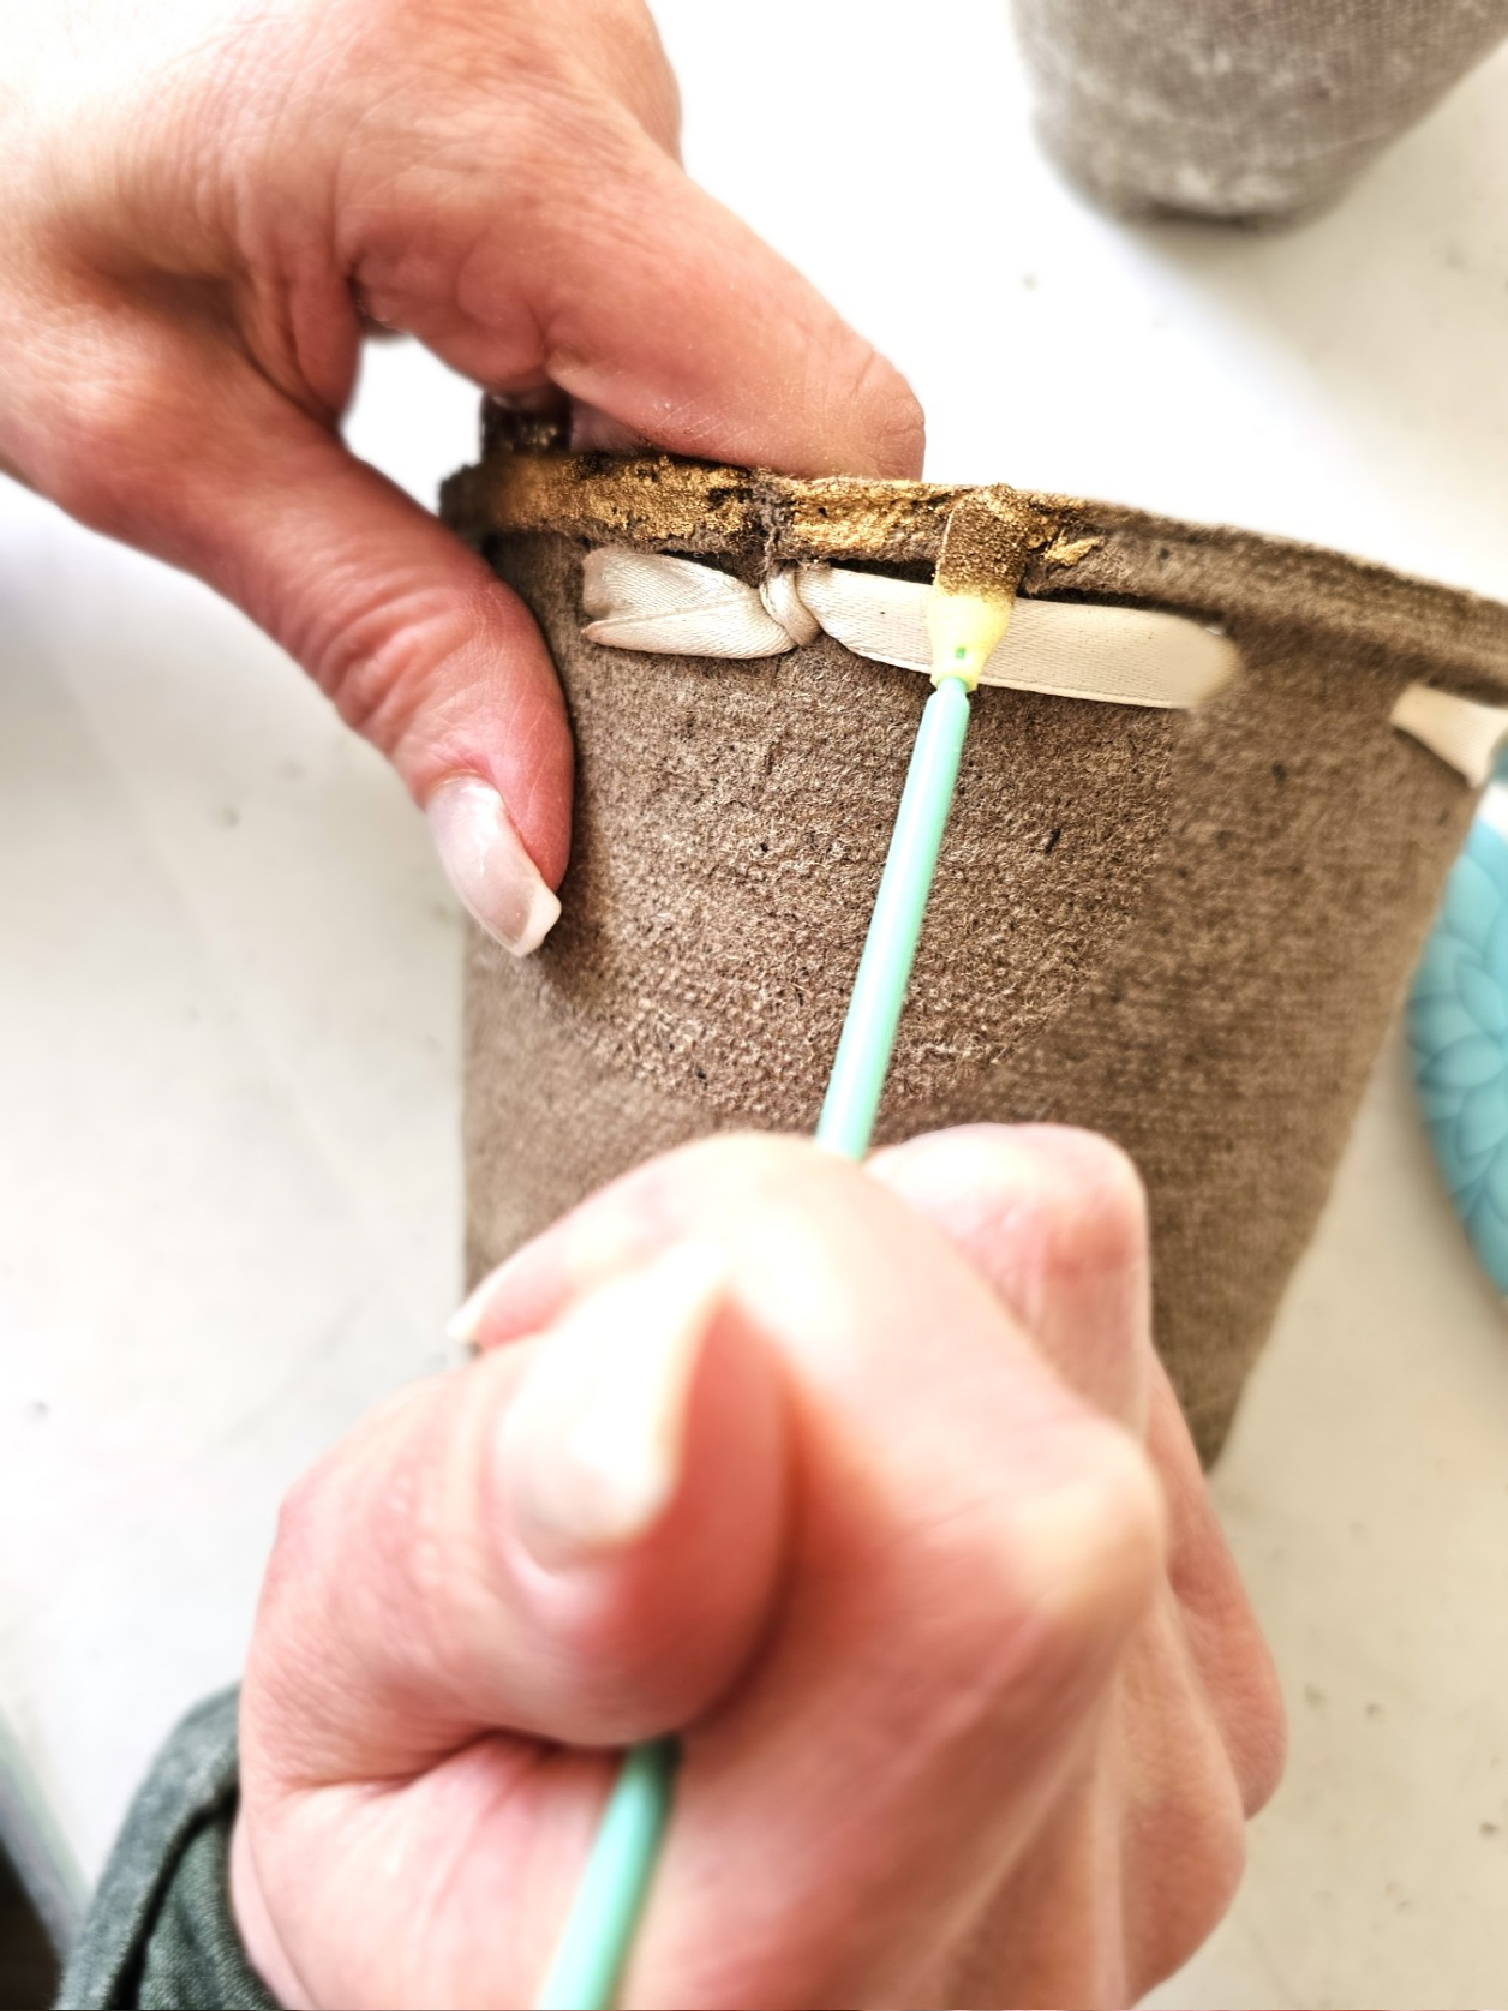
For my Mother’s Day basket, I left the peat pot its natural color. Before making dots with a black pen, use a fabric tape measure for spacing. I added tape to keep it in place. Next, I made dots using a black pen approximately every inch. I used a basic hole punch to make the holes.
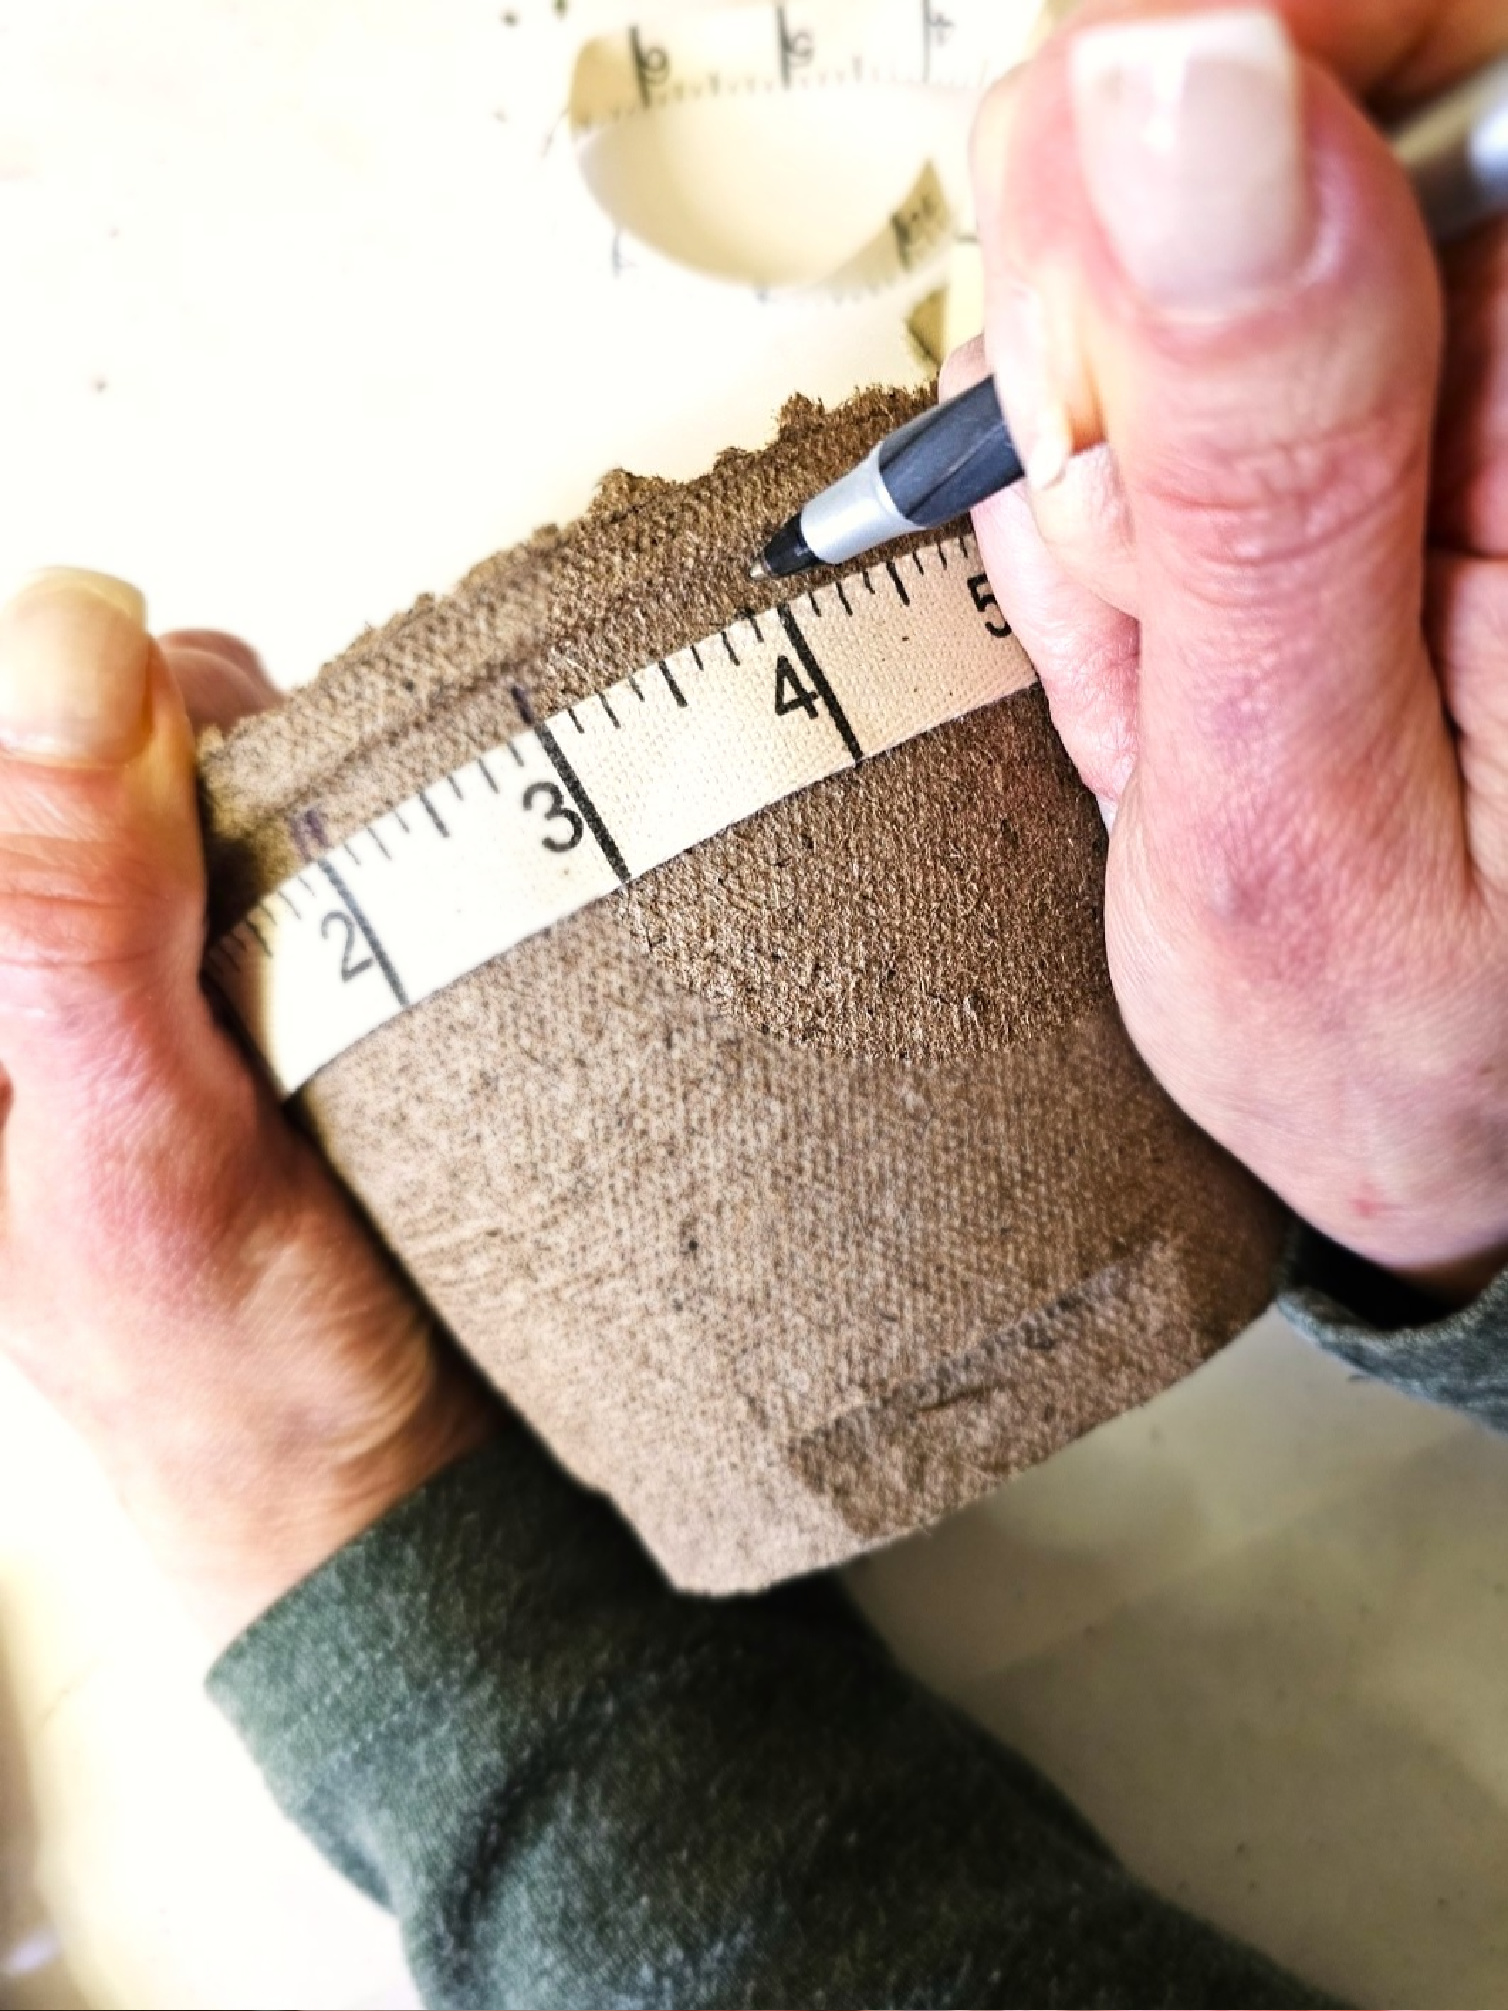
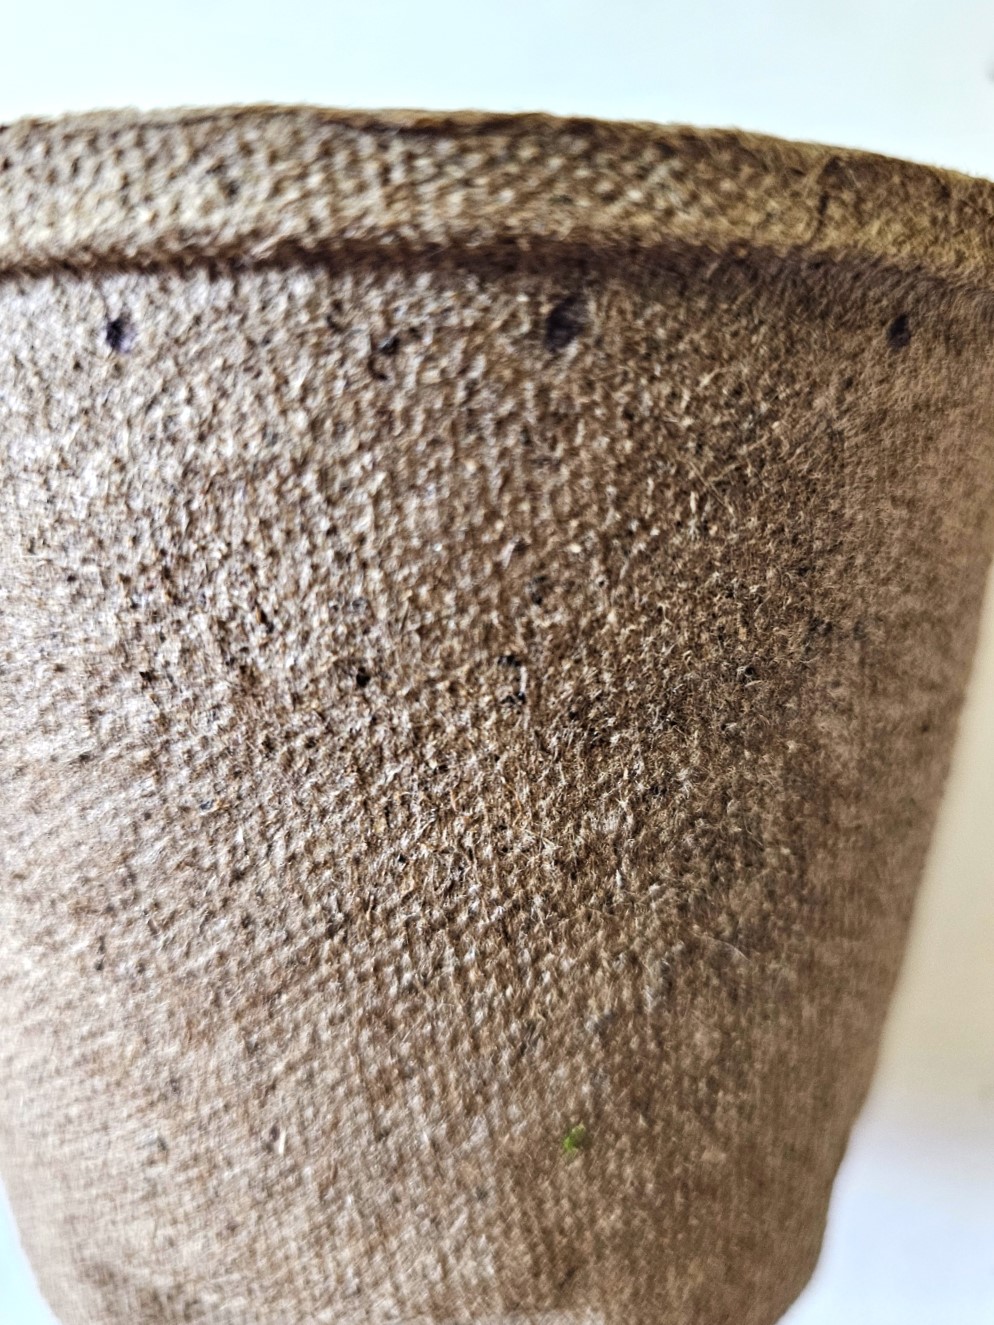
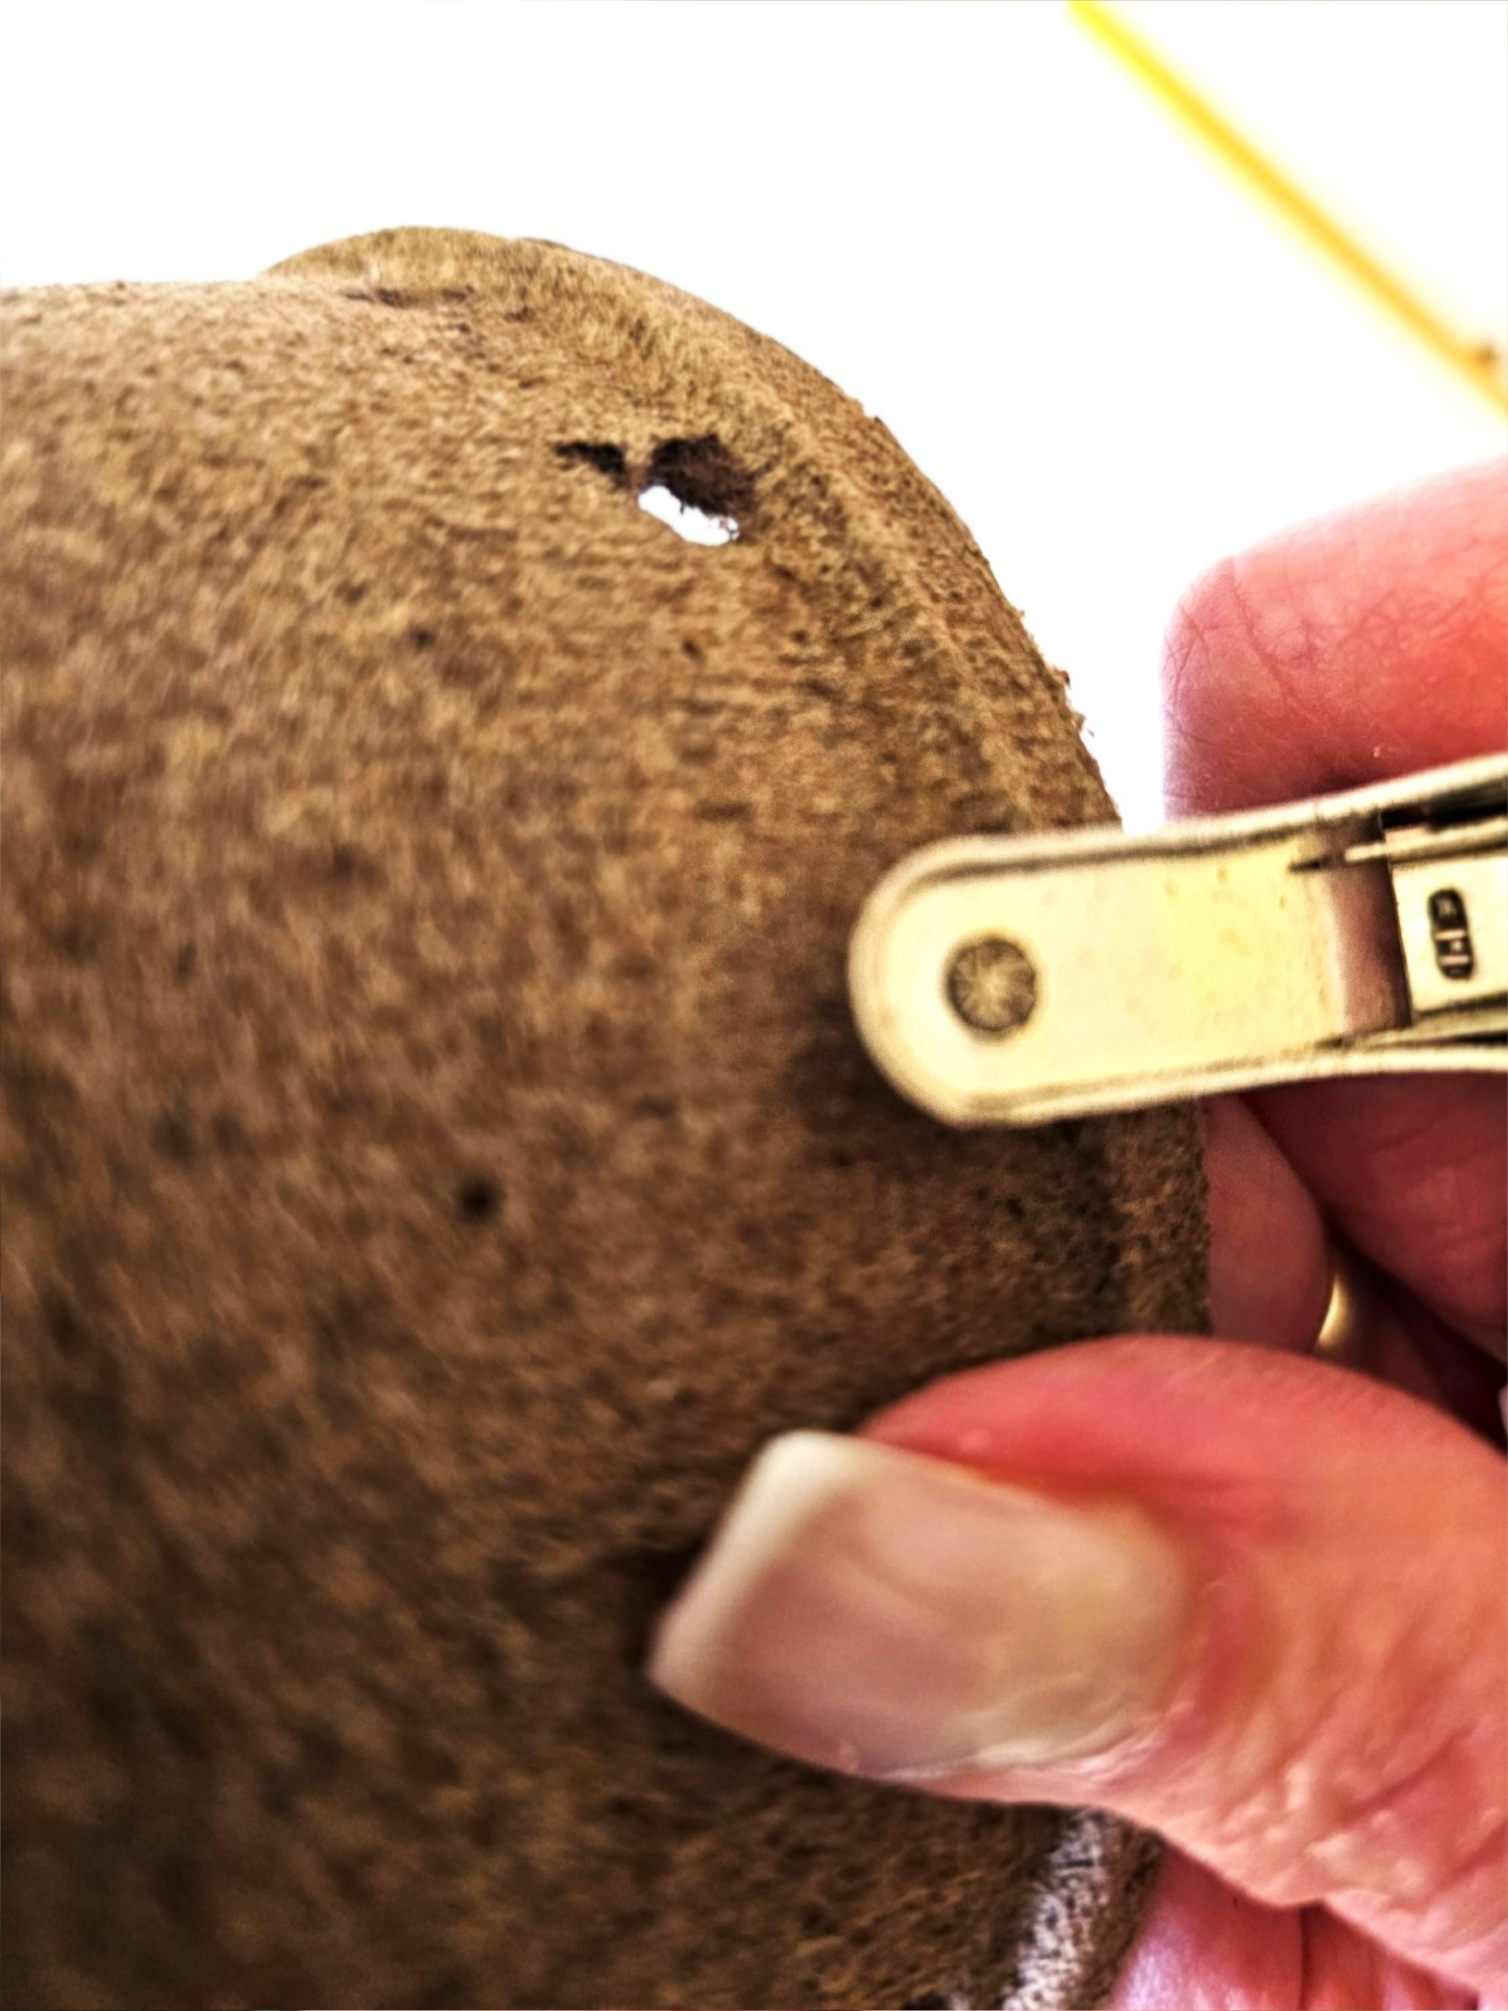
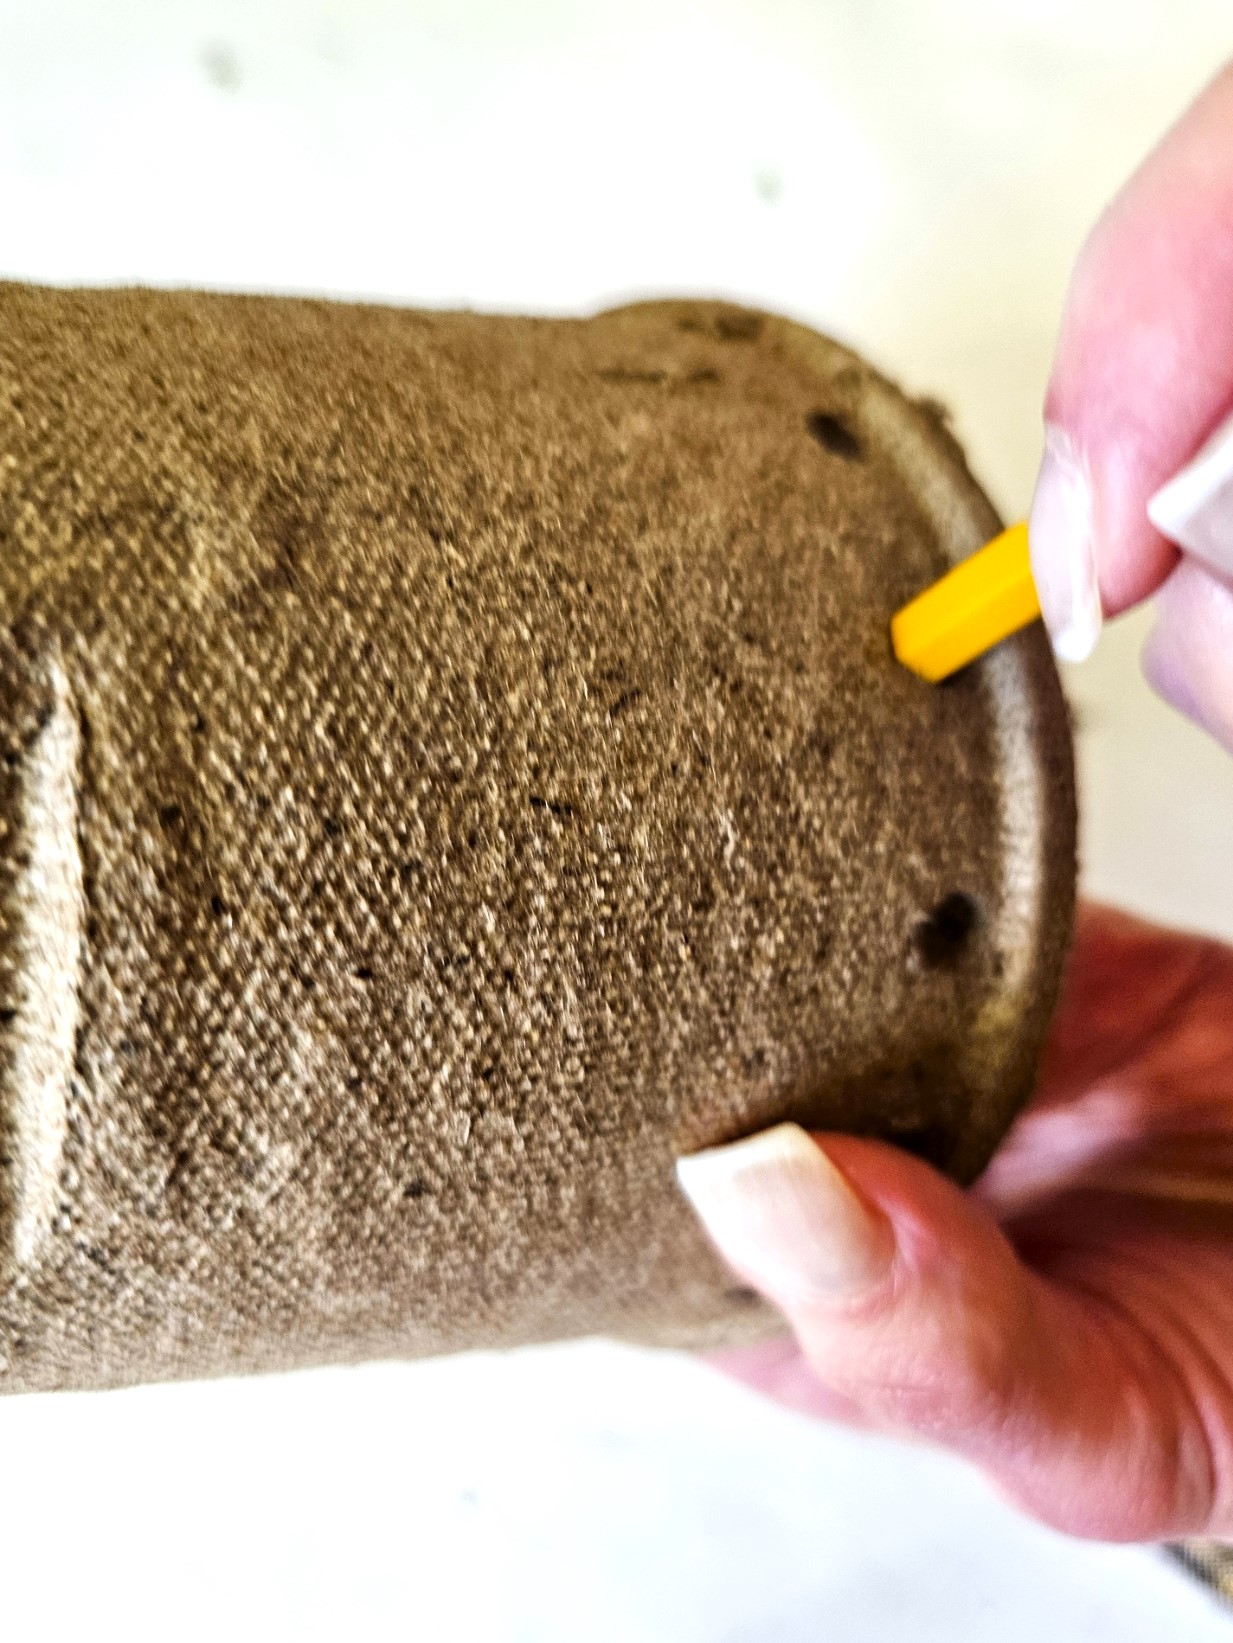
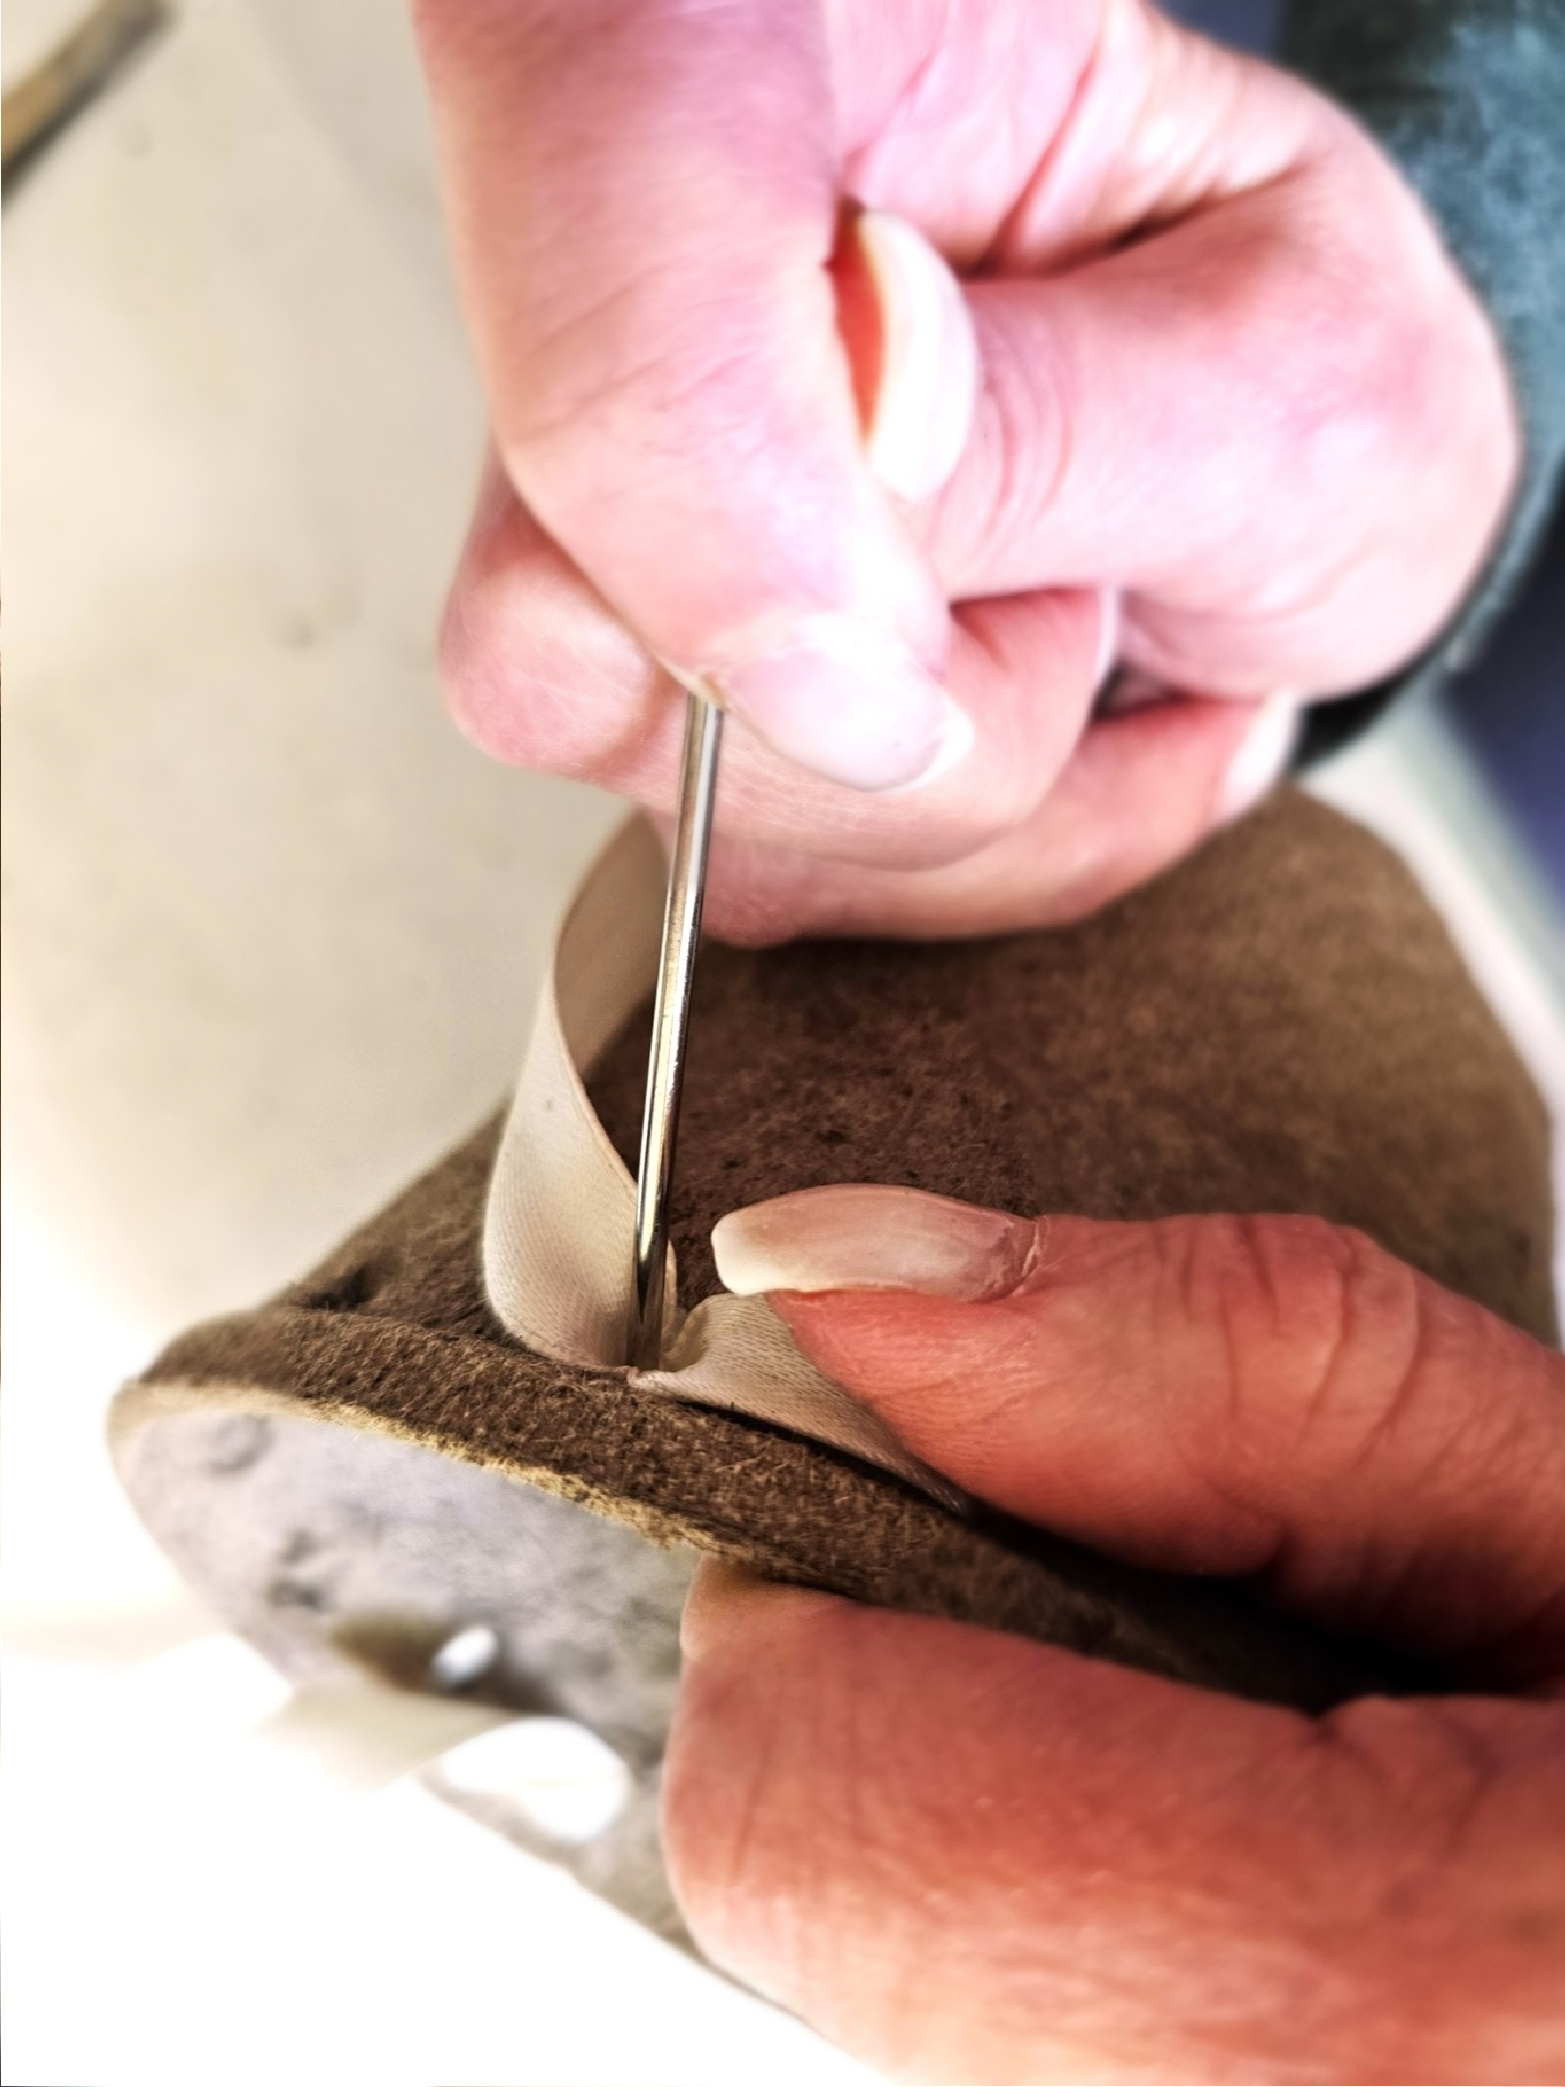
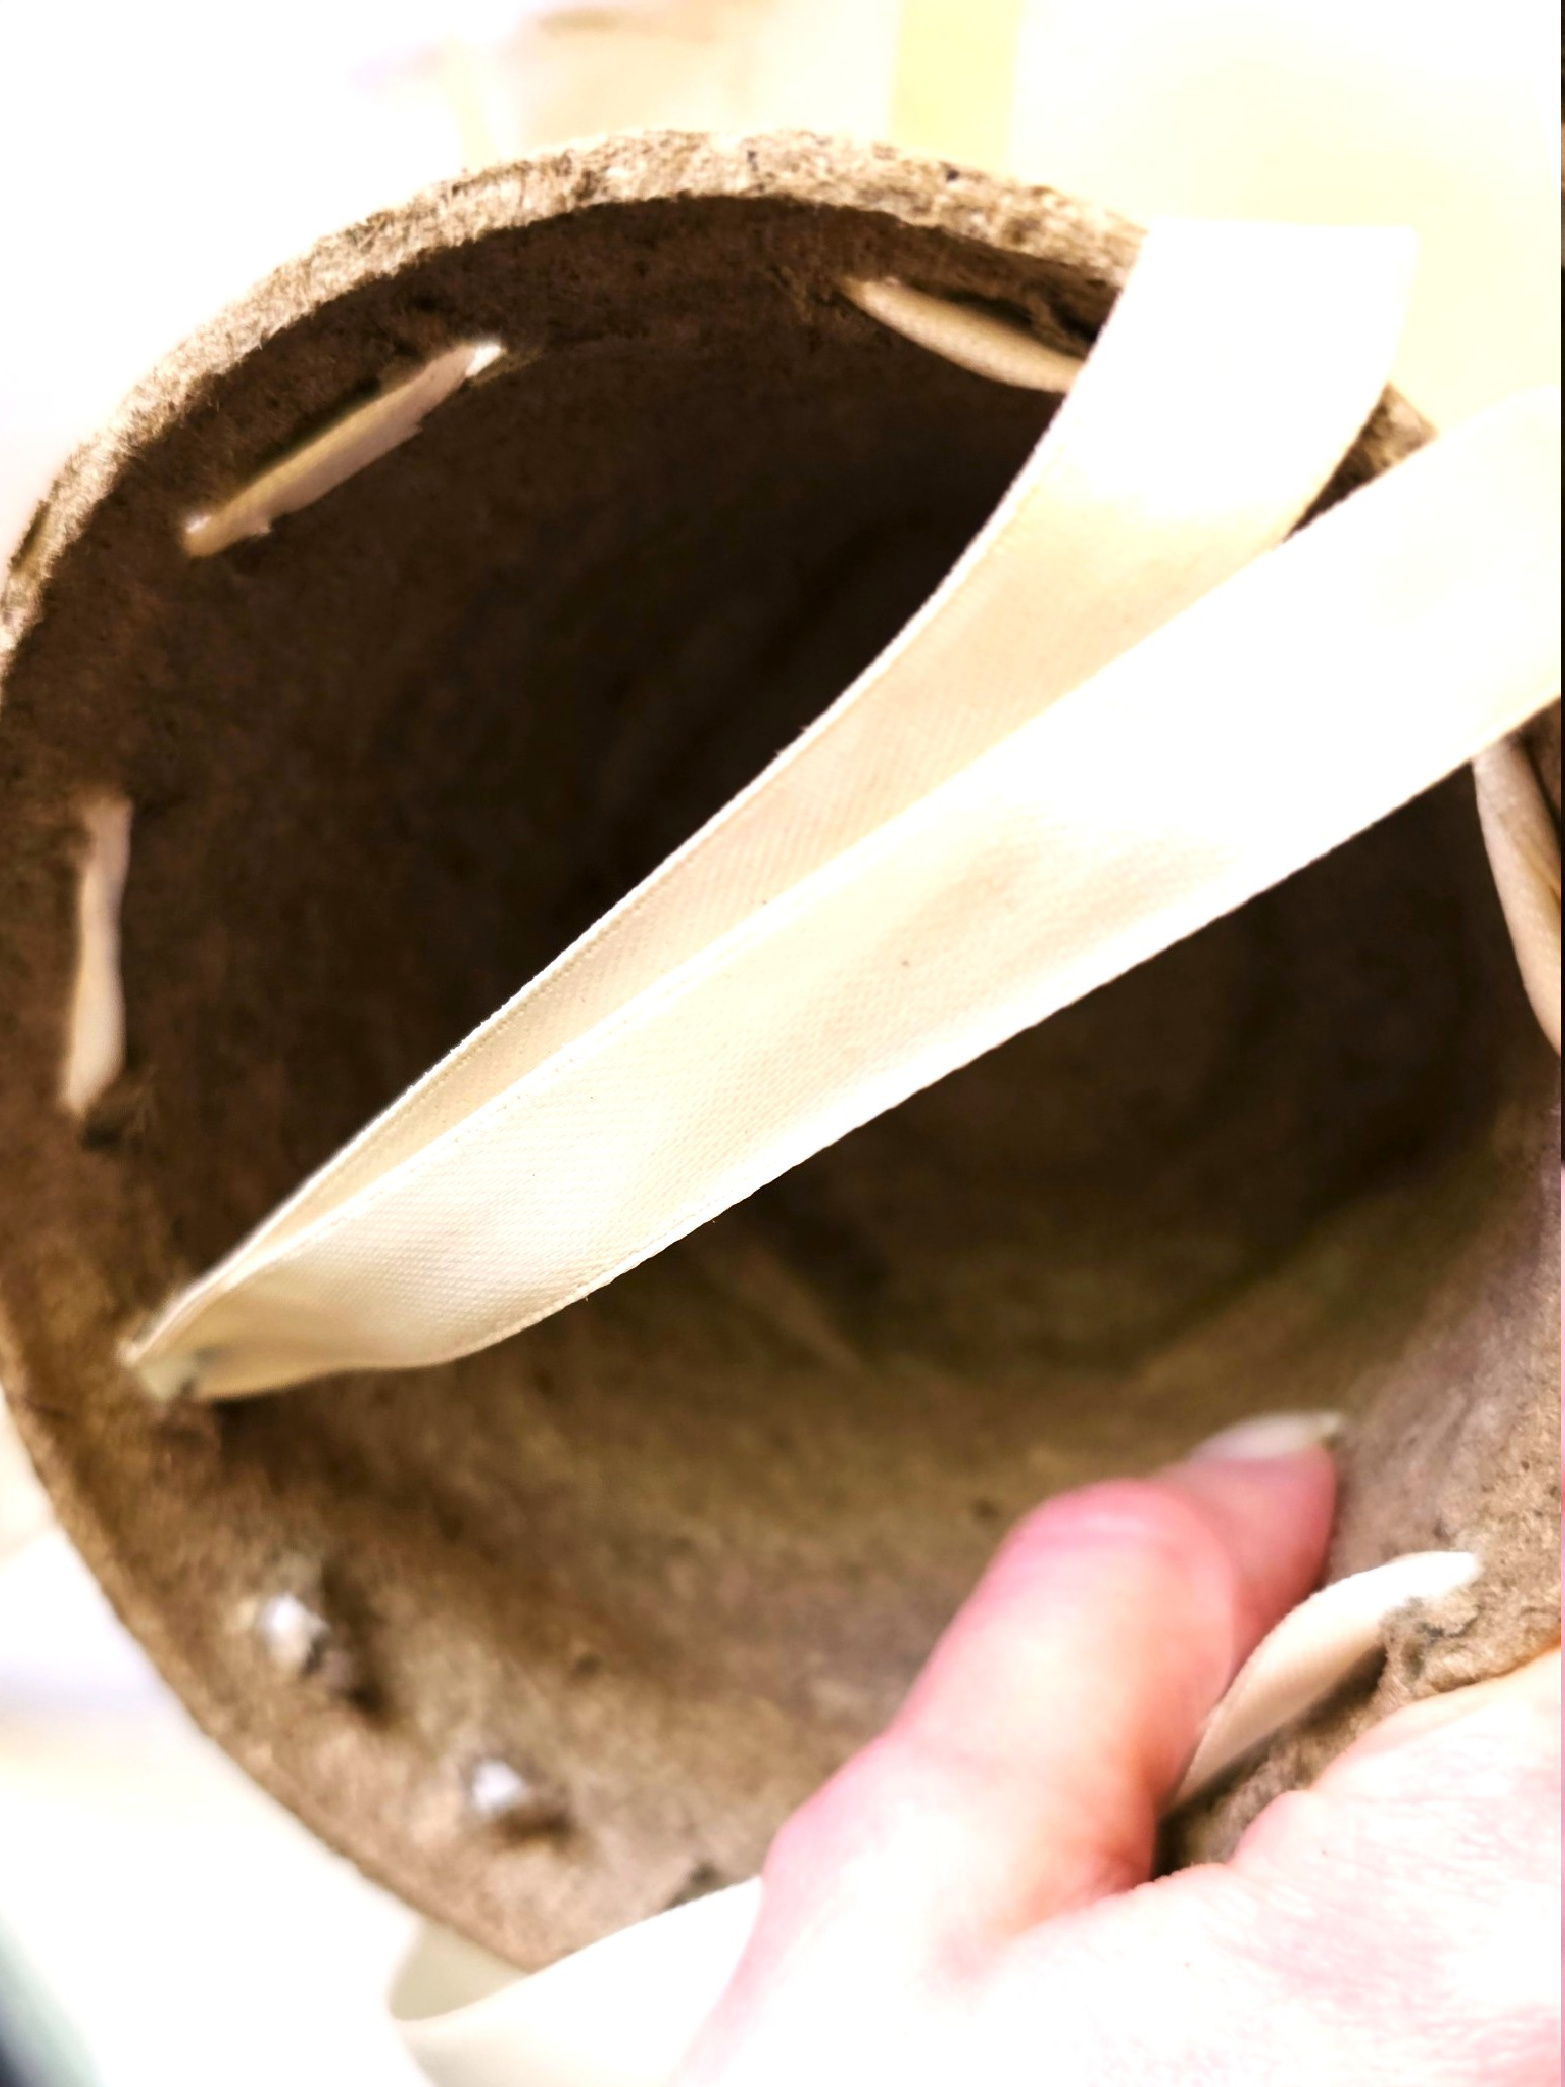
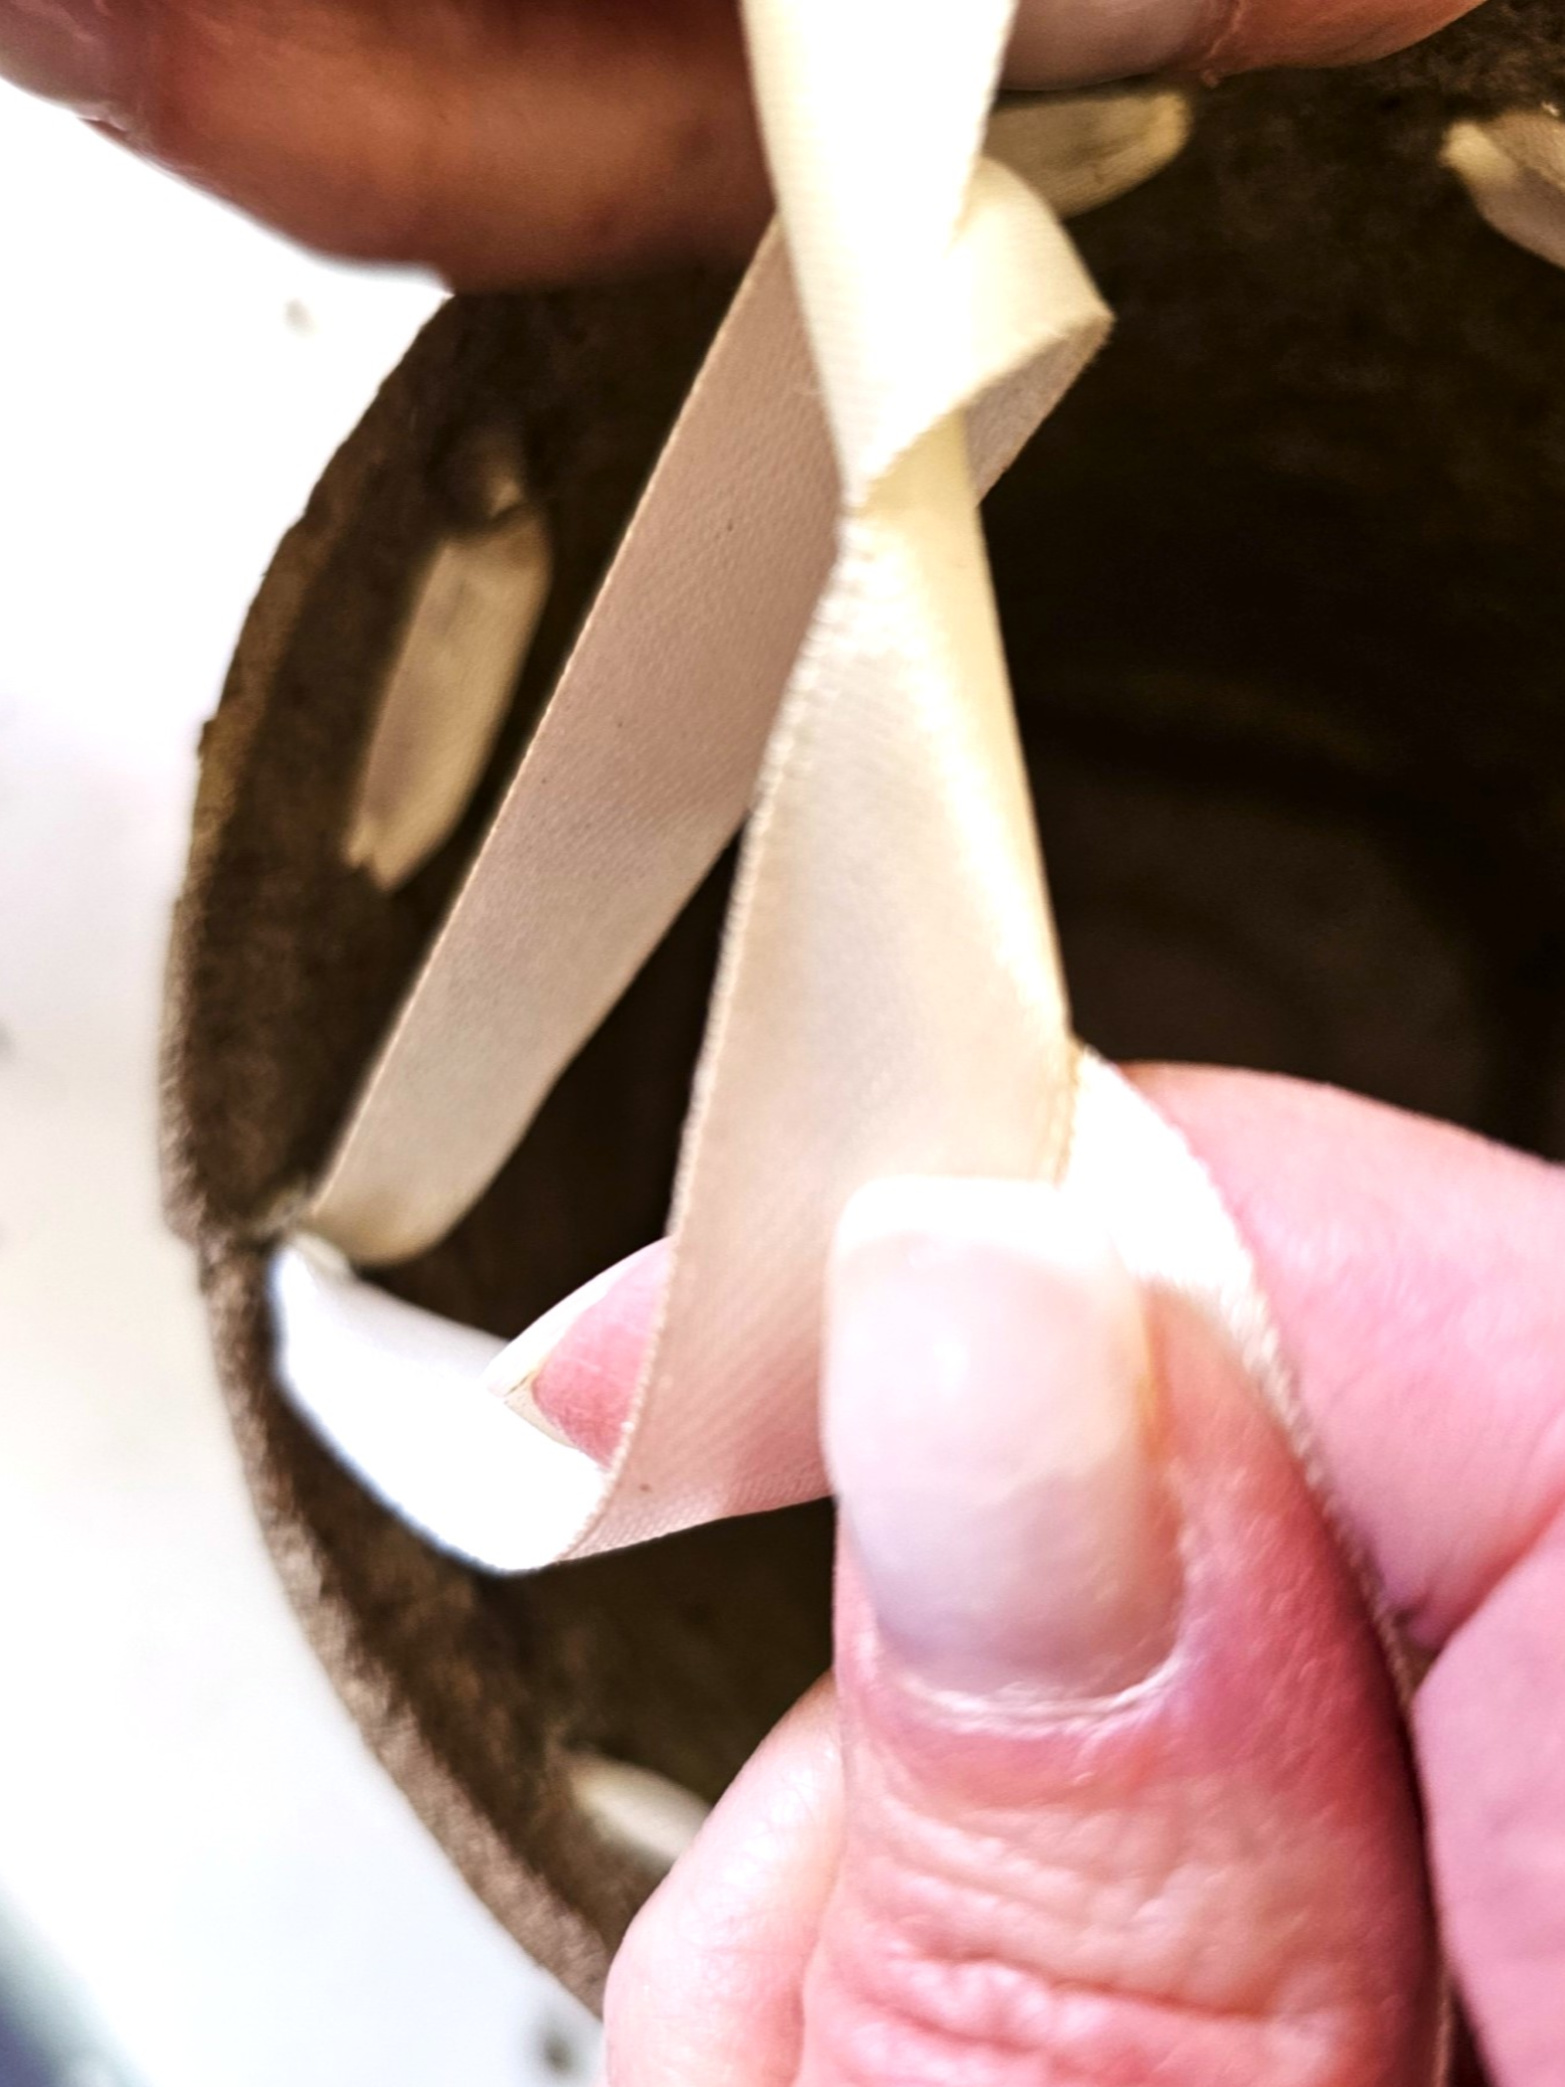
Step 2: Preparing For Perfection: Smoothing Holes For Adding Ribbon With a Pencil
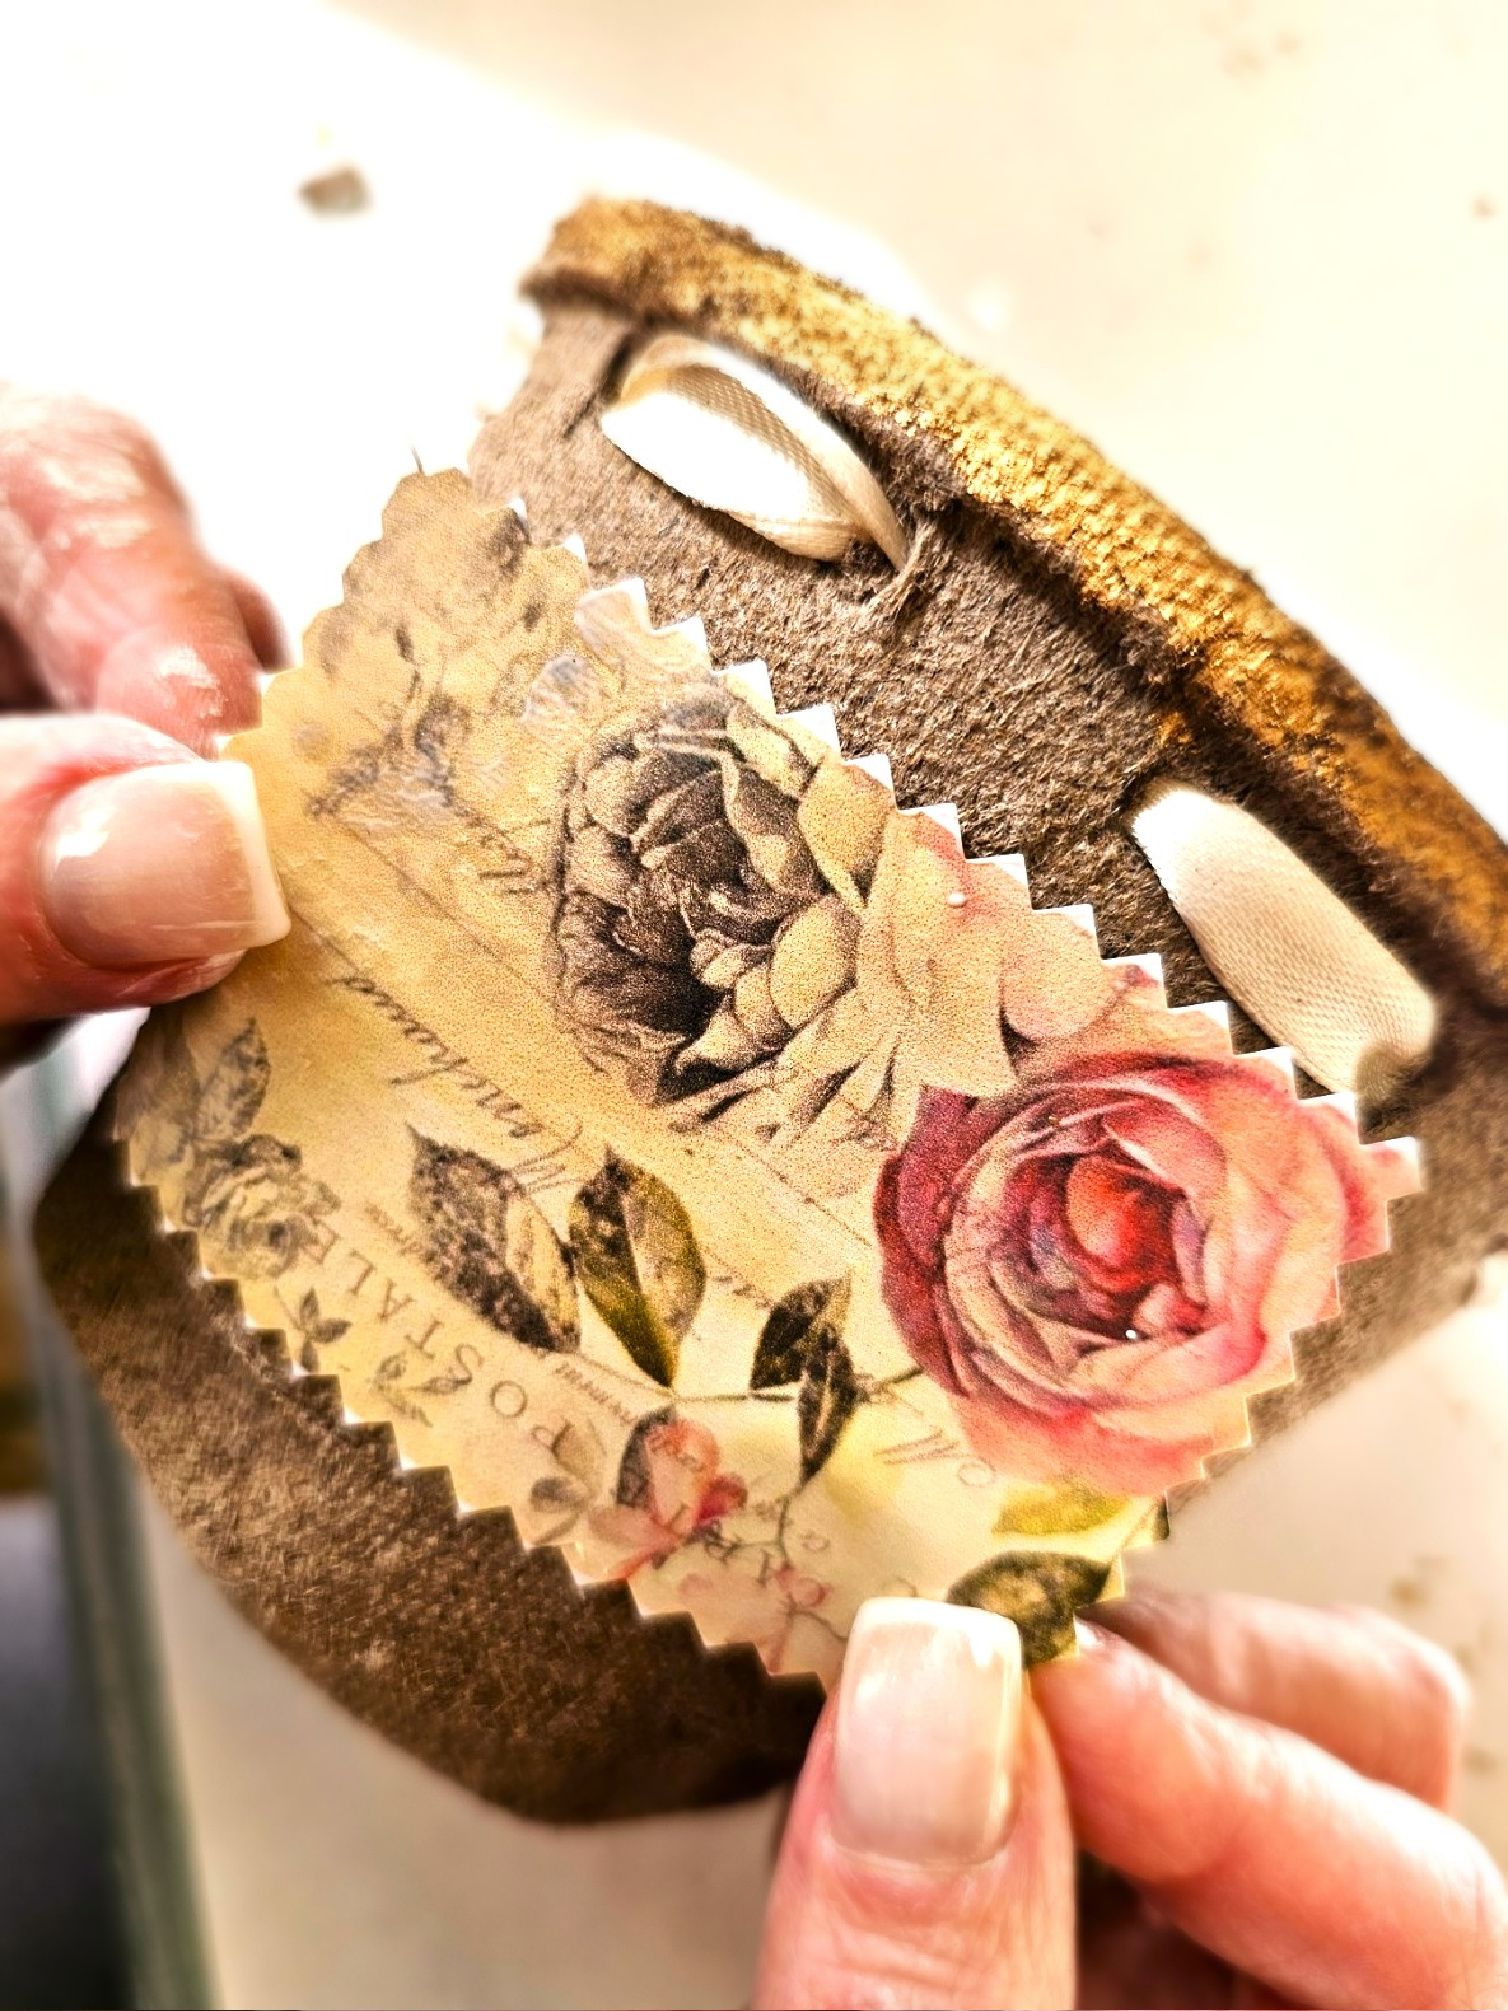
Using a pencil, push it through each small hole. This allowed me to thread 1/2 inch ivory ribbon. I carefully used the square end of a large sewing needle to thread the ribbon in and out of each hole. When the ribbon is threaded through each small hole, tie the two ends together and make a knot. Finally, I added Rub N Buff in Antique Gold to the top edge of the pot to add the perfect finishing touch.
Cindy’s Rub N Buff Note: Normally, I would have applied the Rub N Buff to the top edge of the pot before the ribbon; however, I forgot.
Step 3: Crafting With Love: Cutting And Adding Image To Your Mother’s Day Gift
After printing my image, I used a pair of pinking shears for a final touch. This is optional, and Fiskars scissors will work great for this, too. I cut the image, and I added Mod Podge to the back of the image using a foam brush. Carefully flip over the image and add it to the side of the peat pot.

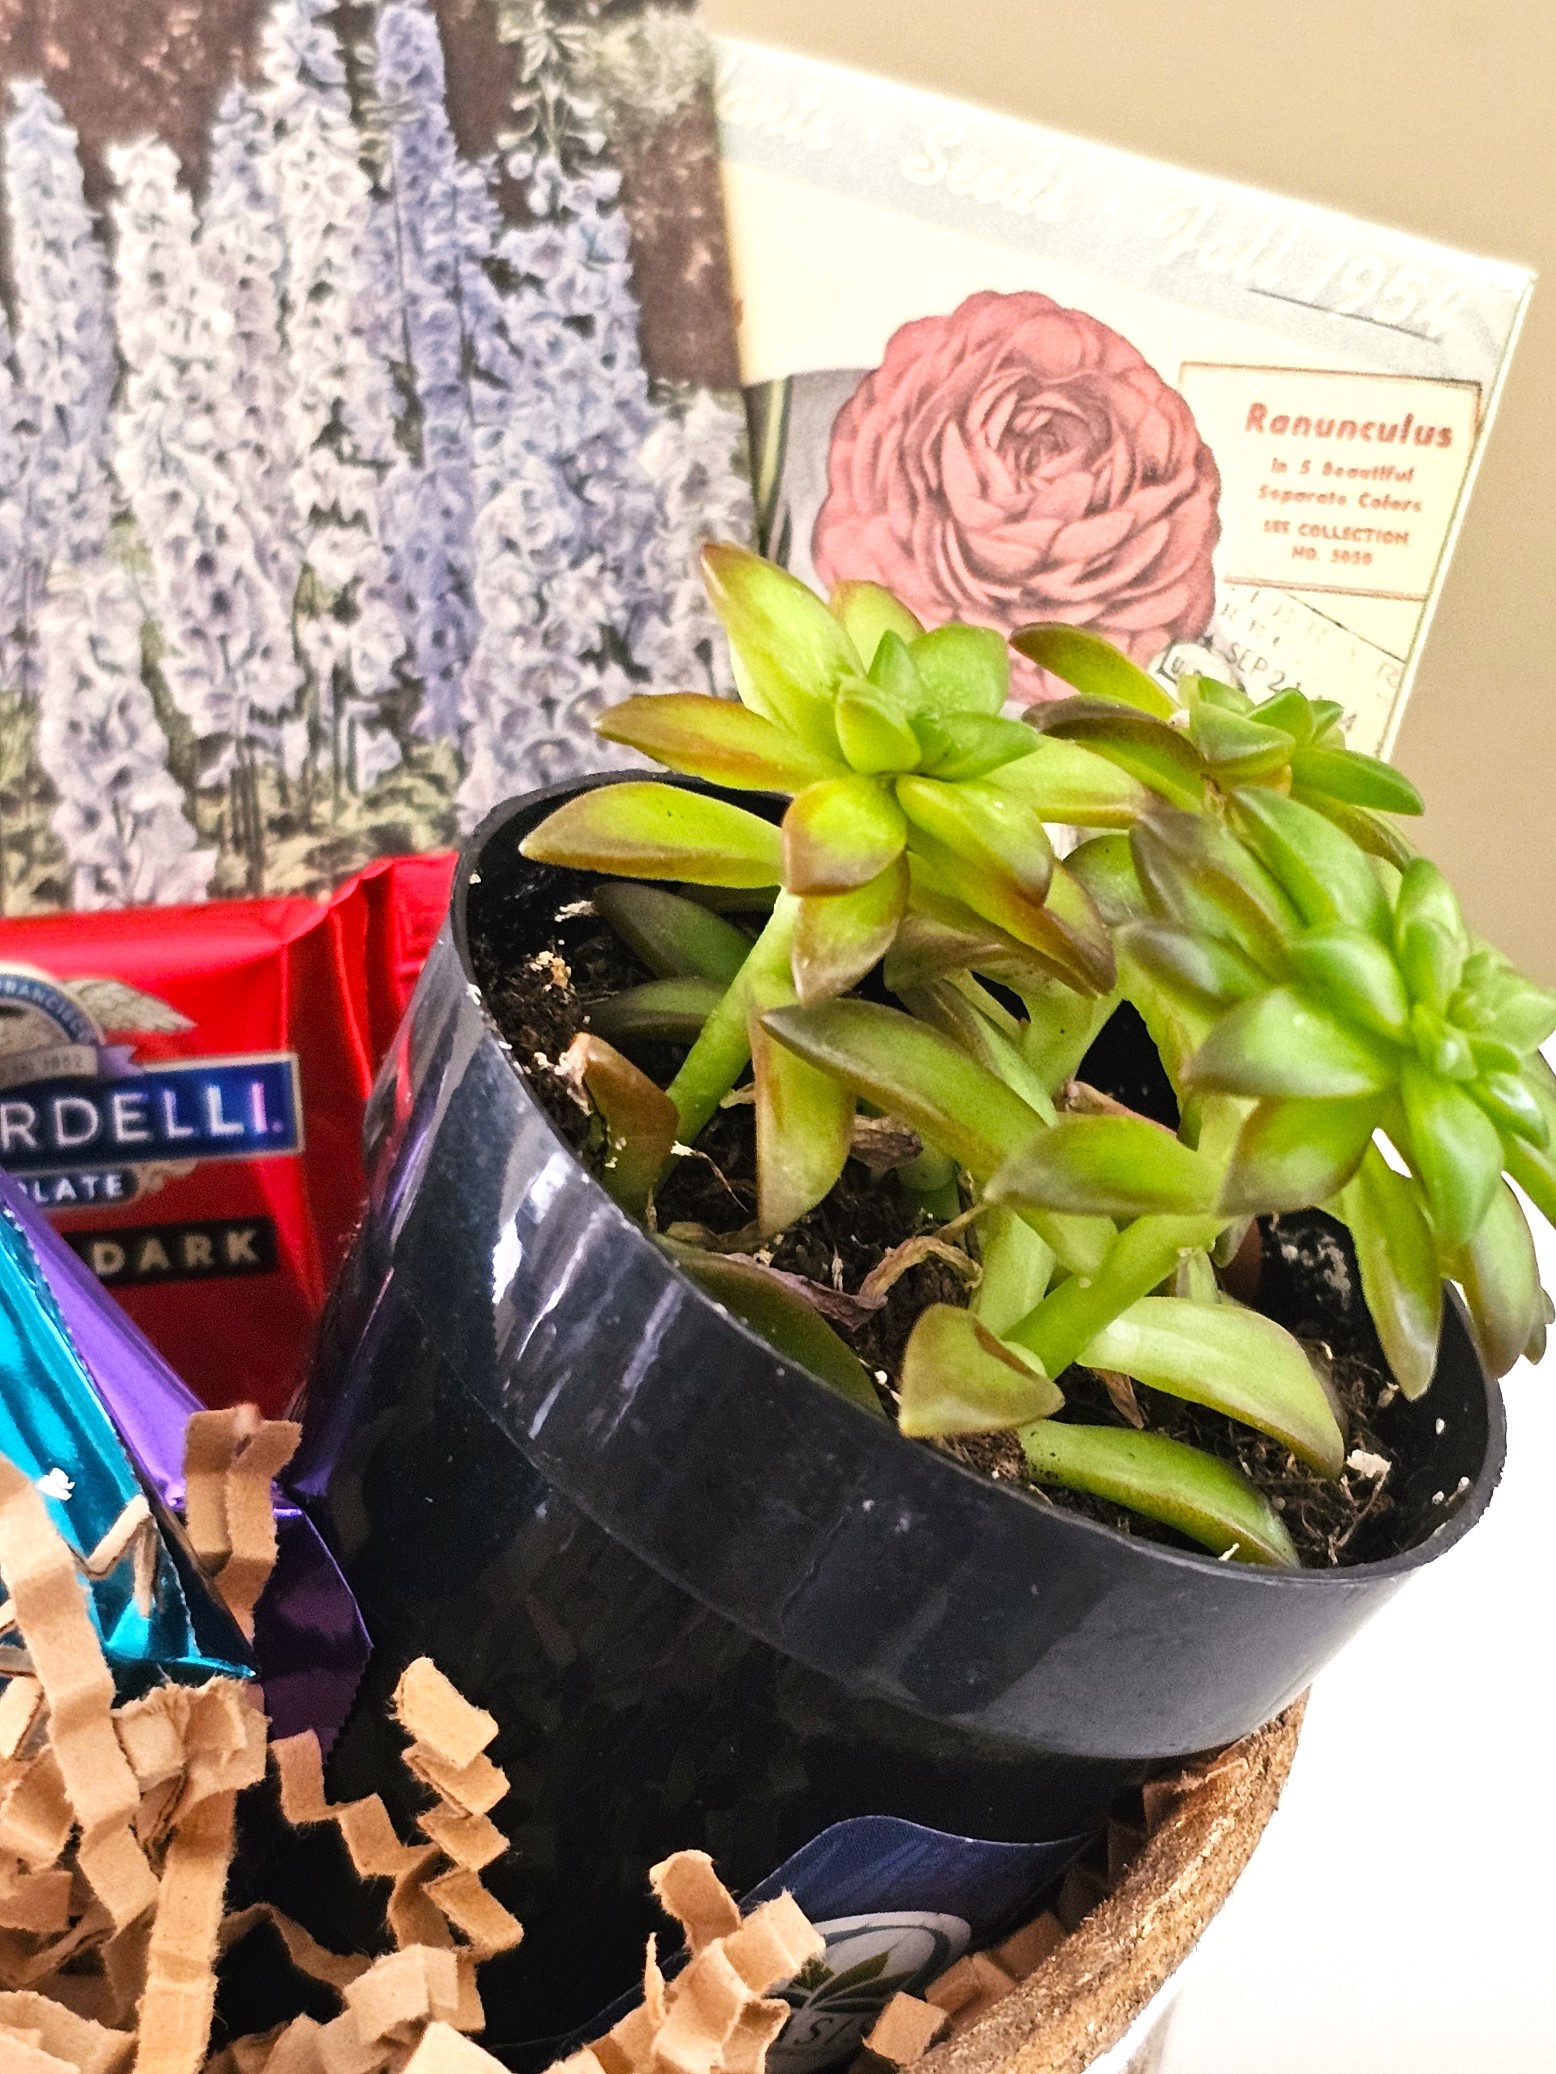
Celebrate Mom’s special day with a heartfelt Mother’s Day pretty basket! Fill this gift basket with her favorite treats, such as chocolates, candies, homemade goodies, or a gift card for a spa day. Does Mom have a green thumb? Add a small plant or seed packets from the garden center. She can add them to her garden. Add a note letting Mom know how much you appreciate and love her. Give Mom a big hug and watch her smile as she opens these spring decorations.
As always, use caution when using hot glue. Keep children and pets away from the hot glue and the cord to avoid burns or injuries.
Finishing Touch Options: Peat Pot Easter Baskets
Elevate your gift baskets with a perfect finishing touch. Consider adding a bit of craft paint around the inner top edge of the pots for a finished look.
Assorted Easter Candy:
- Jellybeans – love these Jelly Belly
- Peeps
- Chocolate
- Chocolate bunny – we eat these minis from the fridge – oh, so good!
- Chocolate eggs
- Cadbury eggs – our favorite
- Cadbury Creme eggs – did you know they make caramel now? So good!
- Reese’s peanut butter eggs
FUN FACT: Did you know Reese’s peanut butter eggs are the number one Easter candy?
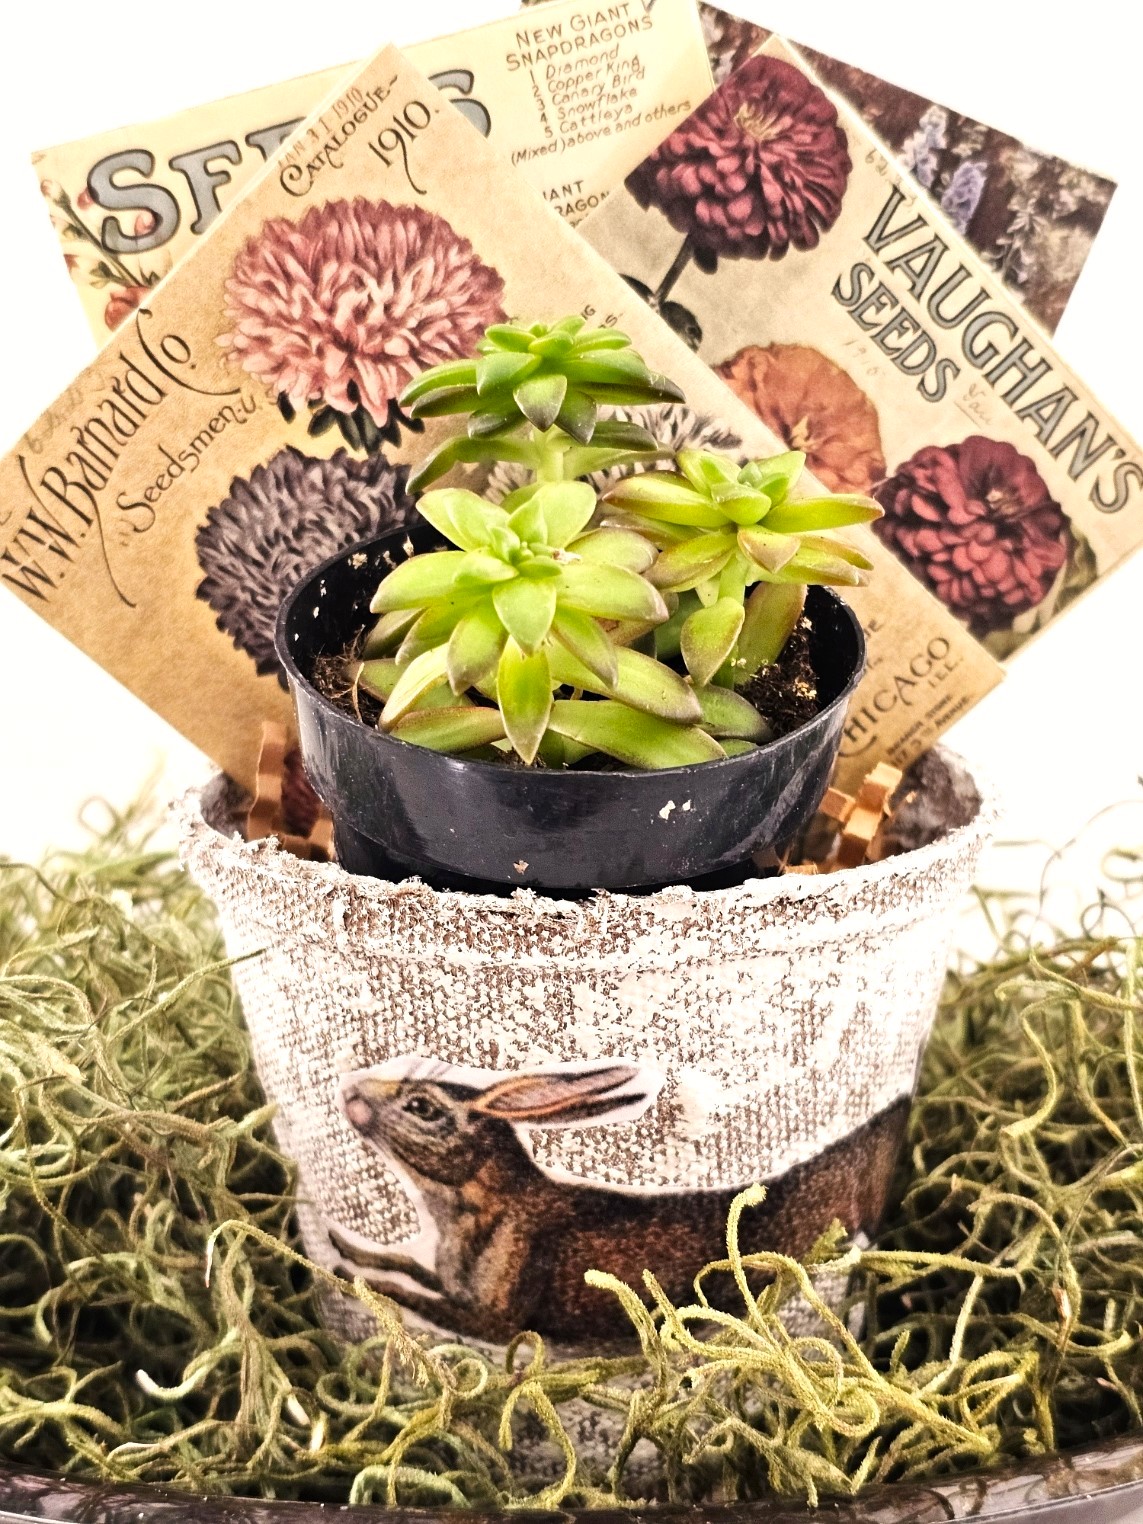
Little Peat Pots: Spring Gardens
- Spring Gardens: These little pots come with peat pellets, peat pots, and garden soil pellets. This will be the best way for kids to start gardens. Kids will love watching their “Spring Gardens” grow and learn how to have a green thumb!
*As an Amazon Associate and other Affiliate links, I earn from qualifying purchases* On this blog, I earn a small commission from qualifying purchases through affiliate links. I use affiliate links, which means a small commission is earned if you purchase through the link. The price will be the same whether you use the affiliate links or go directly to the website. All opinions are my own. (Check our Full Disclosure Policy)
Plant Options For Spring Garden Baskets:
Visit garden centers, Home Depot, or Walmart and find the perfect plant to add to the creative pots!
- Pansy — Violas
- Herbs
- Small bulbs
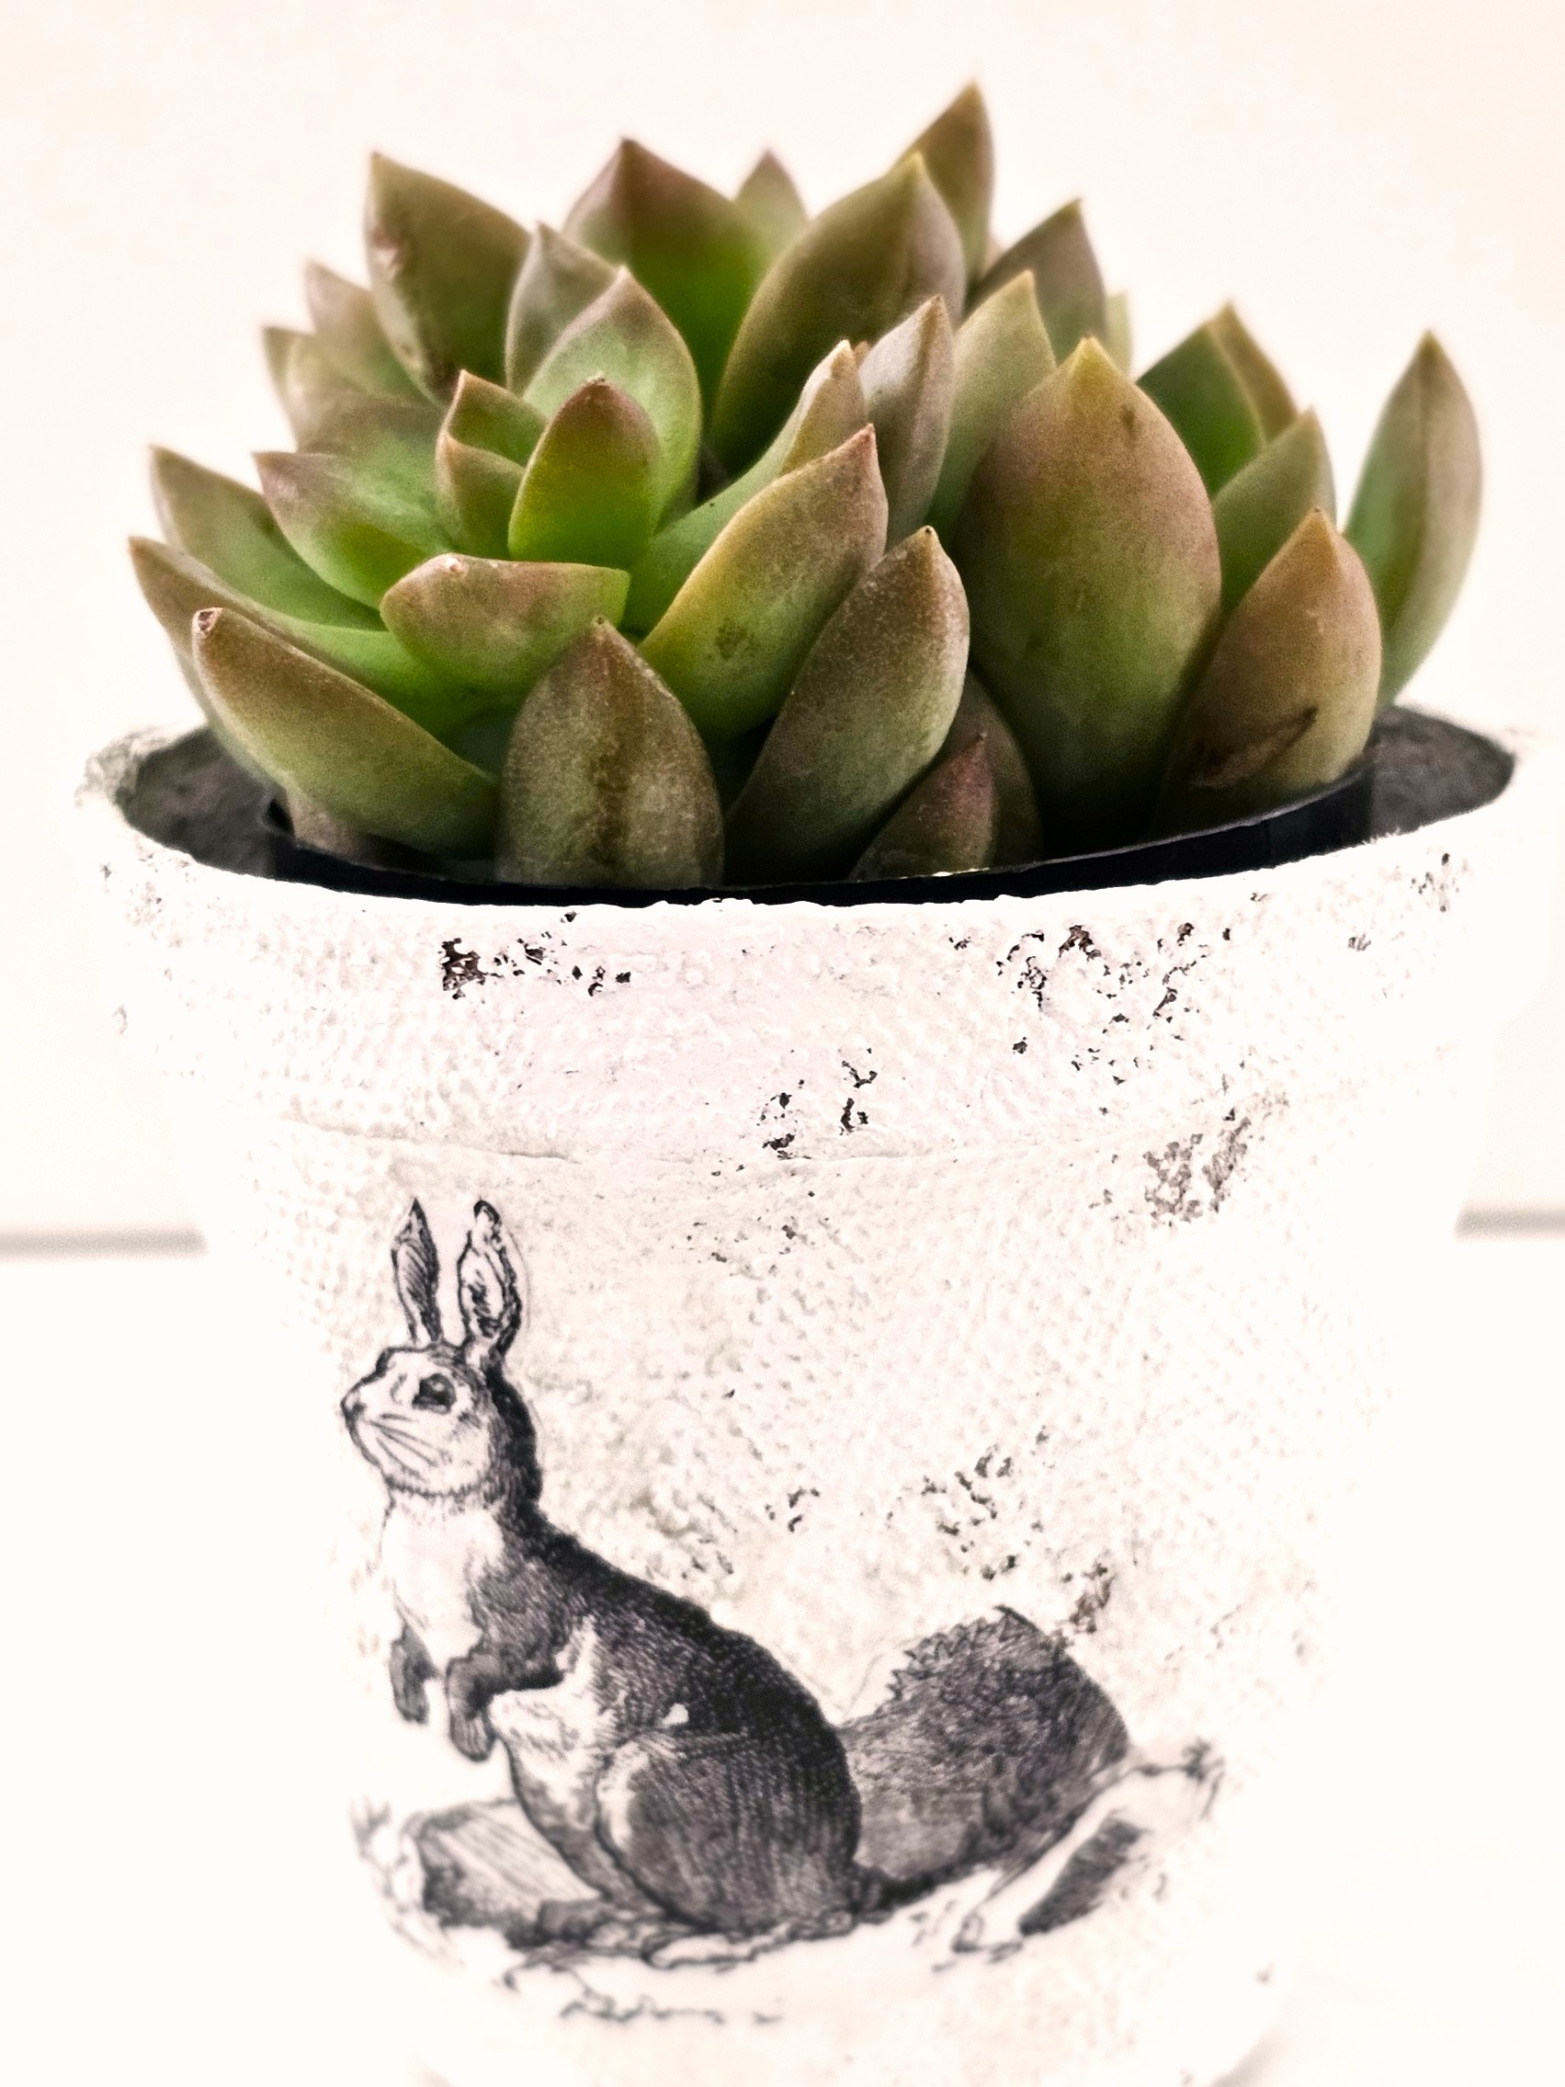
- Tiny succulents
NOTE: Depending on the size of the plant, in each little basket, potting mix or soil may need to be added to the bottom of the pot.
Birthday Gift:
Blooming birthday gift, celebrate birthdays with a floral twist! Make peat pots into blooming birthday gift party favors. Add small plants and create a centerpiece for the party. Depending on the size of the plants, you may need to add garden soil to the bottom of the pot. Leave these little pots in their natural color. Guests can add the plants directly to their gardens.
Gardening Gift Basket: Garden Club
If you’re part of a gardening club, surprise friends with these peat pot gift baskets during a spring or summer gathering. Imagine the beauty of these baskets as a centerpiece. Leave this gardening gift basket in its natural color. Add herbs, a flower, or their favorite seed packet to give their spring gardens a head start. Depending on the size of the plant, you may need to add garden soil to the bottom of the pot.
Flower Pot Plastic Cup With Plastic Dome
Amazon sells a plastic flowerpot with a plastic dome lid. How cute would these be filled with vanilla ice cream on the bottom of the pot? Make dirt cake and add it on top, resembling garden soil. Joy from Joy Food Sunshine shares the easiest way to make Oreo dirt cake. Add gummy worms for extra fun to each basket.
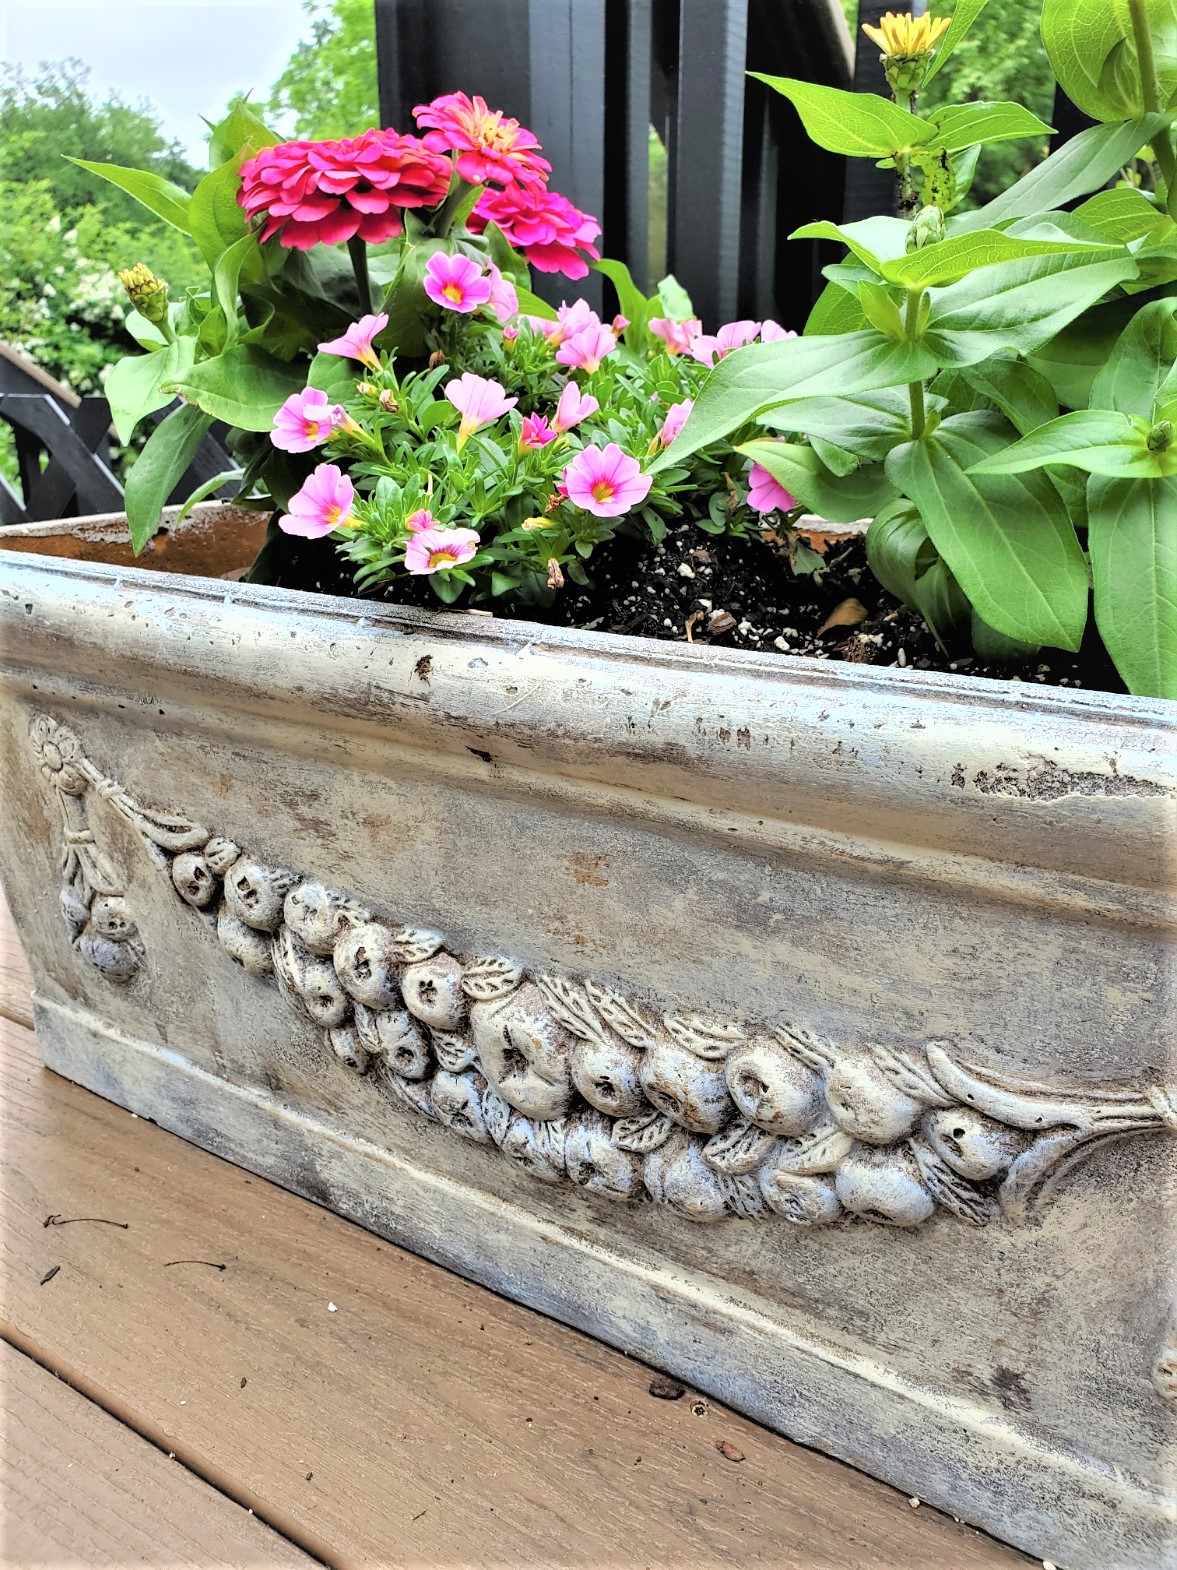
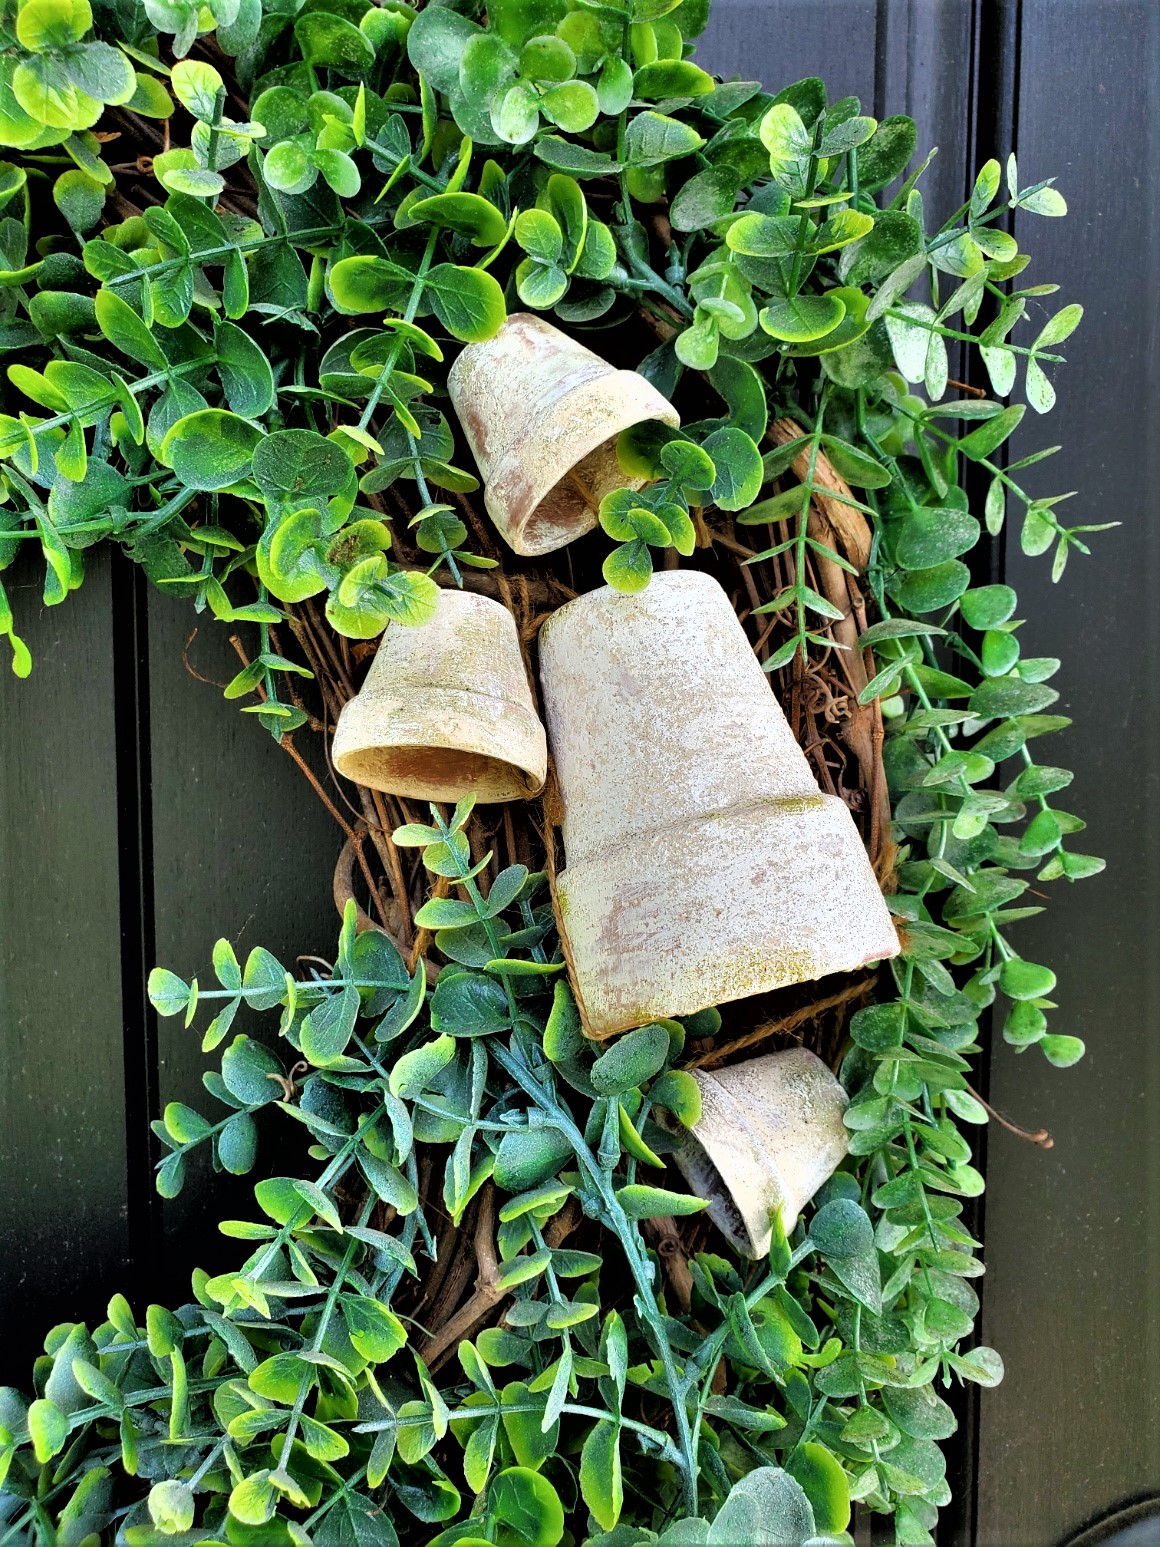
DIY Nature-Inspired Baskets Centerpieces
Elevate your spring table setting with these treat baskets as spring decorations. Incorporate peat pot baskets in their natural color with natural elements like twine, silk flowers, or dried flowers with hot glue on the top edge. This adds rustic charm and is a beautiful focal point for centerpieces. Add small plants to each little pot. Depending on how large each plant is, the potting mix may need to be added to the bottom of the pot.
Spring Baby Shower Surprise: Gift Baskets
Are you hosting a baby shower this spring? Each little basket can serve as a giveaway for guests. Fill the bottom of the pot with candies or small trinkets. Customize them with baby-themed graphics on the side of the peat pot for an extra sweet final touch.
Teacher Appreciation Tokens:
Show your appreciation for teachers with these thoughtful peat pot baskets. Fill them with chocolates, homemade goodies, a small plant, or a gift card. As a final touch, add education-themed graphics on the side of the peat pot. Giving this as a gift is a great way to thank a teacher for working hard.
Explore decorative elements to add to your pretty basket.
- Ribbon – Many Colors Here
- Silk flowers
- Jute – Twine – I use this!
- Dried flowers for a rustic touch
Add these decorative elements with a little bit of hot glue.
Personalization Flair:
For a final touch, adding family names to the baskets is a great way to make these little peat pots a perfect gift. As an example, print a seed packet image or use a seed packet you have for a gardening gift basket. Add garden soil and a small plant to add to spring gardens. This is a great way to make baskets for a gardening party, a birthday, or Mother’s Day. By the way, images for seed packets can be found on Etsy for a great price.
Pro Tip: Here is the best way to print an image on tissue paper. Begin by cutting a piece of tissue paper slightly larger than the cardstock. Next, tape the edges of the tissue paper to the back of the cardstock. Feed the card stock through your printer. Carefully cut the tissue paper from the cardstock. Trim closely around your image.
Make Peat Pot Baskets In 15 Minutes!
Start Your Spring Crafting Adventure Now!
Dive into the world of creativity and charm by crafting your Spring Peat Pot Baskets. Unleash your creativity and bring joy to gatherings such as Easter, a birthday gift, or Mother’s Day. Get started today!
Elevate Your Celebrations with Treats!
Ready to charm your guests and create lasting memories? Follow our step-by-step guide to craft charming Spring or Peat Pot Easter Baskets. Celebrate with a touch of handmade magic!
Spread Joy with Spring Goodies – Try it Today!
Follow our blog post to make your Spring Peat Pot Baskets filled with treats. It’s a great way to add a personal touch to spring decorations for any occasion. Start crafting today for spring!
Personalized Gardening Gift Basket:
These peat pot baskets are the easiest way to make favors for an upcoming garden party, Easter, or Mother’s Day. Fill them with sweets for guests and the added touch of spring.
Final Touch Peat Pot Gift Baskets
In the end, making these spring peat pot treat baskets in 15 minutes isn’t just a fun project; it’s the best way to make the perfect gift or add spring decorations for any gathering! For a final touch, fill them with Easter candy for yummy treats, and small plants for any spring celebration. Share these gift baskets with the gardener in your life, Mother’s Day, or make this pretty basket a special birthday gift. Add potting mix to the pot with a small plant, a seed packet filled with seeds of their favorite flower. These can be added to their spring gardens or spring decorations for any gathering. These little baskets are a reminder of how we can enjoy spring. Happy crafting!
FOLLOW US ON: FACEBOOK, INSTAGRAM, PINTEREST, X, THREADS, AND TIKTOK

Posts Of Interest


SPRING PEAT POT TREAT BASKETS IN 15 MINUTES!
Notes
SPRING PEAT POT TREAT BASKETS IN 15 MINUTES!
Supplies List:
-
- Peat Pots
- White Acrylic Paint
- Scissor
- Pinking Shears – optional
- Mod Podge
- Rub N Buff – Antique Gold – optional
- Foam Brush
- Paintbrush
- Single Hole Punch – optional
- Paper or Card Stock
- Black Pen – optional
- Pencil
- Heavy Duty – wire handle
- Image Printer
Step 1: Priming Peat Pots With Acrylic Paint
Begin by painting the little pots white with acrylic paint. Because of the rough texture of the peat pots, use a paintbrush for a smooth finish. The good news is that one coat of paint is all that’s needed to cover each pot. Let the pots dry overnight. This step sets the foundation for these Easter treat baskets.Step 2: Print and Cut Images for Peat Pot Easter Teat Baskets
Add a graphic to the side of the peat pot. The second step is to print a spring graphic on regular printer paper, card stock, or tissue paper. Use scissors or decoupage scissors to cut around the image as close to the edges as possible. This process ensures that your graphic seamlessly blends on your little pots.Step 3: Enhance Gift Baskets With Mod Podge And A Graphic
Add personality to your peat pot treat baskets using the Mod Podge for decoupage. Apply a coat of Mod Podge to the back of the cut graphic, paying attention to the edges. Gently place the graphic onto the side of the peat pot. Use a tapping motion to avoid any tears. To achieve a professional and polished look to your spring baskets, add another layer of Mod Podge on top of the graphic. This step not only secures the graphic but also enhances the vibrancy of the chosen design.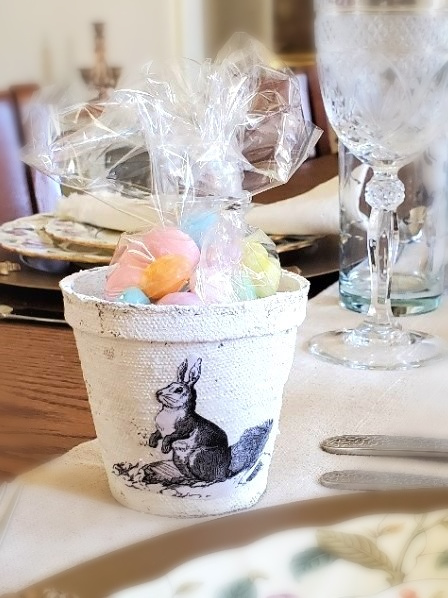


Great minds think alike! I just made little decoupage pots for easter and I love them!
So easy right. Can’t wait to hop over
These are really cute. I love the bunnies you found to put on the pots. I look forward to seeing your Easter table.
Thanks so much Kris!
these pots are super cute, Cindy. I’m all for easy projects!
Thank you so much Debra!
I was just thinking about my peat moss pots! I love graphics fairy. I will be doing this! So so cute!
Thank you so much!
These are so cute, Cindy! I’m sure your guests will love them!
My family loves sweets
What an adorable gift for Easter, thank you for sharing your tips and tricks Cindy!
Thank you for your support
These are so sweet! So versatile for hostess gifts, wedding favors etc.
This is so darling. Thanks for sharing Cindy.
These are simply adorable! I absolutely love them! Thank you for sharing how to make them!
These are so sweet! Thank you for sharing!
So cute – I had never thought of painting this type of pot.
Those are very, very cute…and easy peasy to boot. Happy Wednesday- xo Diana
Adorable! Thanks for sharing.
Love these so much, Cindy – I just pinned! I can’t believe how easy they were to make. Honestly, they look like a million. Can’t wait to see these on your tablescape. They’re just gorgeous! Hugs, CoCo
Such a cute spring craft. And they’re simple too. I can’t wait to make some.
They are just darling, Cindy!
Love this idea! I love how they look and it’s so simple. Pinning and will definitely will be making a version of this although I think yours are perfection. XO- MaryJo
Thanks so much!
These are really cute and I love how simple and inexpensive they are to make! Pinned
They are very easy and fun to make
These are adorable and perfect for spring! Thank you for sharing the DIY on Farmhouse Friday link party. I’m featuring them tomorrow. Hope you link up again soon. pinned
Thank you so much!
thanks for the feature
Such a fabulous idea, Cindy! I love that you can use them for a variety of different things from Easter to Mother’s Day. I could even see putting some little shells in them for Summer or pumpkins in them for the Fall. They’re super cute! Loving and pinning as always sweet friend, CoCo
These are adorable Cindy! I love to paint flower pots, but never thought of using peat pots! Love the idea of using them to hold gifts! I can’t wait to try this! Pinning now!
Cindy, these are adorable and you make them look easy to make. Happy Easter!
I remember these. They are really cute. The one pot with how the bunny is stretching looks like it has a dachshund body lol! Have a great week leading up to Easter. Hugs. Kris