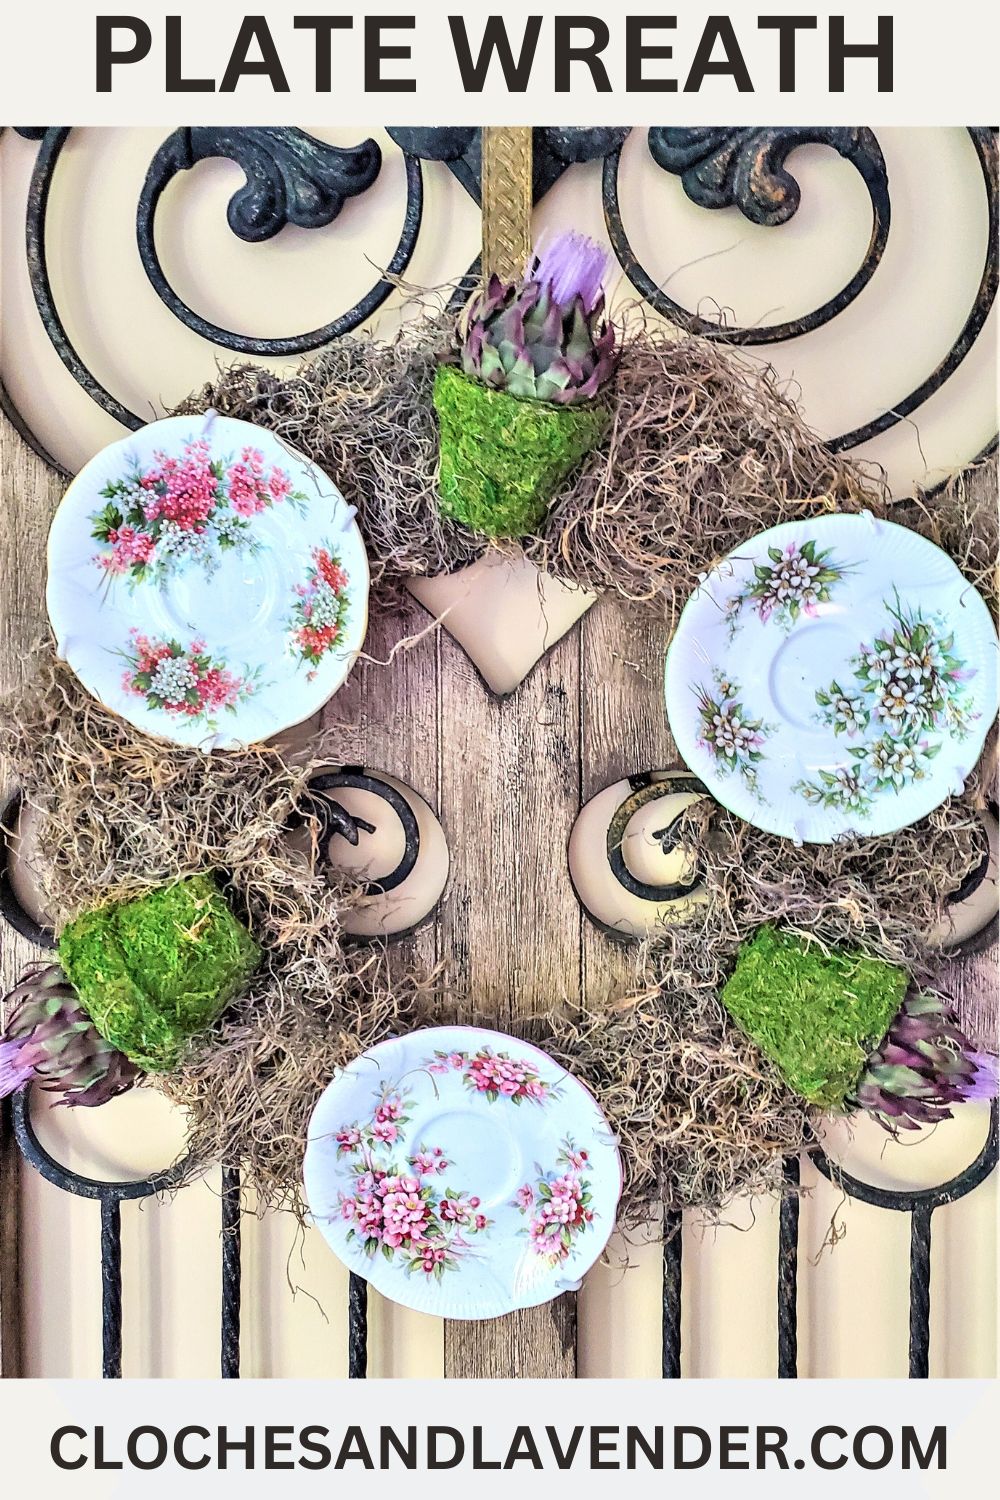
How To Make A Plate Wreath Damage Free!
Welcome to how to make a plate wreath damage free which is so much fun to create! In this creative and fun craft project, we’ll explore adding ordinary plates into stunning wreaths that can add charm and character to any space. Plate wreaths are not only a beautiful way to display and preserve sentimental dishes, but they also offer an opportunity to add memories and stories into your home decor.
â–º Table of Contents
Table of Contents
- 1 Idea Behind This Wreath
- 2 Reasons To Make This Simple Wreath
- 3 Plate Choices in Different Sizes:
- 4 How to Find Plates
- 5 Wreath Bases Choices:
- 6 How This Plate Wreath Project Came To Be
- 7 How to Make A Plate Wreath Damage Free!
- 8 Craft Supplies Plate Wreath Damage Free:
- 9 Step 1: Prepare The Wreath Form
- 10 Step 2: Cover The Flowerpots
- 11 Step 3: Attach The Dishes
- 12 Step 4: Connect The Flowerpots
- 13 Step 5: Cover The Wreath With Moss
- 14 Step 6: Decorative Elements
- 15 Craft Projects for the Holiday Season for Kids
- 16 DIY Cardboard or Paper Plate Ring:
- 17 My Favorite Part About This Easy Craft Project
- 18 Adding Embellishments
- 19 How To Make A Plate Wreath Craft Damage Free
- 20 How To Make A Plate Wreath Craft Damage Free
Idea Behind This Wreath
Jump to DIY Printable CardThe concept behind a plate wreath is simple yet elegant: carefully arranging and attaching plates of various sizes, colors, and designs onto a wreath base. This allows you to showcase cherished plates that have sentimental value, such as heirlooms, antique finds, or even your favorite dishware. Each plate tells a story, capturing moments of nostalgia and connection.
Whether you’re looking to upcycle old plates, showcase a collection of butter pats, small plates, or create a gift, a plate wreath is a great project to embark on. As you follow along, you’ll discover tips and techniques for selecting the right plates, choosing a suitable wreath base, and arranging the plates.
In this tutorial, I will guide you on how to make a plate wreath craft: damage free that will not only showcase these plates but also may serve as a reminder of loved ones. Displaying these can bring a sense of nostalgia and keep the memories of your grandmothers and your mom close to your heart too!
Reasons To Make This Simple Wreath
- Start crafting your plate wreath today and infuse your home decor with sentimental charm! Gather your favorite plates. Explore vintage shops, thrift stores, or online marketplaces, to find plates and choose a sturdy wreath base. Begin assembling your plate wreath to add a personal touch to your living space.
- Gift a plate wreath to someone special and make their day even more memorable! Create a thoughtful gift by selecting plates that the recipent enjoys. Whether it’s a heirloom, favorite dishes, or plates representing memories when thrifting, a plate wreath is a unique and heartwarming present that will be cherished for years.
Plate Choices in Different Sizes:
- large plates
- small plates
- butter pats
- tea spoons
- silver sugar tongs
- assorted butter knives
How to Find Plates
Great Place To Find Plates
When searching for plates to use in your plate wreath, there are several places you can explore to find affordable options:
- Etsy: Etsy is an online marketplace known for its wide variety of vintage items. Many sellers on Etsy sell vintage plates, with beautiful designs that could be perfect for your plate wreath. Browse different shops and filter by specific criteria to find the perfect plates, butter pats, or silver sugar tongs for this easy craft project. This is a great shop I browse often and they have great prices.
- Thrift Stores: Thrift stores are treasure troves for finding affordable items, including small plates and teaspoons. Explore local thrift stores in your area, they often have a rotating inventory of donated items to add to a wreath.
- eBay: eBay is an online marketplace to find a vast selection of plates. You can search for specific plate designs, vintage and different collections, or browse auction listings. eBay allows you to bid on items or purchase them outright, giving you flexibility in finding the right plates for your wreath.
- Garage Sales or Estate Sales: Garage sales and estate sales can be great places to discover hidden gems. These sales often offer household items, including plates, at affordable prices. Check local listings or online platforms to find upcoming sales in your area.
Remember, when searching for plates, look for the size, works best for your wreath. Consider the value and style of the plates, as they will be a focal point of your wreath. Whether you find plates on Etsy, in thrift stores, or at garage/estate sales, be patient and persistent in your search, and you’re likely to discover some beautiful pieces to add to your plate wreath.
Wreath Bases Choices:
When creating a plate wreath, there are several options for the base or foundation of the wreath. Here are a few commonly used wreath bases for a plate wreath:
- Metal Mesh Wreath: A metal mesh wreath form provides a sturdy base for attaching the plates and other decorations. The mesh design allows for easy attachment using twine or piece of floral wire. These wreath forms are available in different sizes and can be found at craft stores or online.
- Wire Wreath Frame: A wire wreath frame is another popular choice for a plate wreath base. These frames are made of sturdy wire and come in different wreath shapes and sizes, such as circular, square, or heart-shaped. They provide a solid foundation for attaching plates and other embellishments.
- Grapevine Wreath: This wreath can add a rustic touch to your plate wreath. Made from natural grapevine branches, these wreaths provide texture. You can attach the plates to the grapevine branches using twine or wire.
- Foam Wreath: Foam wreath forms are lightweight and easy to work with. Cover a foam wreath with moss or fabric to create a soft base for attaching plates. Foam wreath forms come in various sizes and can be found at any craft store or the Dollar Store.
When choosing a wreath base, consider the size and weight of the plates you plan to use, as well as the overall style you want to accomplish. Each type of base offers its own unique look, so select the one that best suits your taste and the design of your plate wreath.
How This Plate Wreath Project Came To Be
The idea for this simple wreath came to mind as I was thinking of the best way to honor these small plates I wanted a display that would be charming and gentle.
Preserving these family pieces was of utmost importance to me. These dishes hold sentimental value, being found during antiquing adventures from my grandmothers and some even passed down from my mom’s collection. I cherish each plate, especially the ones that belonged to my mom. Seeing these everyday is my favorite part aout this wreath. The best part this is my way of keeping her spirit alive.
With this plate wreath project, I wanted to ensure that the special pieces would be treated with care. It required planning and execution. I am excited to share this step-by-step guide on how to make a plate wreath, so you too can preserve your treasures while making this easy craft project for your home. At the bottom of this post I will share a few crafts that are so much fun for children using basic supplies found at the Dollare Store or craft store.
When choosing a wreath base, consider the size and weight of the plates you plan to use, as well as the overall style you want to accomplish. Each type of base offers its own unique look, so select the one that best suits your taste and the design of your plate wreath.
How to Make A Plate Wreath Damage Free!
Let’s dive into the details of this great project of making a plate wreath and embark on this crafting journey together.
Craft Supplies Plate Wreath Damage Free:
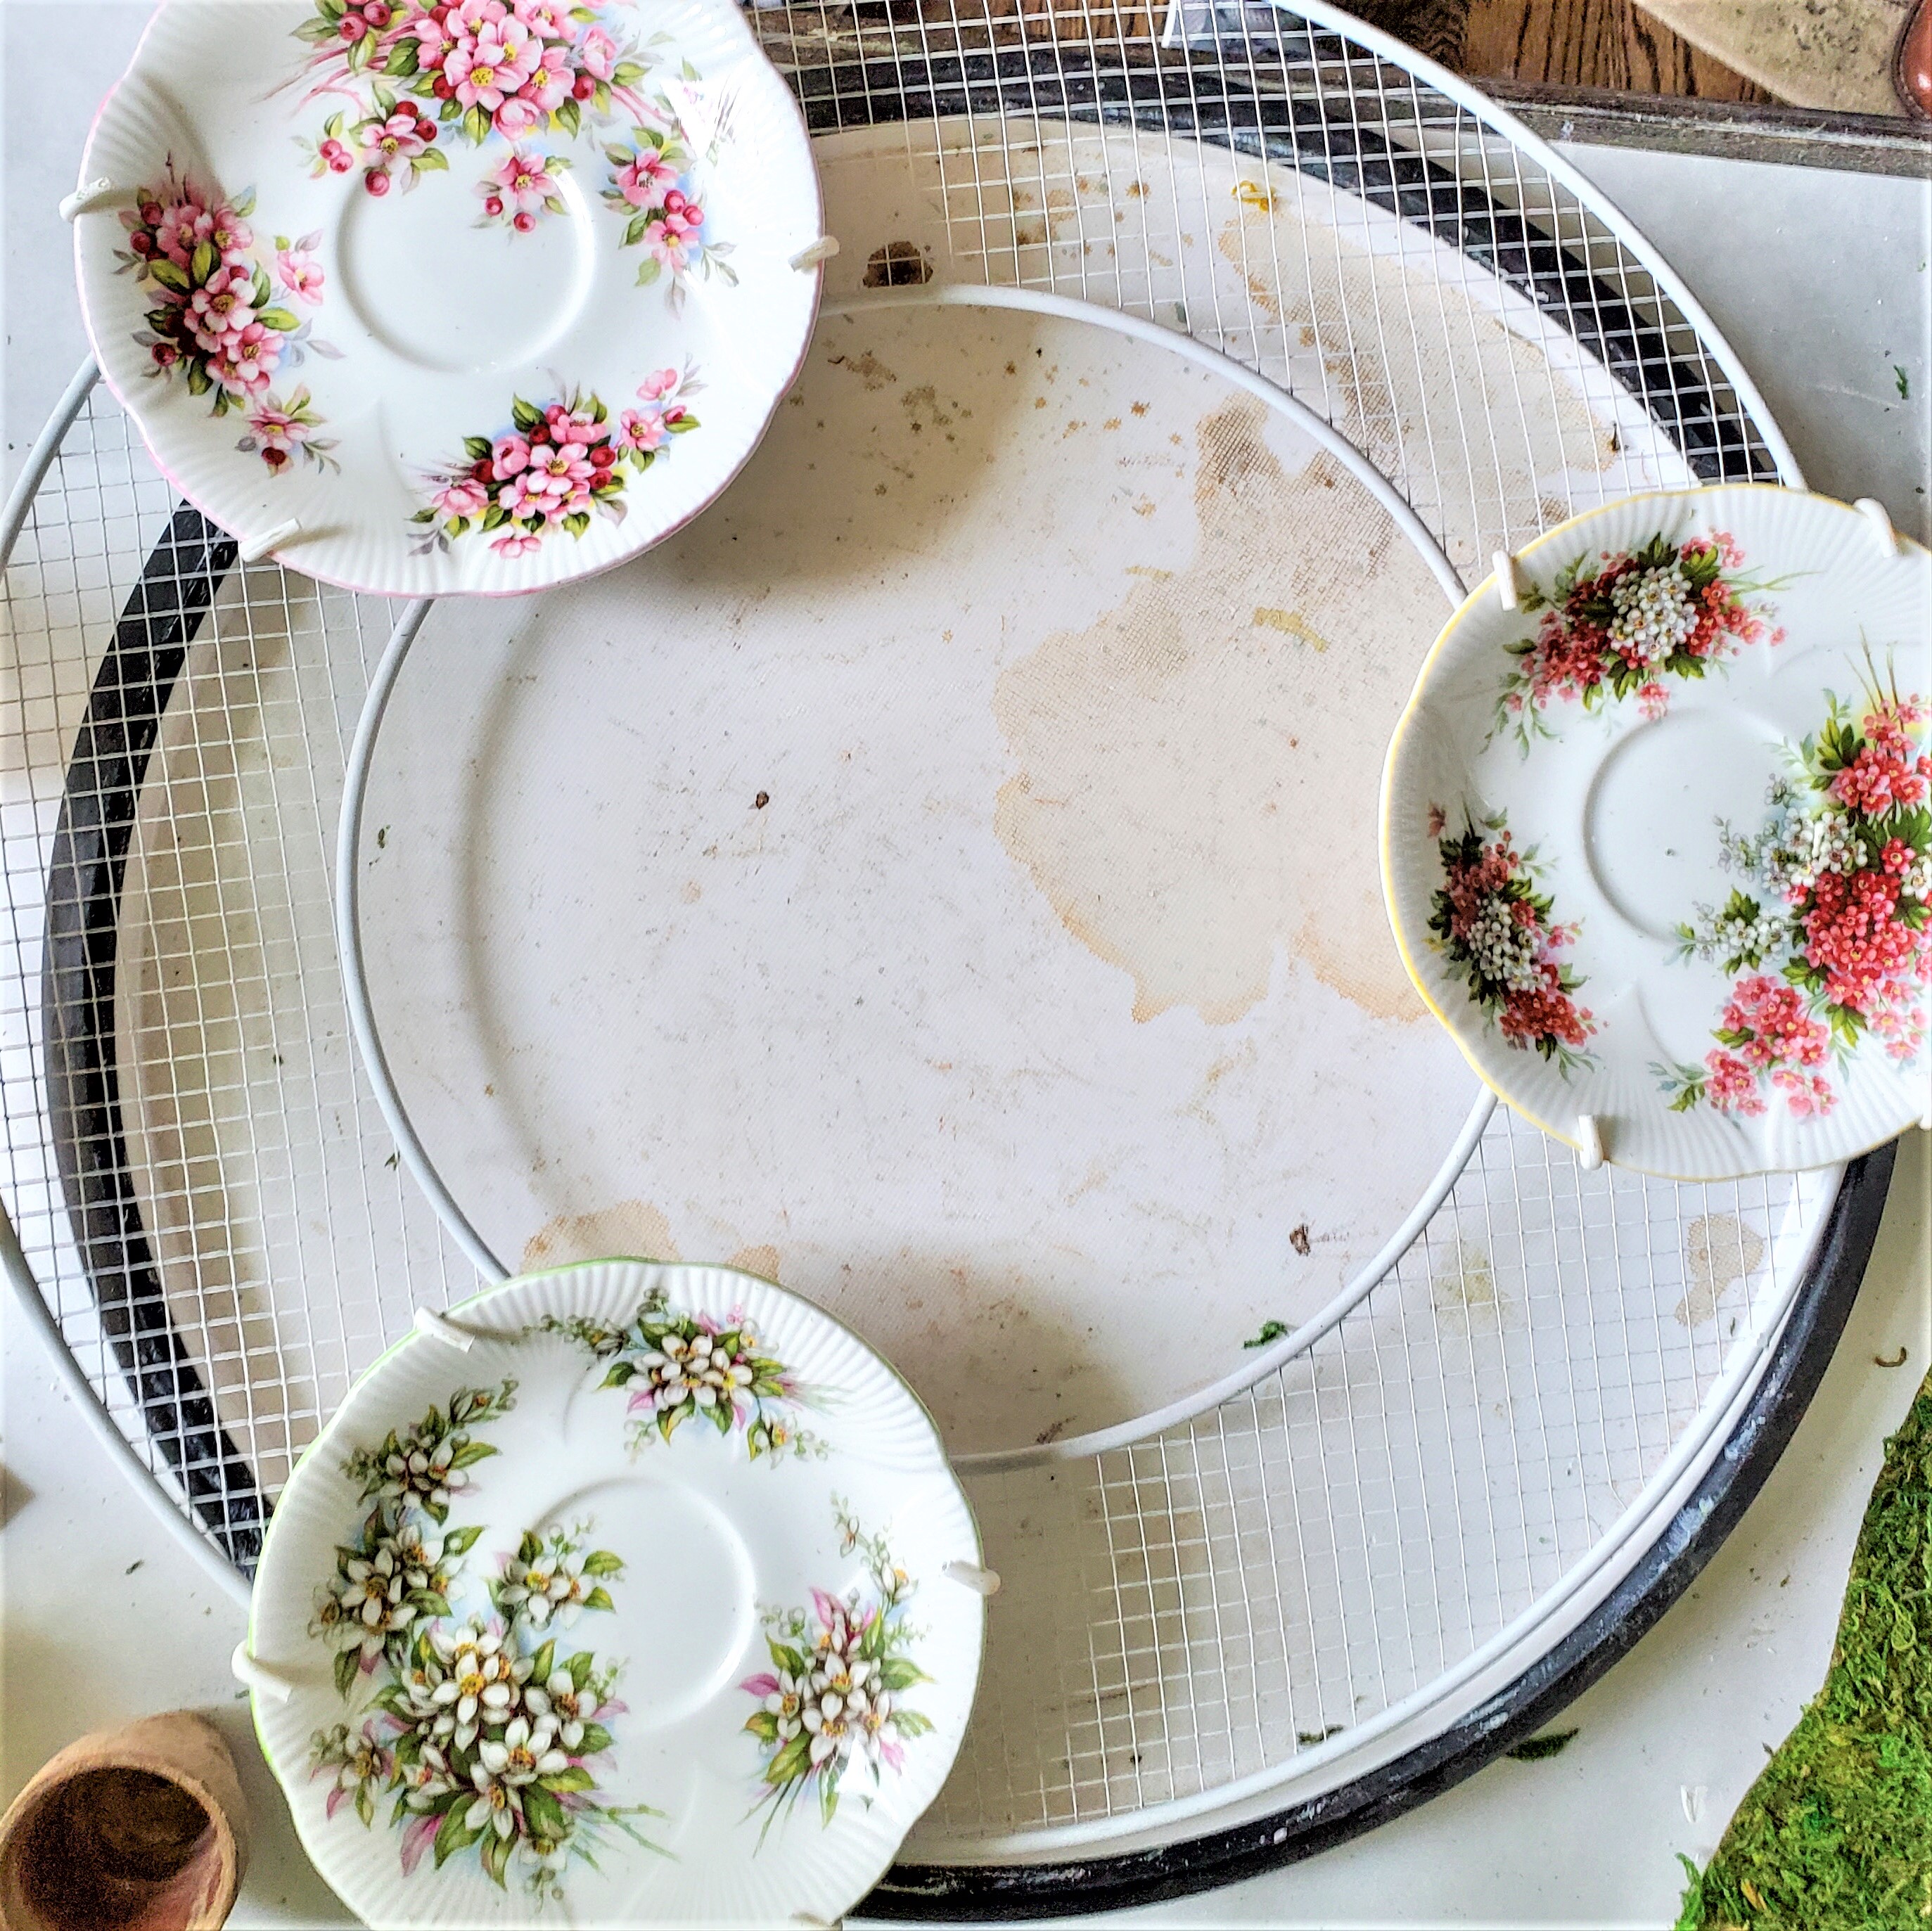
- Wreath form or flat metal wire wreath frame)
- 3 saucers or small plates
- Butcher’s twine or jute
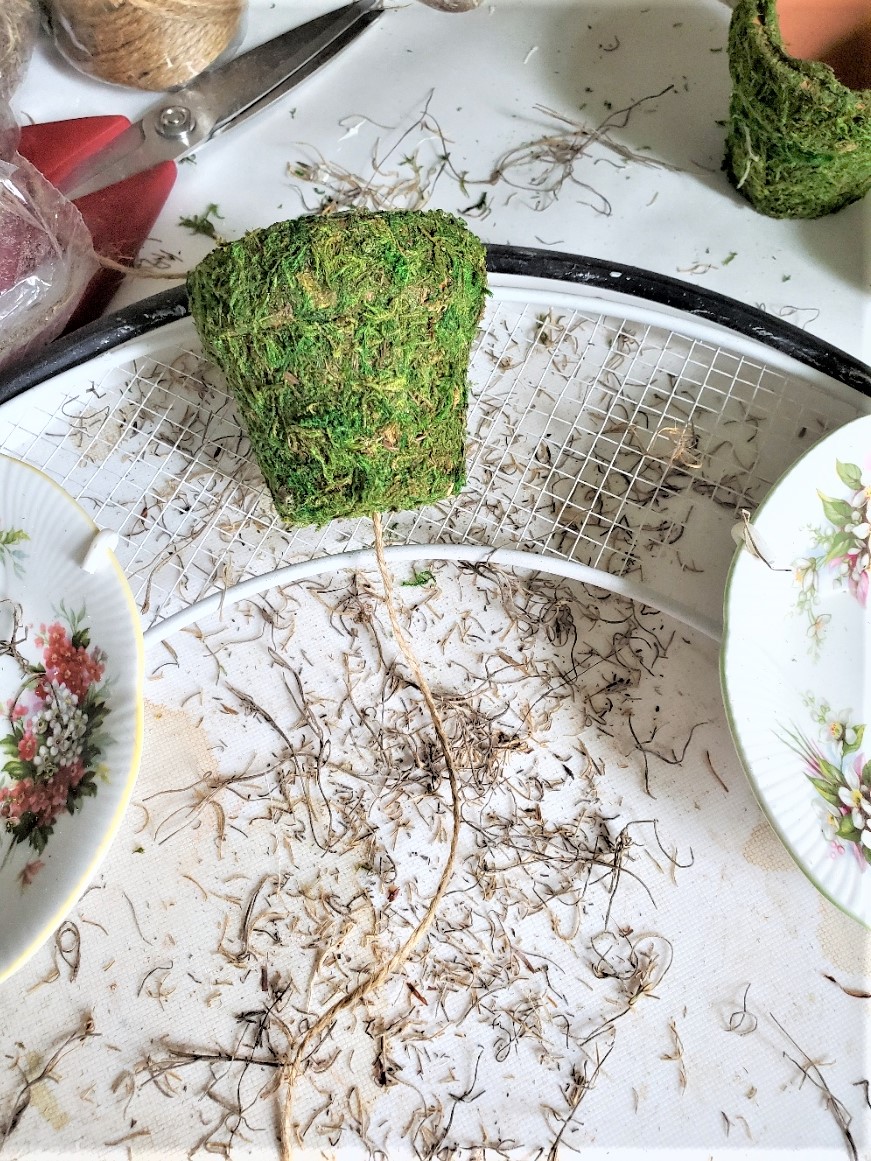
- Flowerpots
- Moss (sheet moss or Spanish moss)
- Hot glue gun
- Blooming artichokes or other decorative elements
- Spray paint (optional)
- Wire plate hanger
Step 1: Prepare The Wreath Form
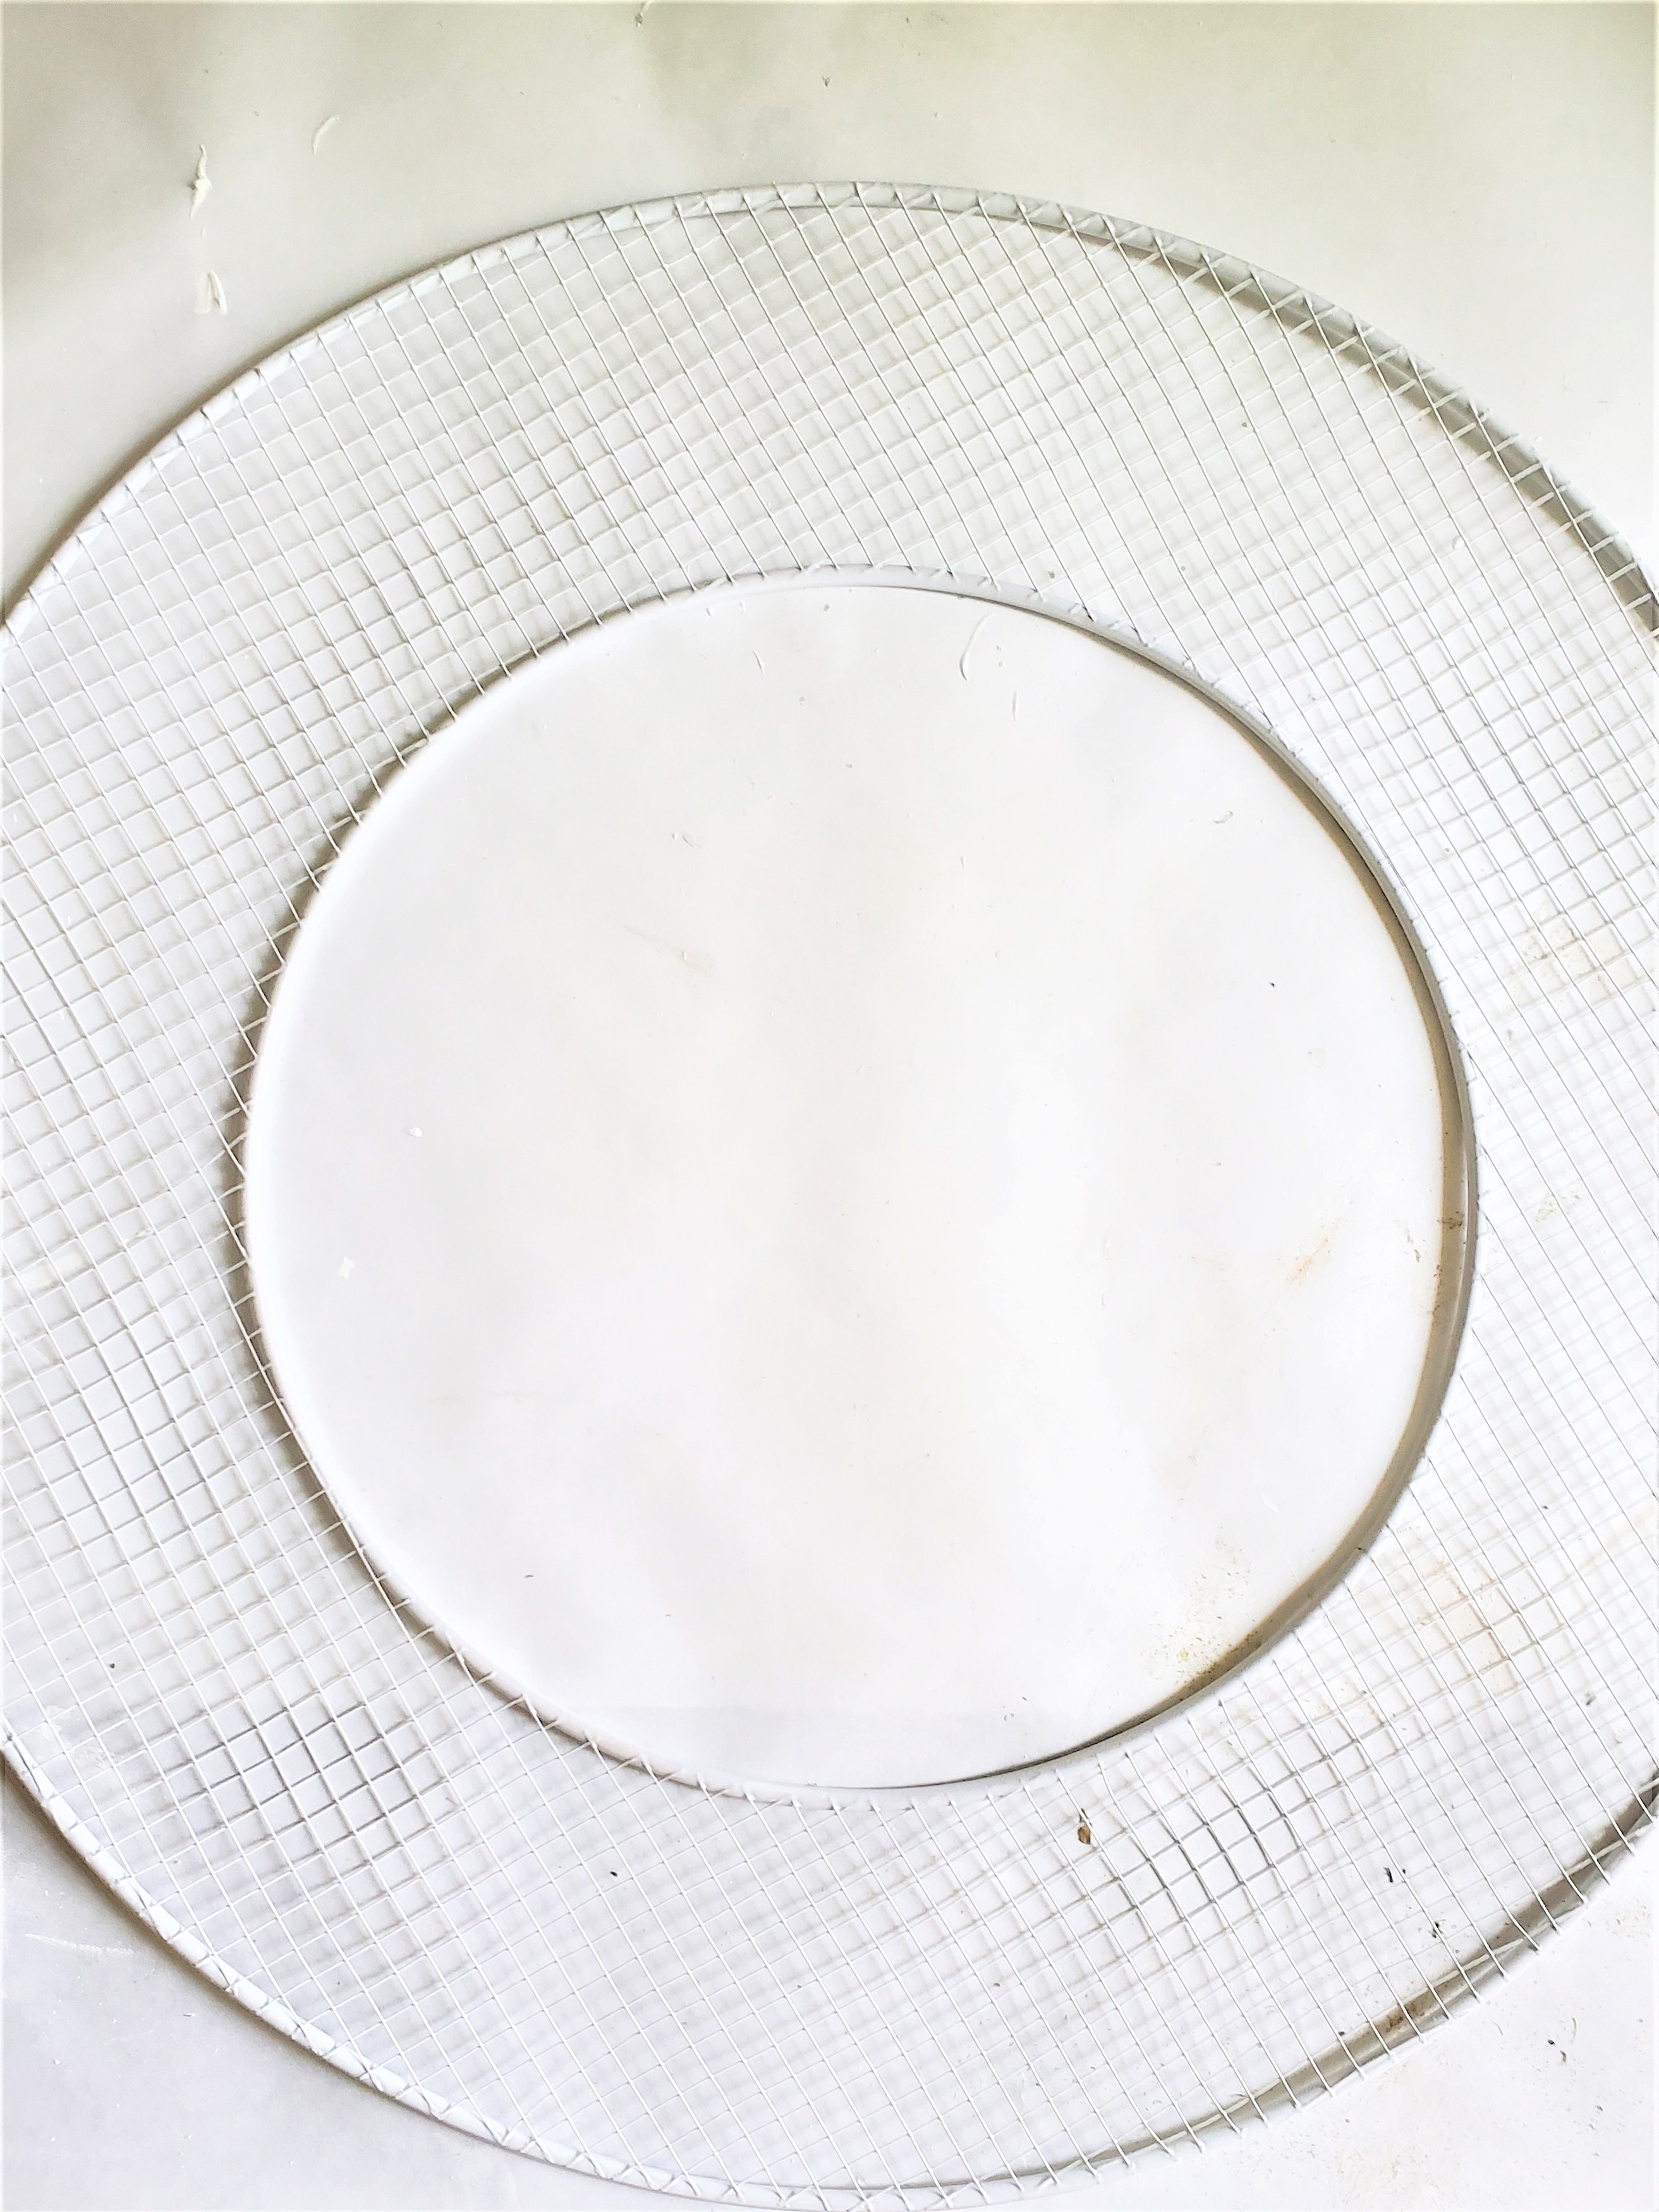
- If you’re using a metal mesh wreath form or a wire wreath, you can spray paint it white or with a desired color. Let it dry.
- Attach the plate hangers to the back side of the plate. White plate hangers blend with the plate wreath or use layers of Velcro command strips. Personally, plate hangers are the best option and are the most sturdy to keep plates damage free that are added on top of the moss.
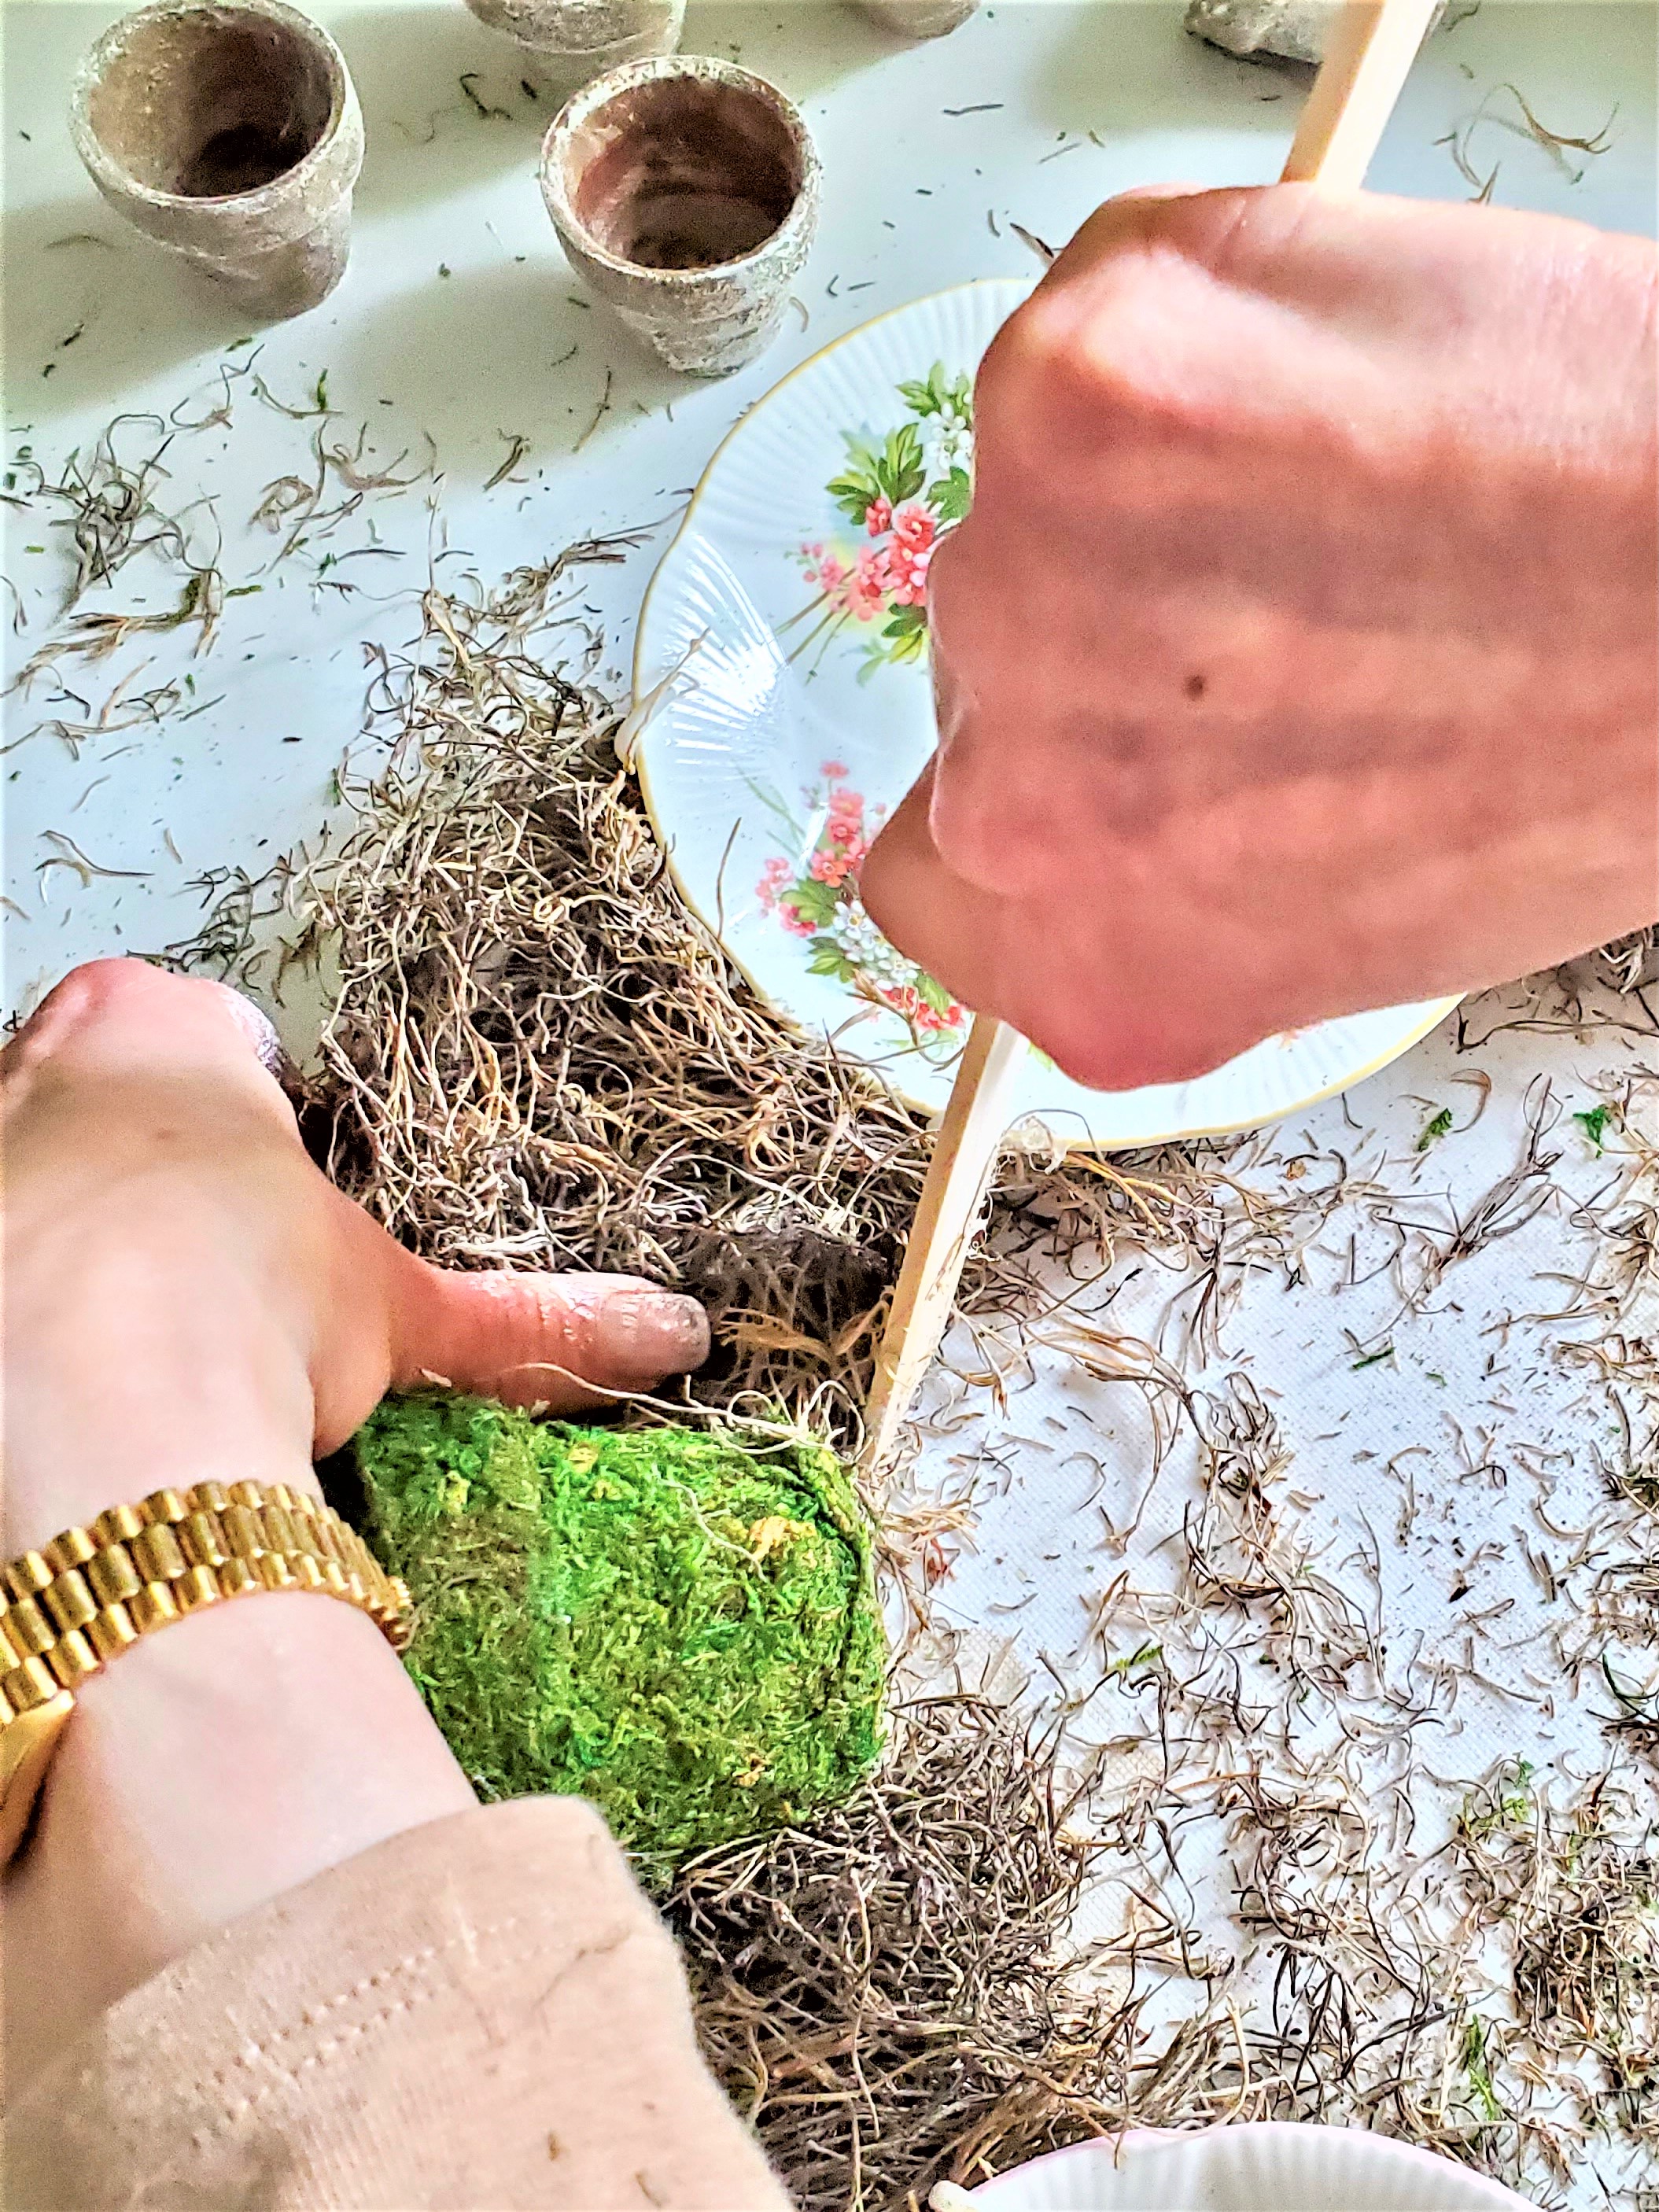
Step 2: Cover The Flowerpots
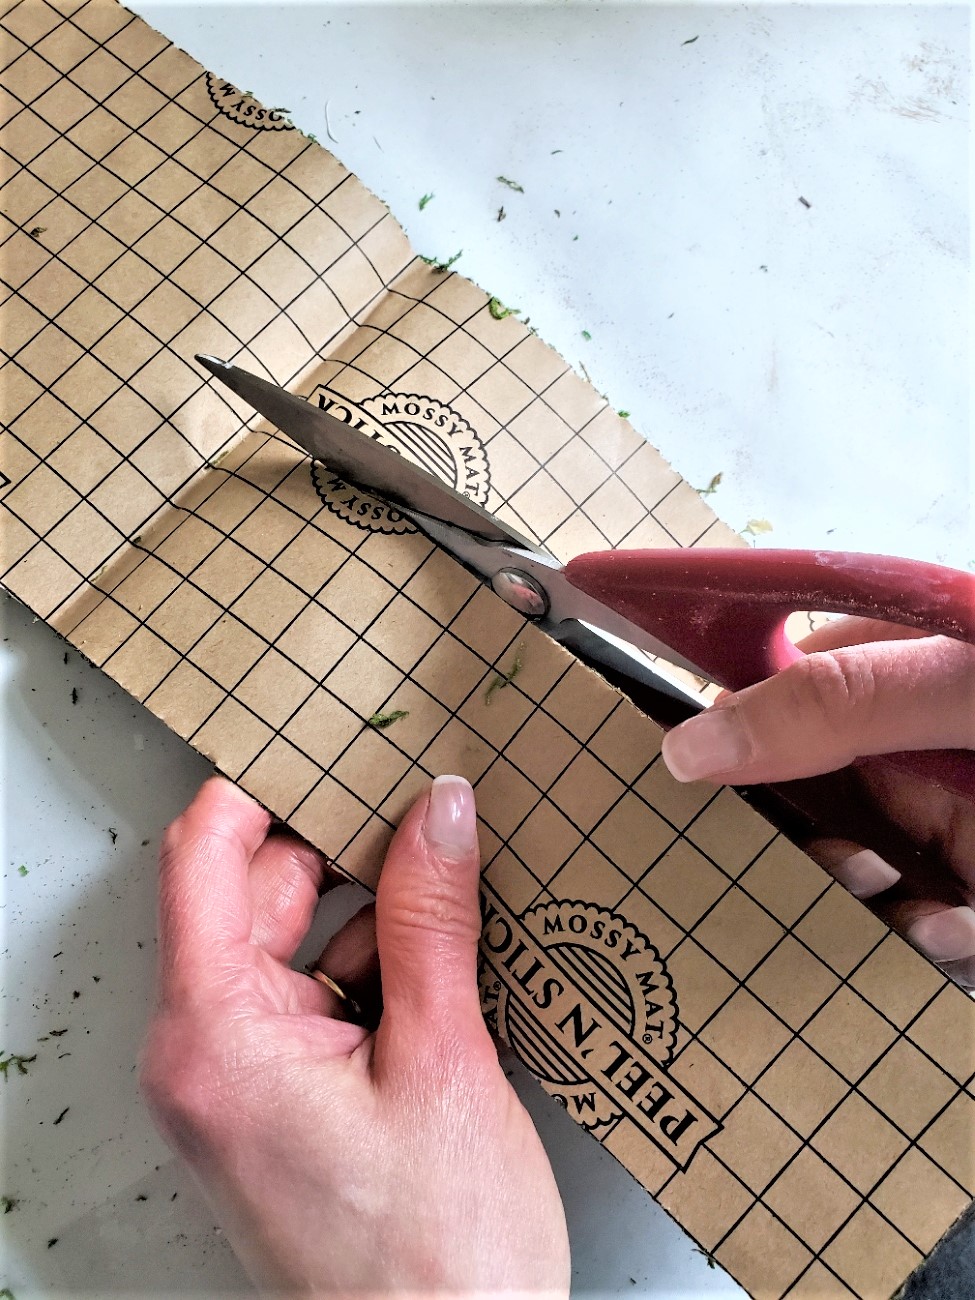
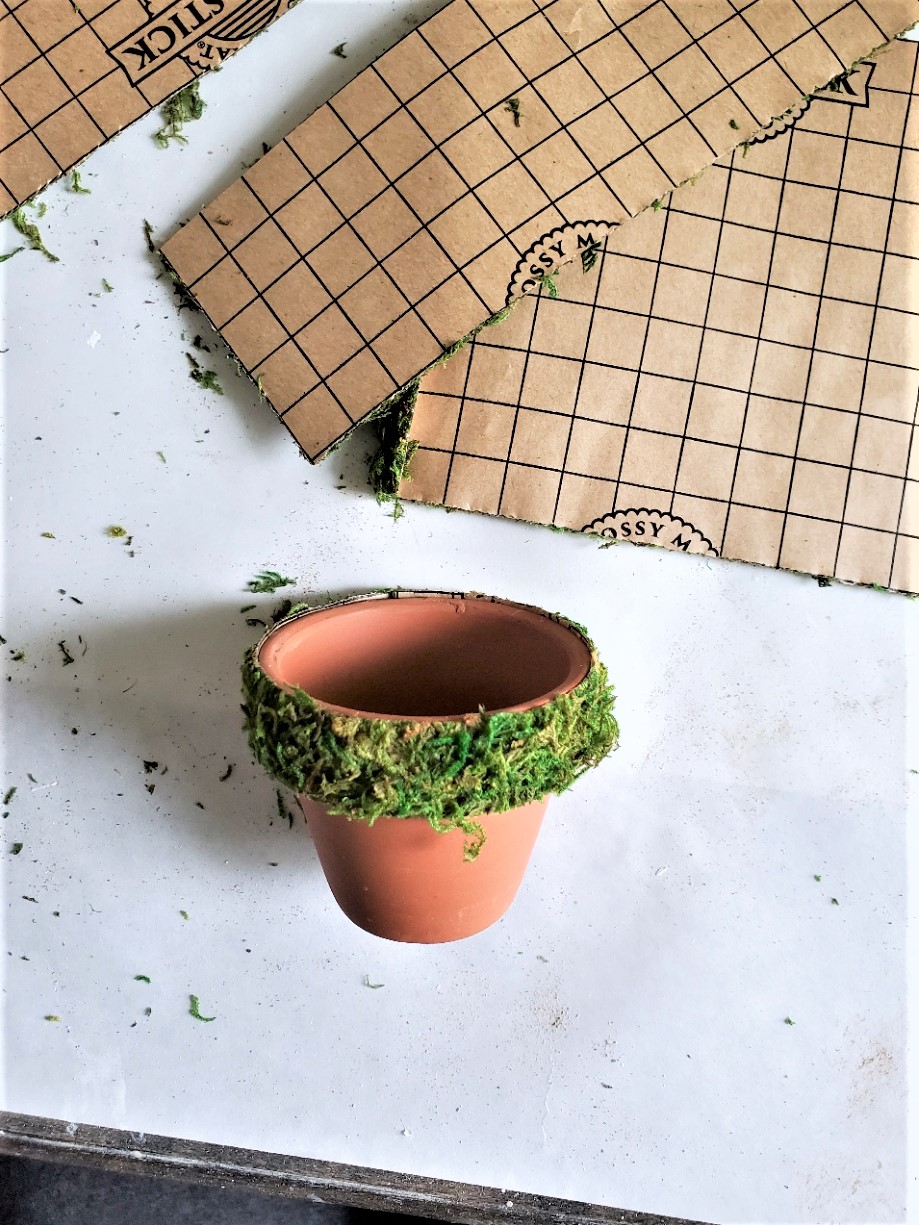
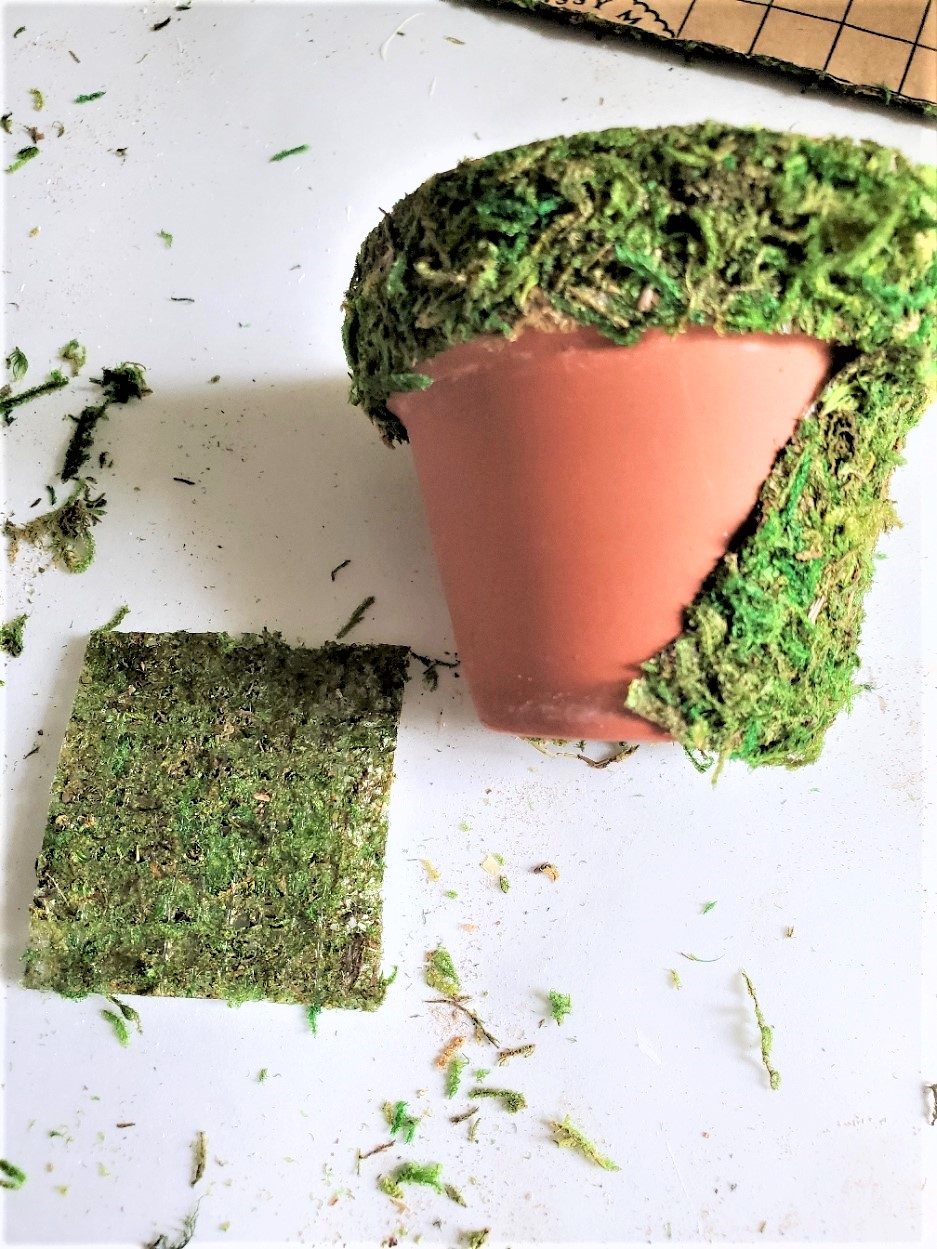
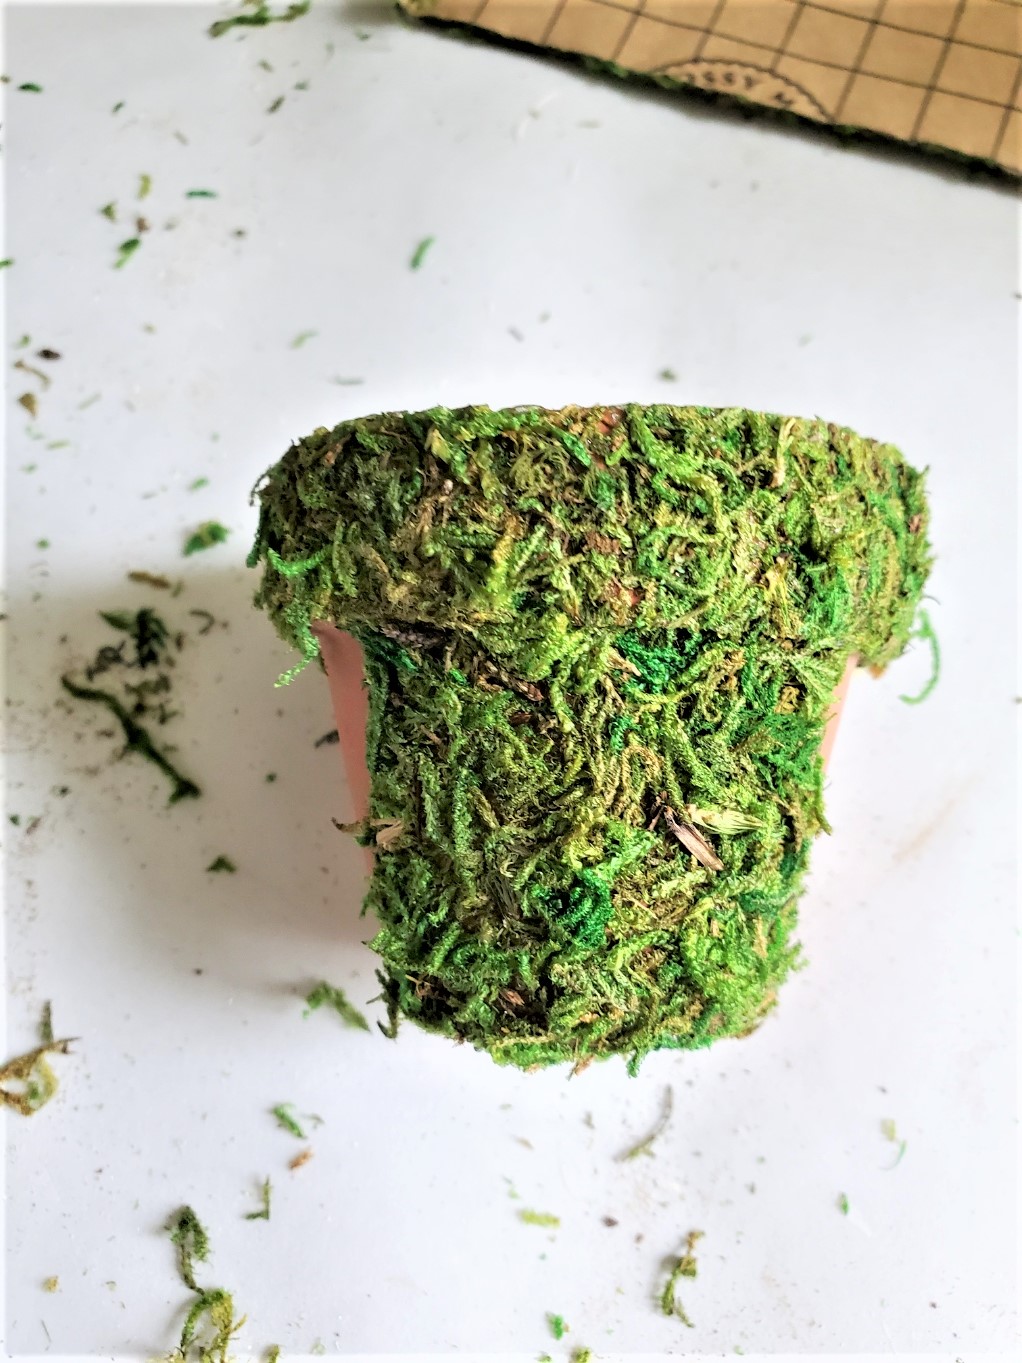
- Cut pieces of self-stick sheet moss and use them to cover the flowerpots. Start with a narrow strip to stick around the rim of the pot, then cut small squares to cover the sides.
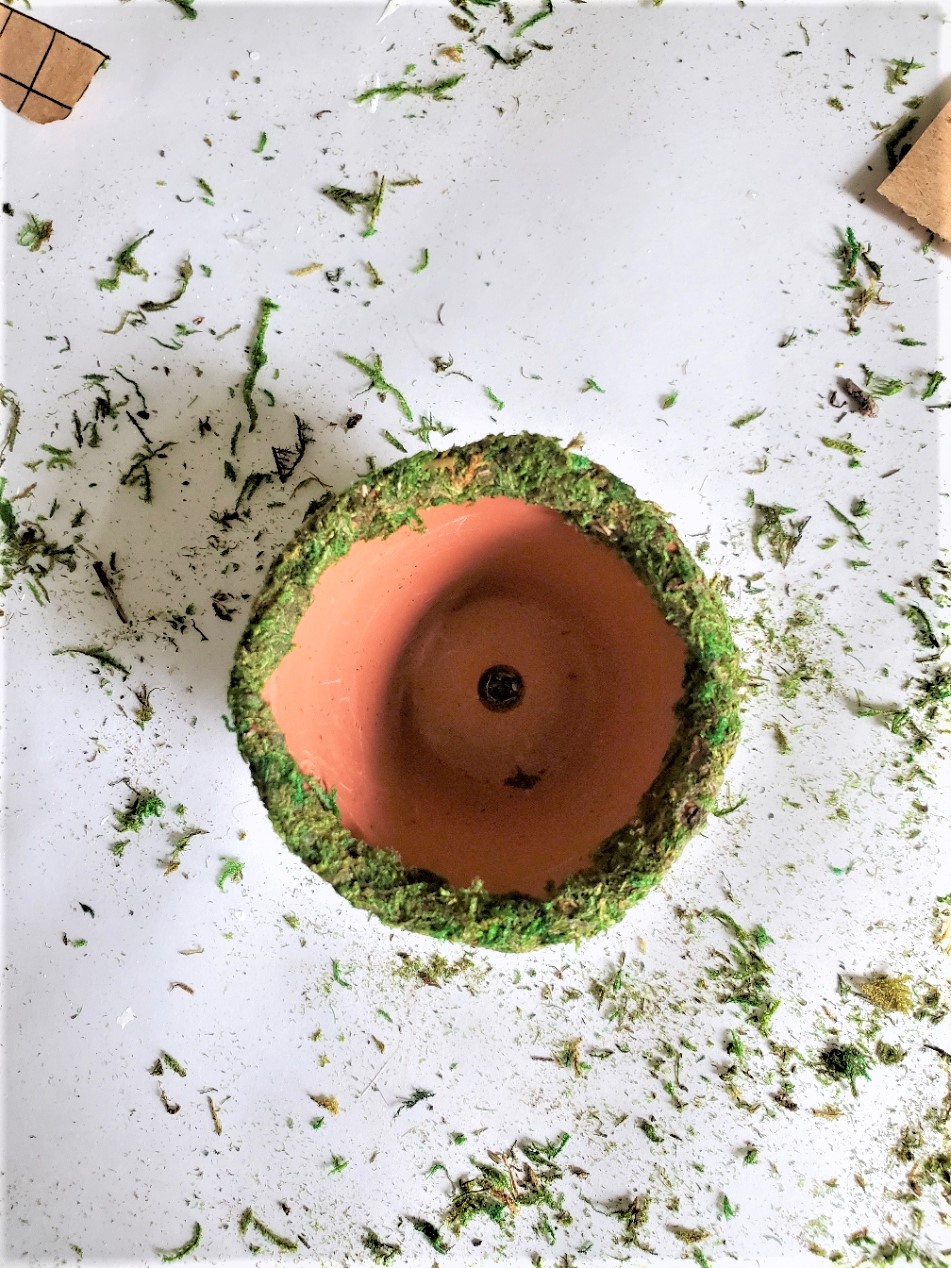
- Add a thin strip of moss to the edge of each flowerpot to create a finished look. Also, cover the bottom of the pots with a small square of moss. If you don’t want to add sheet moss paint the pots.
As an Amazon Associate, Black Dog Salvage Furniture Paint affiliate, and other Affiliate links I earn from qualifying purchases Use Code: C-L20 when visiting Black Dog Salvage Furniture Paint and RECEIVE 20% OFF!! I earn a small commission from qualifying purchases through affiliate links. I use affiliate links, which means a small commission is earned if you purchase through the link. The price will be the same whether you use the affiliate links or go directly to the website. All opinions are my own. (Check our full disclosure Policy)
Step 3: Attach The Dishes
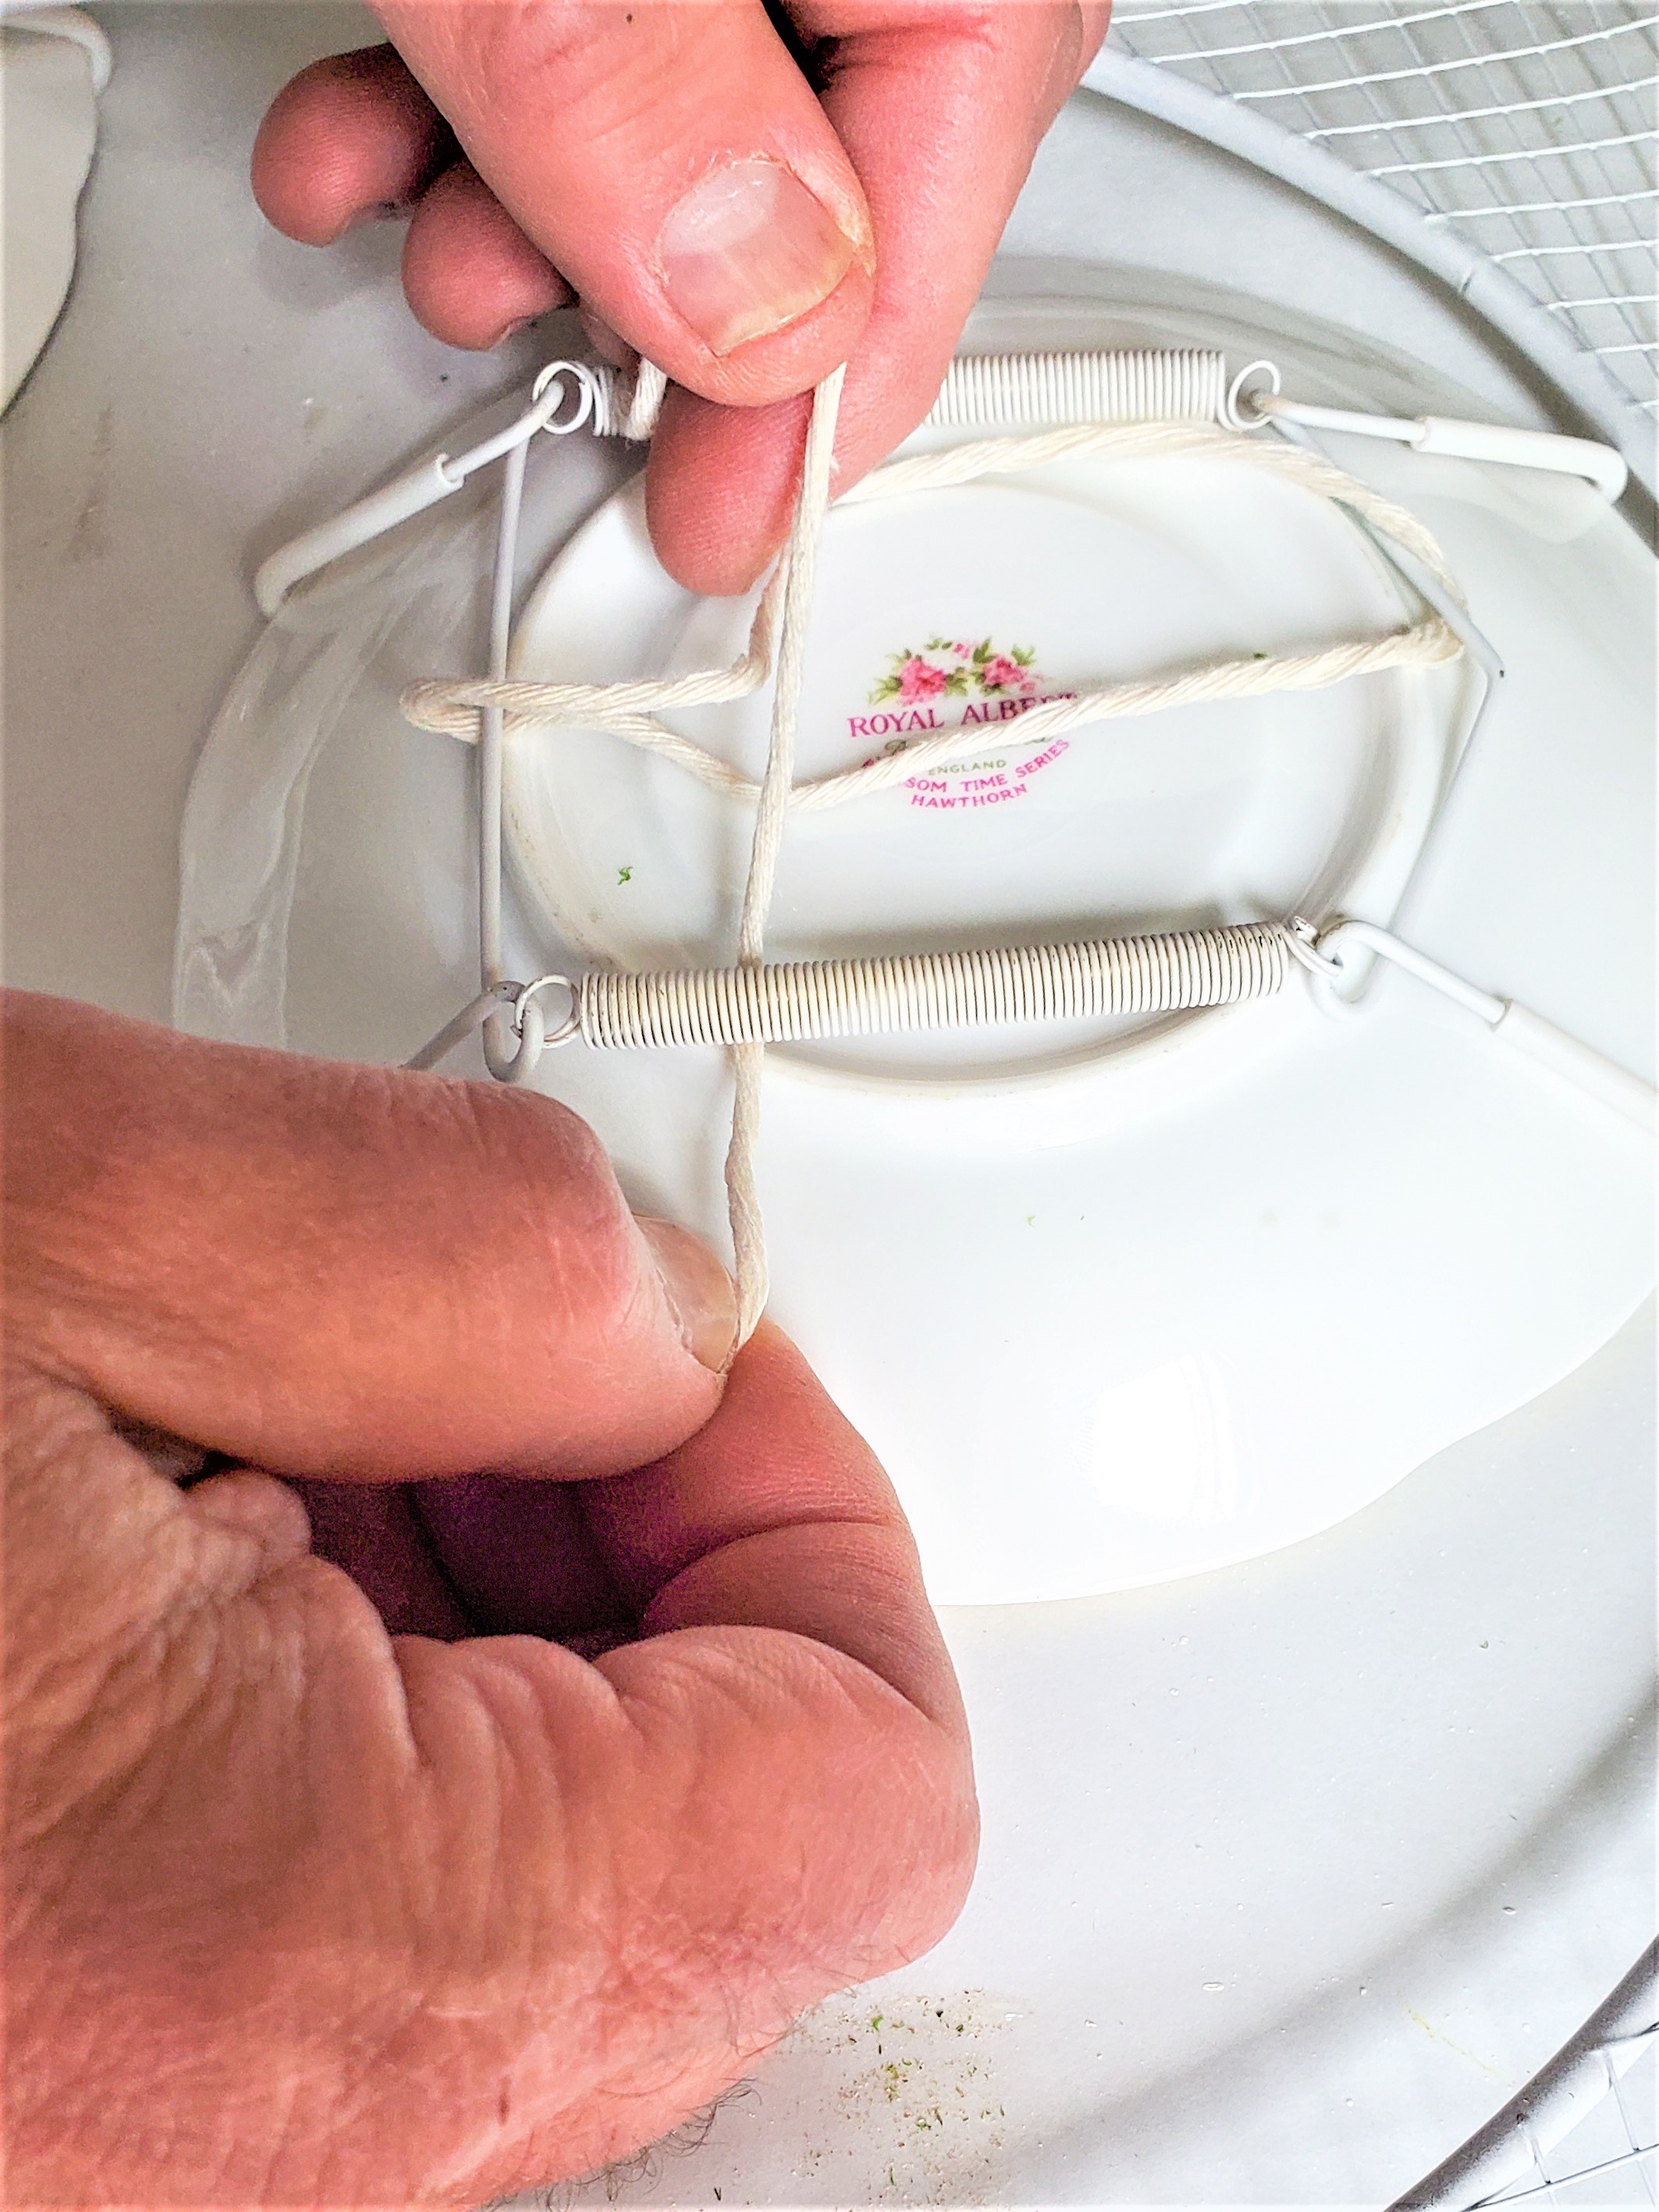
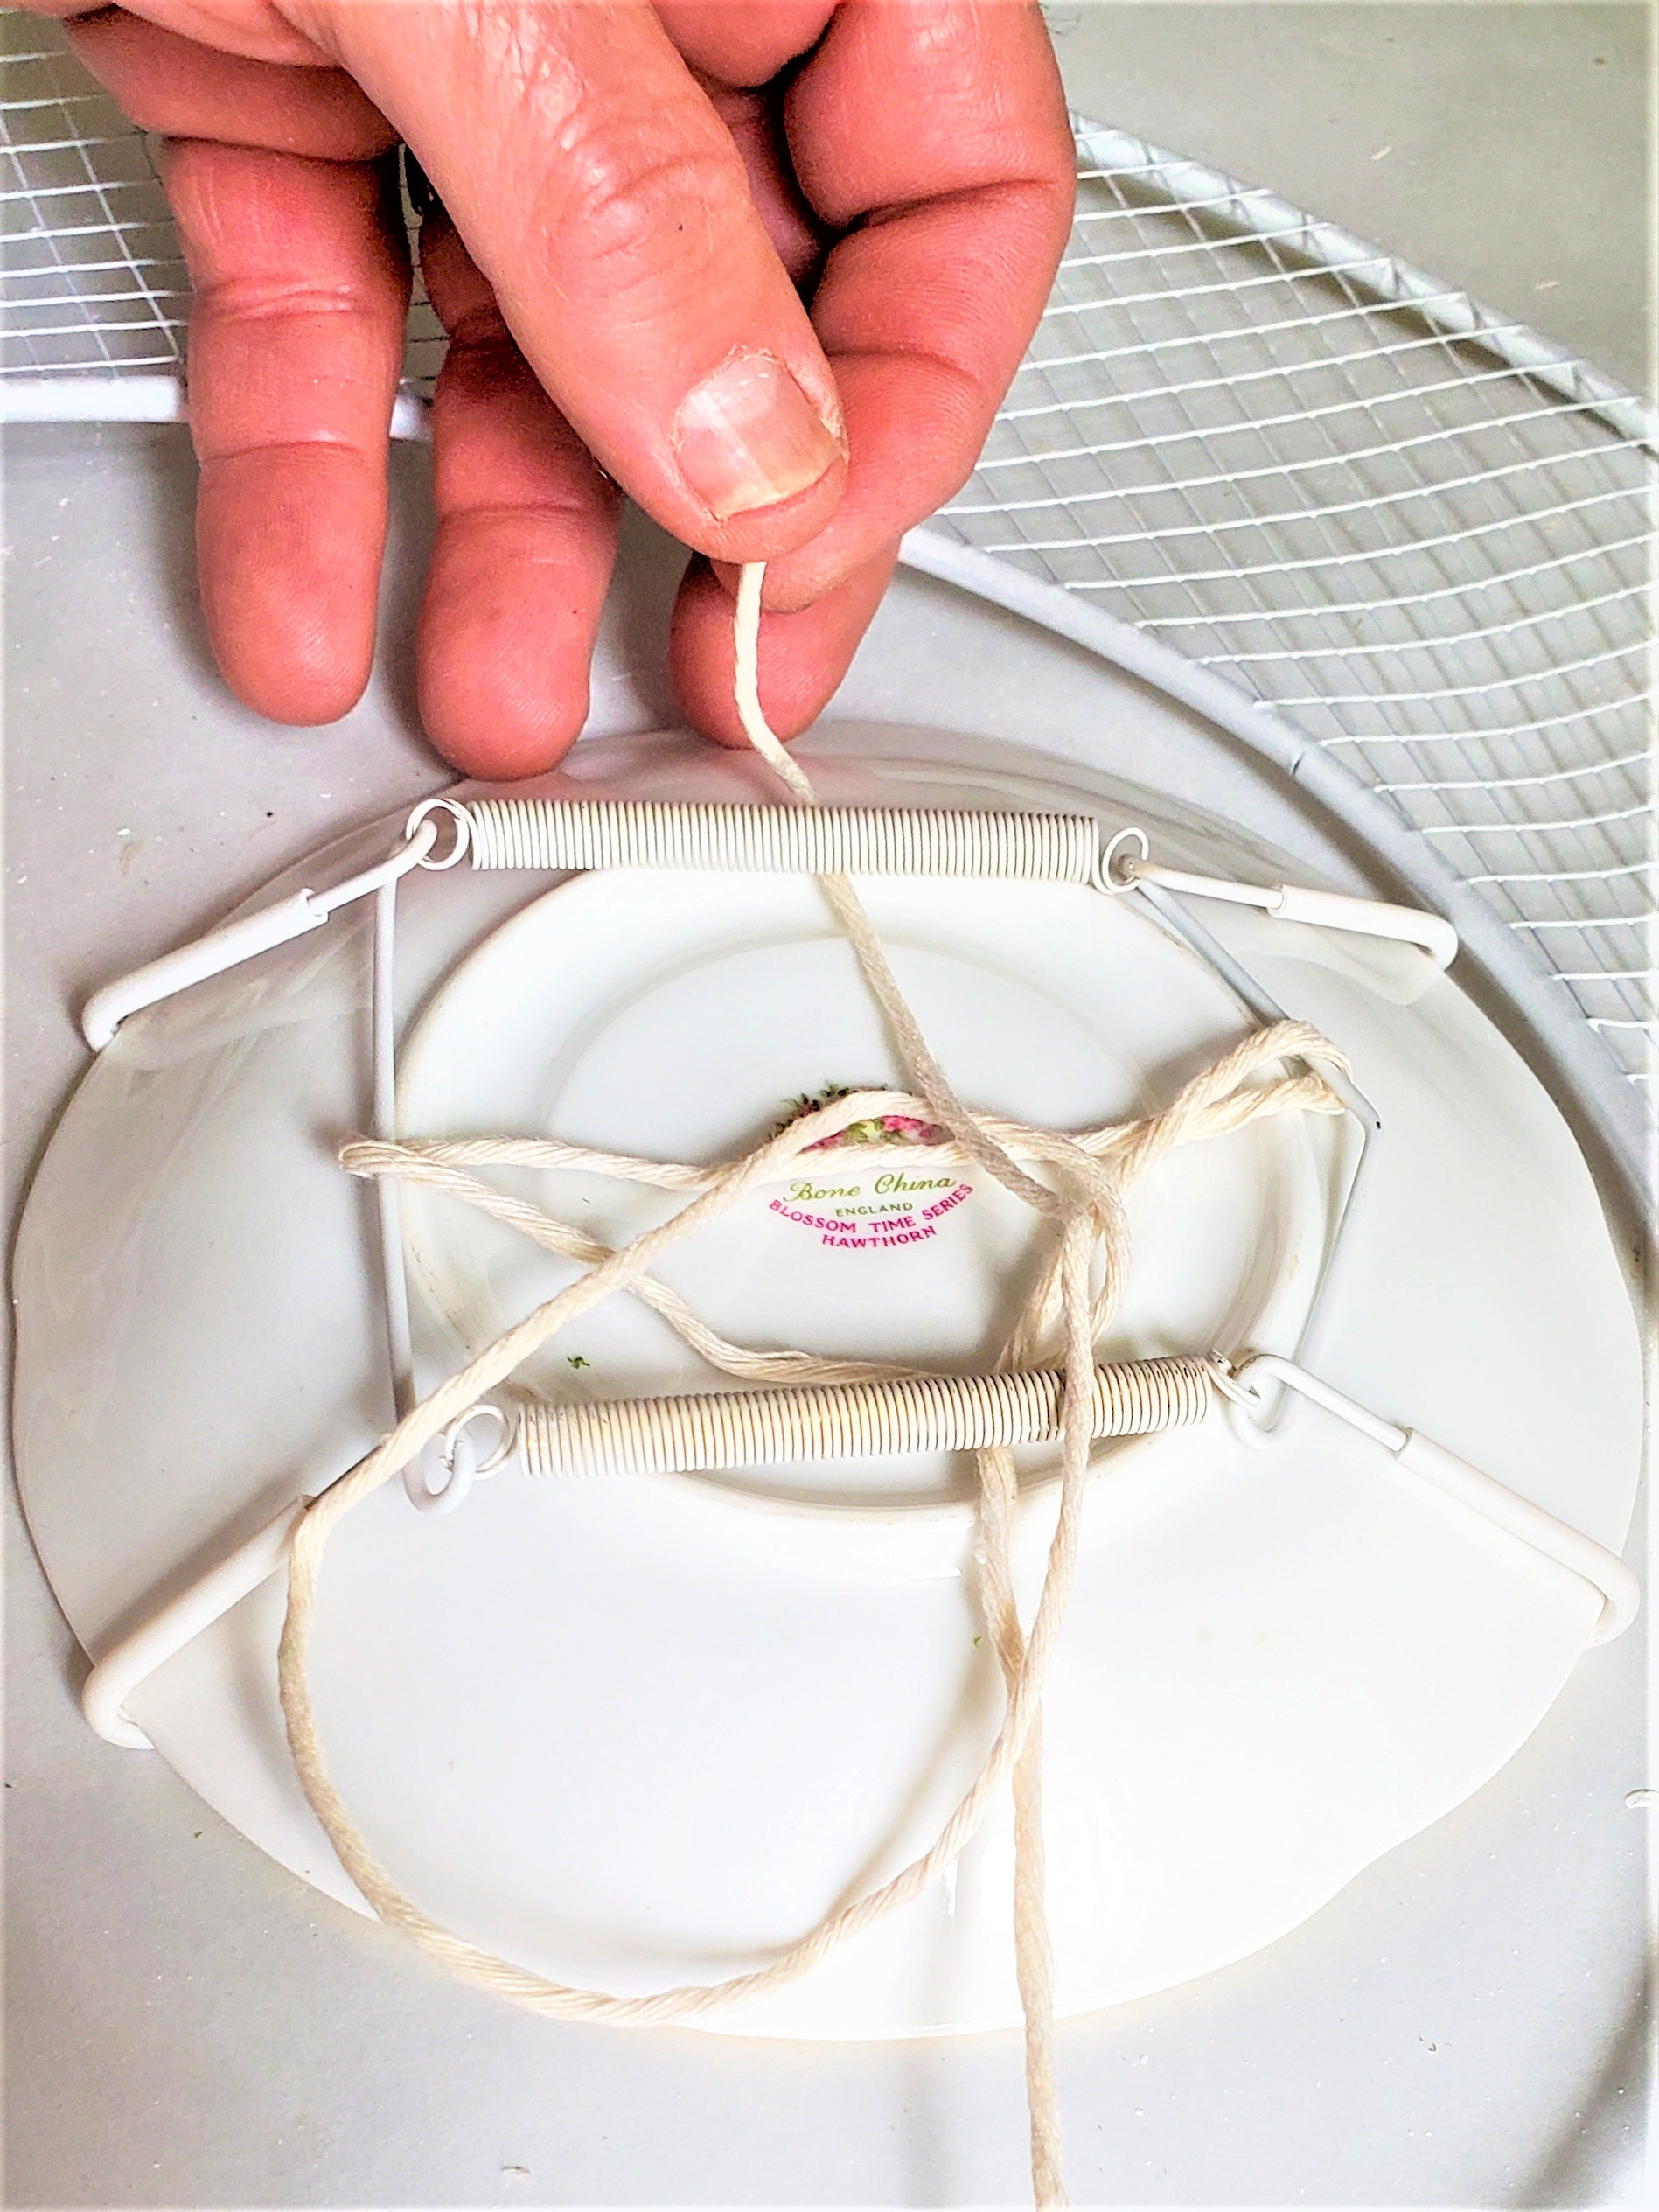
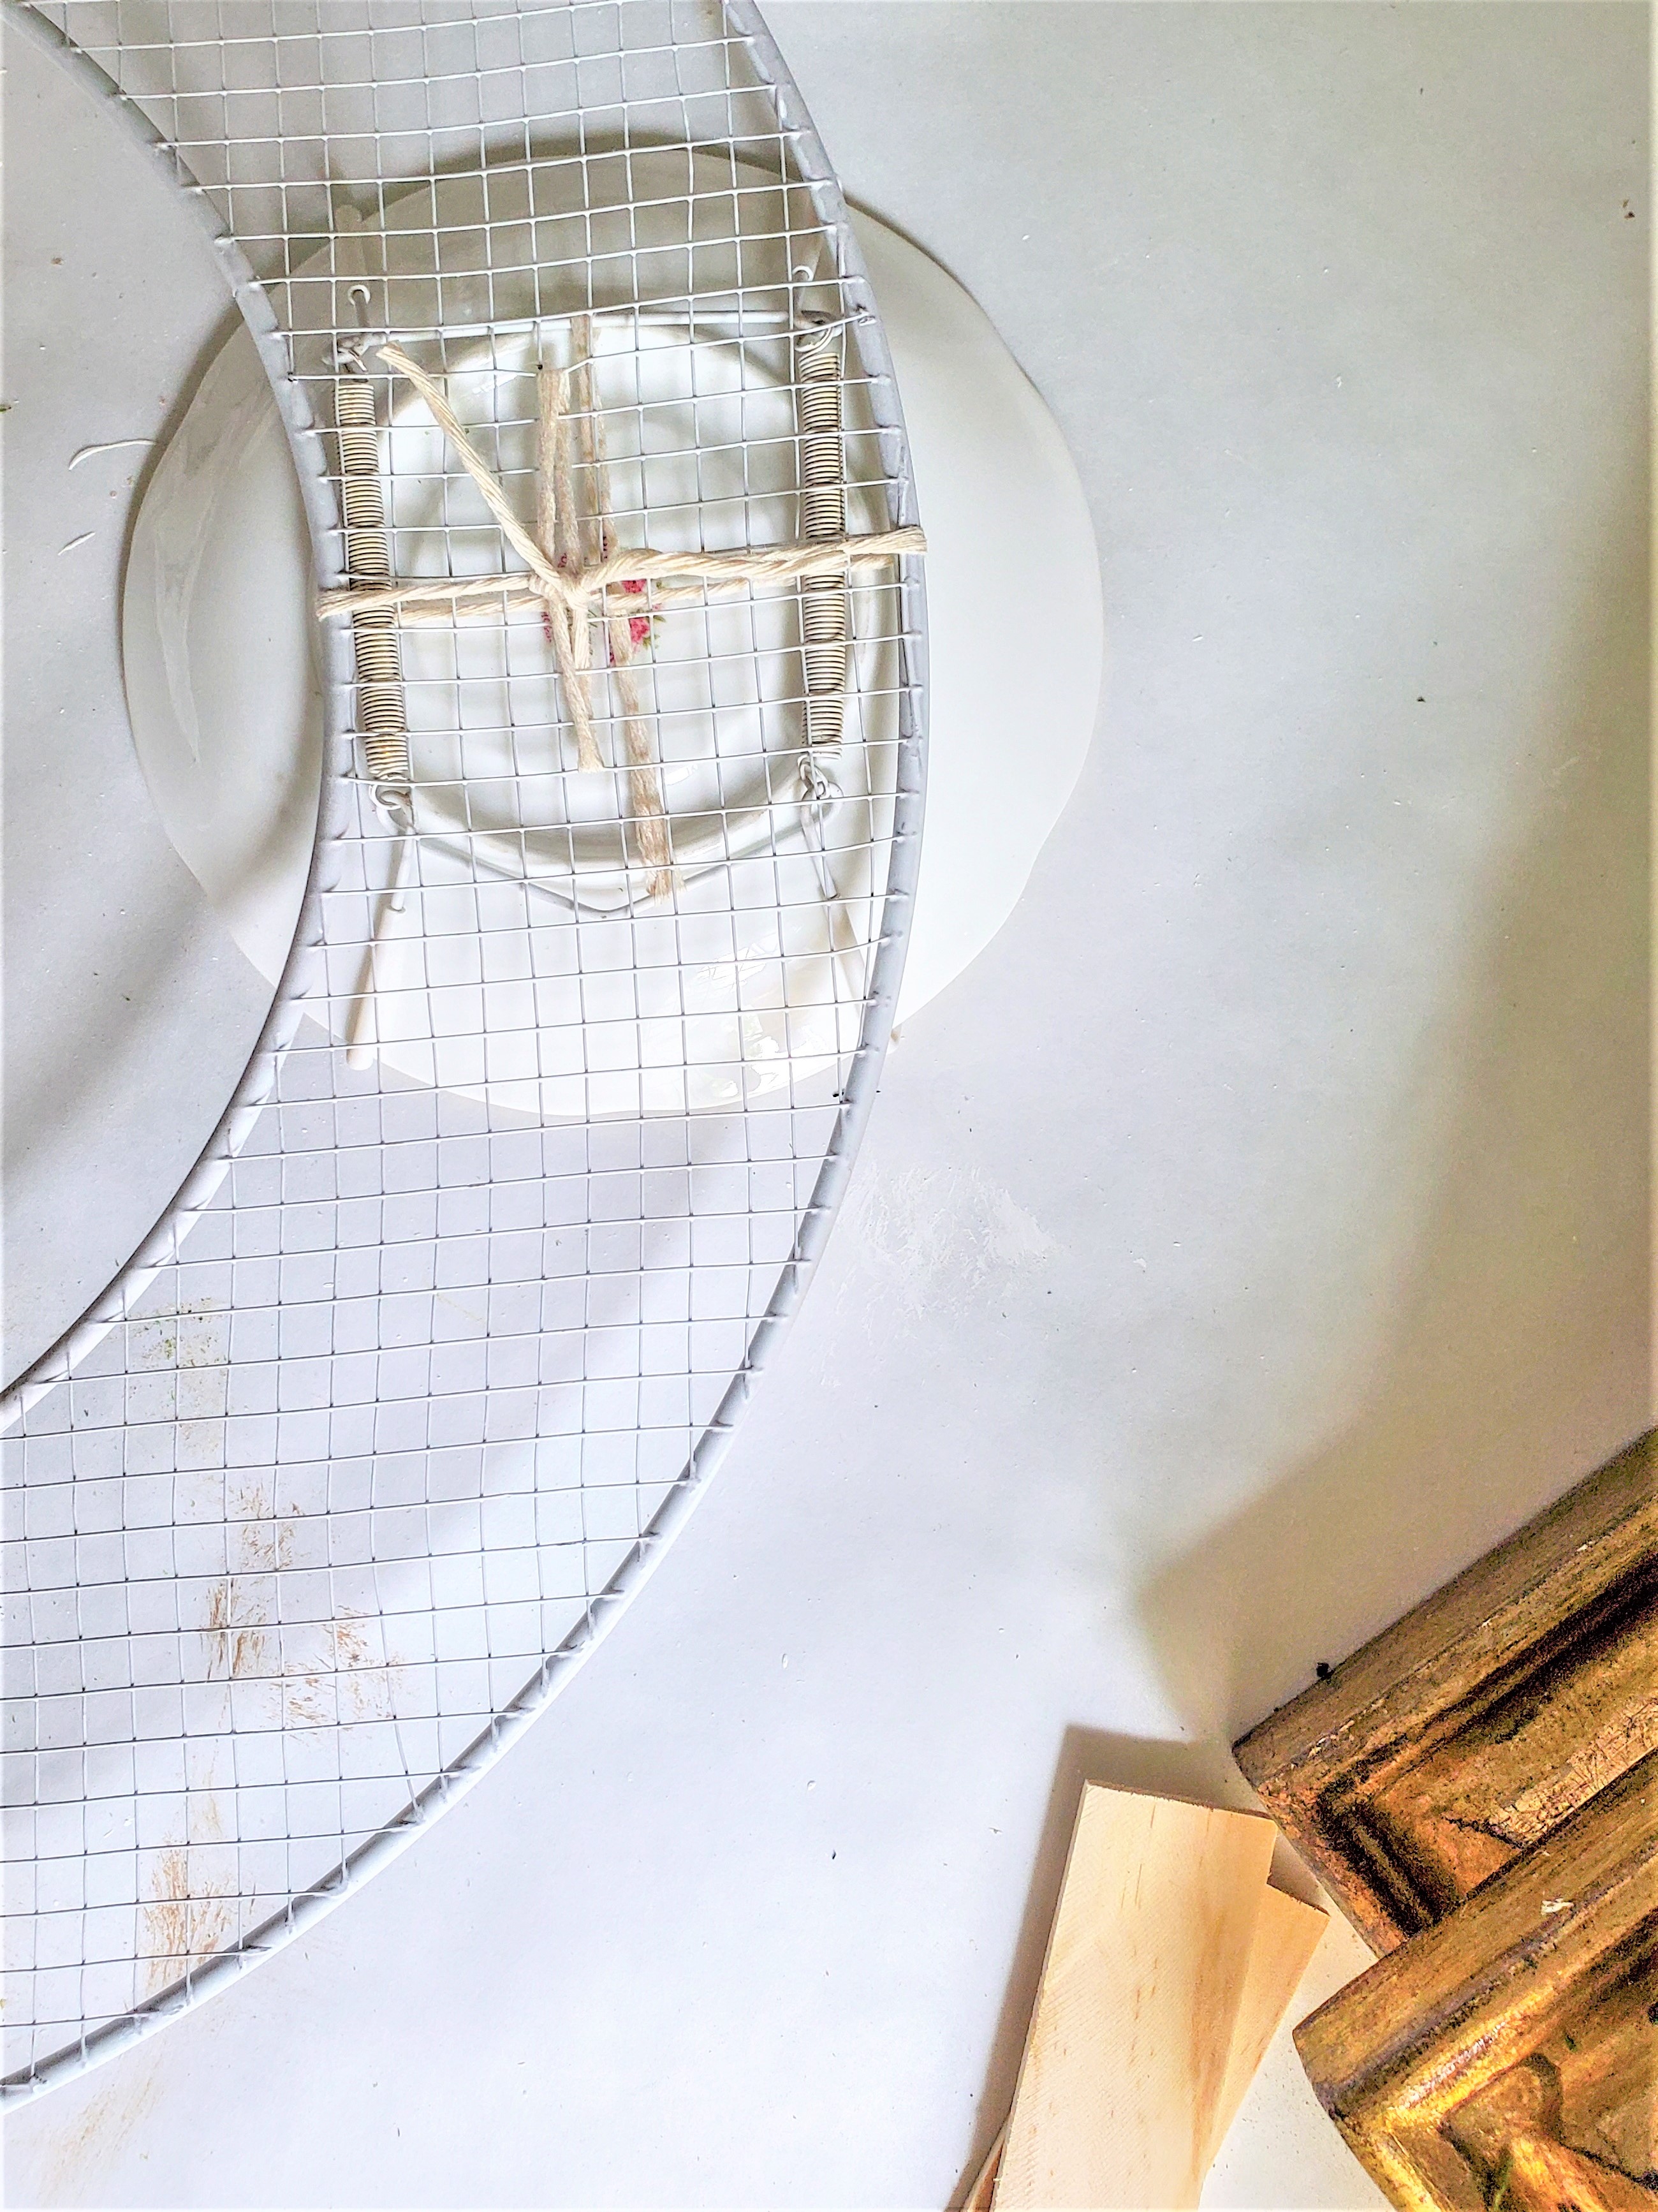
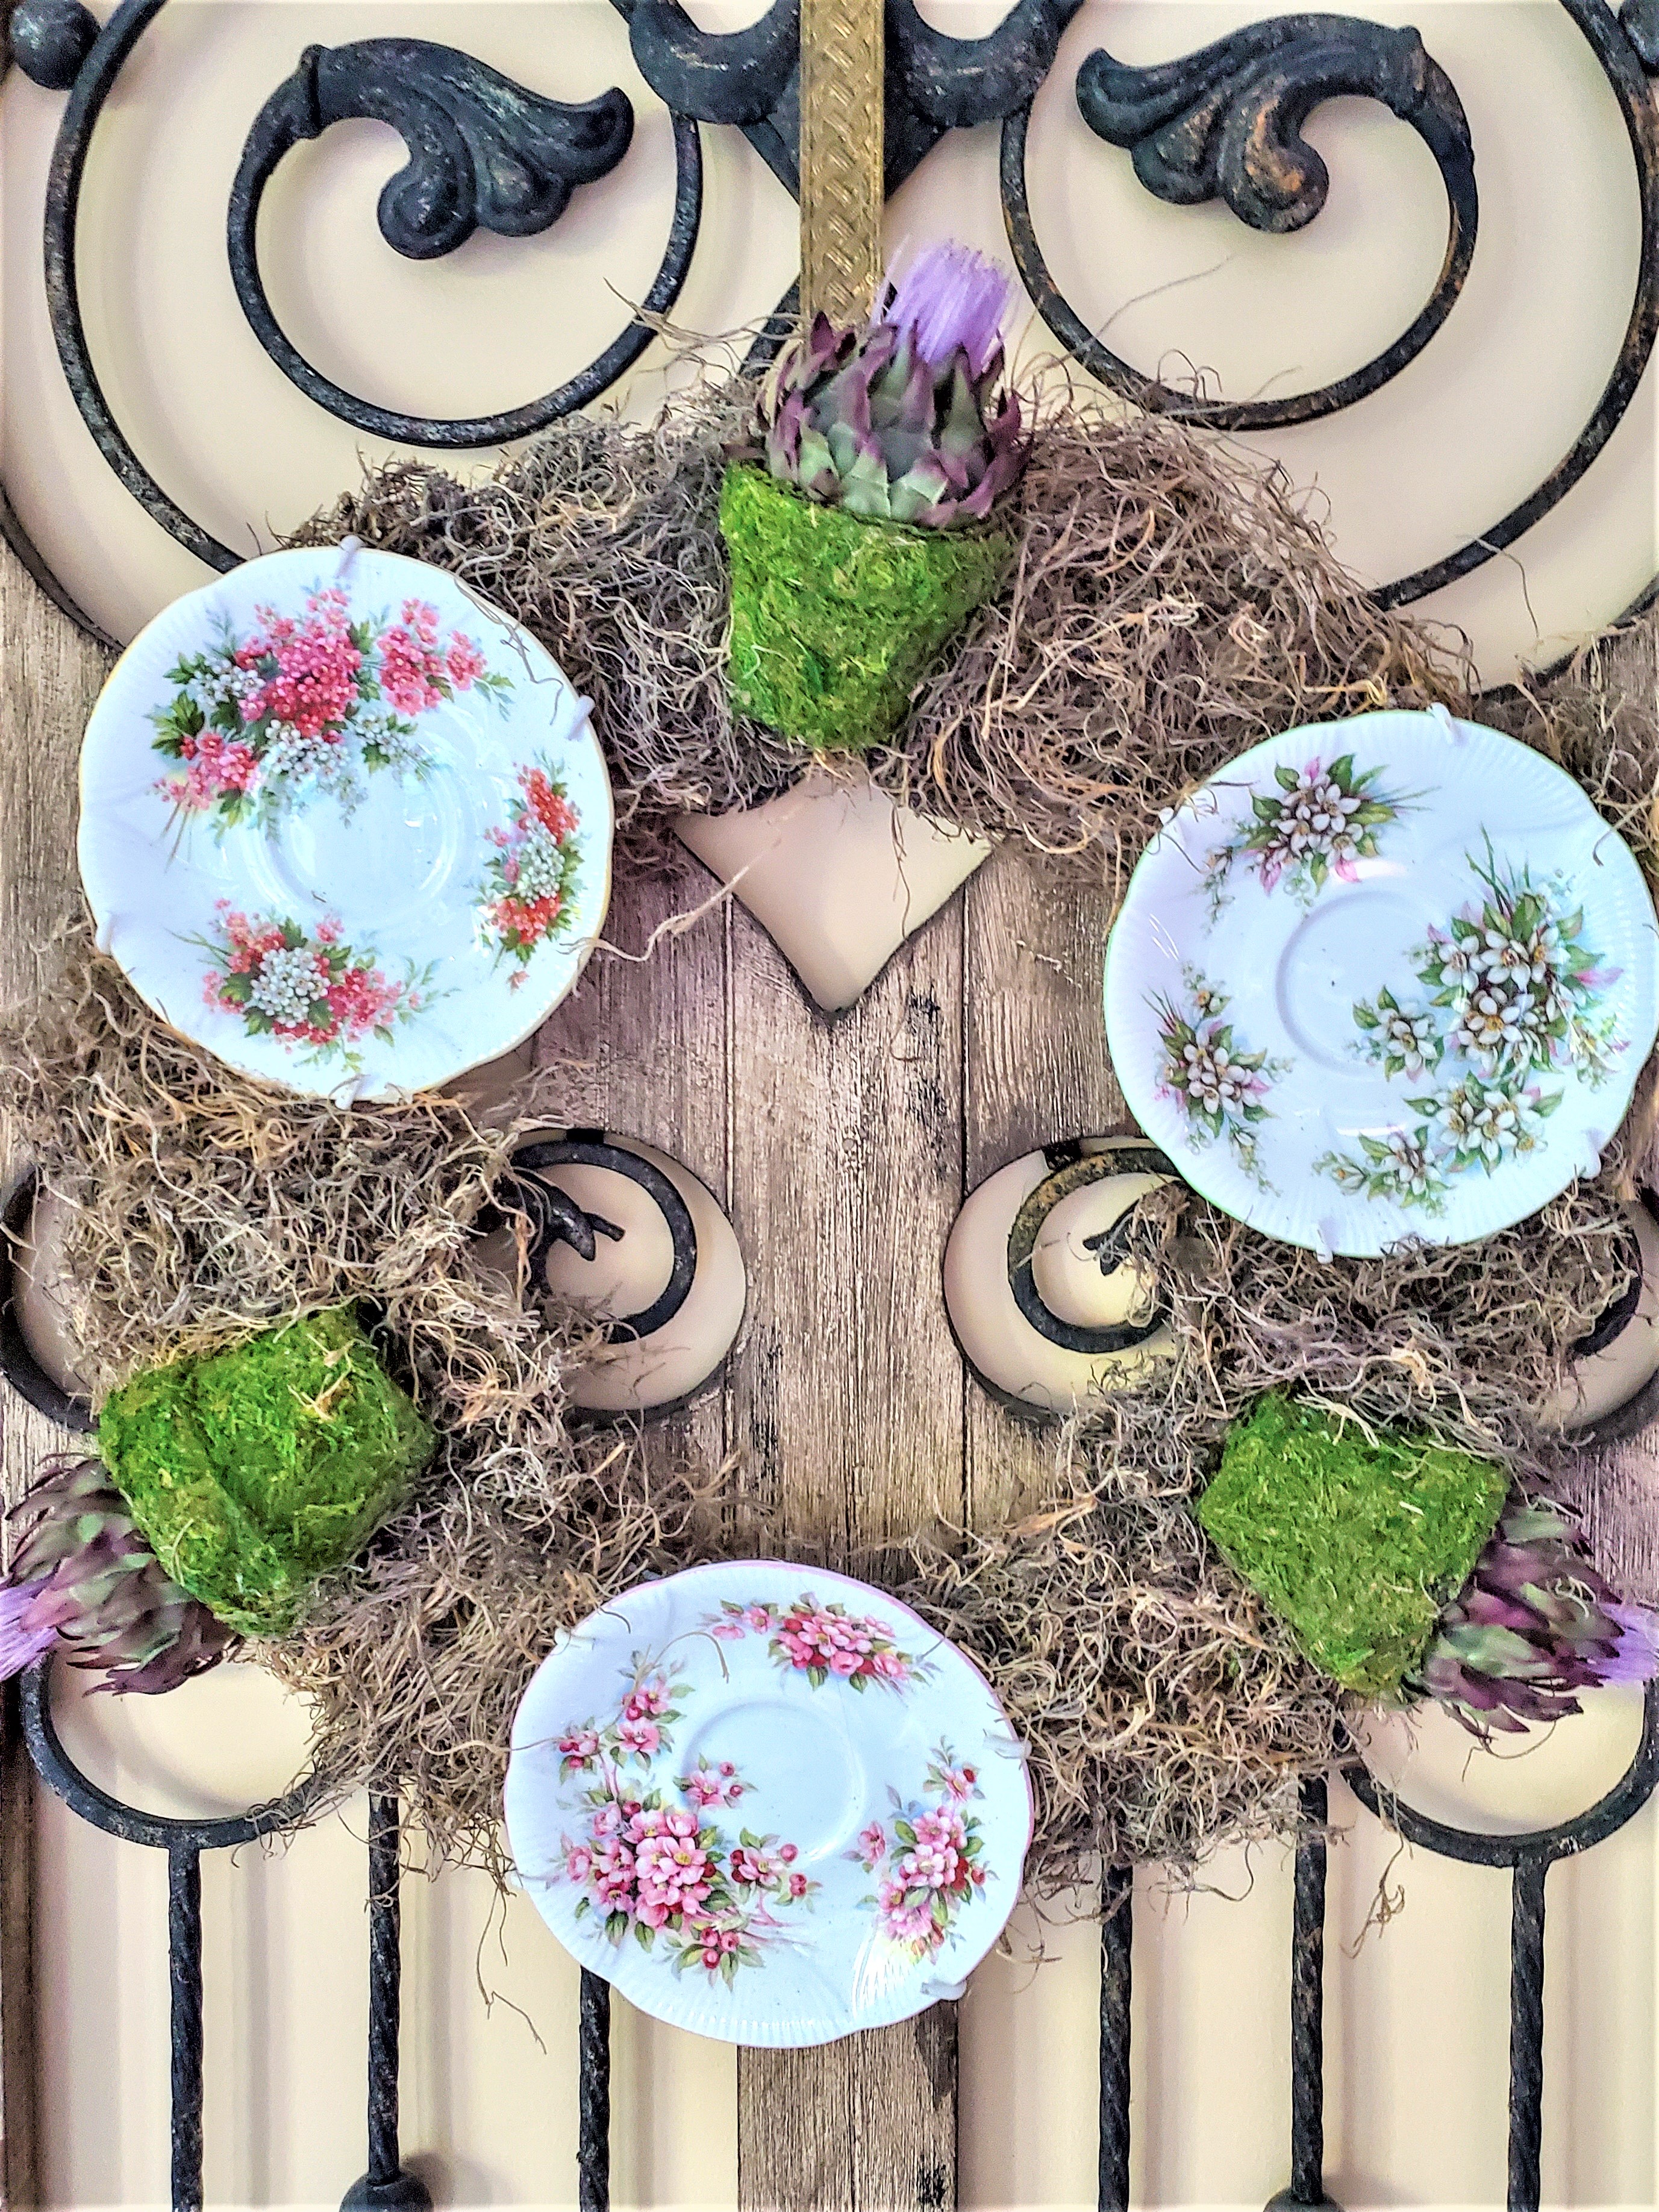
- Begin attaching the small plates to the back of the wreath using butcher’s twine or jute. Add this to the back side of the plate. Slide the string underneath each of the plate hangers. Loop it through the wreath frame, and tie a double knot.
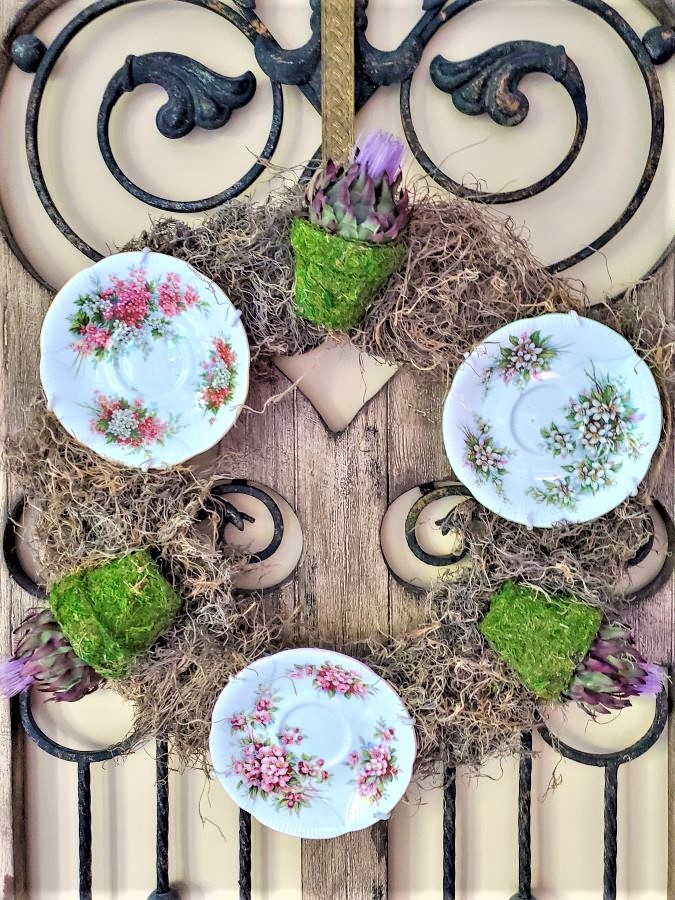
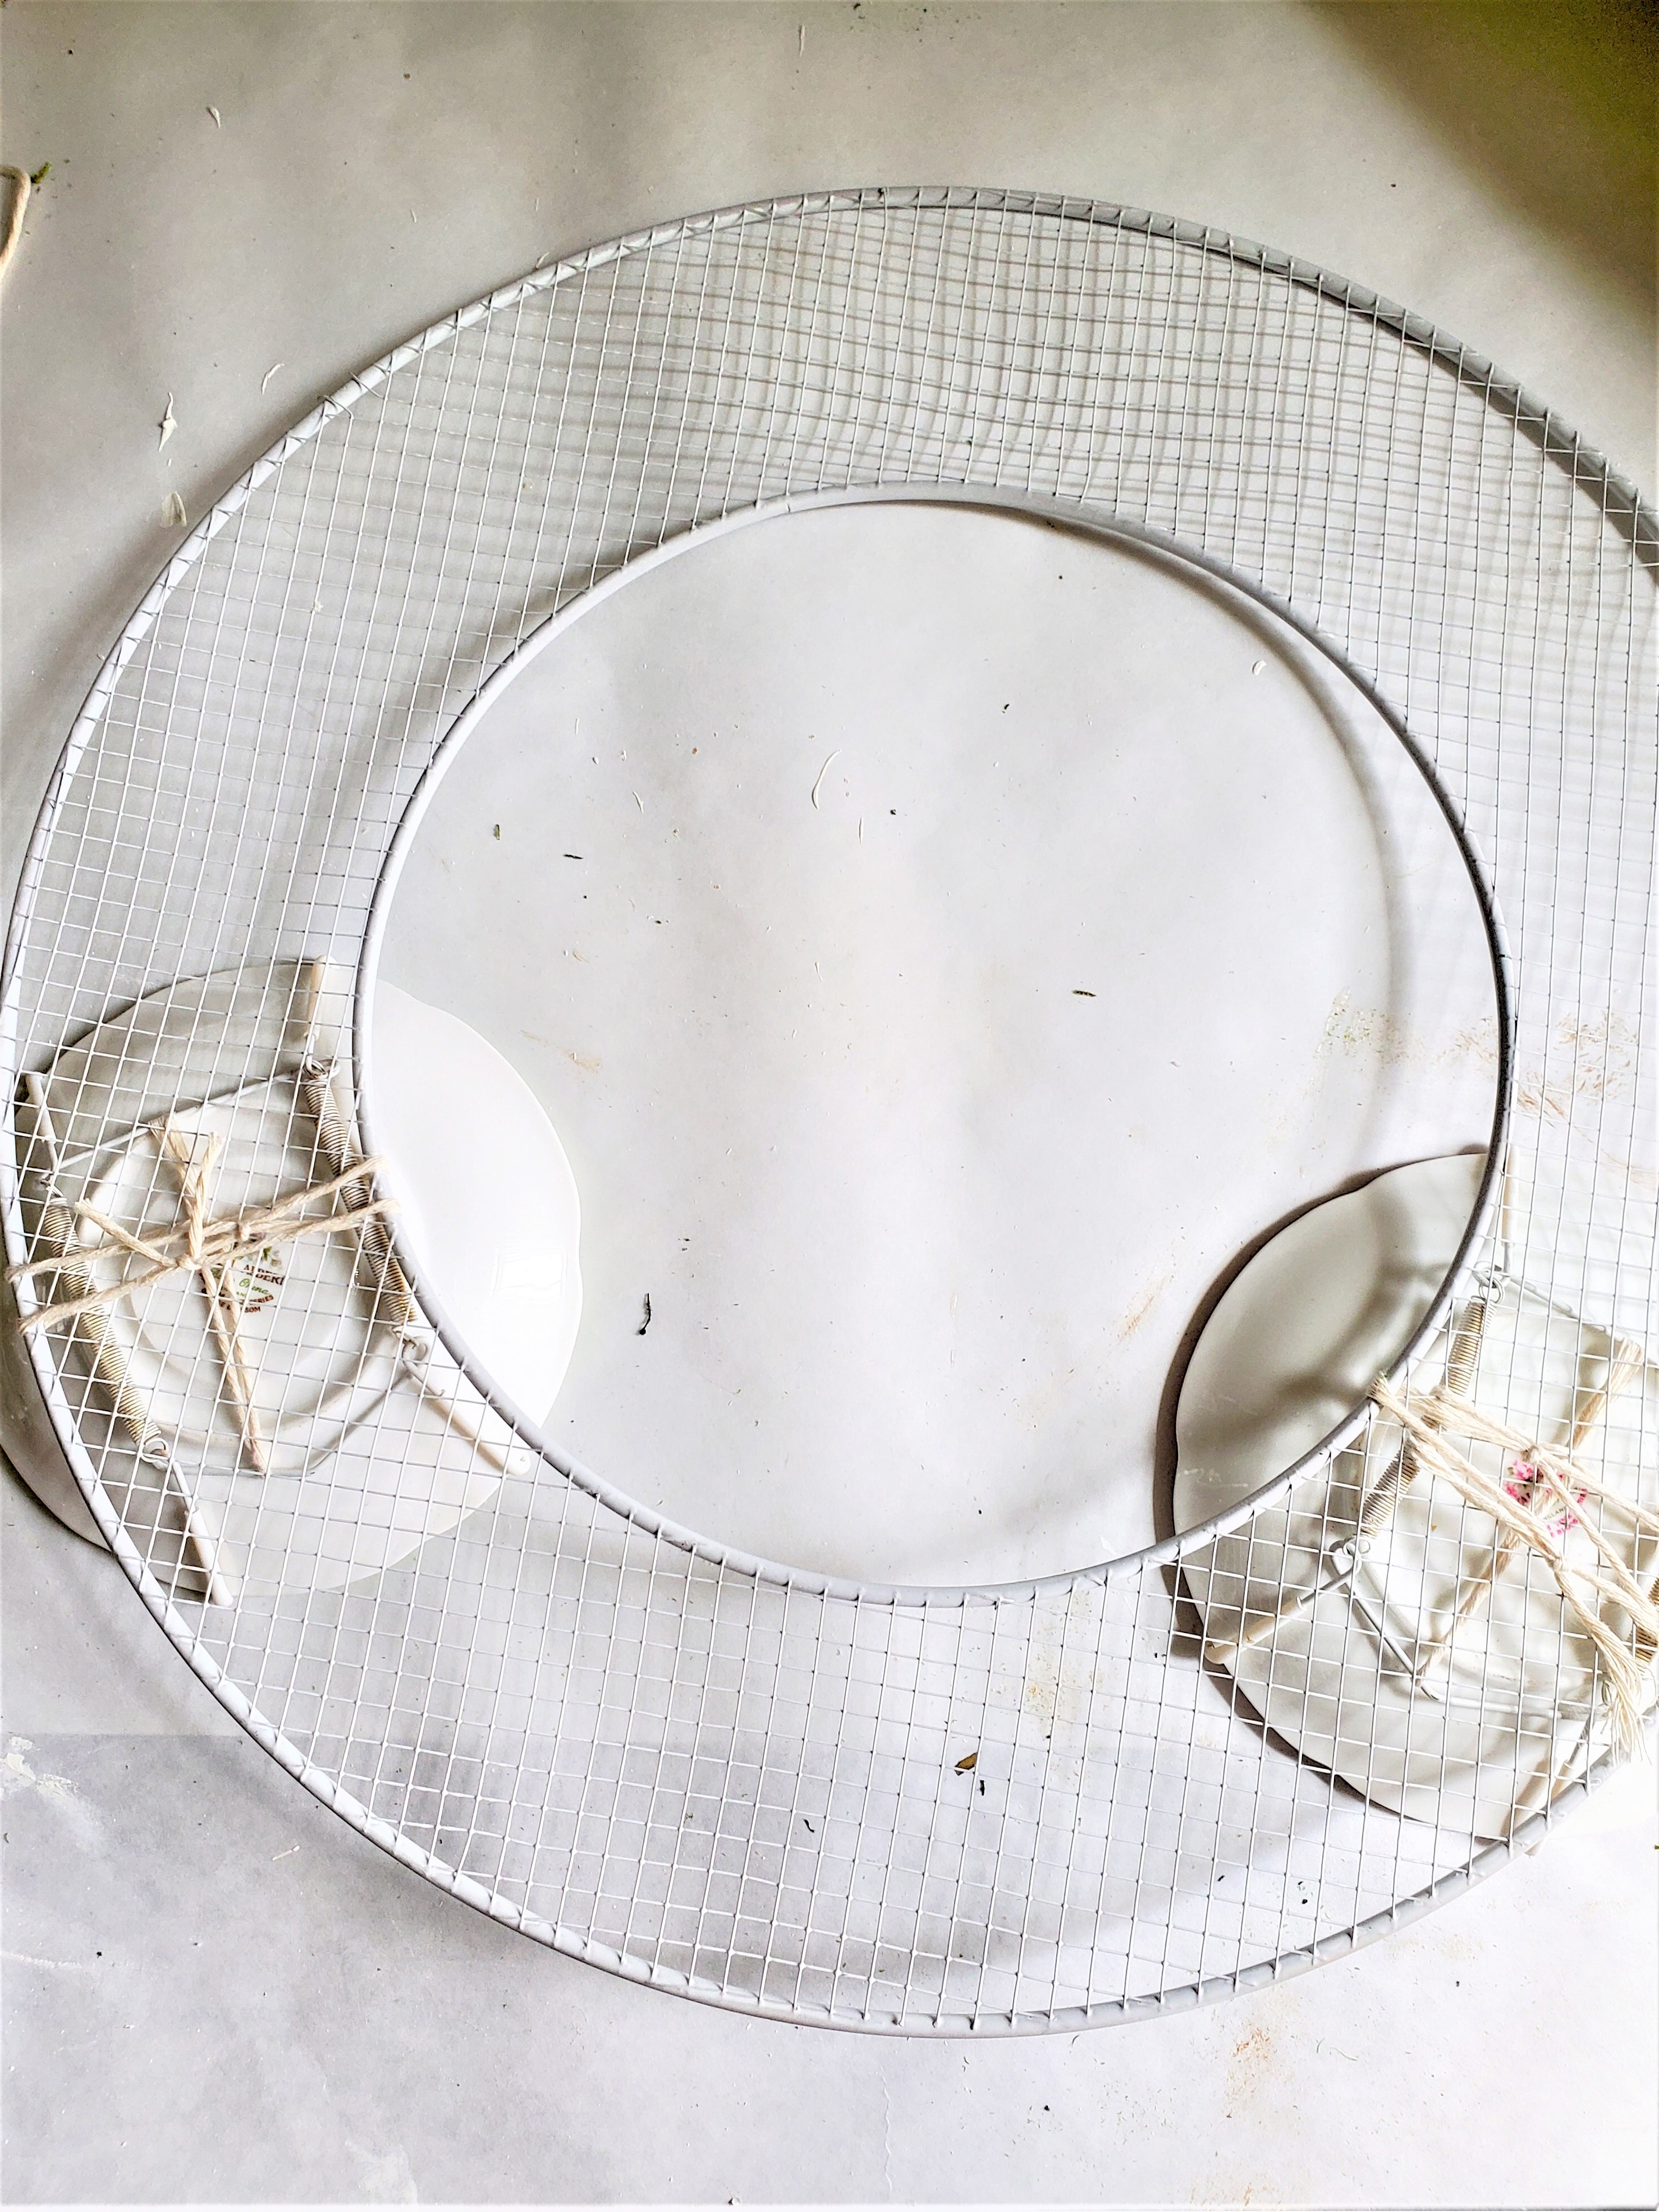
- Repeat this process until all the plates are securely attached to the wreath form. Aim for a balanced arrangement, forming a triangle with the plates.
Step 4: Connect The Flowerpots
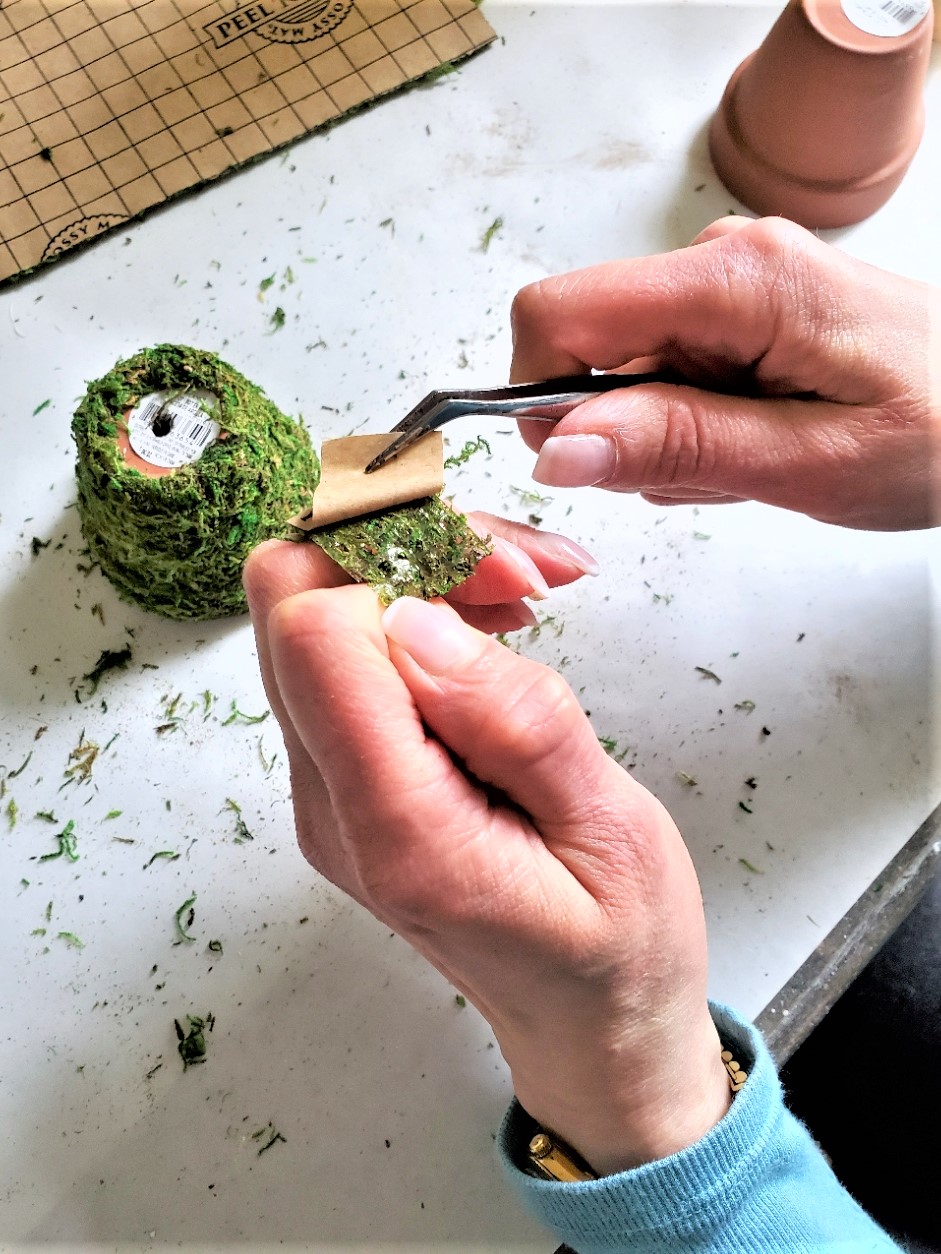
- Use jute to connect the flowerpots to the wreath. Push the jute through the hole on the bottom of each pot using a long tweezer or a similar tool.
- Pull the jute through the wreath frame and tie a double knot to secure the flowerpots in place.
Tip: Don’t want to use clay pots. Peat pots are a great option and since they are light a piece of ribbon will hold them to the plate wreath.
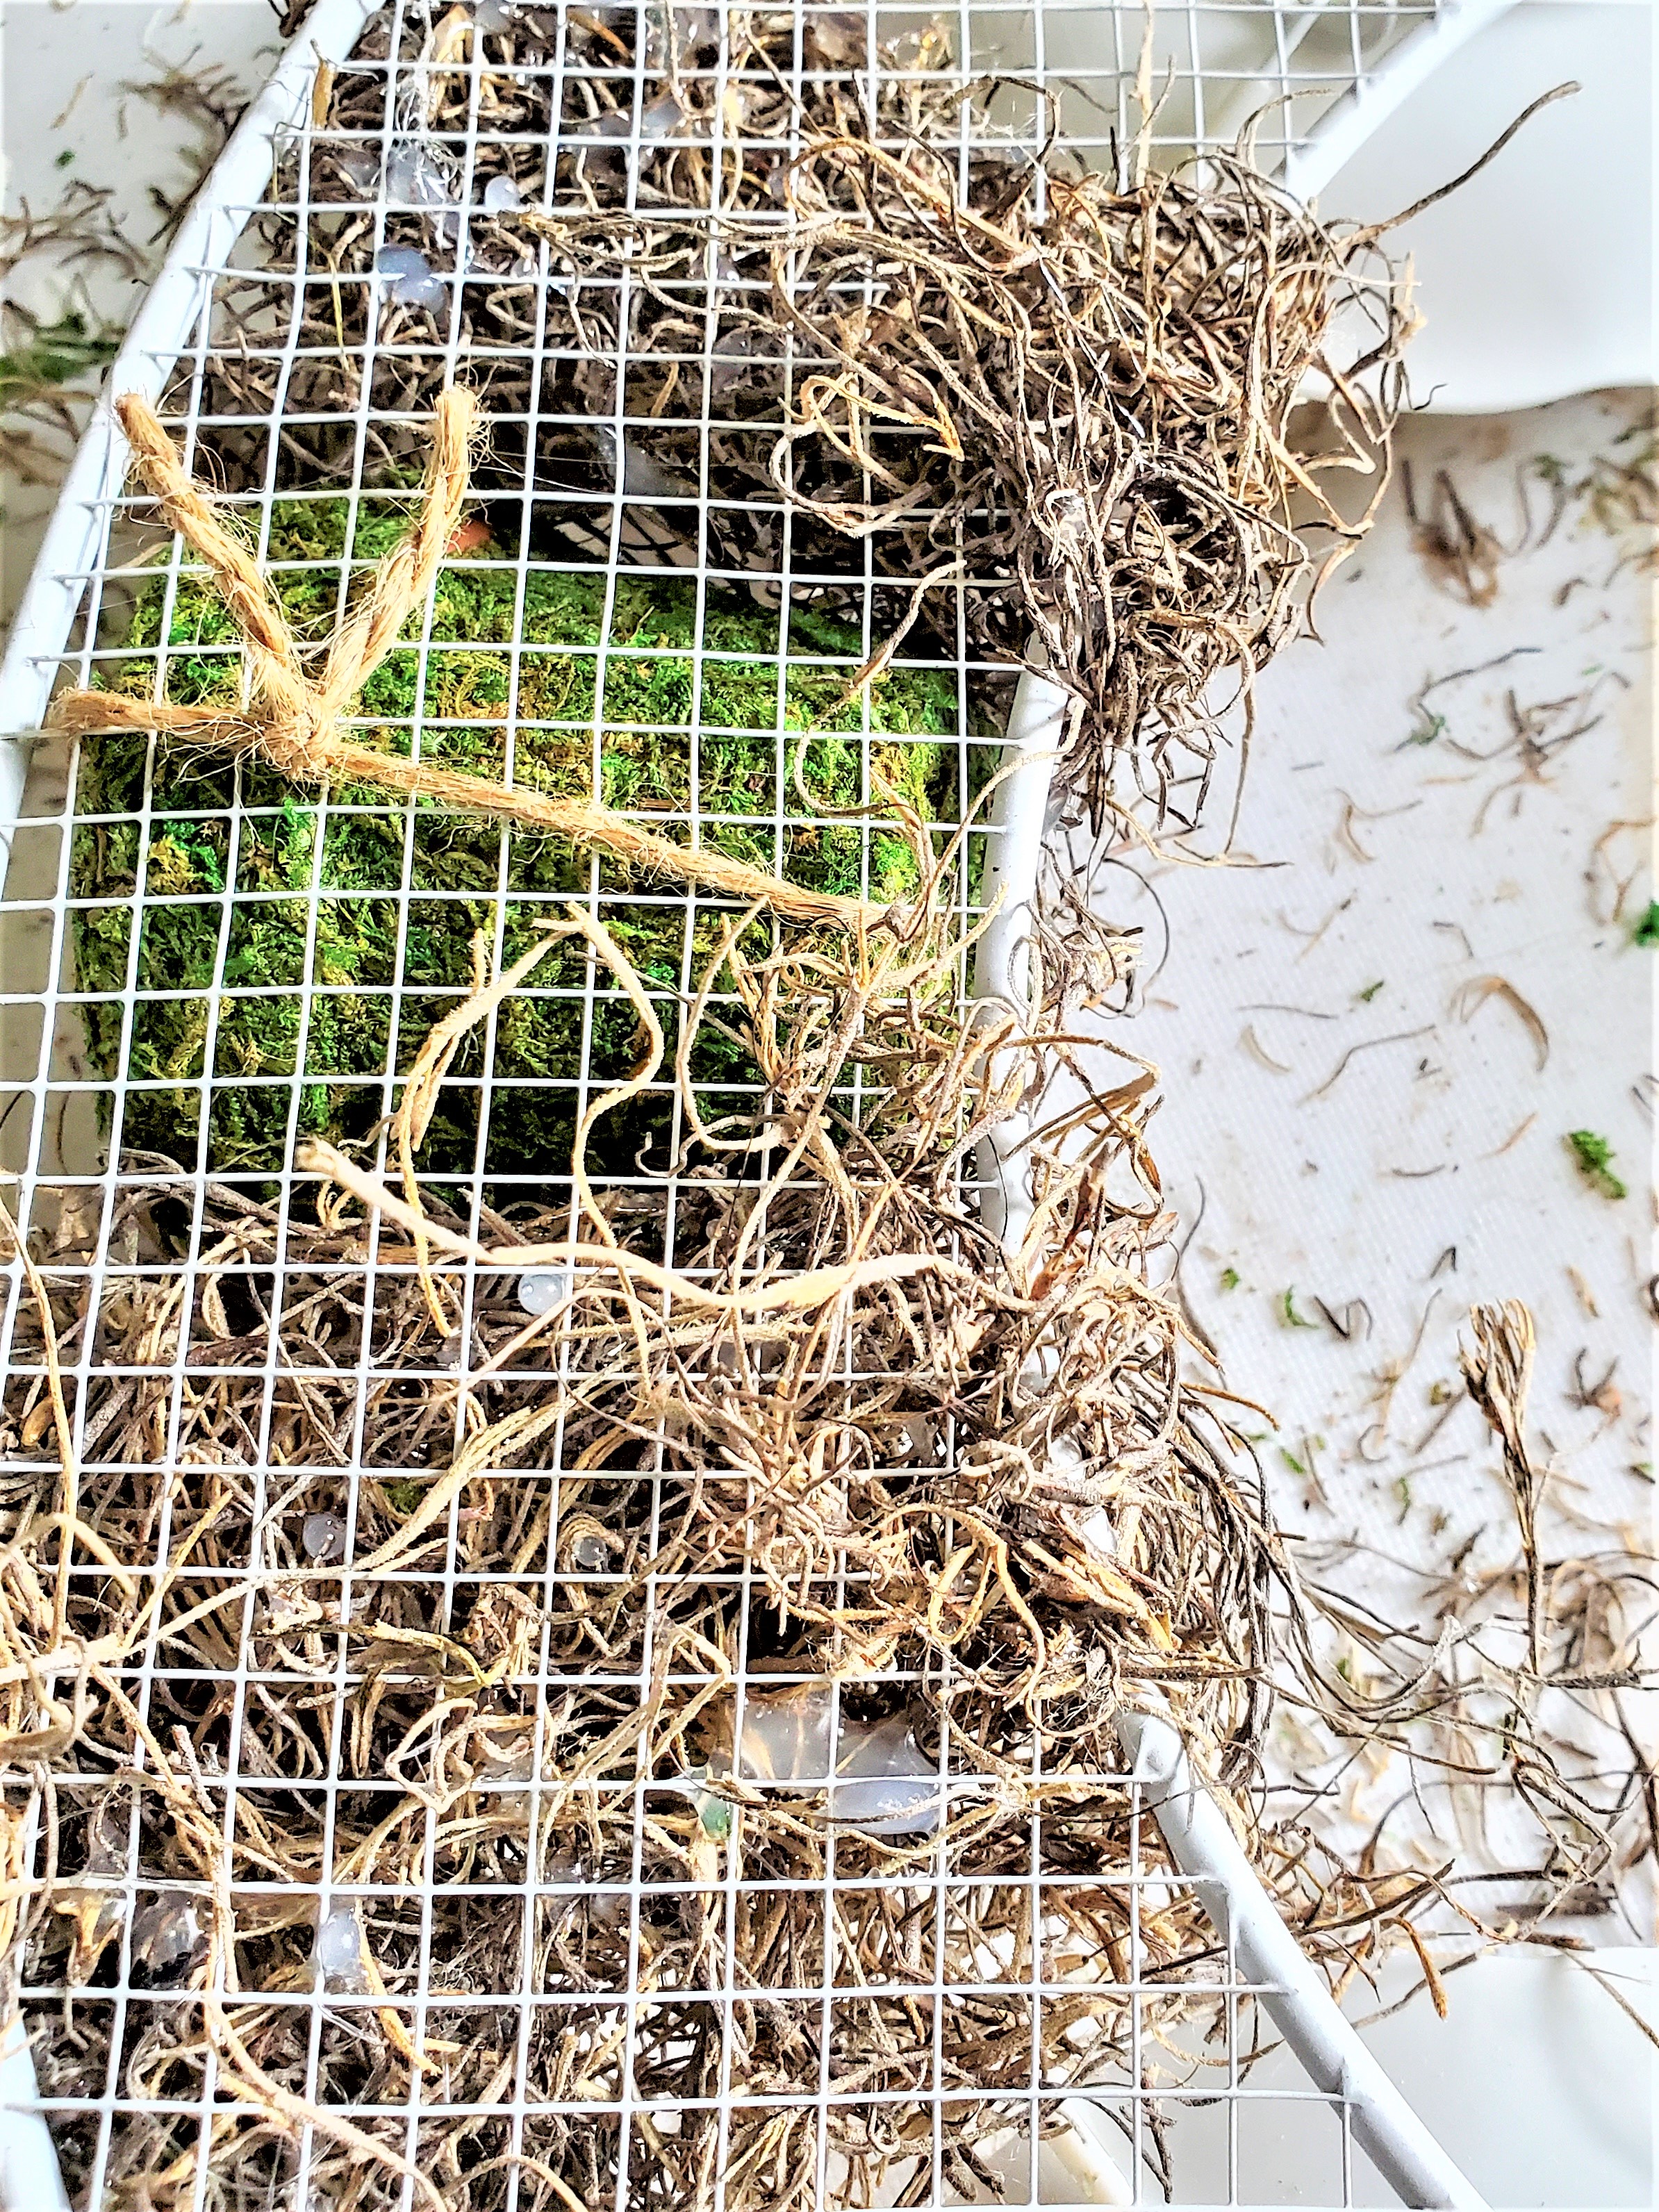
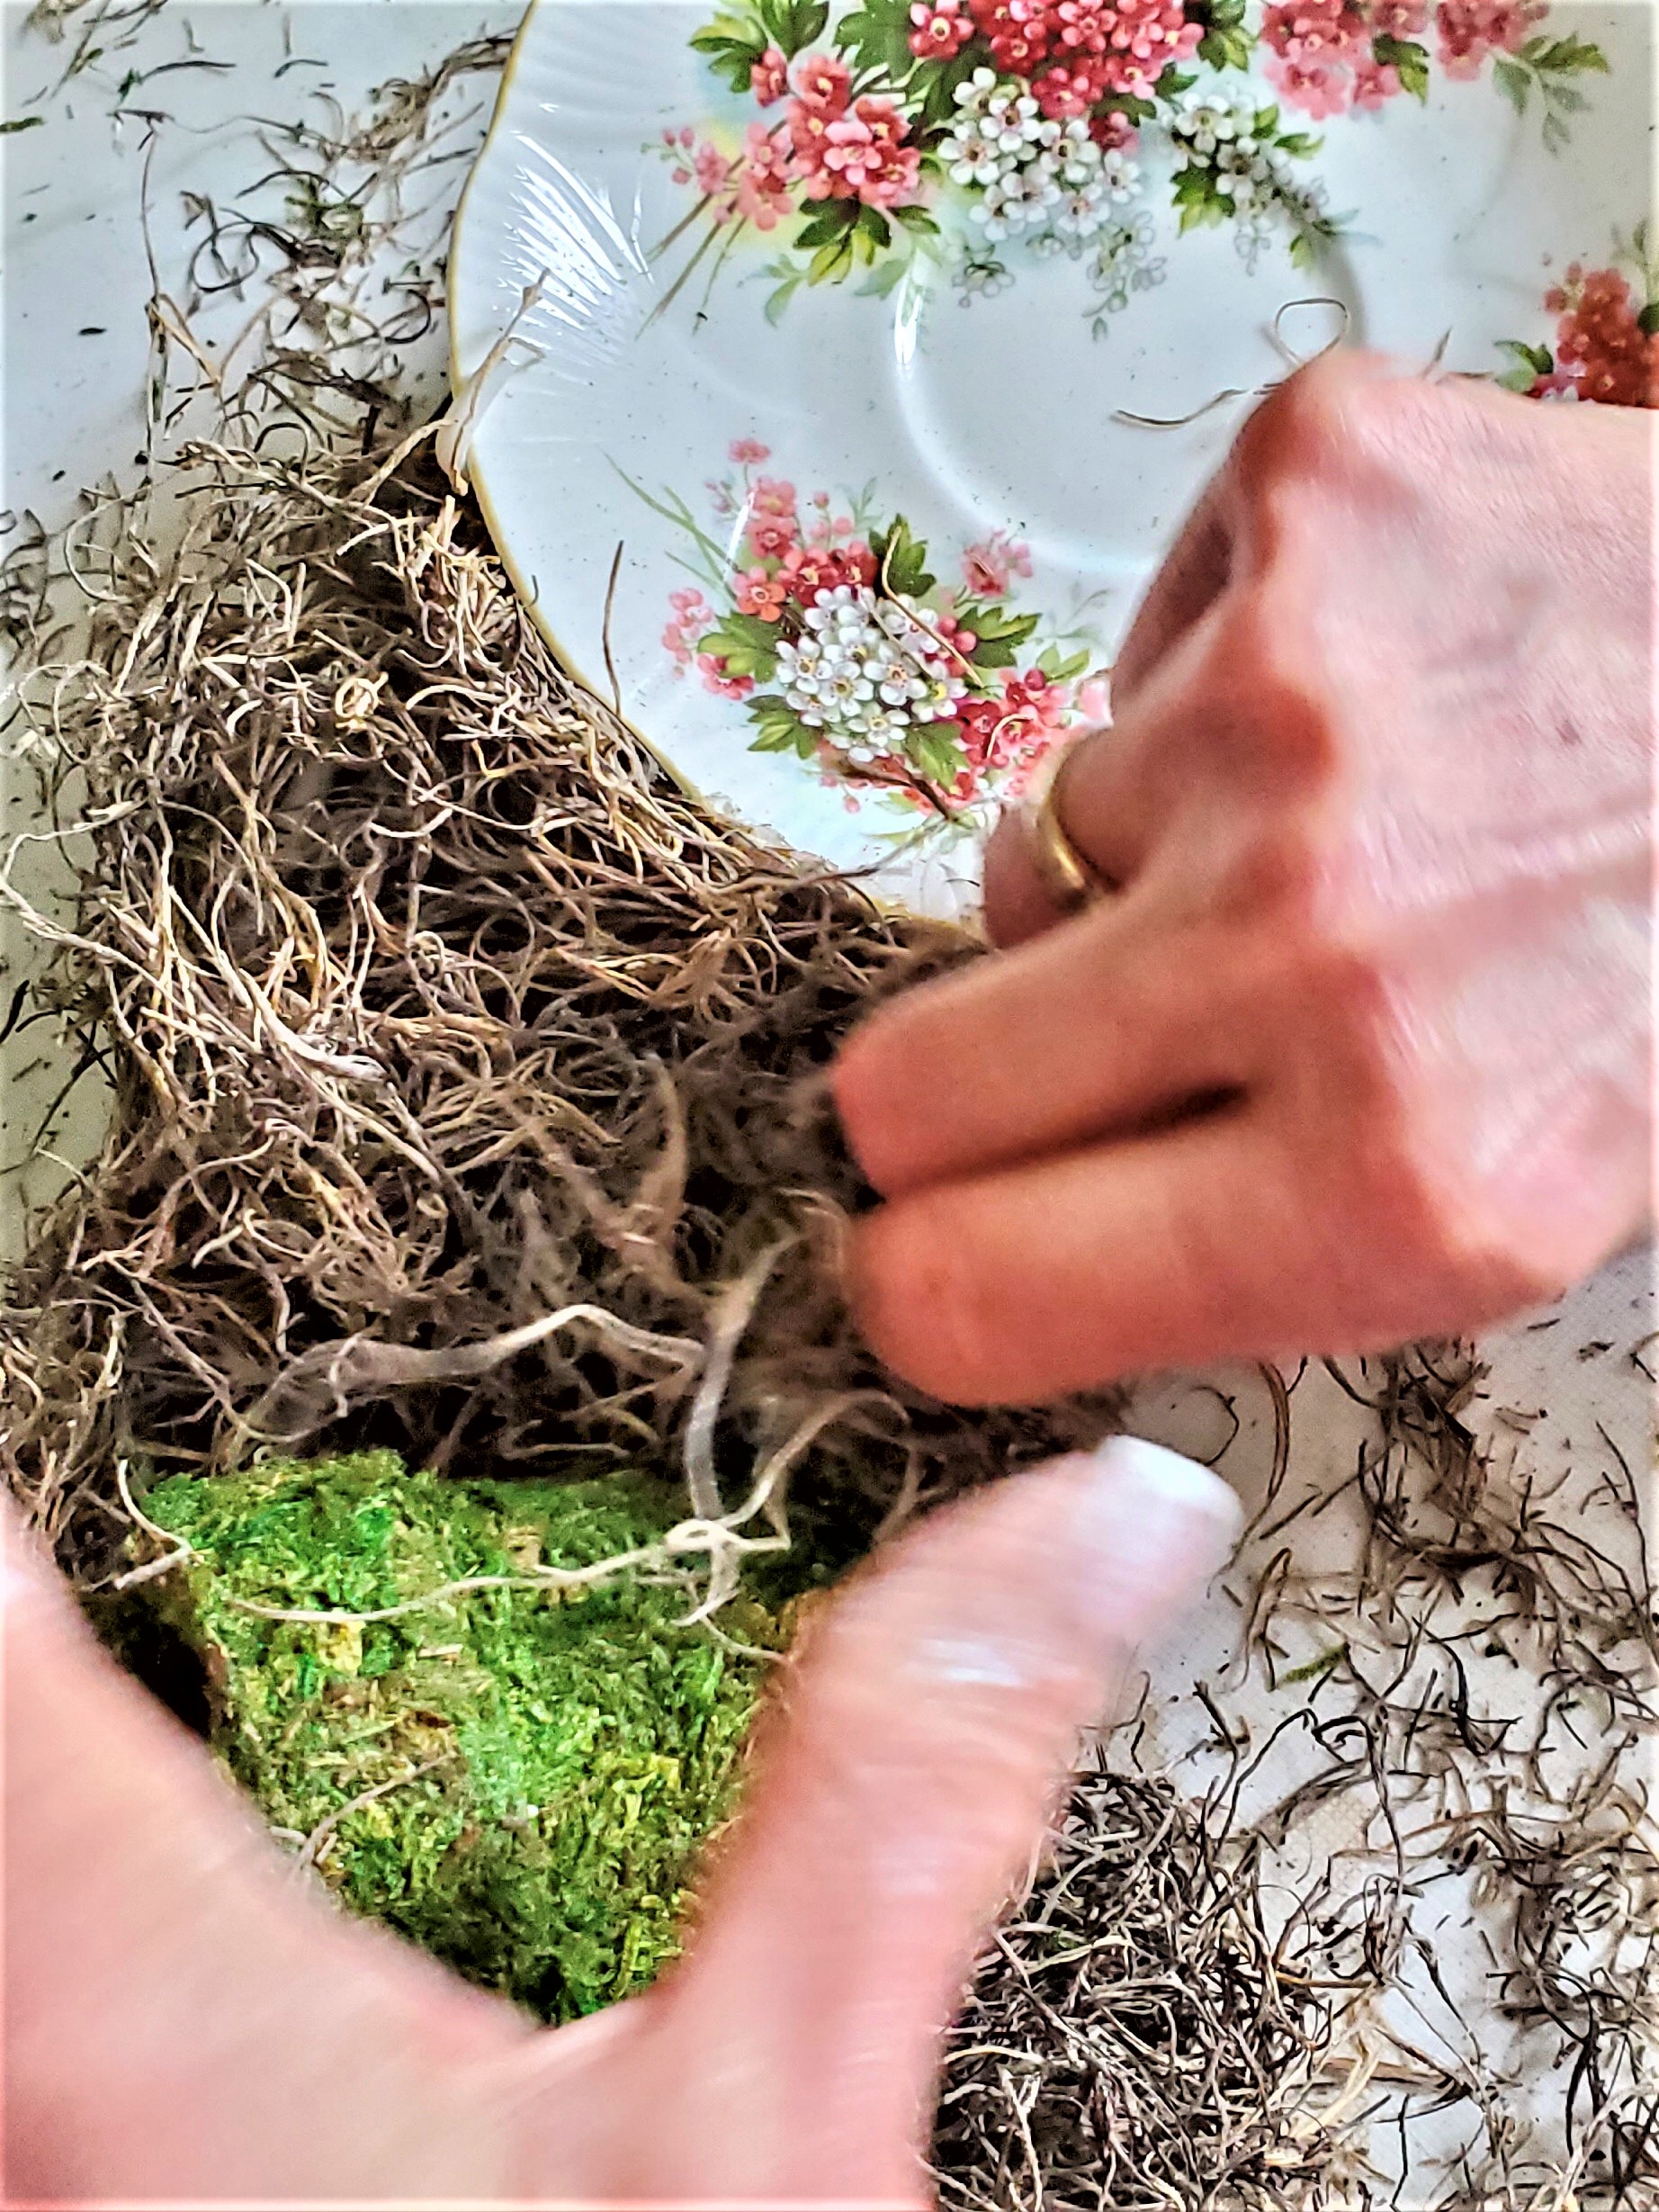
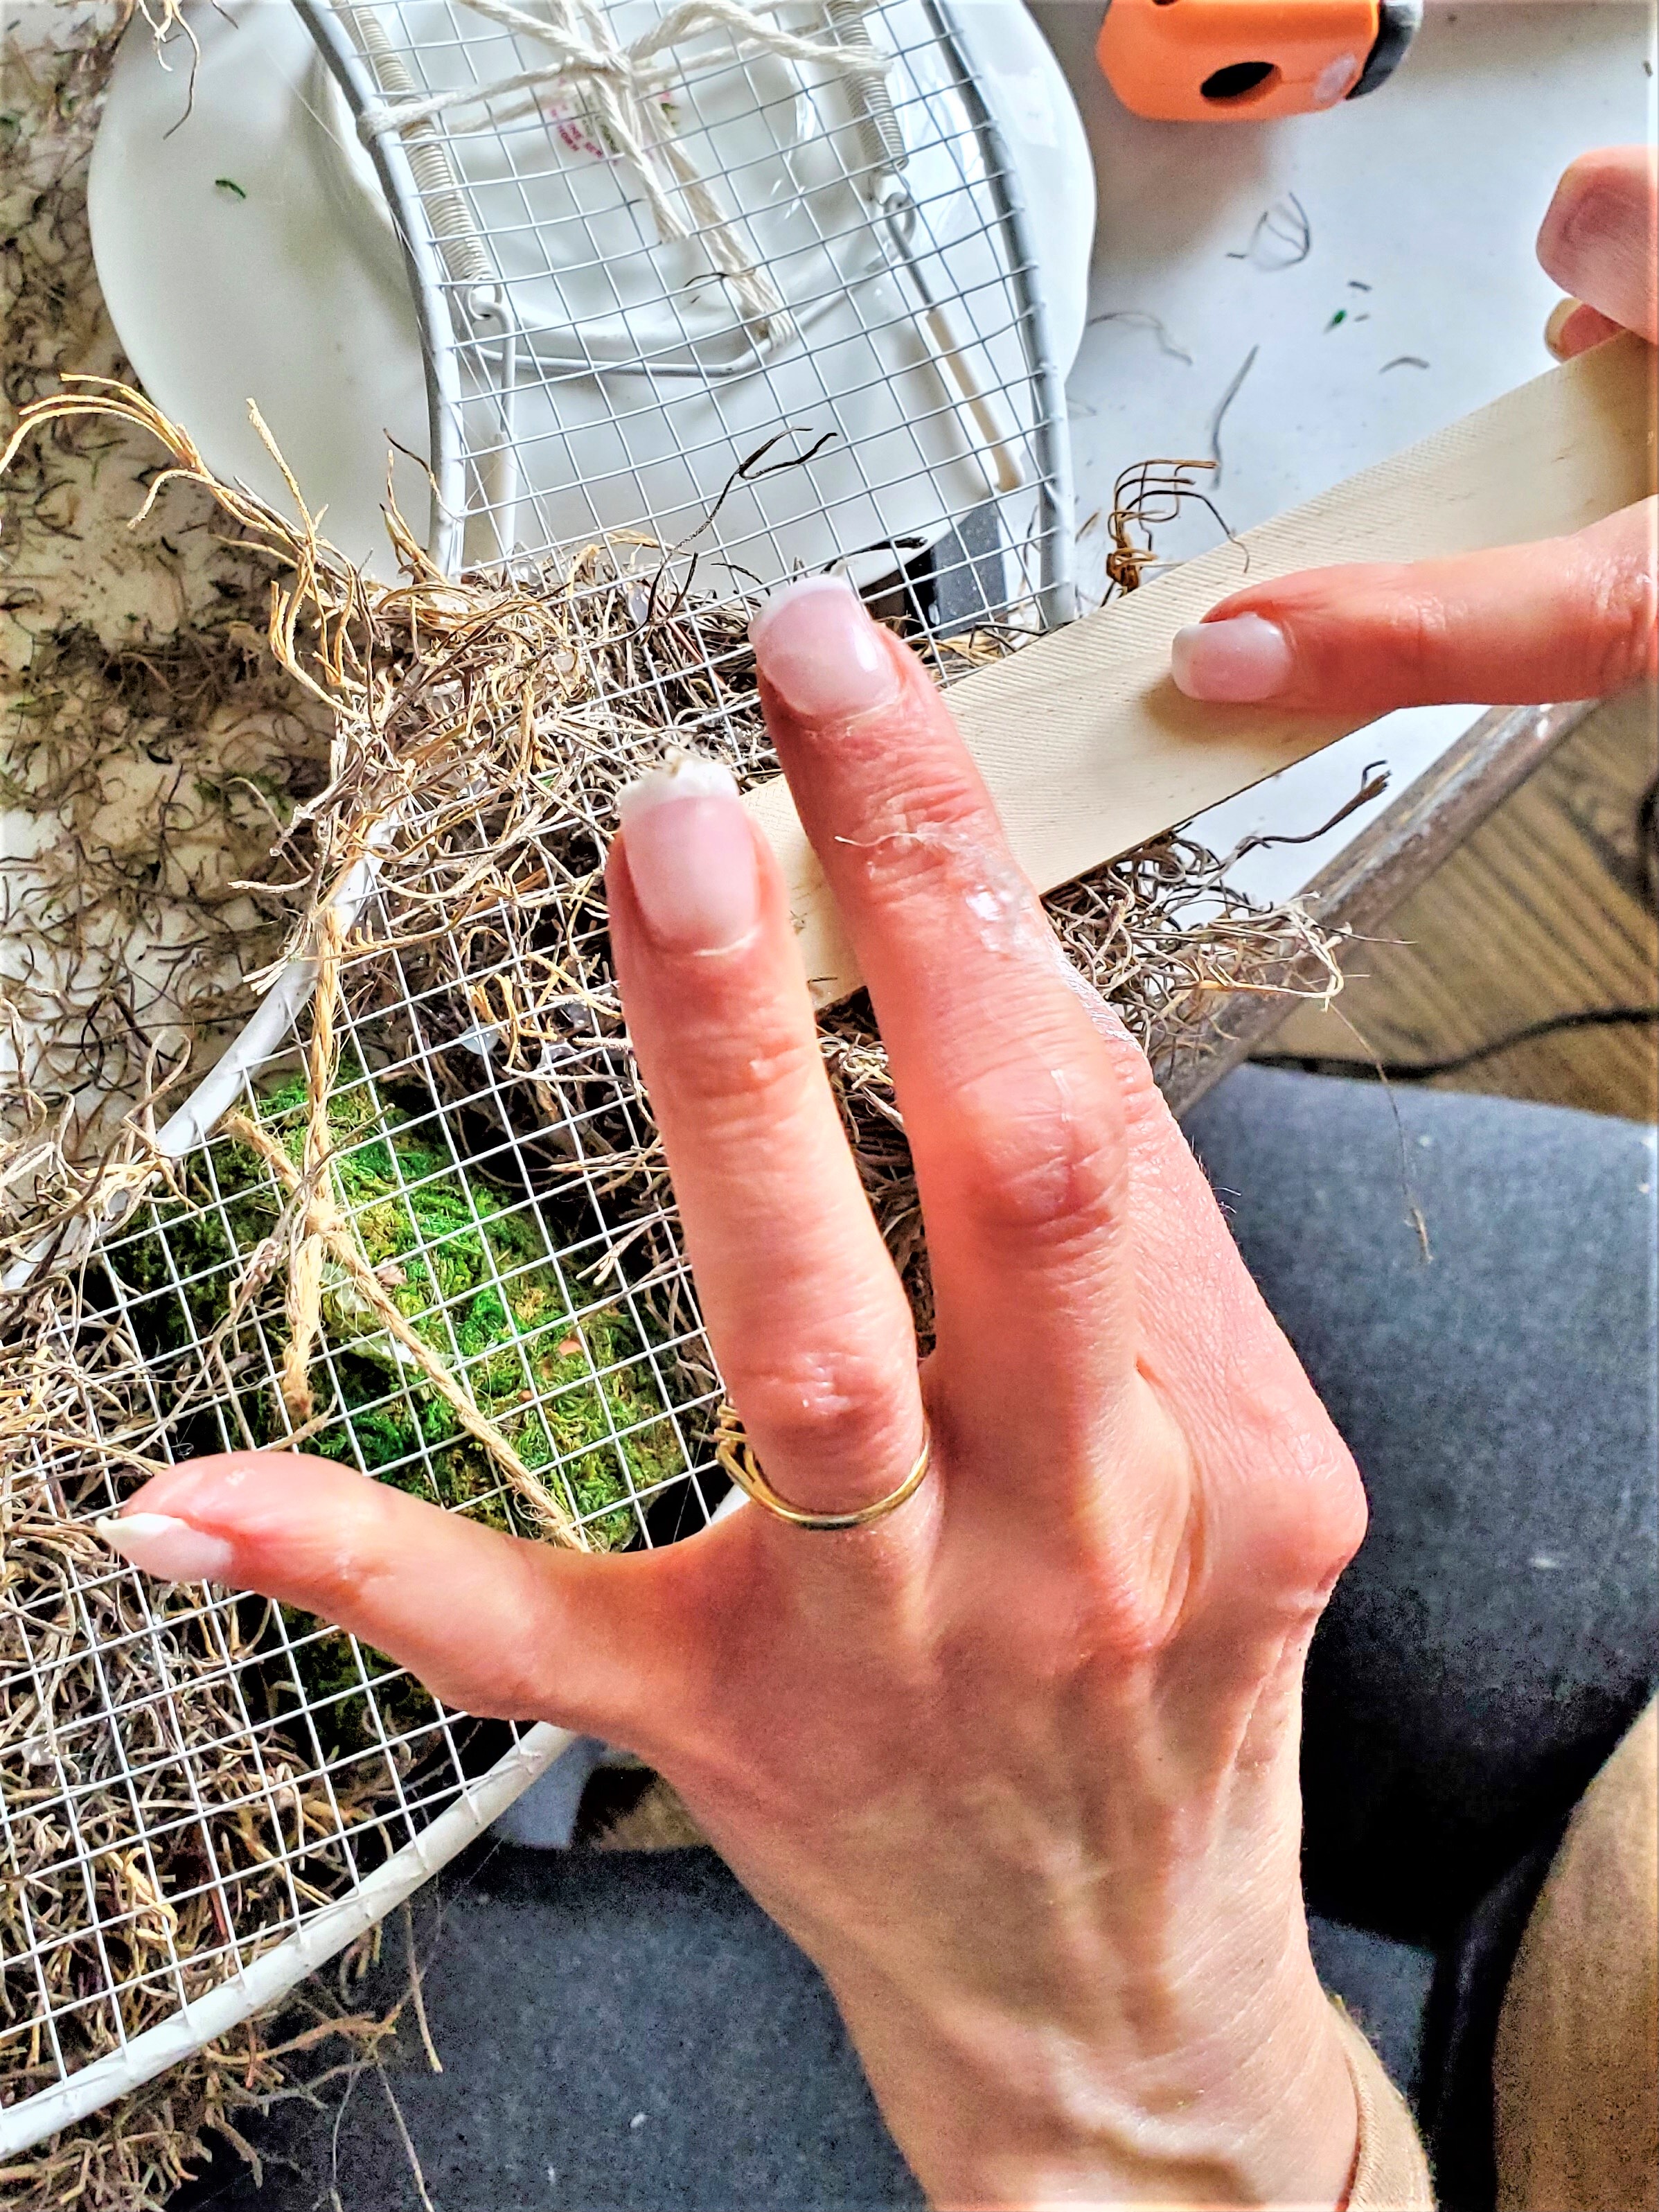
Step 5: Cover The Wreath With Moss
- To add texture lay moss on the wreath frame, and glue Spanish moss to the wreath using a hot glue gun. Cover the edges of the ring with moss.
- If adding moss doesn’t work for you, add a mixture of greenery. Fill in spots with leaves from the craft store or extra pieces you may own and have in your home.
Tip: Use a tool like a paint stirrer or a popsicle stick to hold the moss while gluing it, to protect your fingers from burns. You can also use sheet moss instead of Spanish moss. Glue moss until the entire wreath is covered, including the outer edges of the ring.
Step 6: Decorative Elements
- Finally, you can add blooming artichokes or any other decorative elements such as baby’s breath, or faux lavender to the wreath. Use hot glue to attach them securely.
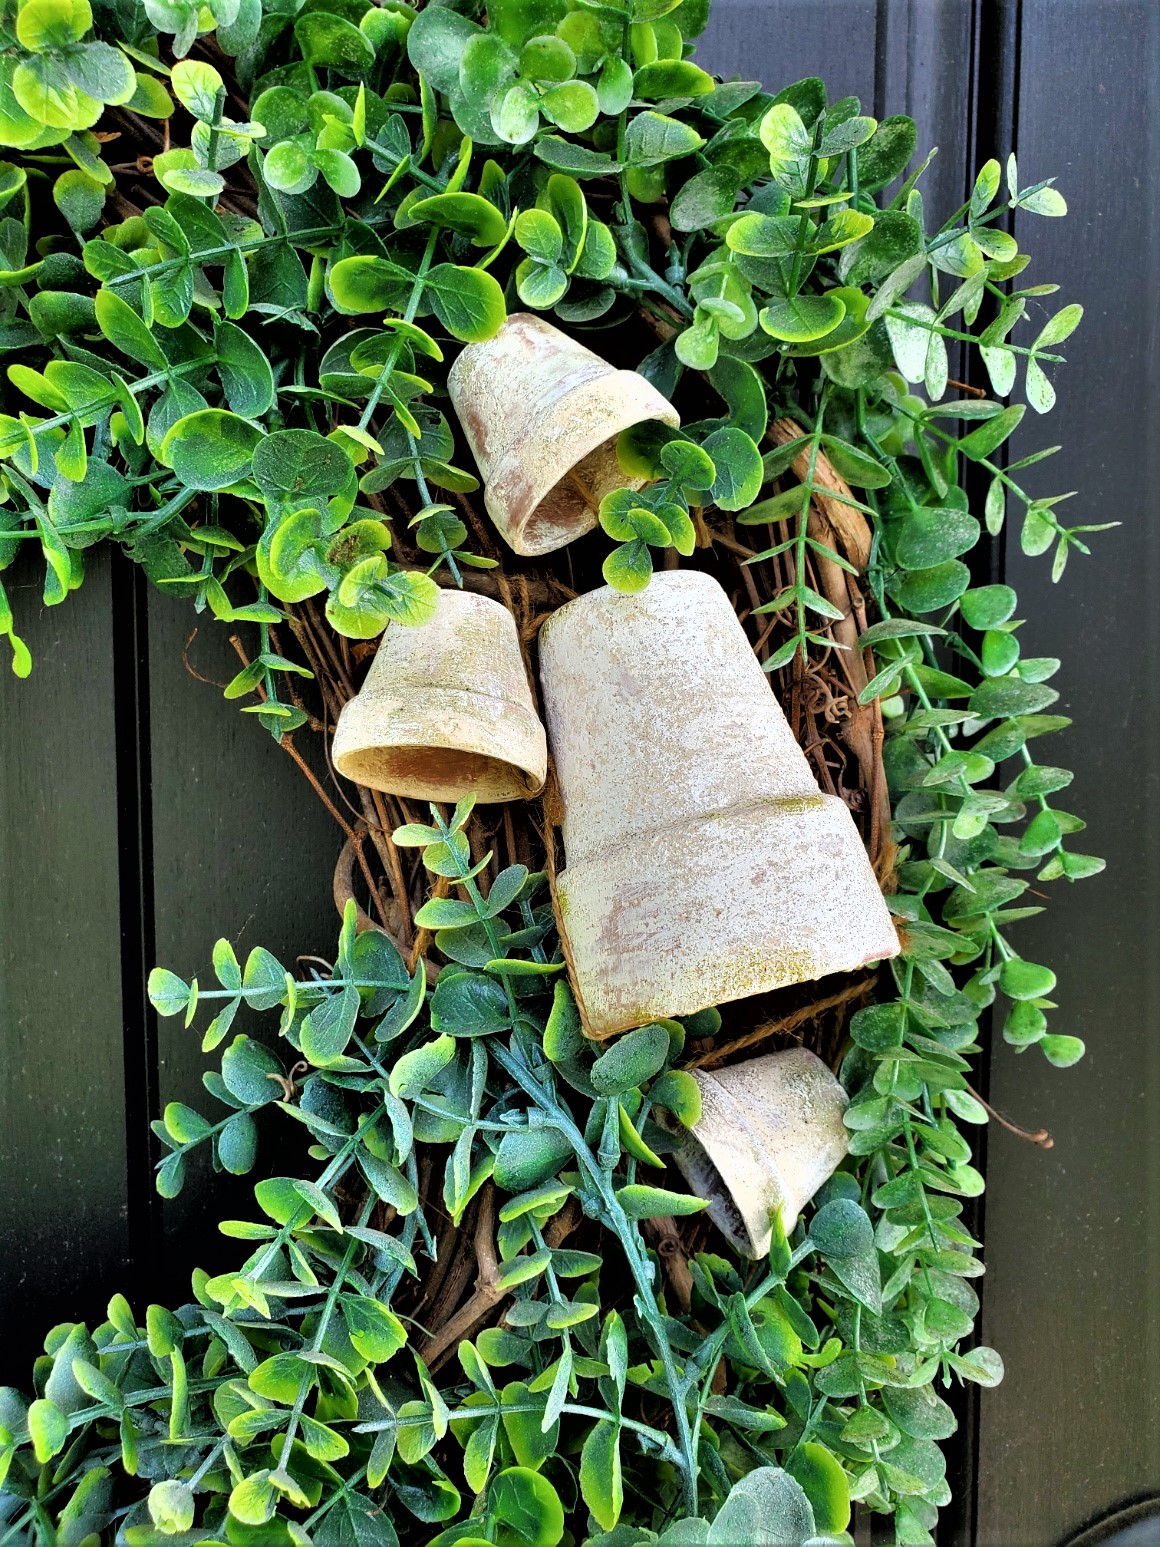
- Alternatively, you can use faux eucalyptus bundles, or succulents for a different look.
- Add extra charm to your plate wreath. Stagger silver sugar tongs. Add these with a tan pipe cleaner or a piece of floral wire.
- Silver tea spoons attached to this wreath would be so much fun. Attach these by wrapping a piece of floral wire around the tea spoons and wrapping it around the wreath to secure them.
Craft Projects for the Holiday Season for Kids
DIY Cardboard or Paper Plate Ring:
This is a fun project for the whole family especially with younger children. You can create your own wreath base using cardboard or paper plates. Cut out the center of the paper plate to make a ring shape.
These rings are a great and fun craft and can be made in many different ways. Here’s a fun craft for younger children from Reading Confetti. It uses a paper plate and empty toilet paper rolls.
Crafting a Fun Life shares a Christmas paper plate wreath that older children will enjoy too! And here’s an easy paper plate wreath that can be enjoyed beyond the holiday season from Glitter on a Dime. Good news, the items can be found at the Dollar Store to make a Christmas wreath craft.
Tip: Paper plate crafts can be used with glue dots. These are available in numerous sizes at the Dollar Store or any craft store!
Basic Supplies Paper Plate Crafts:
Younger children will have fun making a paper plate Christmas wreath or a snowman craft for the holiday season. And the good news this will help them with fine motor skills
- green tissue paper
- green construction paper
- red paper
- red pom poms
- holly berries
- coffee filters
- pipe cleaner
- ribbon bow for the bottom of the wreath
The good news is these don’t come with extra cost and kids and the whole family will make memories!
My Favorite Part About This Easy Craft Project
My favorite part about creating a plate wreath craft is a perfect way to infuse charm, sentimental items, and personal memories into your home decor. By carefully selecting and attaching plates of various sizes, colors, and designs onto a wreath base, and enjoy dishes with meaning. Whether you find plates from vintage shops, thrift stores, online marketplaces, or garage sales, for the perfect plates, it will be worth it to create a beautiful and unique plate wreath.
- When choosing a wreath base, consider the size and weight of the plates, and opt for a sturdy option such as a metal mesh wreath form, wire wreath frame, grapevine wreath, or foam wreath. Alternatively, you can get creative and make your own wreath base using cardboard or paper plates, making it a fun and family-friendly project.
- Once you have prepared the wreath and covered flowerpots with moss, attach the plates using butcher’s twine or jute. Aim for a balanced arrangement, forming a triangle with the plates, and secure the flowerpots in place using jute. To add texture and cover the wreath frame, glue Spanish moss or other greenery using a hot glue gun.
Tip: When hanging your plate wreath it is best to keep it away from a high traffic area in the home. After spending time searching for the perfect small plates to add to your wreath you want to keep it damage free!
Adding Embellishments
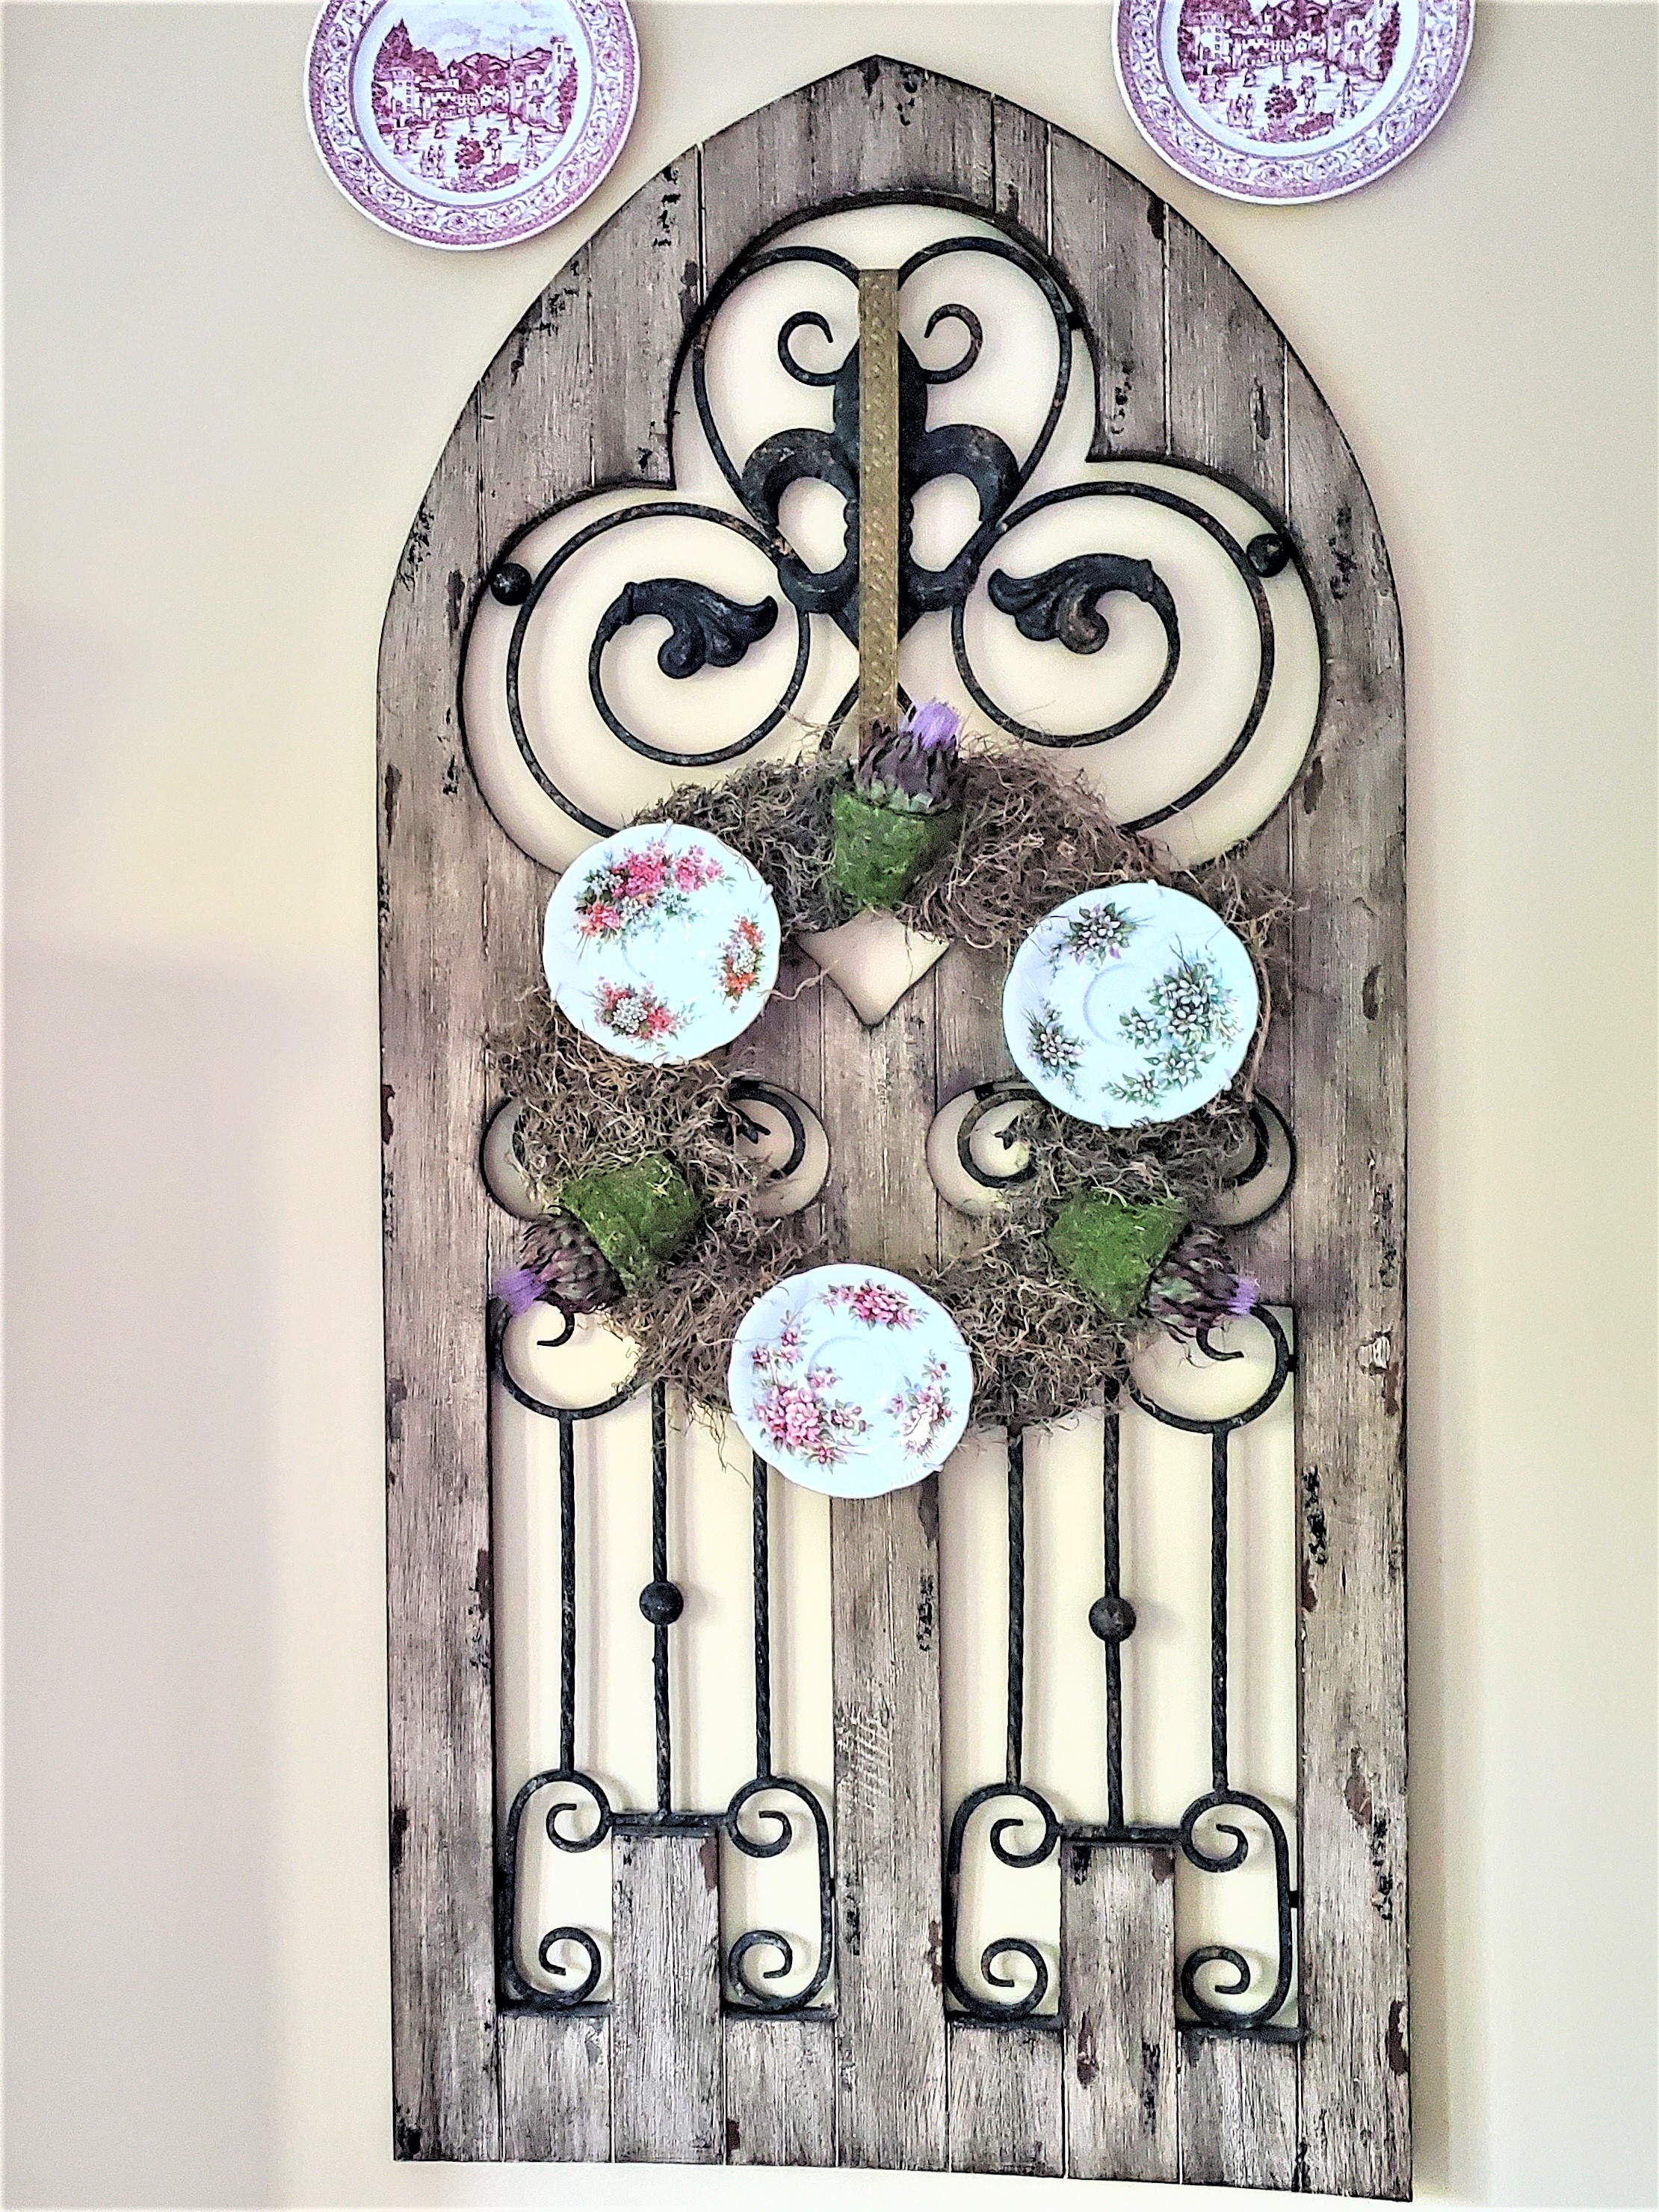
Finally, adding decorative elements like blooming artichokes, baby’s breath, faux lavender, faux eucalyptus bundles, or succulents will enhance the overall look of your plate wreath.
With these steps, you’ll have a plate wreath that adds character and beauty to your space but holds memories, making it a special and damage-free addition to your dining room or home decor.
I hope you enjoyed learning about ideas on how to make a plate wreath damage free and add on to your home! Let me know your thoughts in the comment section. As always, if you have any questions feel free to an email. I’m here to help!
Happy Crafting!!

FOLLOW US ON:
Facebook, Pinterest, and Instagram


How To Make A Plate Wreath Craft Damage Free
Equipment
- 1 wreath form flat metal wire wreath frame, grapvine works too
- 1 roll of butchers twine
- 1 roll of jute
- 3 wire plate hangers
- 1 hot glue gun and glue sticks
- 1 Pair of Scissors
- 1 can spray paint optional
Materials
- 3 saucers small plates large plates and butterm pat woks too
- 3 flowerpots terracotta pots peat pots work well
- 1 sheet self-stick sheet moss
- 1 bag Spanish moss
Instructions
- Step 1: Prepare The Wreath FormIf you're using a metal mesh wreath form or a wire wreath, you can spray paint it white or with a desired color. Let it dry.Attach the plate hangers to the back side of the plate. White plate hangers blend with the plate wreath or use layers of Velcro command strips. Plate hangers are the best option and are the most sturdy to keep plates damage free that are added on top of the moss.
- Step 2: Cover The FlowerpotsCut pieces of self-stick sheet moss and use them to cover the flowerpots. Start with a narrow strip to stick around the rim of the pot, then cut small squares to cover the sides.Add a thin strip of moss to the edge of each flowerpot to create a finished look. Cover the bottom of the pots with a small square of moss. If you don't want to add sheet moss feel free to paint the pots.
- Step 3: Attach The Dishes To The Wreath FormBegin attaching the small plates to the back of the wreath using butcher's twine or jute. Add this to the back side of the plate. Slide the string underneath each of the plate hangers. Loop it through the wreath frame, and tie a double knot.Repeat this process until all the plates are securely attached to the wreath form. Aim for a balanced arrangement, forming a triangle with the plates.
- Step 4: Connect The FlowerpotsUse jute to connect the flowerpots to the wreath. Push the jute through the hole on the bottom of each pot using a long tweezer or a similar tool.Pull the jute through the wreath frame and tie a double knot to secure the flowerpots in place.
- Step 5: Cover The Wreath Form With MossTo add texture begin to lay moss the wreath frame, glue Spanish moss to the wreath using a hot glue gun.Cover the edges of the ring with moss.If adding moss doesn't work for you, add a mixture of greenery. Fill in spots with leaves from the craft store or extra pieces you may already own and have in your home.
- Step 6: Add Decorative ElementsFinally, you can add blooming artichokes or any other decorative elements such as baby's breath, or faux lavender to the wreath. Use hot glue to attach them securely.You can use faux eucalyptus bundles, or succulents for a different look.
Notes
How To Make A Plate Wreath Craft Damage Free
Craft Supplies:
-
- Wreath form or flat metal wire wreath frame)
-
- 3 saucers or small plates
-
- Butcher’s twine or jute
-
- Flowerpots
-
- Moss (sheet moss or Spanish moss)
-
- Hot glue gun
-
- Blooming artichokes or other decorative elements
-
- Spray paint (optional)
-
- Wire plate hanger
Step 1: Prepare The Wreath Form
-
- If you’re using a metal mesh wreath form or a wire wreath, you can spray paint it white or with a desired color. Let it dry.
-
- Attach the plate hangers to the back side of the plate. White plate hangers blend with the plate wreath or use layers of Velcro command strips. Personally, plate hangers are the best option and are the most sturdy to keep plates damage free that are added on top of the moss.
Step 2: Cover The Flowerpots
- Cut pieces of self-stick sheet moss and use them to cover the flowerpots. Start with a narrow strip to stick around the rim of the pot, then cut small squares to cover the sides.
- Add a thin strip of moss to the edge of each flowerpot to create a finished look. Also, cover the bottom of the pots with a small square of moss. If you don’t want to add sheet moss feel free to paint the pots.
Step 3: Attach The Dishes To The Wreath Form
-
- Begin attaching the small plates to the back of the wreath using butcher’s twine or jute. Add this to the back side of the plate. Slide the string underneath each of the plate hangers. Loop it through the wreath frame, and tie a double knot.
-
- Repeat this process until all the plates are securely attached to the wreath form. Aim for a balanced arrangement, forming a triangle with the plates.
Step 4: Connect The Flowerpots
-
- Use jute to connect the flowerpots to the wreath. Push the jute through the hole on the bottom of each pot using a long tweezer or a similar tool.
-
- Pull the jute through the wreath frame and tie a double knot to secure the flowerpots in place.
Step 5: Cover The Wreath Form With Moss
-
- To add texture begin to lay moss the wreath frame, glue Spanish moss to the wreath using a hot glue gun. Cover the edges of the ring with moss.
-
- If adding moss doesn’t work for you, add a mixture of greenery. Fill in spots with leaves from the craft store or extra pieces you may already own and have in your home.
Step 6: Add Decorative Elements
- Finally, you can add blooming artichokes or any other decorative elements such as baby’s breath, or faux lavender to the wreath. Use hot glue to attach them securely.
- Alternatively, you can use faux eucalyptus bundles, or succulents for a different look.
- Add extra charm to your plate wreath. Stagger silver sugar tongs. Add these with a tan pipe cleaner or a piece of floral wire.
- Silver tea spoons attached to this wreath would be so much fun. Attach these by wrapping a piece of floral wire around the tea spoons and wrap it around the wreath to secure.
That is so sweet!
Thanks Penny
Very pretty, Cindy. I love seeing new ways of decorating with plates. xo Laura
This took a bit of thinking. I’m so happy I’m figuring our way to see these special pieces.
It’s beautiful and so creative! And what a wonderful way to display memories of your mom and grandmother.
Thanks Michelle. I am finding ways to be able to see these family treasures.
This is simply adorable. Love the plates you had to work with too. Love it Cindy. Happy Wednesday.
Thanks Kris! Hope you are getting settled into the new place!
That wire mesh wreath thingy is amazing!! I’ve not seen one like it but I have got to get one! Pinned!!
How creative. I love how you made this. Love the pattern on the plates too. Happy Wednesday Cindy.
Thank you Terrie. It was fun to make!
Not only is this wreath incredibly beautiful but so creative too!!!! I just adore the moss covered pots and the tea saucers make it one of a kind.
Thanks so much for this tutorial that I am pinning for my Pinterest followers to see too;)
Maria,
Thank you I’m happy with how this turned out. Thank you for Pinning!
I love your version! And that mesh wreath is incredible! I’ll have to look for one! Beautiful job!
Amazing! I’ve always wanted to make a plate wreath, but never sat down to think about the construction. This is awesome. Now I know what to do and I think I may try this! Thanks!!
It’s nice using these instead of storing them
Oh wow! I love this. Those plates are really gorgeous too.
Thanks so much!
I love that you incorporated family history into your wreath by using floral saucers that belonged to your mother. This wreath is a perfect summer decor item.
These mean so much to me. Now I’m thinking of something to do with the tea cups. My dad said they rather you use them creatively then leave them in a cabinet
This wreath is so perfect for spring and summer! I love that you used your Mom’s plates – they’re really pretty and those flower pots are amazing too. I definitely need to try those! Hugs, CoCo
I have many tea cups too. I’m not tea drinker. I’m trying to think of something to do with the cups too
What a charming way to display these saucers. I especially like the vignette with the wreath on thes hutters and more plates on the wall above.
Thank you so much!
This is so beautiful I’ve been wondering how to make one. And I seen those wreath forms at Michaels and couldn’t think of what to do. Now I know!
Thank you so much Corrine! It’s a great wreath form for many wreaths
Such a fun mix of materials!
Thank you!
What a wonderful idea! I just love how it turned out and I love using things that have sentimental meaning in my decorating too!
Thank you so much Jana.
Oh Cindy, this plate wreath is absolutely beautiful and looks so pretty in your home. What a special way to display your treasured pieces that belonged your grandmothers and mother. I have always wondered how these plate wreaths were made. Thank you so much for showing us. Now I know how to safely attach the plates to a wreath. Your instructions are so helpful. You have inspired me to give this a try!
What a lovely way to use cherished items! All of the details you added like lining the little pots with moss add to the beauty. Thank you for sharing it with all of us at the FWF party.
This is a wonderful way to display family treasures, however, I would use the matching cups instead of the moss covered cups.
Thank you Thesare moss covered flower pots.
I’m working on figuring out a tea cup wreath.
Also making a saucer wreath with just saucers
Sign up to follow so you won’t miss it
Absolutely beautiful!! And such detailed instructions… that took lots of time from you. Thank you for sharing! I love, love old pieces of china and have way too much. Most of my pieces are just stacked. I definitely need to try this… adding it to my mile long project list haha!
I can imagine the great pieces you have in your home. Thank you so much!
How unique Cindy! I was just telling my husband tonight I wanted to try making a wreath with plates tonight, it’s like you read my mind. This one is so neat, I love the pots coordinated with the wreath. Thank you for linking up with Whimsy Home Wednesday!
Thanks Cara and the best part, it’s damage free.
This DIY is so cute!
Thank you!
This is SUCH a beautiful way to use those pretty plates!! I love the use of the green moss and flower pots. It’s a lovely wreath to display all season long! Thanks so much for sharing at Home Imagined this week!
Thank you so much Rachel.
This is flat out ADORABLE! I have several small flow blue saucers I think I need to do this with.
It’s a great way to use plates we love with no damage
Love this Cindy! I have never seen a wreath form like that! It’s perfect for the plates! Pinning now!
What a pretty plate wreath.